2020 FORD EXPLORER torque
[x] Cancel search: torquePage 293 of 555

RV & Trailer Towing Guide Online
http://www.fleet.ford.com/towing-guides/
Website
TRAILER SWAY CONTROL (IF
EQUIPPED) WARNING: Turning off trailer sway
control increases the risk of loss of
vehicle control, serious injury or death.
Ford does not recommend disabling this
feature except in situations where speed
reduction may be detrimental (such as
hill climbing), the driver has significant
trailer towing experience, and can control
trailer sway and maintain safe operation.
Note: This feature does not prevent trailer
sway, but reduces it when it begins.
Note: This feature cannot stop all trailers
from swaying.
Note: In some cases, if your vehicle speed
is too high, the system may turn on multiple
times, gradually reducing your vehicle speed.
The system applies the brakes to the
individual wheels and reduces engine
torque to aid vehicle stability. If the trailer
begins to sway, the stability control
warning lamp flashes and a message
appears in the information display. See
Information Messages (page 120). Slow
your vehicle down, pull safely to the side
of the road and check for correct load
distribution. See
Load Carrying (page
281).
You can switch this feature off in the
information display. When you switch the
ignition on, the system automatically turns
on. RECOMMENDED TOWING
WEIGHTS
Note:
Do not exceed the trailer
weight for your vehicle
configuration listed in the chart
below.
Note: Be sure to take into
consideration trailer frontal area.
Do not exceed 20 ft² (1.86 m²) if
your vehicle can tow a class I
trailer, or 55 ft² (5.11 m²) if your
vehicle can tow a class III trailer
weighing more than
5,000 lb
(2,267 kg).
Note: Your vehicle could have
reduced performance when
operating at high altitudes, and
when heavily loaded or towing a
trailer. When driving at elevation,
in order to match driving
performance as perceived at sea
level, reduce gross vehicle weight
and gross combination weight by
2% per
1,000 ft (300 m) of
elevation.
290
Explorer (CTW) Canada/United States of America, enUSA, Edition date: 201902, Third-Printing- Towing
Page 333 of 555

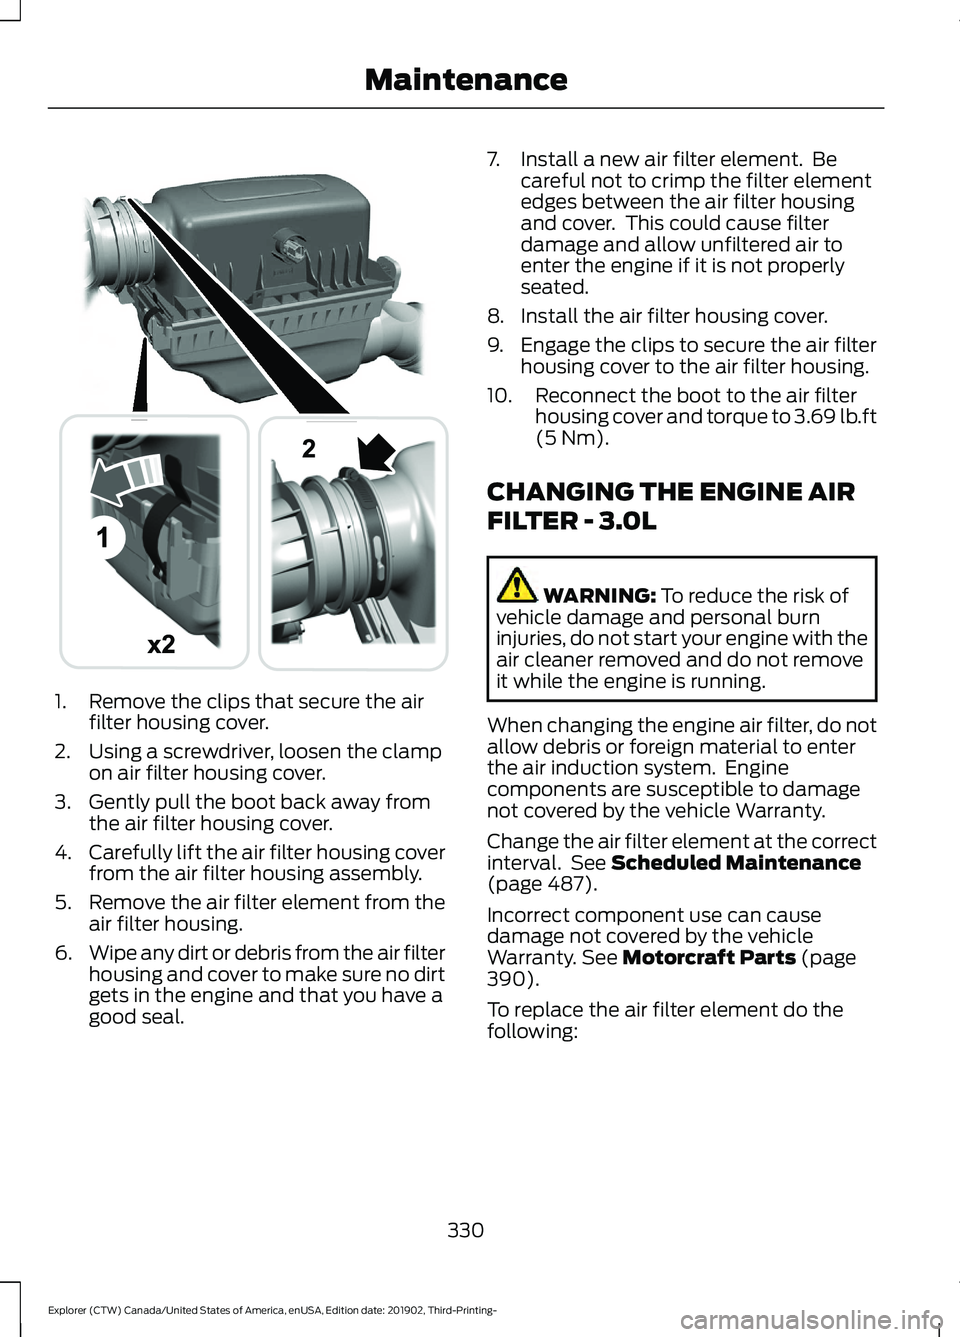
1. Remove the clips that secure the air
filter housing cover.
2. Using a screwdriver, loosen the clamp on air filter housing cover.
3. Gently pull the boot back away from the air filter housing cover.
4. Carefully lift the air filter housing cover
from the air filter housing assembly.
5. Remove the air filter element from the
air filter housing.
6. Wipe any dirt or debris from the air filter
housing and cover to make sure no dirt
gets in the engine and that you have a
good seal. 7. Install a new air filter element. Be
careful not to crimp the filter element
edges between the air filter housing
and cover. This could cause filter
damage and allow unfiltered air to
enter the engine if it is not properly
seated.
8. Install the air filter housing cover.
9. Engage the clips to secure the air filter housing cover to the air filter housing.
10. Reconnect the boot to the air filter housing cover and torque to 3.69 lb.ft
(5 Nm).
CHANGING THE ENGINE AIR
FILTER - 3.0L WARNING:
To reduce the risk of
vehicle damage and personal burn
injuries, do not start your engine with the
air cleaner removed and do not remove
it while the engine is running.
When changing the engine air filter, do not
allow debris or foreign material to enter
the air induction system. Engine
components are susceptible to damage
not covered by the vehicle Warranty.
Change the air filter element at the correct
interval. See
Scheduled Maintenance
(page 487).
Incorrect component use can cause
damage not covered by the vehicle
Warranty.
See Motorcraft Parts (page
390).
To replace the air filter element do the
following:
330
Explorer (CTW) Canada/United States of America, enUSA, Edition date: 201902, Third-Printing- MaintenanceE294782
Page 334 of 555

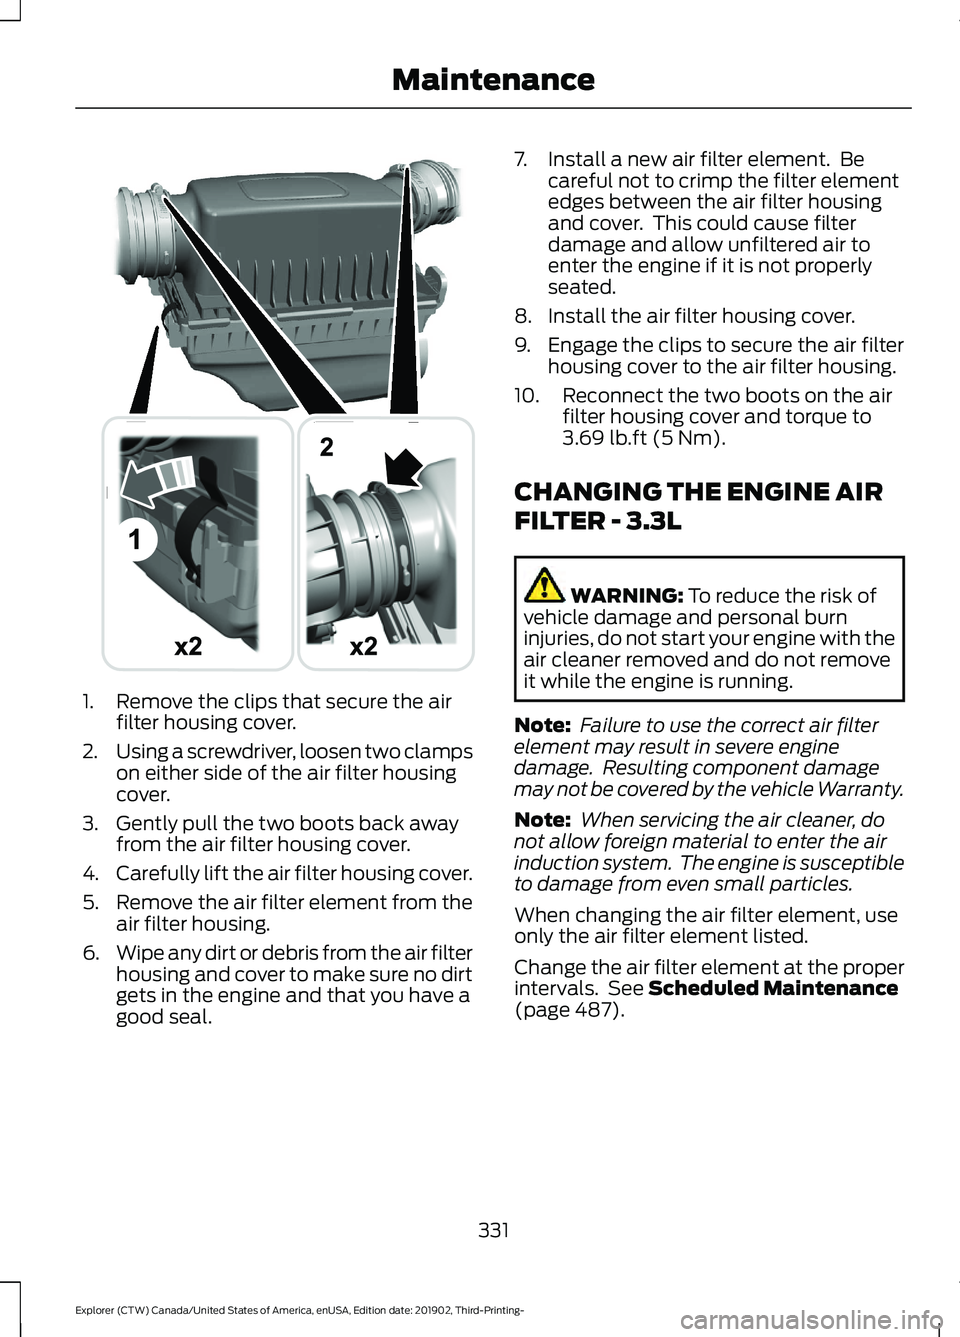
1. Remove the clips that secure the air
filter housing cover.
2. Using a screwdriver, loosen two clamps
on either side of the air filter housing
cover.
3. Gently pull the two boots back away from the air filter housing cover.
4. Carefully lift the air filter housing cover.
5. Remove the air filter element from the
air filter housing.
6. Wipe any dirt or debris from the air filter
housing and cover to make sure no dirt
gets in the engine and that you have a
good seal. 7. Install a new air filter element. Be
careful not to crimp the filter element
edges between the air filter housing
and cover. This could cause filter
damage and allow unfiltered air to
enter the engine if it is not properly
seated.
8. Install the air filter housing cover.
9. Engage the clips to secure the air filter housing cover to the air filter housing.
10. Reconnect the two boots on the air filter housing cover and torque to
3.69 lb.ft (5 Nm).
CHANGING THE ENGINE AIR
FILTER - 3.3L WARNING:
To reduce the risk of
vehicle damage and personal burn
injuries, do not start your engine with the
air cleaner removed and do not remove
it while the engine is running.
Note: Failure to use the correct air filter
element may result in severe engine
damage. Resulting component damage
may not be covered by the vehicle Warranty.
Note: When servicing the air cleaner, do
not allow foreign material to enter the air
induction system. The engine is susceptible
to damage from even small particles.
When changing the air filter element, use
only the air filter element listed.
Change the air filter element at the proper
intervals. See
Scheduled Maintenance
(page 487).
331
Explorer (CTW) Canada/United States of America, enUSA, Edition date: 201902, Third-Printing- MaintenanceE294778
Page 335 of 555

1.
Release the clamps that secure the air
filter cover to the housing.
2. Using a screwdriver, loosen the clamp on the air filter housing cover.
3. Gently pull the boot back away from the air filter housing cover.
4. Carefully lift the air filter housing cover.
5. Remove the air filter element from the
air filter housing.
6. Wipe any dirt or debris from the air filter
housing and cover to make sure no dirt
gets in the engine and that you have a
good seal.
7. Install a new air filter element. Be careful not to crimp the filter element
edges between the air filter housing
and cover. This could cause filter
damage and allow unfiltered air to
enter the engine if it is not properly
seated. 8. Install the air filter housing cover.
9. Engage the clips to secure the air filter
housing cover to the air filter housing.
10. Reconnect the boot to the air filter housing cover and torque to 3.69 lb.ft
(5 Nm).
ENGINE COOLANT CHECK WARNING:
Do not remove the
coolant reservoir cap when the engine is
on or the cooling system is hot. Wait 10
minutes for the cooling system to cool
down. Cover the coolant reservoir cap
with a thick cloth to prevent the
possibility of scalding and slowly remove
the cap. Failure to follow this instruction
could result in personal injury. WARNING:
Do not put coolant in
the windshield washer reservoir. If
sprayed on the windshield, coolant could
make it difficult to see through the
windshield. WARNING:
To reduce the risk of
personal injury, make sure the engine is
cool before unscrewing the coolant
pressure relief cap. The cooling system
is under pressure. Steam and hot liquid
can come out forcefully when you loosen
the cap slightly. WARNING:
Do not add coolant
further than the MAX mark.
When the engine is cold, check the
concentration and level of the coolant at
the intervals listed in the scheduled
maintenance information. See Scheduled
Maintenance
(page 487).
Note: Make sure that the coolant level is
between the
MIN and MAX marks on the
coolant reservoir.
332
Explorer (CTW) Canada/United States of America, enUSA, Edition date: 201902, Third-Printing- MaintenanceE295061
x2
Page 385 of 555

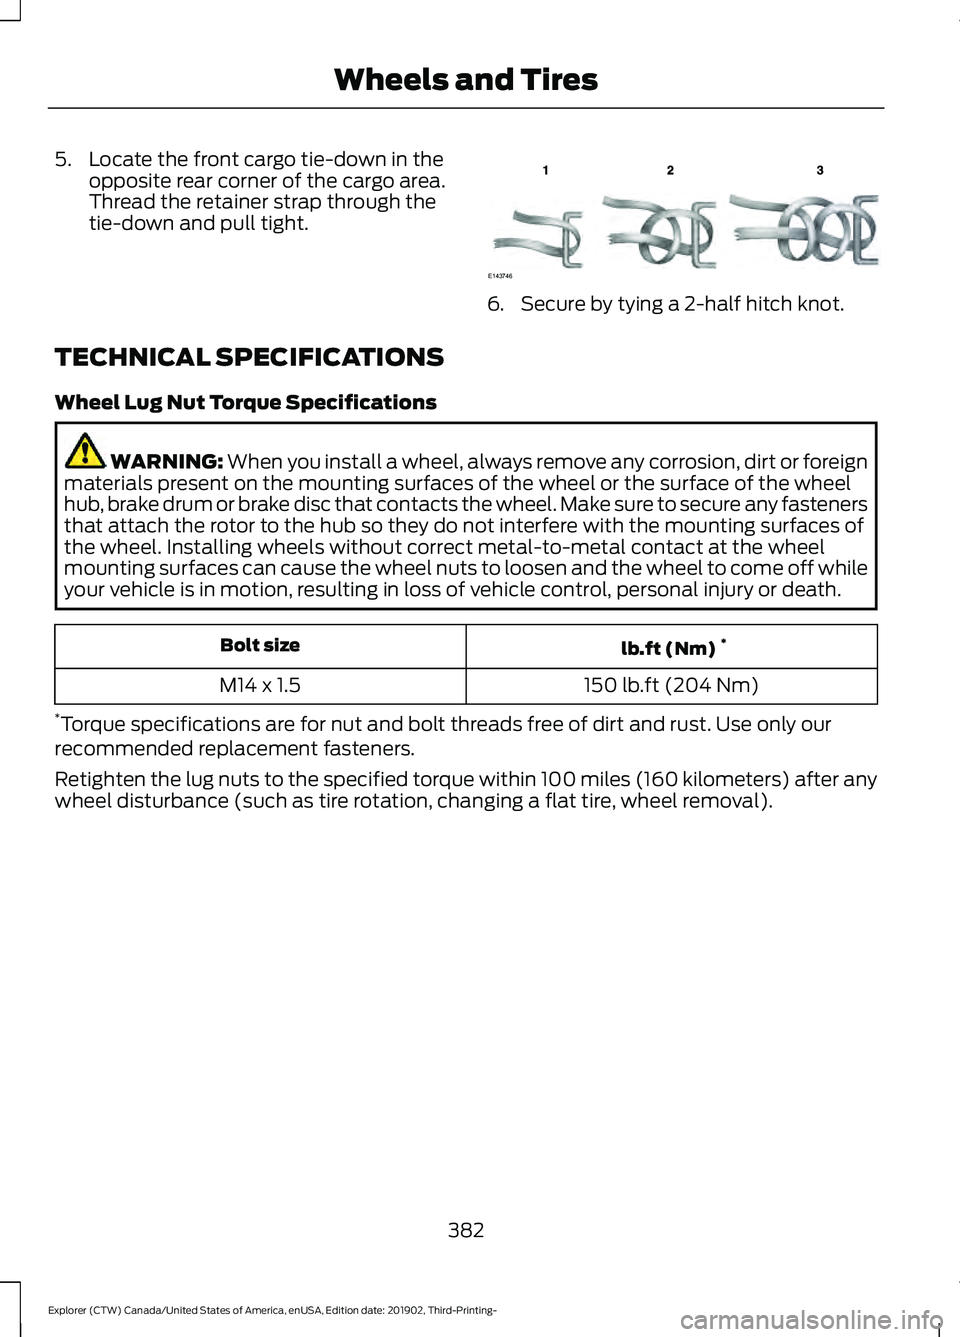
5. Locate the front cargo tie-down in the
opposite rear corner of the cargo area.
Thread the retainer strap through the
tie-down and pull tight. 6. Secure by tying a 2-half hitch knot.
TECHNICAL SPECIFICATIONS
Wheel Lug Nut Torque Specifications WARNING: When you install a wheel, always remove any corrosion, dirt or foreign
materials present on the mounting surfaces of the wheel or the surface of the wheel
hub, brake drum or brake disc that contacts the wheel. Make sure to secure any fasteners
that attach the rotor to the hub so they do not interfere with the mounting surfaces of
the wheel. Installing wheels without correct metal-to-metal contact at the wheel
mounting surfaces can cause the wheel nuts to loosen and the wheel to come off while
your vehicle is in motion, resulting in loss of vehicle control, personal injury or death. lb.ft (Nm)
*
Bolt size
150 lb.ft (204 Nm)
M14 x 1.5
* Torque specifications are for nut and bolt threads free of dirt and rust. Use only our
recommended replacement fasteners.
Retighten the lug nuts to the specified torque within 100 miles (160 kilometers) after any
wheel disturbance (such as tire rotation, changing a flat tire, wheel removal).
382
Explorer (CTW) Canada/United States of America, enUSA, Edition date: 201902, Third-Printing- Wheels and TiresE143746
Page 389 of 555

Description
Item
400 hp1
Horsepower.
415 lb.ft1
Torque.
6500 RPM
Redline.
Overhead cam - roller finger followers
Valvetrain.
Coil on plug
Ignition.
2.4 in (60 mm)
Throttle body.
Cast aluminum
Pistons.
Forged steel
Crankshaft.
Forged steel
Connecting rods.
Twin tubocharged
Induction.
18.0 psi (124 kPa)
Max Boost.
Dual 2.16 in (55 mm) exhaust with quad3 in (76 mm) chrome tips
Exhaust system.
1 When using premium fuel.
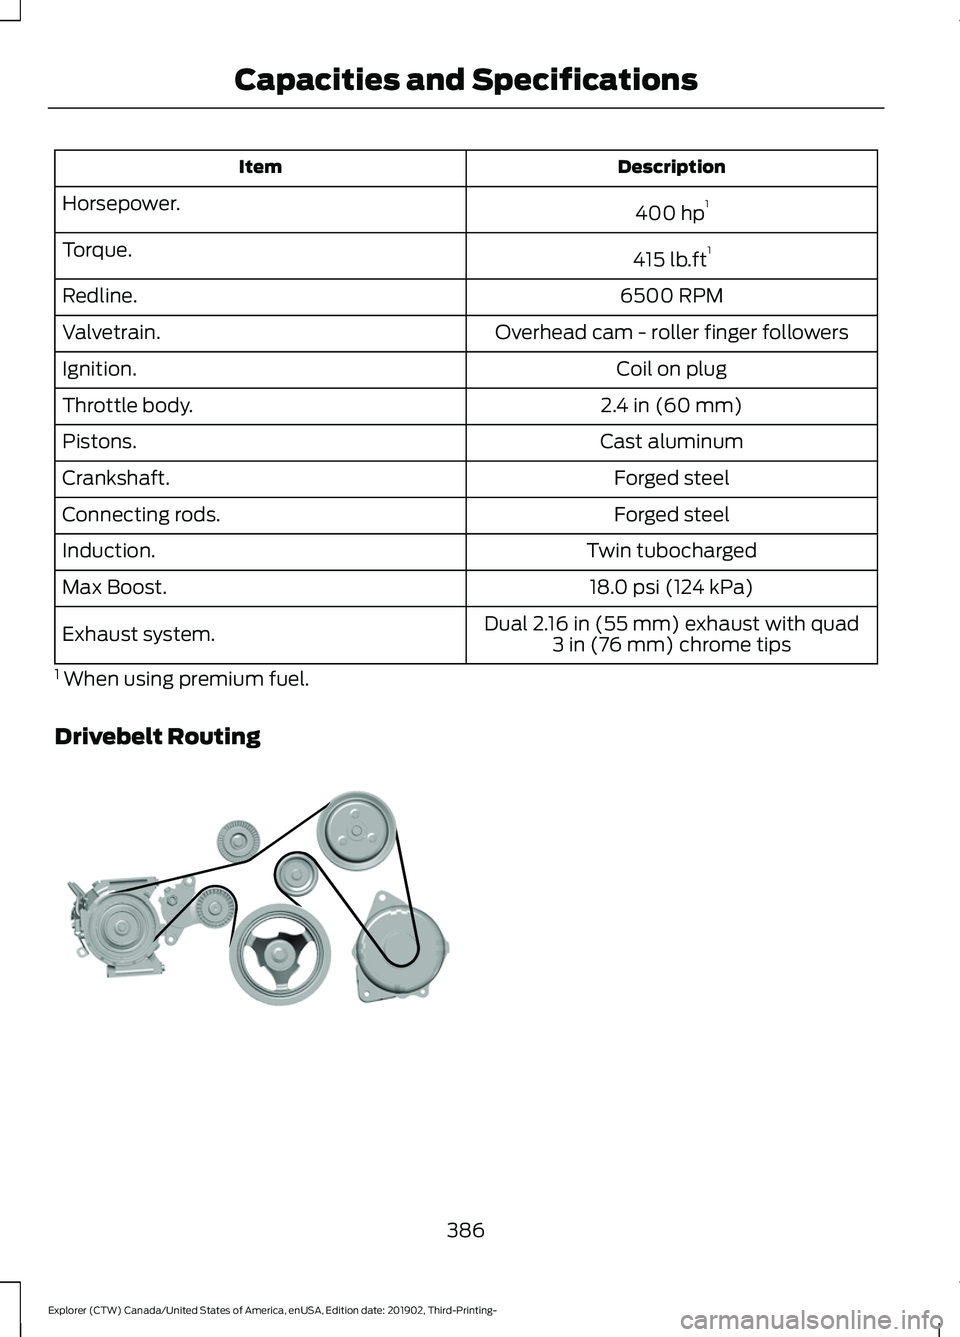
Drivebelt Routing 386
Explorer (CTW) Canada/United States of America, enUSA, Edition date: 201902, Third-Printing- Capacities and SpecificationsE297178