2020 FORD EXPLORER sport mode
[x] Cancel search: sport modePage 8 of 555

Adaptive Cruise Control Limitations -
Vehicles With: Adaptive Cruise Control
With Lane Centering ..............................247
Adaptive Cruise Control Limitations - Vehicles With: Adaptive Cruise Control
With Stop and Go ..................................
248
Switching Adaptive Cruise Control On and Off .......................................................
250
Setting the Adaptive Cruise Control Speed .........................................................
250
Setting the Adaptive Cruise Control Gap ........................................................................\
.
251
Canceling the Set Speed .........................
252
Resuming the Set Speed .........................
252
Overriding the Set Speed .........................
252
Adaptive Cruise Control Indicators - Vehicles With: Adaptive Cruise Control
With Lane Centering ..............................
253
Adaptive Cruise Control Indicators - Vehicles With: Adaptive Cruise Control
With Stop and Go ...................................
253
Adaptive Cruise Control Indicators - Vehicles With: Intelligent Adaptive
Cruise Control ..........................................
253
Switching From Adaptive Cruise Control to Cruise Control .....................................
253
Switching Lane Centering On and Off ........................................................................\
254
Switching Intelligent Mode On and Off ........................................................................\
255
Adjusting the Set Speed Tolerance ......
255
Adaptive Cruise Control – Troubleshooting ......................................
256
Driving Aids
Driver Alert ....................................................
259
Lane Keeping System ...............................
260
Blind Spot Information System ............
264
Cross Traffic Alert .......................................
268
Traffic Sign Recognition ............................
272
Steering ...........................................................
273
Pre-Collision Assist ....................................
274Drive Mode Control
What Is Drive Mode Control
....................
279
Selecting a Drive Mode .............................
279
Drive Modes ..................................................
279
Load Carrying
Rear Under Floor Storage .........................
281
Cargo Nets ......................................................
281
Luggage Covers ...........................................
282
Roof Racks and Load Carriers ...............
282
Load Limit ......................................................
283
Towing
Towing a Trailer ...........................................
289
Trailer Sway Control ..................................
290
Recommended Towing Weights ..........
290
Essential Towing Checks .........................
293
Towing the Vehicle on Four Wheels .....
295
Driving Hints
Reduced Engine Performance ..............
296
Economical Driving ....................................
296
Cold Weather Precautions ......................
297
Breaking-In ....................................................
297
Driving Through Water ..............................
297
Floor Mats .....................................................
298
Roadside Emergencies
Roadside Assistance .................................
299
Hazard Flashers ..........................................
300
Fuel Shutoff .................................................
300
Jump Starting the Vehicle ........................
301
Collision, Damage or Fire Event ............
303
Post-Crash Alert System .........................
304
Transporting the Vehicle .........................
304
Customer Assistance
Getting the Services You Need .............
306
In California (U.S. Only) ............................
307
5
Explorer (CTW) Canada/United States of America, enUSA, Edition date: 201902, Third-Printing- Table of Contents
Page 23 of 555

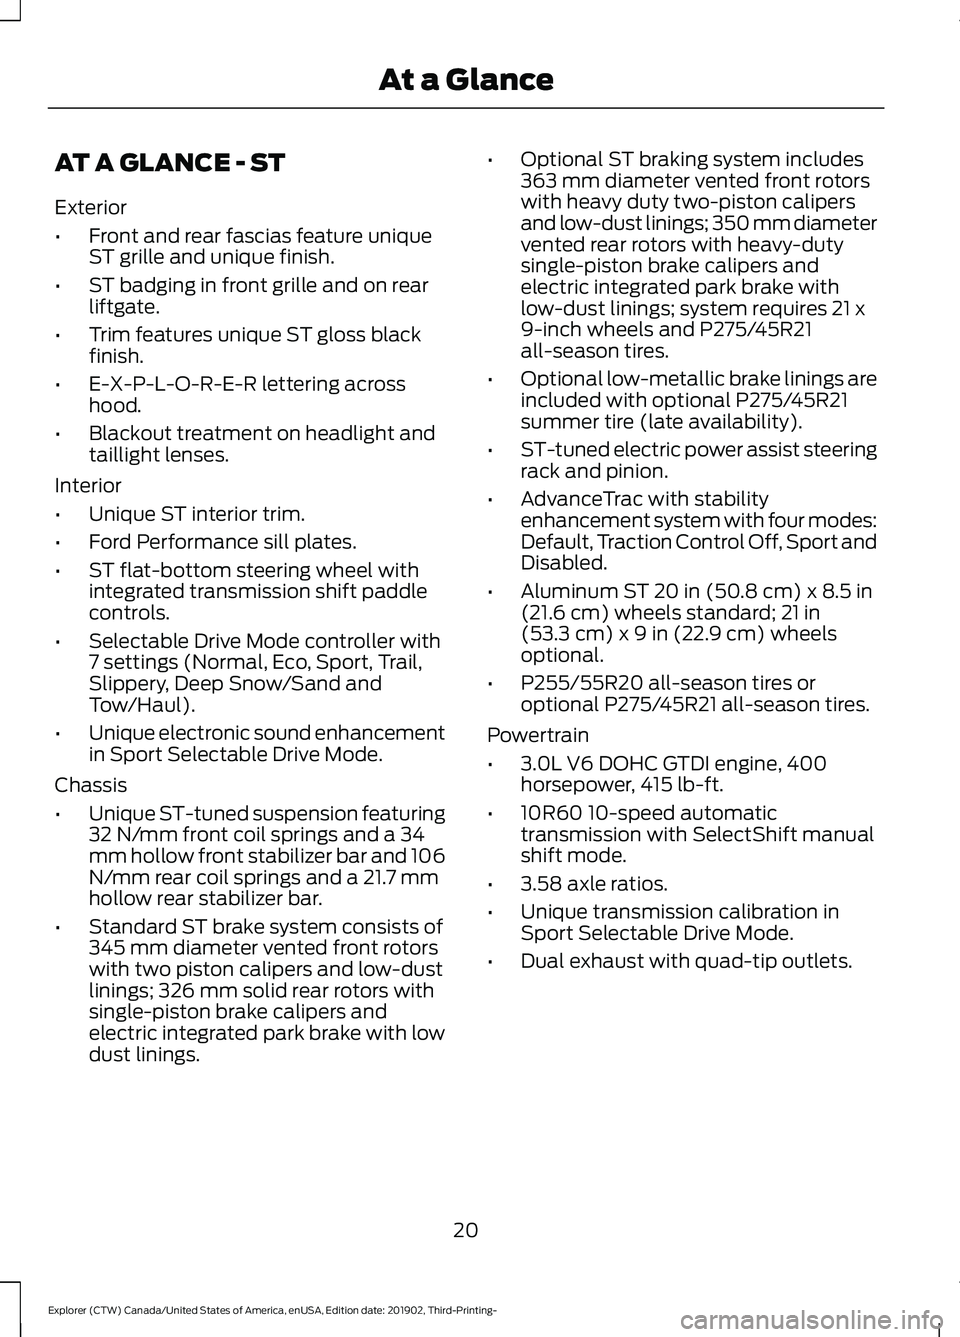
AT A GLANCE - ST
Exterior
•
Front and rear fascias feature unique
ST grille and unique finish.
• ST badging in front grille and on rear
liftgate.
• Trim features unique ST gloss black
finish.
• E-X-P-L-O-R-E-R lettering across
hood.
• Blackout treatment on headlight and
taillight lenses.
Interior
• Unique ST interior trim.
• Ford Performance sill plates.
• ST flat-bottom steering wheel with
integrated transmission shift paddle
controls.
• Selectable Drive Mode controller with
7 settings (Normal, Eco, Sport, Trail,
Slippery, Deep Snow/Sand and
Tow/Haul).
• Unique electronic sound enhancement
in Sport Selectable Drive Mode.
Chassis
• Unique ST-tuned suspension featuring
32 N/mm front coil springs and a 34
mm hollow front stabilizer bar and 106
N/mm rear coil springs and a 21.7 mm
hollow rear stabilizer bar.
• Standard ST brake system consists of
345 mm diameter vented front rotors
with two piston calipers and low-dust
linings; 326 mm solid rear rotors with
single-piston brake calipers and
electric integrated park brake with low
dust linings. •
Optional ST braking system includes
363 mm diameter vented front rotors
with heavy duty two-piston calipers
and low-dust linings; 350 mm diameter
vented rear rotors with heavy-duty
single-piston brake calipers and
electric integrated park brake with
low-dust linings; system requires 21 x
9-inch wheels and P275/45R21
all-season tires.
• Optional low-metallic brake linings are
included with optional P275/45R21
summer tire (late availability).
• ST-tuned electric power assist steering
rack and pinion.
• AdvanceTrac with stability
enhancement system with four modes:
Default, Traction Control Off, Sport and
Disabled.
• Aluminum ST 20 in (50.8 cm) x 8.5 in
(21.6 cm) wheels standard; 21 in
(53.3 cm) x 9 in (22.9 cm) wheels
optional.
• P255/55R20 all-season tires or
optional P275/45R21 all-season tires.
Powertrain
• 3.0L V6 DOHC GTDI engine, 400
horsepower, 415 lb-ft.
• 10R60 10-speed automatic
transmission with SelectShift manual
shift mode.
• 3.58 axle ratios.
• Unique transmission calibration in
Sport Selectable Drive Mode.
• Dual exhaust with quad-tip outlets.
20
Explorer (CTW) Canada/United States of America, enUSA, Edition date: 201902, Third-Printing- At a Glance
Page 30 of 555

5. To put the retractor in the automatic
locking mode, grasp the shoulder
portion of the belt and pull downward
until you pull all of the belt out.
Note: The automatic locking mode is
available on the front passenger and rear
seats.
6. Allow the belt to retract to remove slack. The belt clicks as it retracts to
indicate it is in the automatic locking
mode.
7. Try to pull the belt out of the retractor to make sure the retractor is in the
automatic locking mode. You should
not be able to pull more belt out. If the
retractor did not lock, unbuckle the belt
and repeat Steps 5 and 6. 8.
Remove remaining slack from the belt.
Force the seat down with extra weight,
for example, by pressing down or
kneeling on the child restraint as you
pull up on the shoulder belt to force
slack from the belt. This is necessary
to remove the remaining slack that
exists once you add the extra weight
of the child to the child restraint. It also
helps to achieve the proper snugness
of the child restraint to your vehicle.
Sometimes, a slight lean toward the
buckle provides extra help to remove
remaining slack from the belt.
9. If the child restraint has a tether strap, attach it now. 10. Before placing the child in the seat,
forcibly move the seat forward and
back to make sure you have the seat
securely held in place. To check this,
grab the seat at the belt path and
attempt to move it side to side and
forward and back. There should be
no more than 1 in (2.5 cm) of
movement for proper installation.
We recommend checking with a NHTSA
Certified Child Passenger Safety
Technician to make sure you properly
installed the child restraint. In Canada,
check with Transport Canada for referral
to a Child Car Seat Clinic.
27
Explorer (CTW) Canada/United States of America, enUSA, Edition date: 201902, Third-Printing- Child SafetyE142875 E142533 E142534
Page 125 of 555

AdvanceTrac
™ and Traction Control Action
Message
The system detects a condition that requires service. Contactan authorized dealer as soon as possible.
Service AdvanceTrac
The status of the AdvanceTrac system after you switched it off.
AdvanceTrac Off
The status of the AdvanceTrac system after you switched it on.
AdvanceTrac On
The system is off while the vehicle is in 4x4 low.
AdvanceTrac OFF in 4x4
LOW
The status of the AdvanceTrac sport mode after you switched it on.
AdvanceTrac SPORT
MODE
The status of the traction control system after you switched it off.
Traction Control Off
The status of the traction control system after you switched it on.
Traction Control On
Alarm Action
Message
Alarm triggered due to unauthorized entry. See Anti-Theft
Alarm (page 78).
Vehicle Alarm To Stop
Alarm, Start Vehicle.
Battery and Charging System (12 Volt) Action
Message
The charging system needs servicing. If the warning stays on
or continues to come on, contact an authorized dealer as soon as possible.
Check Charging System
The charging system needs servicing. If the warning stays on
or continues to come on, contact an authorized dealer as soon as possible.
Charging System Service
Soon
The charging system needs servicing. Contact an authorized dealer as soon as possible.
Charging System Service
Now
122
Explorer (CTW) Canada/United States of America, enUSA, Edition date: 201902, Third-Printing- Information Displays
Page 132 of 555

Action
Message
The brake system needs servicing. Stop the vehicle in a safeplace. Contact an authorized dealer.
Check Brake System
The engine coolant temperature is excessively high.
Engine Coolant Over
Temperature
The washer fluid is low and needs to be refilled.
Washer Fluid Level Low
Indicates that your vehicle is still in Transport mode. This maynot allow some features to operate properly. Contact an authorized dealer.
Transport Mode Contact
Dealer
Indicates that your vehicle is still in Factory mode. This maynot allow some features to operate properly. Contact an authorized dealer.
Factory Mode Contact
Dealer
Informs the driver that the powertrain needs service due to a powertrain malfunction.
See Manual
The engine has reduced power to help reduce high engine temperature.
Power Reduced to
Lower Engine Temp
The brake system has reduced stopping power.
Brake Applied Power
Reduced
MyKey Action
Message
You cannot program a MyKey.
MyKey not Created
MyKey is active.
MyKey Active Drive
Safely
When switching on your vehicle and MyKey is in use, displaysthat the MyKey speed limit is on.
Speed Limited to {avg
speed XXXX} km/h
MyKey is in use and the MyKey speed limit is on and the vehiclespeed is approaching 81 mph (130 km/h).
Near Vehicle Top Speed
You have reached the speed limit set for your MyKey.
Vehicle at Top Speed of
MyKey Setting
You have an active MyKey with a programmed set speed limit.
Check Speed Drive
Safely
Belt-Minder turns on with a MyKey in use.
Buckle Up to Unmute
Audio
129
Explorer (CTW) Canada/United States of America, enUSA, Edition date: 201902, Third-Printing- Information Displays
Page 138 of 555

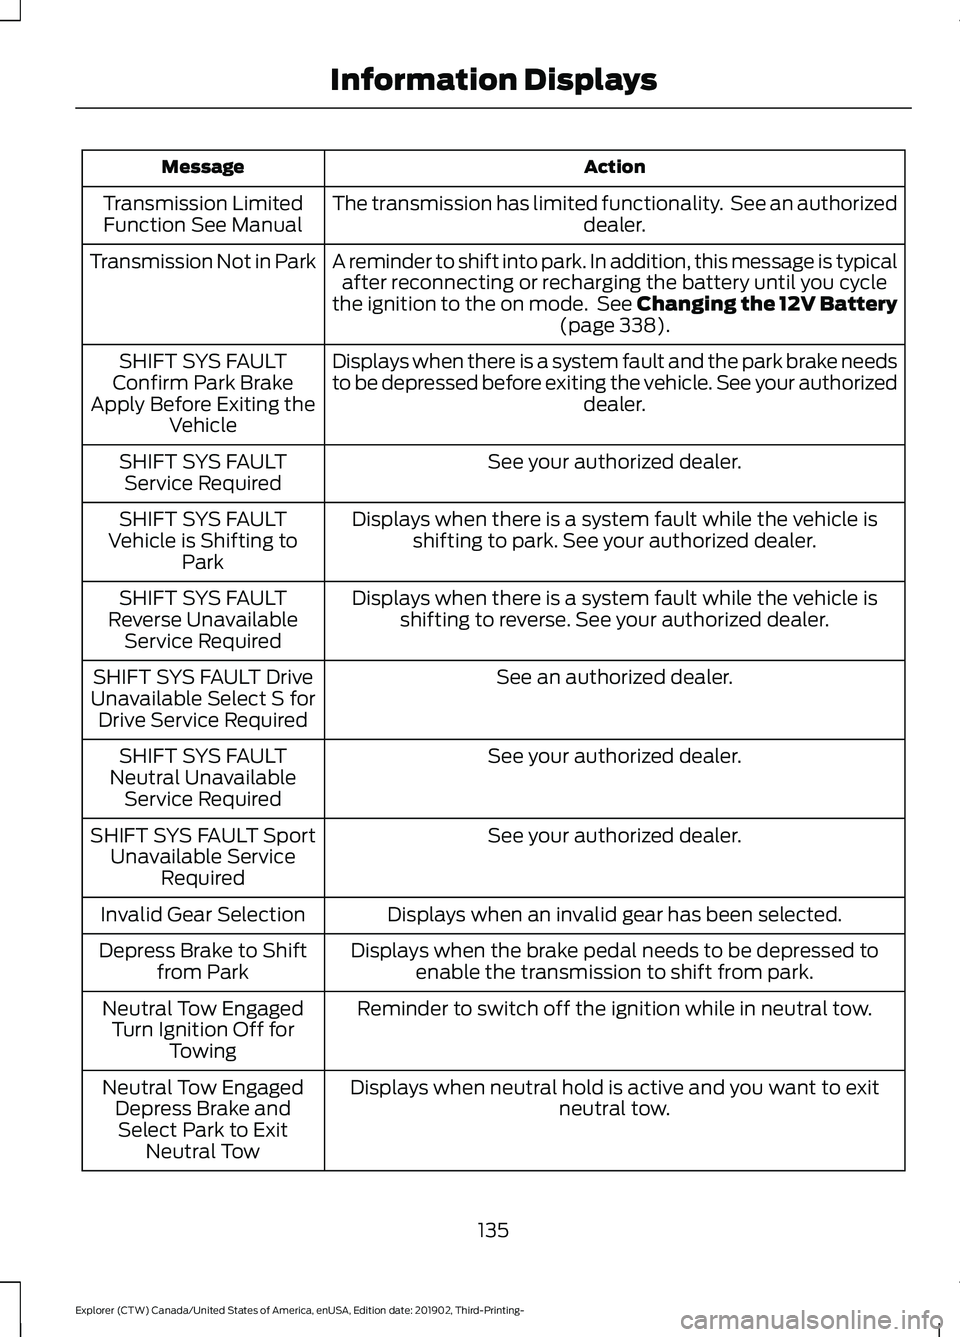
Action
Message
The transmission has limited functionality. See an authorized dealer.
Transmission Limited
Function See Manual
A reminder to shift into park. In addition, this message is typicalafter reconnecting or recharging the battery until you cycle
the ignition to the on mode. See Changing the 12V Battery (page 338).
Transmission Not in Park
Displays when there is a system fault and the park brake needs
to be depressed before exiting the vehicle. See your authorized dealer.
SHIFT SYS FAULT
Confirm Park Brake
Apply Before Exiting the Vehicle
See your authorized dealer.
SHIFT SYS FAULT
Service Required
Displays when there is a system fault while the vehicle isshifting to park. See your authorized dealer.
SHIFT SYS FAULT
Vehicle is Shifting to Park
Displays when there is a system fault while the vehicle isshifting to reverse. See your authorized dealer.
SHIFT SYS FAULT
Reverse Unavailable Service Required
See an authorized dealer.
SHIFT SYS FAULT Drive
Unavailable Select S for Drive Service Required
See your authorized dealer.
SHIFT SYS FAULT
Neutral Unavailable Service Required
See your authorized dealer.
SHIFT SYS FAULT Sport
Unavailable Service Required
Displays when an invalid gear has been selected.
Invalid Gear Selection
Displays when the brake pedal needs to be depressed toenable the transmission to shift from park.
Depress Brake to Shift
from Park
Reminder to switch off the ignition while in neutral tow.
Neutral Tow Engaged
Turn Ignition Off for Towing
Displays when neutral hold is active and you want to exit neutral tow.
Neutral Tow Engaged
Depress Brake andSelect Park to Exit Neutral Tow
135
Explorer (CTW) Canada/United States of America, enUSA, Edition date: 201902, Third-Printing- Information Displays
Page 171 of 555

When the indicator light on the power point
is:
•
On: The power point is working, the
ignition is ON or the vehicle is in
accessory mode.
• Off: The power point is OFF, the ignition
is OFF or the vehicle is not in accessory
mode.
• Flashing: The power point is in fault
mode.
Due to the different technologies used on
its construction, some devices may exceed
the capacity shown on its label when they
are initially plugged-in.
The power outlet temporarily turns off
power when in fault mode if the device
exceeds the 150 watt limit. Unplug your
device and switch the ignition off. Switch
the ignition back on, but do not plug your
device back in. Let the system cool off and
switch the ignition off to reset the fault
mode. Switch the ignition back on and
make sure the indicator light remains on.
Do not use the power point for certain
electric devices, including:
• Cathode-ray, tube-type televisions.
• Motor loads, such as vacuum cleaners,
electric saws and other electric power
tools or compressor-driven
refrigerators. •
Measuring devices, which process
precise data, such as medical
equipment or measuring equipment.
• Other appliances requiring an
extremely stable power supply such as
microcomputer-controlled electric
blankets or touch-sensor lamps.
WIRELESS ACCESSORY
CHARGER (IF EQUIPPED) WARNING:
Wireless charging
devices can affect the operation of
implanted medical devices, including
cardiac pacemakers. If you have any
implanted medical devices, we
recommend that you consult with your
physician.
Note: Devices without built-in Qi wireless
charging receivers require an additional Qi
receiver or sleeve.
Note: For compatible devices with built-in
Qi wireless charging capability, the charging
performance may be affected if your device
is in a case. It may be necessary to remove
the case to wirelessly charge your device.
The system supports one Qi wireless
charging compatible device on the
charging area.
Keep the charging area clean and remove
foreign objects prior to charging a device.
Do not place items with a magnetic strip,
for example passports, parking tickets or
credit cards, near the charging area when
charging a device. Damage may occur to
the magnetic strip.
Do not place metal objects, for example
remote controls, coins and candy
wrappers, on or near the charging area
when charging a device. Metal objects may
heat up and degrade the charging
performance.
168
Explorer (CTW) Canada/United States of America, enUSA, Edition date: 201902, Third-Printing- Auxiliary Power PointsE247586
Page 183 of 555

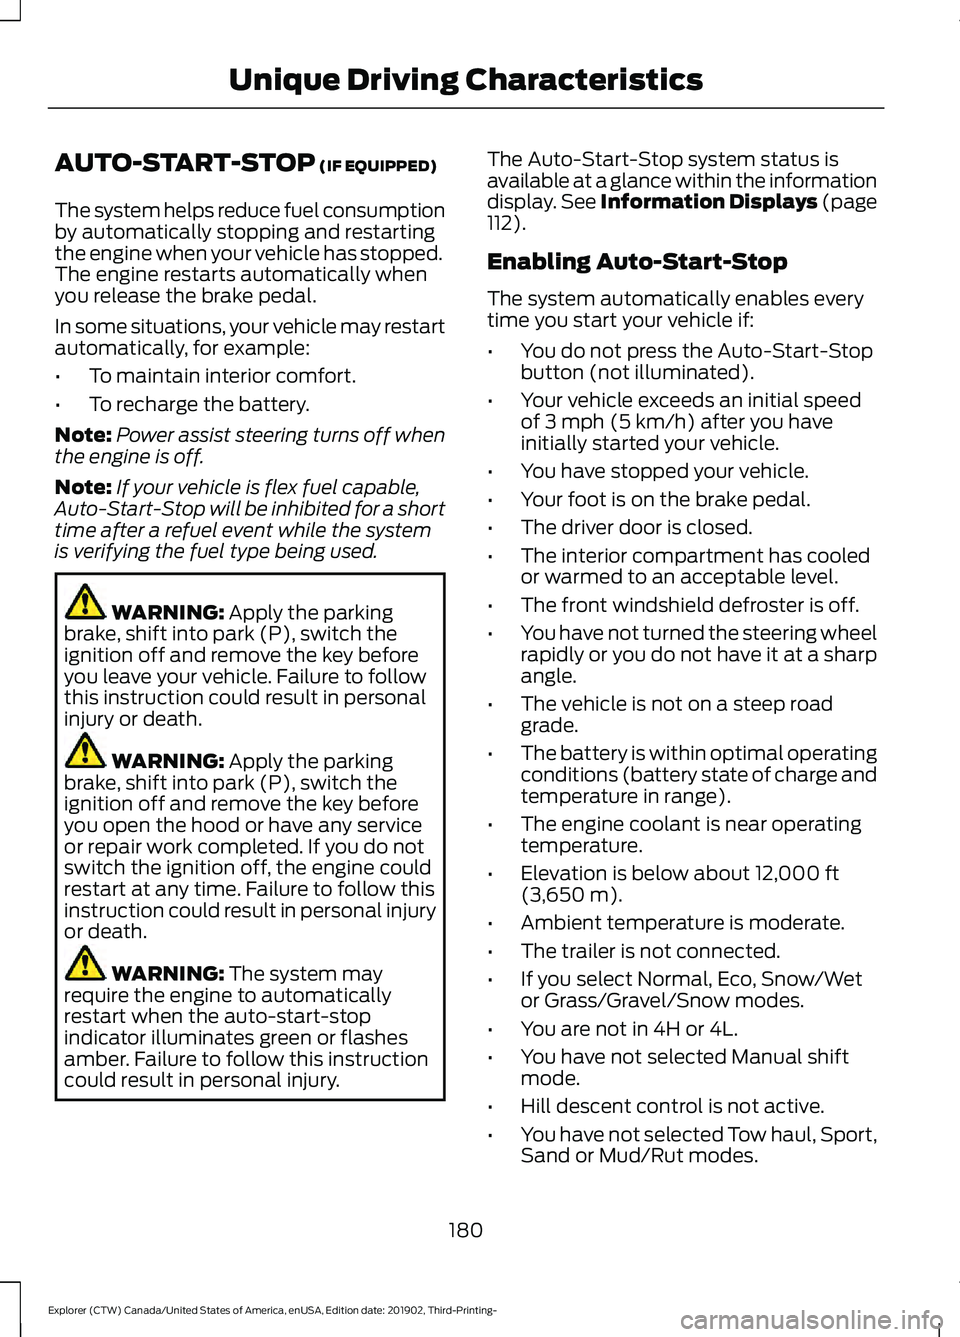
AUTO-START-STOP (IF EQUIPPED)
The system helps reduce fuel consumption
by automatically stopping and restarting
the engine when your vehicle has stopped.
The engine restarts automatically when
you release the brake pedal.
In some situations, your vehicle may restart
automatically, for example:
• To maintain interior comfort.
• To recharge the battery.
Note: Power assist steering turns off when
the engine is off.
Note: If your vehicle is flex fuel capable,
Auto-Start-Stop will be inhibited for a short
time after a refuel event while the system
is verifying the fuel type being used. WARNING:
Apply the parking
brake, shift into park (P), switch the
ignition off and remove the key before
you leave your vehicle. Failure to follow
this instruction could result in personal
injury or death. WARNING:
Apply the parking
brake, shift into park (P), switch the
ignition off and remove the key before
you open the hood or have any service
or repair work completed. If you do not
switch the ignition off, the engine could
restart at any time. Failure to follow this
instruction could result in personal injury
or death. WARNING:
The system may
require the engine to automatically
restart when the auto-start-stop
indicator illuminates green or flashes
amber. Failure to follow this instruction
could result in personal injury. The Auto-Start-Stop system status is
available at a glance within the information
display.
See Information Displays (page
112).
Enabling Auto-Start-Stop
The system automatically enables every
time you start your vehicle if:
• You do not press the Auto-Start-Stop
button (not illuminated).
• Your vehicle exceeds an initial speed
of
3 mph (5 km/h) after you have
initially started your vehicle.
• You have stopped your vehicle.
• Your foot is on the brake pedal.
• The driver door is closed.
• The interior compartment has cooled
or warmed to an acceptable level.
• The front windshield defroster is off.
• You have not turned the steering wheel
rapidly or you do not have it at a sharp
angle.
• The vehicle is not on a steep road
grade.
• The battery is within optimal operating
conditions (battery state of charge and
temperature in range).
• The engine coolant is near operating
temperature.
• Elevation is below about
12,000 ft
(3,650 m).
• Ambient temperature is moderate.
• The trailer is not connected.
• If you select Normal, Eco, Snow/Wet
or Grass/Gravel/Snow modes.
• You are not in 4H or 4L.
• You have not selected Manual shift
mode.
• Hill descent control is not active.
• You have not selected Tow haul, Sport,
Sand or Mud/Rut modes.
180
Explorer (CTW) Canada/United States of America, enUSA, Edition date: 201902, Third-Printing- Unique Driving Characteristics