2020 FORD EXPEDITION battery
[x] Cancel search: batteryPage 195 of 542
Your vehicle may not pass the I/M test if
the service engine soon indicator is on or
not working properly (bulb is burned out),
or if the OBD-II system has determined
that some of the emission control systems
have not been properly checked. In this
case, the vehicle is not ready for I/M
testing.
If the vehicle
’s engine or transmission has
just been serviced, or the battery has
recently run down or been replaced, the
OBD-II system may indicate that the
vehicle is not ready for I/M testing. To
determine if the vehicle is ready for I/M
testing, turn the ignition key to the on
position for 15 seconds without cranking
the engine. If the service engine soon
indicator blinks eight times, it means that
the vehicle is not ready for I/M testing; if
the service engine soon indicator stays on
solid, it means that your vehicle is ready
for I/M testing.
The OBD-II system checks the emission
control system during normal driving. A
complete check may take several days.
If the vehicle is not ready for I/M testing,
you can perform the following driving cycle
consisting of mixed city and highway
driving:
1. 15 minutes of steady driving on an expressway or highway followed by 20
minutes of stop-and-go driving with at
least four 30-second idle periods.
2. Allow your vehicle to sit for at least eight hours with the ignition off. Then,
start the vehicle and complete the
above driving cycle. The vehicle must
warm up to its normal operating
temperature. Once started, do not turn
off the vehicle until the above driving
cycle is complete.
If the vehicle is still not ready for I/M
testing, you need to repeat the above
driving cycle.
192
Expedition (TB8) Canada/United States of America, enUSA, Edition date: 201907, Third-Printing- Engine Emission Control
Page 198 of 542
Stay in Neutral Mode - Console Shifter
This mode allows your vehicle to stay in
neutral when you exit your vehicle.
Extended usage of Stay in Neutral mode
could result in a battery voltage reduction
to a level where the vehicle may no longer
start. Keep your vehicle stationary to enter
this mode.
Note:
Stay in Neutral mode is a temporary
vehicle state with the ignition off. Once in
this mode, maintain sufficient battery
voltage or your vehicle returns to park. Do
not tow your vehicle in this mode.
Note: Always put your vehicle in Stay in
Neutral mode if you want your vehicle to
stay in neutral when you exit or switch off
your vehicle.
Note: Do not use this feature for towing
your vehicle. WARNING: When doing this
procedure, you need to take the
transmission out of park (P) which
means your vehicle can roll freely. To
avoid unwanted vehicle movement,
always fully apply the parking brake prior
to doing this procedure. Use wheels
chocks if appropriate. To enter Stay in Neutral mode:
•
Move the transmission selector to
neutral (N).
• A message appears in your information
display screen prompting you to press
the manual (M) button.
• Press the manual (M) button again to
enter Stay in Neutral mode.
•You can complete this step as long
as the message prompts you to
remain in neutral (N).
• A confirmation message appears
in the information display when
your vehicle has entered Stay in
Neutral mode.
To exit Stay in Neutral mode, apply the
brake and select a different gear. See
Putting your vehicle in or out of gear for
more information.
Stay in Neutral Mode - Console Shifter -
No Start
Use this feature to move your transmission
from the park (P) position in the event of
a no start situation. If your vehicle has a
dead battery, it requires an external power
source. Do not tow your vehicle in this
mode.
Note: This feature only functions if your 12
volt battery has power and the starter can
spin the engine. If vehicle battery voltage is
not sufficient, it could need an external 12
volt power source, for example, jumper
cables, battery charger or jump pack, for this
feature to function.
Note: Once in this mode, maintain sufficient
battery voltage or your vehicle returns to
park.
195
Expedition (TB8) Canada/United States of America, enUSA, Edition date: 201907, Third-Printing- Transmission
Page 213 of 542
•
You take corners too fast.
• The road surface is poor.
Note: If the system activates, the brake
pedal may pulse and may travel further.
Maintain pressure on the brake pedal. You
may also hear a noise from the system. This
is normal.
ELECTRIC PARKING BRAKE WARNING: Always fully apply the
parking brake and make sure you shift
into park (P). Failure to follow this
instruction could result in personal injury
or death. WARNING:
If you drive extended
distances with the parking brake applied,
you could cause damage to the brake
system. WARNING:
The electric parking
brake does not operate if the vehicle
battery is running out of charge.
Your vehicle has an electric parking brake.
You operate it with a switch instead of a
lever. The switch is on the center console
or to the left-hand side of the steering
wheel, on the lower part of the instrument
panel.
Note: The electric parking brake makes
noises during operation. This is normal.
Applying the Electric Parking
Brake Pull the switch upward.
The red warning lamp flashes
during operation and illuminates
when the parking brake is
applied. Note:
It remains illuminated for a short
period of time after you switch the ignition
off.
If it continues to flash or does not
illuminate, the system has malfunctioned.
Have your vehicle checked as soon as
possible.
Note: You can apply the electric parking
brake when the ignition is off.
Note: The electric parking brake could
automatically apply when you shift into park
(P). See
Transmission (page 193).
Applying the Electric Parking Brake in
an Emergency
Note: Do not apply the electric parking
brake when your vehicle is moving, except
in an emergency. If you repeatedly use the
electric parking brake to slow or stop your
vehicle, you could cause damage to the
brake system.
You can use the electric parking brake to
slow or stop your vehicle in an emergency. Pull the switch upward and hold
it.
The red warning lamp
illuminates, a tone sounds and
the stoplamps turn on.
The electric parking brake continues to
slow your vehicle down unless you release
the switch.
Manually Releasing the Electric
Parking Brake
Switch the ignition on.
Press and hold the brake pedal.
210
Expedition (TB8) Canada/United States of America, enUSA, Edition date: 201907, Third-Printing- BrakesE267156 E270480 E267156 E270480
Page 214 of 542
Push the switch downward.
The red warning lamp turns off.
If it remains illuminated or flashes, the
system has malfunctioned. Have your
vehicle checked as soon as possible.
Pulling Away on a Hill When Towing a
Trailer
Press and hold the brake pedal.
Pull the switch upward and hold
it.
Shift into gear.
Press the accelerator pedal until engine
has developed sufficient torque to prevent
your vehicle from rolling down the hill. Release the switch and pull
away in a normal manner.
Automatically Releasing the
Electric Parking Brake
Close the driver door.
Shift into gear.
Press the accelerator pedal and pull away
in a normal manner. The red warning lamp turns off.
If it remains illuminated or flashes, the
electric parking brake has not released.
Manually release the parking brake. Releasing the Electric Parking
Brake if the Vehicle Battery is
Running Out of Charge
Connect a booster battery to the vehicle
battery to release the electric parking brake
if the vehicle battery is running out of
charge. See Jump Starting the Vehicle
(page 304).
HILL START ASSIST WARNING:
The system does not
replace the parking brake. When you
leave your vehicle, always apply the
parking brake. WARNING:
You must remain in
your vehicle when the system turns on.
At all times, you are responsible for
controlling your vehicle, supervising the
system and intervening, if required.
Failure to take care may result in the loss
of control of your vehicle, serious
personal injury or death. WARNING:
The system will turn
off if a malfunction is apparent or if you
rev the engine excessively. Failure to take
care may result in the loss of control of
your vehicle, serious personal injury or
death.
The system makes it easier to pull away
when your vehicle is on a slope without the
need to use the parking brake.
When the system is active, your vehicle
remains stationary on the slope for two to
three seconds after you release the brake
pedal. This allows time to move your foot
from the brake to the accelerator pedal.
The system releases the brakes
automatically once the engine has
211
Expedition (TB8) Canada/United States of America, enUSA, Edition date: 201907, Third-Printing- BrakesE267156 E270480 E267156 E267156 E270480
Page 232 of 542

Note:
You are responsible for controlling
your vehicle and making sure the path is
clear prior to pulling into traffic.
Troubleshooting Possible Cause
Symptom
You may have switched the traction control off.
The system does not search for
a parking space.
The transmission is in reverse (R). Your vehicle must
be moving forward to be able to detect a parking space.
The sensors may be blocked. For example, snow, ice
or dirt buildup. Blocked sensors can affect how the
system functions.
The system does not offer a
parking space.
There is not enough room in the parking space for your
vehicle to safely park.
There is not enough space for the parking maneuver on
the opposite side of the parking space.
The parking space is more than 5 ft (1.5 m) or less than
2 ft (0.5 m) away.
The vehicle speed is greater than
22 mph (35 km/h)
for parallel parking or greater than 19 mph (30 km/h)
for perpendicular parking.
You recently disconnected or replaced the battery. After
you reconnect the battery you must drive your vehicle
on a straight road for a short period of time.
Your vehicle is rolling in the opposite direction of the
current transmission position. For example, rolling
forward when in reverse (R).
The system does not correctly
position your vehicle in a
parking space.
An irregular curb along the parking space prevents the
system from correctly aligning your vehicle.
Vehicles or objects bordering the space may not be
correctly parked.
Your vehicle stopped too far past the parking space.
The tires may not be correctly installed or maintained.
For example, not inflated correctly, improper size, or of
different sizes.
A repair or alteration changes the detection capabilities.
229
Expedition (TB8) Canada/United States of America, enUSA, Edition date: 201907, Third-Printing- Parking Aids
Page 260 of 542
Extreme continuous steering may increase
the effort required for you to steer your
vehicle, this increased effort prevents
overheating and permanent damage to
the steering system. You do not lose the
ability to steer your vehicle manually.
Typical steering and driving maneuvers
allow the system to cool and return to
normal operation.
Steering Tips
If the steering wanders or pulls, check for:
•
Correct tire pressures.
• Uneven tire wear.
• Loose or worn suspension
components.
• Loose or worn steering components.
• Improper vehicle alignment.
Note: A high crown in the road or high
crosswinds may also make the steering
seem to wander or pull.
Adaptive Learning (If Equipped)
The electronic power steering system
adaptive learning helps correct road
irregularities and improves overall handling
and steering feel. It communicates with
the brake system to help operate
advanced stability control and accident
avoidance systems. Additionally, whenever
the battery is disconnected or a new
battery installed, you must drive your
vehicle a short distance before the system
relearns the strategy and reactivates all
systems. PRE-COLLISION ASSIST WARNING: You are responsible for
controlling your vehicle at all times. The
system is designed to be an aid and does
not relieve you of your responsibility to
drive with due care and attention. Failure
to follow this instruction could result in
the loss of control of your vehicle,
personal injury or death. WARNING:
The system does not
detect vehicles that are driving in a
different direction, pedestrians at night,
cyclists or animals. Apply the brakes
when necessary. Failure to follow this
instruction could result in the loss of
control of your vehicle, personal injury or
death. WARNING:
The system does not
operate during hard acceleration or
steering. Failure to take care may lead
to a crash or personal injury. WARNING: The system may fail or
operate with reduced function during
cold and severe weather conditions.
Snow, ice, rain, spray and fog can
adversely affect the system. Keep the
front camera and radar free of snow and
ice. Failure to take care may result in the
loss of control of your vehicle, serious
personal injury or death. WARNING:
Some situations and
objects prevent hazard detection. For
example low or direct sunlight, inclement
weather, unconventional vehicle types,
and pedestrians. Apply the brakes when
necessary. Failure to follow this
instruction could result in the loss of
control of your vehicle, personal injury or
death.
257
Expedition (TB8) Canada/United States of America, enUSA, Edition date: 201907, Third-Printing- Driving Aids
Page 286 of 542
For best results:
•
Use a long, straight, smooth and level
road when attempting to calibrate.
• Drive straight forward.
• Drive between 4 mph (6 km/h) and
24 mph (39 km/h).
System Operation
The following warnings or difficulties may
occur during feature operation. Tips to
resolve them are listed below.
The system is not available:
• The system relies on many
sub-systems in your vehicle to operate
correctly. If those sub-systems are not
operating correctly the system may not
be available.
• Low battery voltage is a condition
which prevents the system from
operating. Please make sure the
battery is correctly charged if the
system is not available.
• You may need to drive your vehicle
straight forward above
25 mph
(40 km/h) before the system is
available again.
• If the message still displays take your
vehicle to an authorized dealer for
service.
Sticker lost:
• If the system cannot initially find the
sticker, it may be necessary for you to
change the lighting conditions by
moving the vehicle and trailer or
waiting until conditions change.
• Check for the following if you receive
the lost sticker message while using
the system.
• Stop your vehicle as soon as the
message displays.
• Make sure the sticker is visible and the
pattern is discernable in the rear view
camera image. •
Clean the sticker and camera to make
sure they are unobstructed.
• Clean the lens with a soft, lint-free
cloth and water.
• Clean the sticker with isopropyl rubbing
alcohol sprayed directly onto the
sticker, and then wipe clean with a soft
cloth.
• Remove any items that may be
blocking the view of the sticker.
Depending on your trailer configuration
and any equipment mounted to your
trailer it is possible for the sticker to be
blocked from view of the camera as it
rotates on the hitch ball but not be
blocked during setup. Remove the
obstruction if possible. It is necessary
to remove the sticker from its current
location if the obstruction cannot be
cleared and place a new sticker that is
visible to the camera in all positions of
the trailer behind your vehicle.
• Placing the sticker on a surface angled
away from the vehicle reduces
performance. Use a drawbar that
positions the trailer level to the ground
when attached to vehicle. This typically
provides a level surface to mount the
sticker. Place the sticker on a bracket
or other object when no level surface
is available.
• Make sure the entire sticker is on a flat
surface that is completely visible to the
camera. Do not fold the sticker over an
edge on the trailer frame. This can
degrade performance.
• Shadows on the sticker may effect
tracking performance under some
lighting conditions. Moving the sticker
to another location within the allowed
placement area may improve
performance. Use the change sticker
option in your Towing menu if you
move the sticker.
283
Expedition (TB8) Canada/United States of America, enUSA, Edition date: 201907, Third-Printing- Towing
Page 292 of 542
ESSENTIAL TOWING CHECKS
Follow these guidelines for safe towing:
•
Do not tow a trailer until you drive your
vehicle at least 1,000 mi (1,600 km).
• Consult your local motor vehicle laws
for towing a trailer.
• See the instructions included with
towing accessories for the proper
installation and adjustment
specifications.
• Service your vehicle more frequently if
you tow a trailer. See your scheduled
maintenance information.
• If you use a rental trailer, follow the
instructions the rental agency gives
you.
For load specification terms found on the
tire label and Safety Compliance label and
instructions on calculating your vehicle's
load,
See Load Limit (page 269).
Remember to account for the trailer
tongue weight as part of your vehicle load
when calculating the total vehicle weight.
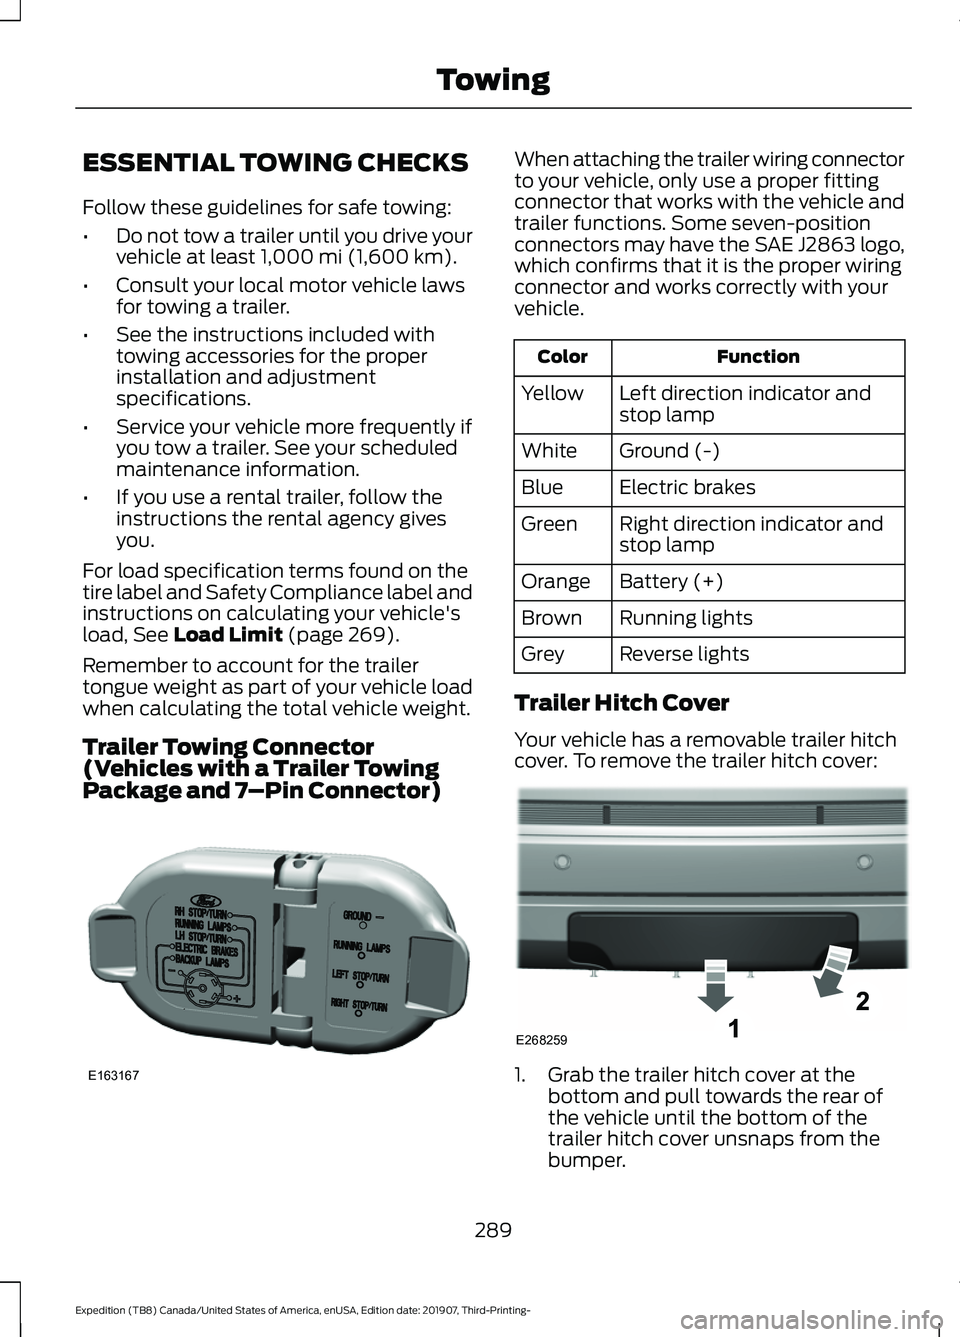
Trailer Towing Connector
(Vehicles with a Trailer Towing
Package and 7 –Pin Connector) When attaching the trailer wiring connector
to your vehicle, only use a proper fitting
connector that works with the vehicle and
trailer functions. Some seven-position
connectors may have the SAE J2863 logo,
which confirms that it is the proper wiring
connector and works correctly with your
vehicle.
Function
Color
Left direction indicator and
stop lamp
Yellow
Ground (-)
White
Electric brakes
Blue
Right direction indicator and
stop lamp
Green
Battery (+)
Orange
Running lights
Brown
Reverse lights
Grey
Trailer Hitch Cover
Your vehicle has a removable trailer hitch
cover. To remove the trailer hitch cover: 1. Grab the trailer hitch cover at the
bottom and pull towards the rear of
the vehicle until the bottom of the
trailer hitch cover unsnaps from the
bumper.
289
Expedition (TB8) Canada/United States of America, enUSA, Edition date: 201907, Third-Printing- TowingE163167 E268259