2020 FORD EXPEDITION washer fluid
[x] Cancel search: washer fluidPage 8 of 542

Maintenance
General Information
..................................325
Opening and Closing the Hood .............
325
Under Hood Overview ..............................
326
Engine Oil Dipstick ......................................
327
Engine Oil Check ..........................................
327
Oil Change Indicator Reset .....................
328
Changing the Engine Air Filter ...............
329
Engine Coolant Check ..............................
329
Automatic Transmission Fluid Check ........................................................................\
333
Transfer Case Fluid Check .......................
334
Brake Fluid Check .......................................
334
Power Steering Fluid Check ....................
335
Changing the 12V Battery ........................
335
Adjusting the Headlamps ........................
337
Washer Fluid Check ...................................
338
Fuel Filter .......................................................
339
Checking the Wiper Blades ....................
339
Changing the Wiper Blades ....................
339
Removing a Headlamp ............................
340
Changing a Bulb .........................................
340
Vehicle Care
General Information ..................................
343
Cleaning Products ......................................
343
Cleaning the Exterior .................................
344
Waxing ............................................................
345
Cleaning the Engine ...................................
345
Cleaning the Windows and Wiper Blades ........................................................................\
345
Cleaning the Interior ..................................
346
Cleaning the Instrument Panel and Instrument Cluster Lens ......................
346
Cleaning Leather Seats .............................
347
Repairing Minor Paint Damage .............
348
Cleaning the Wheels .................................
348
Vehicle Storage ...........................................
348Wheels and Tires
General Information
...................................
351
Tire Care .........................................................
353
Using Snow Chains ....................................
367
Tire Pressure Monitoring System .........
368
Changing a Road Wheel ...........................
372
Technical Specifications ..........................
378
Capacities and Specifications
Engine Specifications ...............................
380
Motorcraft Parts .........................................
380
Vehicle Identification Number ...............
382
Vehicle Certification Label ......................
383
Transmission Code Designation ...........
383
Capacities and Specifications ...............
384
Bulb Specification Chart ..........................
392
Connected Vehicle
Connected Vehicle Requirements .......
394
Connected Vehicle Limitations .............
394
Connecting the Vehicle to a Mobile Network .....................................................
394
Connecting the Vehicle to a Wi-Fi Network .....................................................
394
Connected Vehicle – Troubleshooting ........................................................................\
395
Vehicle Wi-Fi Hotspot
Creating a Vehicle Wi-Fi Hotspot .........
397
Changing the Vehicle Wi-Fi Hotspot Name or Password .................................
397
Audio System
General Information ..................................
398
Audio Unit - Vehicles Without: Touchscreen Display .............................
398
Audio Unit - Vehicles With: Touchscreen Display .........................................................
401
Digital Radio .................................................
402
Satellite Radio .............................................
405
5
Expedition (TB8) Canada/United States of America, enUSA, Edition date: 201907, Third-Printing- Table of Contents
Page 96 of 542
In these conditions, you can do the
following:
•
Lower the sensitivity of the autowipers
to reduce the amount of smearing on
the windshield.
• Switch to normal or high-speed wipe.
• Switch autowipers off.
Autowipers Settings
Autowipers default to on and remain on
until you switch them off in the information
display. When you switch off autowipers,
the wipers operate in intermittent mode.
WINDSHIELD WASHERS
Note: Do not operate the wipers on a dry
windshield. This may scratch the glass,
damage the wiper blades or cause the wiper
motor to burn out. Always use the
windshield washers before wiping a dry
windshield.
Note: Do not operate the washers when
the washer reservoir is empty. This may
cause the washer pump to overheat. •
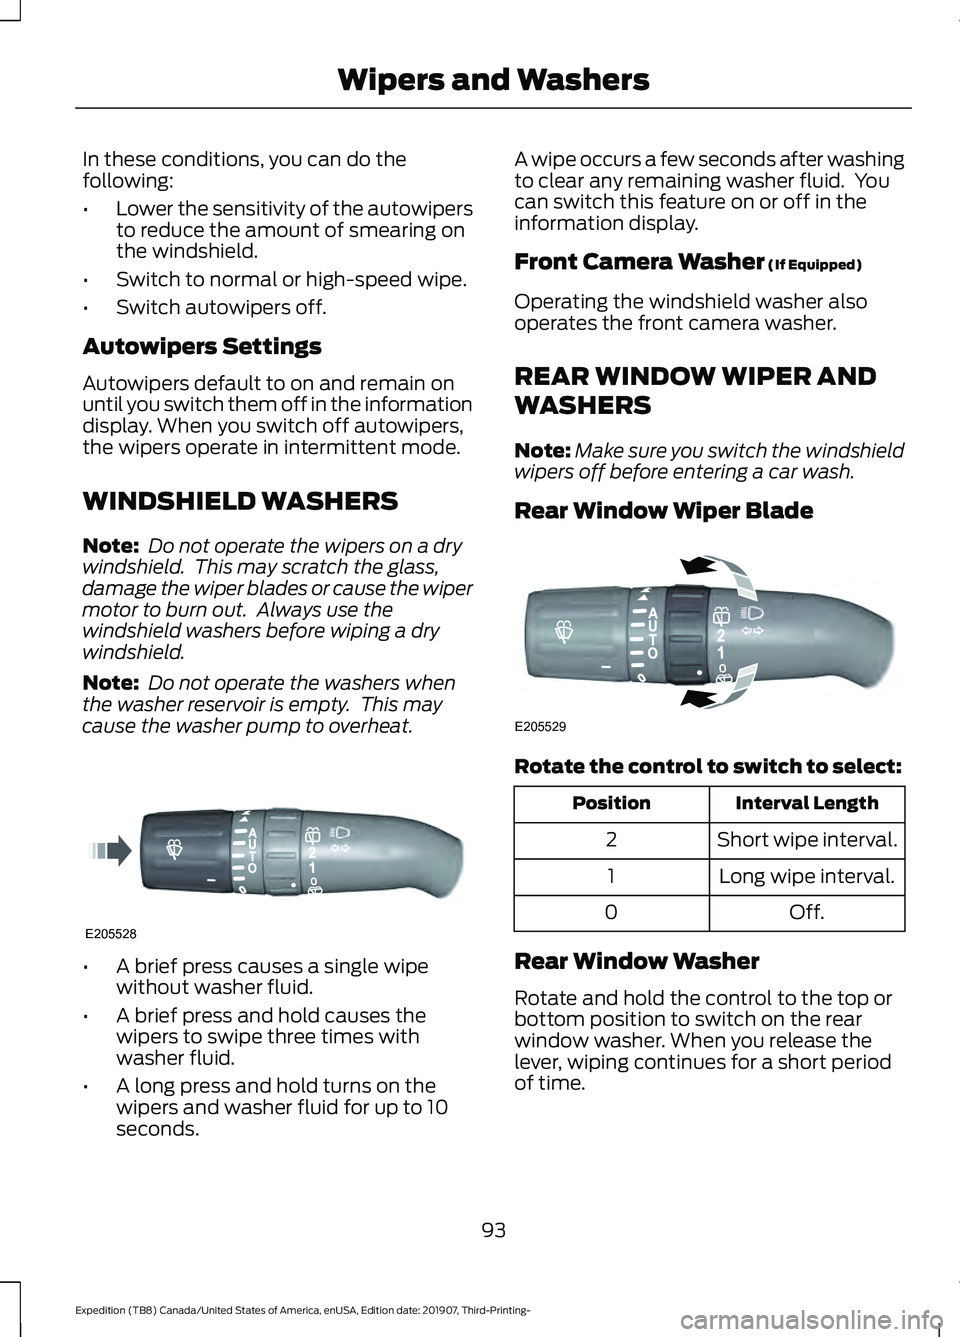
A brief press causes a single wipe
without washer fluid.
• A brief press and hold causes the
wipers to swipe three times with
washer fluid.
• A long press and hold turns on the
wipers and washer fluid for up to 10
seconds. A wipe occurs a few seconds after washing
to clear any remaining washer fluid. You
can switch this feature on or off in the
information display.
Front Camera Washer (If Equipped)
Operating the windshield washer also
operates the front camera washer.
REAR WINDOW WIPER AND
WASHERS
Note: Make sure you switch the windshield
wipers off before entering a car wash.
Rear Window Wiper Blade Rotate the control to switch to select:
Interval Length
Position
Short wipe interval.
2
Long wipe interval.
1
Off.
0
Rear Window Washer
Rotate and hold the control to the top or
bottom position to switch on the rear
window washer. When you release the
lever, wiping continues for a short period
of time.
93
Expedition (TB8) Canada/United States of America, enUSA, Edition date: 201907, Third-Printing- Wipers and WashersE205528 E205529
Page 329 of 542
3. Raise the hood until the lift cylinders
hold it open.
4. To close, lower the hood and make sure that it is properly closed and fully
latched.
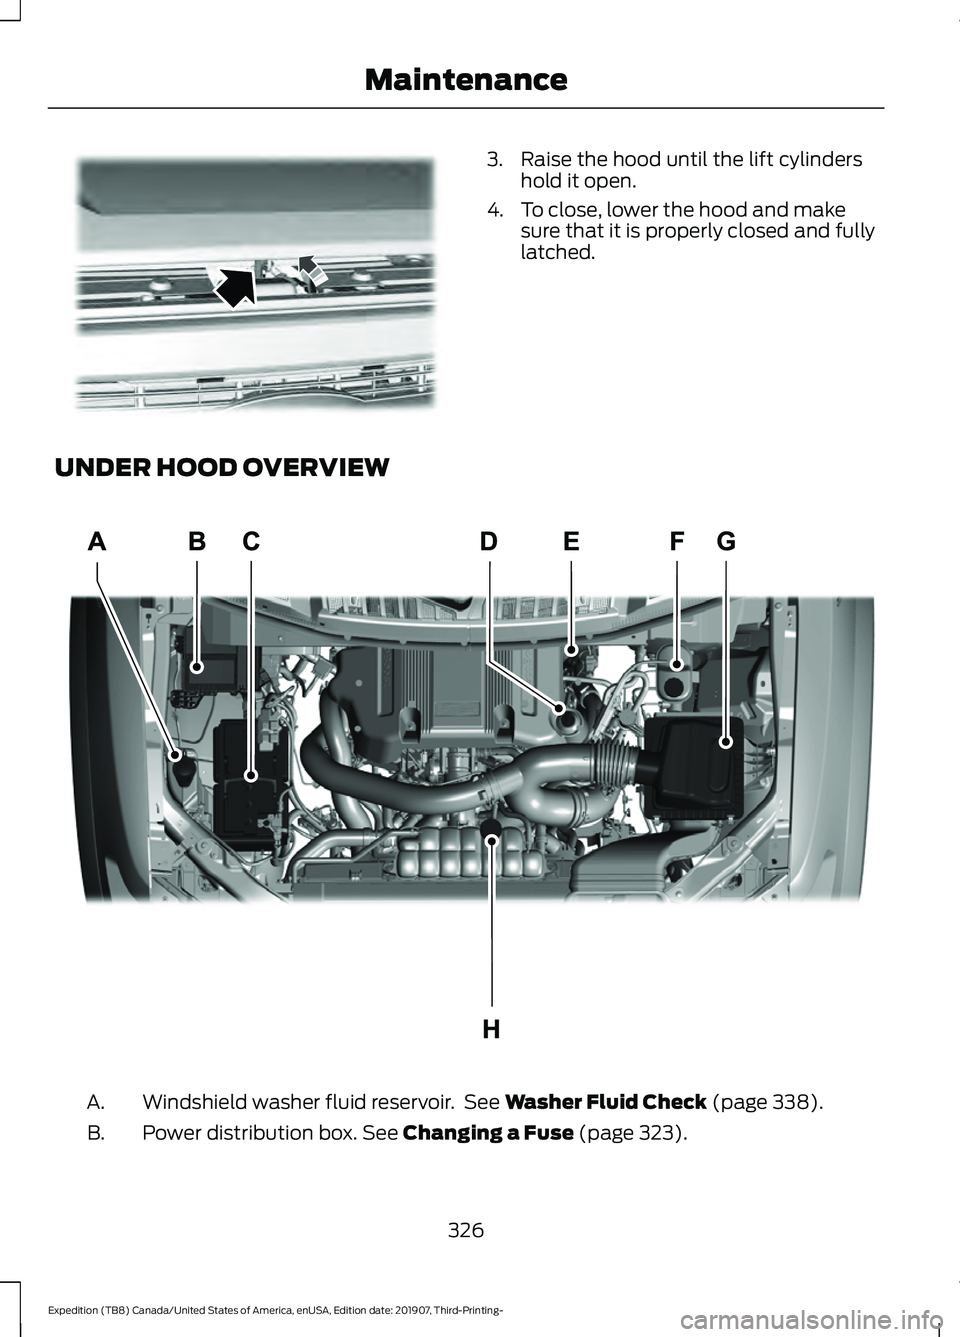
UNDER HOOD OVERVIEW Windshield washer fluid reservoir. See Washer Fluid Check (page 338).
A.
Power distribution box.
See Changing a Fuse (page 323).
B.
326
Expedition (TB8) Canada/United States of America, enUSA, Edition date: 201907, Third-Printing- MaintenanceE190266 E258054
Page 333 of 542
WARNING: To reduce the risk of
personal injury, make sure the engine is
cool before unscrewing the coolant
pressure relief cap. The cooling system
is under pressure. Steam and hot liquid
can come out forcefully when you loosen
the cap slightly. WARNING:
Do not add coolant
further than the MAX mark.
When the engine is cold, check the
concentration and level of the coolant at
the intervals listed in the scheduled
maintenance information. See Scheduled
Maintenance
(page 475).
Note: Make sure that the coolant level is
between the
MIN and MAX marks on the
coolant reservoir.
Note: Coolant expands when it is hot. The
level may extend beyond the
MAX mark.
Maintain coolant concentration within
48% to 50%, which equates to a freeze
point between
-29°F (-34°C) and -35°F
(-37°C). Coolant concentration should be
checked using a refractometer. We do not
recommend the use of hydrometers or
coolant test strips for measuring coolant
concentration.
Adding Coolant WARNING:
Do not remove the
coolant reservoir cap when the engine is
on or the cooling system is hot. Wait 10
minutes for the cooling system to cool
down. Cover the coolant reservoir cap
with a thick cloth to prevent the
possibility of scalding and slowly remove
the cap. Failure to follow this instruction
could result in personal injury. WARNING:
Do not add engine
coolant when the engine is on or the
cooling system is hot. Failure to follow
this instruction could result in personal
injury.
Note: Automotive fluids are not
interchangeable. Take care not to put
engine coolant in the windshield washer
fluid reservoir or windshield washer fluid in
the engine coolant reservoir.
Note: Do not use stop leak pellets, cooling
system sealants, or non-specified additives
as they can cause damage to the engine
cooling or heating systems. Resulting
component damage may not be covered by
the vehicle Warranty.
It is very important to use prediluted
coolant approved to the correct
specification in order to avoid plugging the
small passageways in the engine cooling
system. See
Capacities and
Specifications (page 380). Do not mix
different colors or types of coolant in your
vehicle. Mixing of engine coolants or using
an incorrect coolant may harm the engine
or cooling system components and may
not be covered by the vehicle Warranty.
Note: If prediluted coolant is not available,
use the approved concentrated coolant
diluting it to 50/50 with distilled water. See
Capacities and Specifications (page 380).
Using water that has not been deionised
may contribute to deposit formation,
corrosion and plugging of the small cooling
system passageways.
Note: Coolants marketed for all makes and
models may not be approved to our
specifications and may cause damage to
the cooling system. Resulting component
damage may not be covered by the vehicle
Warranty.
330
Expedition (TB8) Canada/United States of America, enUSA, Edition date: 201907, Third-Printing- Maintenance
Page 341 of 542

Vertical Aim Adjustment
1. Park your vehicle directly in front of a
wall or screen on a level surface,
approximately 25 ft (7.6 m) away.
2. Measure the height from the center of your headlamp (indicated by a 3 mm
circle on the lens) to the ground and
mark an
8 ft (2.4 m) horizontal
reference line on the vertical wall or
screen at this height (a piece of
masking tape works well).
Note: To see a clearer light pattern for
adjusting, you may want to block the light
from one headlamp while adjusting the
other.
3. Switch on the low beam headlamps to
illuminate the wall or screen and open
the hood. Cover one of the headlamps
so no light hits the wall. 4.
For halogen or LED headlamps:
On
the wall or screen you will observe a
light pattern with a distinct horizontal
edge toward the right. If this edge is not
at the horizontal reference line, you will
need to adjust the beam so the edge
is at the same height as the horizontal
reference line. 5. Locate the vertical adjuster on each
headlamp. Use a #2 Phillips
screwdriver to turn the adjuster either
counterclockwise or clockwise in order
to adjust the vertical aim of the
headlamp.
6. Repeat Steps 3 through 7 to adjust the
other headlamp.
7. Close the hood and turn off the lamps.
Horizontal Aim Adjustment
Horizontal aim is not required for this
vehicle and is not adjustable.
WASHER FLUID CHECK WARNING:
If you operate your
vehicle in temperatures below 41.0°F
(5°C), use washer fluid with antifreeze
protection. Failure to use washer fluid
with antifreeze protection in cold
weather could result in impaired
windshield vision and increase the risk
of injury or accident.
338
Expedition (TB8) Canada/United States of America, enUSA, Edition date: 201907, Third-Printing- MaintenanceE167358 E248807
Page 342 of 542
Note:
The front and rear washer systems
are supplied from the same reservoir.
Add fluid to fill the reservoir if the level is
low. Only use a washer fluid that meets
our specifications. See Capacities and
Specifications (page 380).
State or local regulations on volatile
organic compounds may restrict the use
of methanol, a common windshield washer
antifreeze additive. Washer fluids
containing non-methanol antifreeze
agents should be used only if they provide
cold weather protection without damaging
the vehicle ’s paint finish, wiper blades or
washer system.
FUEL FILTER
Your vehicle is equipped with a lifetime
fuel filter that is integrated with the fuel
tank. Regular maintenance or replacement
is not needed.
CHECKING THE WIPER
BLADES Run the tip of your fingers over the edge of
the blade to check for roughness.
Clean the wiper blades with washer fluid
or water applied with a soft sponge or
cloth. CHANGING THE WIPER
BLADES
Note:
Do not hold the wiper blade when
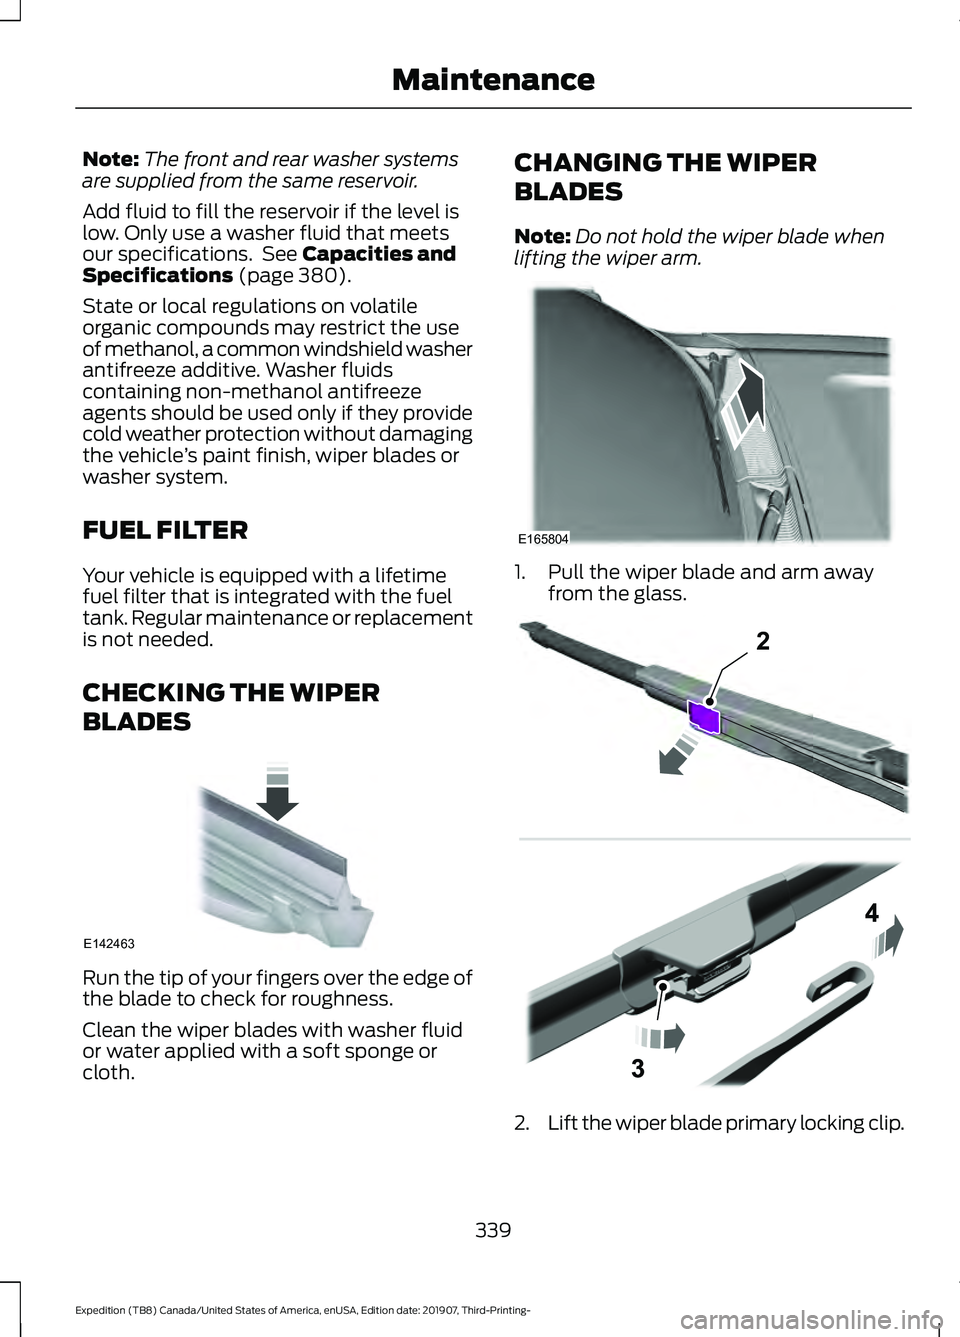
lifting the wiper arm. 1. Pull the wiper blade and arm away
from the glass. 2.
Lift the wiper blade primary locking clip.
339
Expedition (TB8) Canada/United States of America, enUSA, Edition date: 201907, Third-Printing- MaintenanceE142463 E165804 2E295620
Page 346 of 542
GENERAL INFORMATION
Your dealer has many quality products
available to clean your vehicle and protect
its finishes.
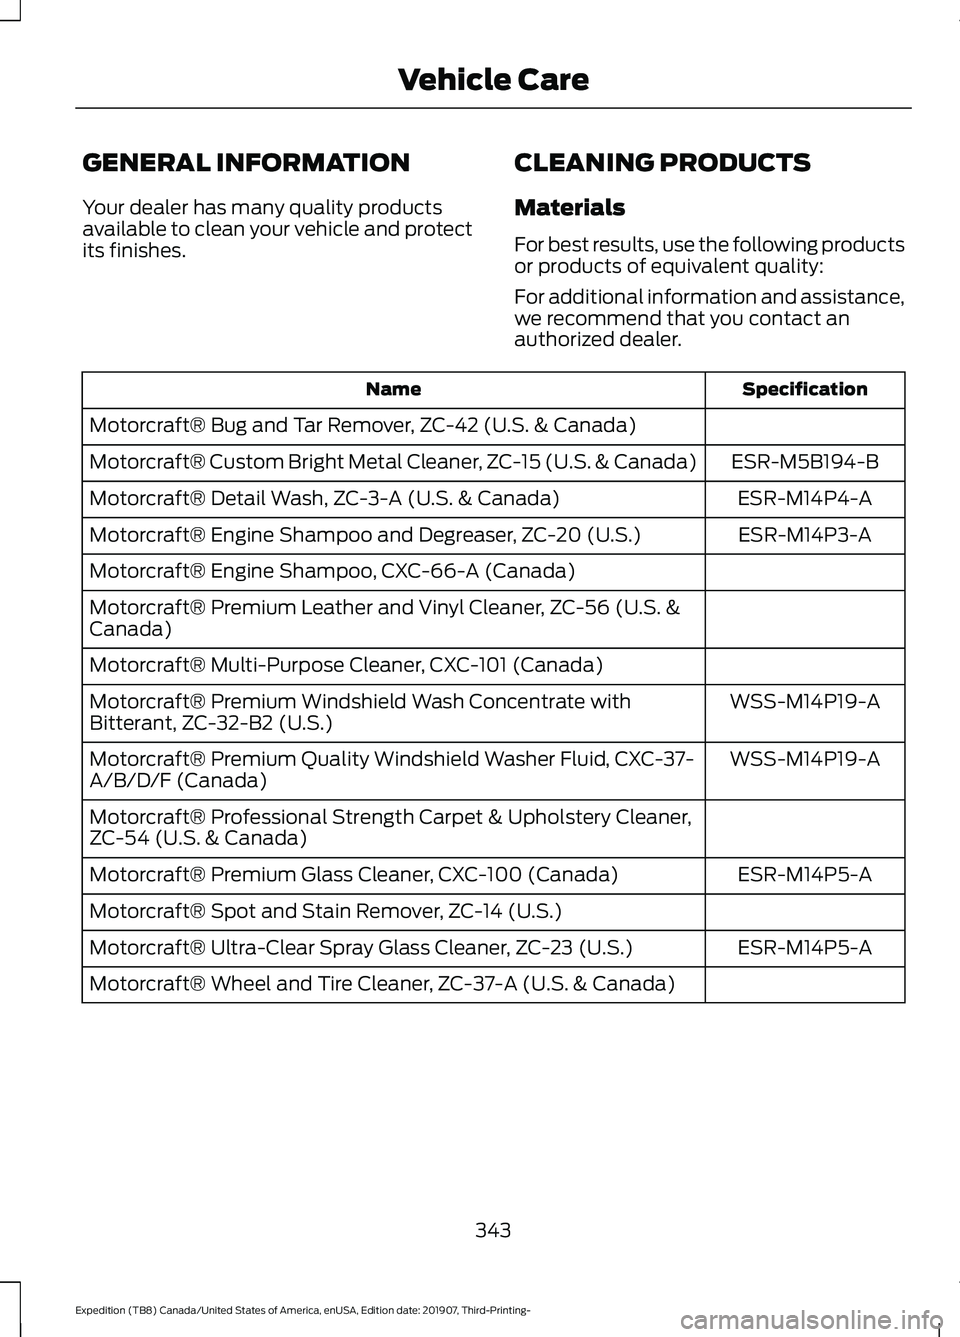
CLEANING PRODUCTS
Materials
For best results, use the following products
or products of equivalent quality:
For additional information and assistance,
we recommend that you contact an
authorized dealer. Specification
Name
Motorcraft® Bug and Tar Remover, ZC-42 (U.S. & Canada) ESR-M5B194-B
Motorcraft® Custom Bright Metal Cleaner, ZC-15 (U.S. & Canada)
ESR-M14P4-A
Motorcraft® Detail Wash, ZC-3-A (U.S. & Canada)
ESR-M14P3-A
Motorcraft® Engine Shampoo and Degreaser, ZC-20 (U.S.)
Motorcraft® Engine Shampoo, CXC-66-A (Canada)
Motorcraft® Premium Leather and Vinyl Cleaner, ZC-56 (U.S. &
Canada)
Motorcraft® Multi-Purpose Cleaner, CXC-101 (Canada)
WSS-M14P19-A
Motorcraft® Premium Windshield Wash Concentrate with
Bitterant, ZC-32-B2 (U.S.)
WSS-M14P19-A
Motorcraft® Premium Quality Windshield Washer Fluid, CXC-37-
A/B/D/F (Canada)
Motorcraft® Professional Strength Carpet & Upholstery Cleaner,
ZC-54 (U.S. & Canada)
ESR-M14P5-A
Motorcraft® Premium Glass Cleaner, CXC-100 (Canada)
Motorcraft® Spot and Stain Remover, ZC-14 (U.S.)
ESR-M14P5-A
Motorcraft® Ultra-Clear Spray Glass Cleaner, ZC-23 (U.S.)
Motorcraft® Wheel and Tire Cleaner, ZC-37-A (U.S. & Canada)
343
Expedition (TB8) Canada/United States of America, enUSA, Edition date: 201907, Third-Printing- Vehicle Care
Page 348 of 542
Underbody
Regularly clean the underside of your
vehicle using water. Keep body and door
drain holes free of debris or foreign
material.
Under Hood
For removing black rubber marks from
under the hood we recommend Motorcraft
Wheel and Tire Cleaner or Motorcraft Bug
and Tar Remover.
WAXING
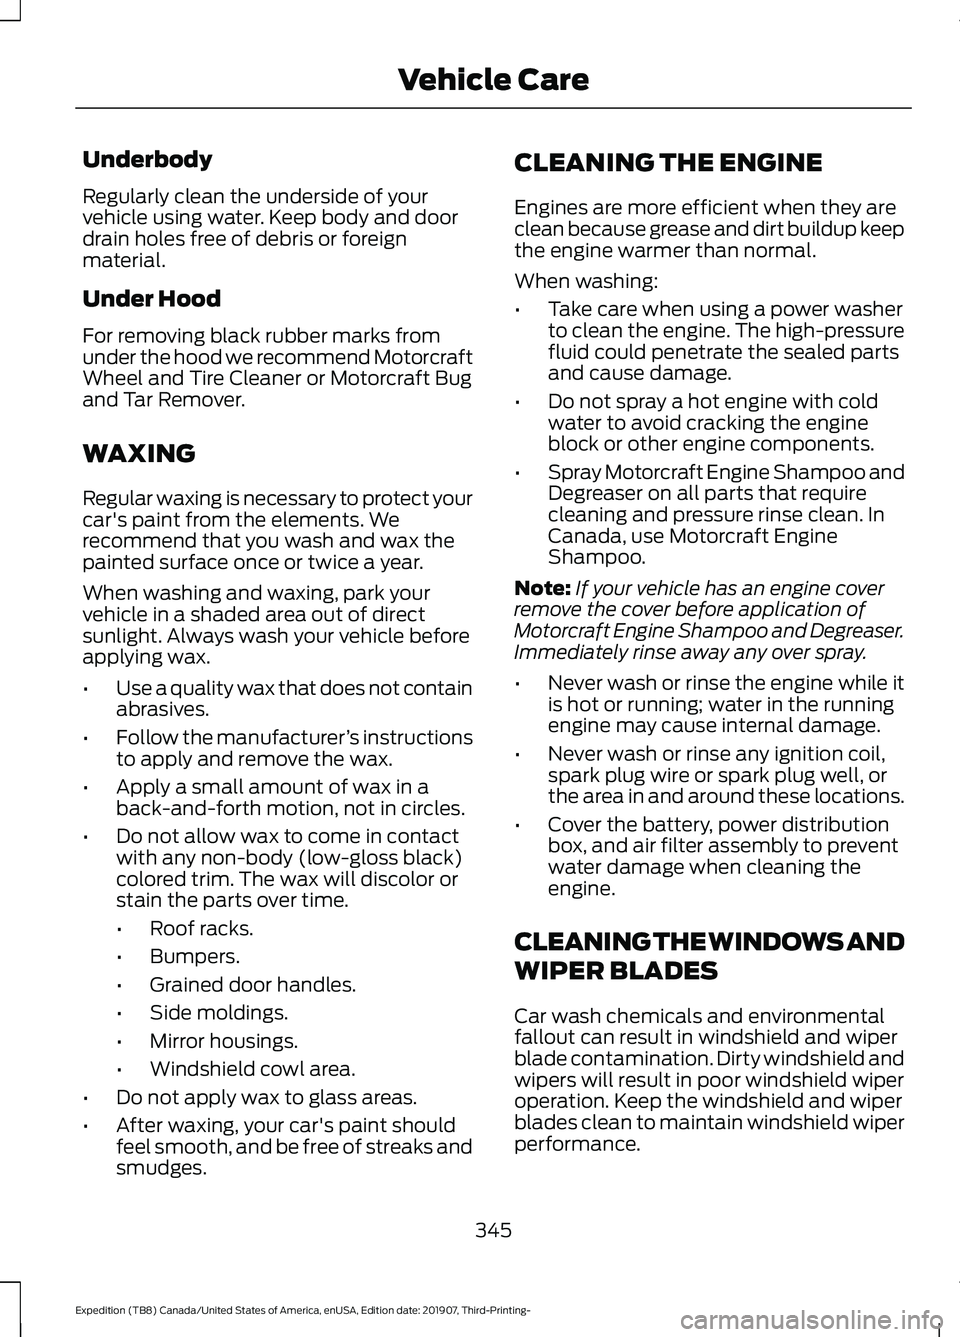
Regular waxing is necessary to protect your
car's paint from the elements. We
recommend that you wash and wax the
painted surface once or twice a year.
When washing and waxing, park your
vehicle in a shaded area out of direct
sunlight. Always wash your vehicle before
applying wax.
•
Use a quality wax that does not contain
abrasives.
• Follow the manufacturer ’s instructions
to apply and remove the wax.
• Apply a small amount of wax in a
back-and-forth motion, not in circles.
• Do not allow wax to come in contact
with any non-body (low-gloss black)
colored trim. The wax will discolor or
stain the parts over time.
•Roof racks.
• Bumpers.
• Grained door handles.
• Side moldings.
• Mirror housings.
• Windshield cowl area.
• Do not apply wax to glass areas.
• After waxing, your car's paint should
feel smooth, and be free of streaks and
smudges. CLEANING THE ENGINE
Engines are more efficient when they are
clean because grease and dirt buildup keep
the engine warmer than normal.
When washing:
•
Take care when using a power washer
to clean the engine. The high-pressure
fluid could penetrate the sealed parts
and cause damage.
• Do not spray a hot engine with cold
water to avoid cracking the engine
block or other engine components.
• Spray Motorcraft Engine Shampoo and
Degreaser on all parts that require
cleaning and pressure rinse clean. In
Canada, use Motorcraft Engine
Shampoo.
Note: If your vehicle has an engine cover
remove the cover before application of
Motorcraft Engine Shampoo and Degreaser.
Immediately rinse away any over spray.
• Never wash or rinse the engine while it
is hot or running; water in the running
engine may cause internal damage.
• Never wash or rinse any ignition coil,
spark plug wire or spark plug well, or
the area in and around these locations.
• Cover the battery, power distribution
box, and air filter assembly to prevent
water damage when cleaning the
engine.
CLEANING THE WINDOWS AND
WIPER BLADES
Car wash chemicals and environmental
fallout can result in windshield and wiper
blade contamination. Dirty windshield and
wipers will result in poor windshield wiper
operation. Keep the windshield and wiper
blades clean to maintain windshield wiper
performance.
345
Expedition (TB8) Canada/United States of America, enUSA, Edition date: 201907, Third-Printing- Vehicle Care