2020 DODGE JOURNEY instrument panel
[x] Cancel search: instrument panelPage 3 of 396

TABLE OF CONTENTS
1
2
3
4
5
6
7
8
9
10
11
1INTRODUCTION .. ............................................................................................................................ 7
2 GETTING TO KNOW YOUR VEHICLE . .
................................................................................. 9
3 GETTING TO KNOW YOUR INSTRUMENT PANEL . .
..................................................... 93
4 SAFETY .
........................................................................................................................................109
5 S
TARTING AND OPERATING . .
............................................................................................. 157
6 IN CASE OF EMERGENCY . .
................................................................................................... 189
7 SERVICING AND MAINTENANCE .
.
..................................................................................... 216
8 TECHNICAL SPECIFICATIONS . .
.......................................................................................... 256
9 MULTIMEDIA . .
............................................................................................................................ 265
10 CUSTOMER ASSISTANCE .
.
...................................................................................................380
11 INDEX . ............................................................................................................................................ 384
Page 5 of 396

3
CLIMATE CONTROLS ...........................................47
Manual Climate Control Overview .. ............ 47
Automatic Climate Controls Overview . . ...... 58
Climate Control Functions . . ......................... 70
Automatic Temperature Control (ATC) — If
Equipped . ..................................................... 70
O
perating Tips . . ........................................... 71
WINDOWS . . ..........................................................72
Power Windows .. ......................................... 72
Wind Buffeting . . .......................................... 74
POWER SUNROOF — IF EQUIPPED. . ...................74
Opening Sunroof .. ........................................ 75
Closing Sunroof . . .......................................... 75
Wind Buffeting . . ........................................... 75
Sunshade Operation. . .................................. 75
Anti Pinch Protect Feature . . ........................ 75
Sunroof Maintenance . . ................................ 75
Ignition Off Operation . . ................................ 76
HOOD. .....................................................................76
O pening ........................................................ 76
C losing . ......................................................... 76
L
IFTGATE . ...............................................................77
O pening ........................................................ 77
C argo Area Features . . ................................. 78
GARAGE DOOR OPENER — IF EQUIPPED . . ........80
Before You Begin Programming
HomeLink® . .
................................................ 80
Canadian/Gate Operator Programming . . ... 82Using HomeLink®.
.
...................................... 83
Security. ........................................................ 83
T roubleshooting Tips . . ................................. 83
General Information . . .................................. 84
INTERNAL EQUIPMENT . . ...................................... 84
Storage ......................................................... 84
C upholders . . ................................................ 86
Power Outlets. . ............................................. 87
Power Inverter — If Equipped . . ................... 89
Sunglasses Storage . . .................................. 90
ROOF LUGGAGE RACK — IF EQUIPPED . . .......... 91
GETTING TO KNOW YOUR
INSTRUMENT PANEL
INSTRUMENT CLUSTER ....................................... 93
Instrument Cluster Descriptions .. ............... 94
INSTRUMENT CLUSTER DISPLAY. . ..................... 95
Instrument Cluster Display Location And
Controls . ....................................................... 95
O
il Change Due . . ......................................... 96
Instrument Cluster Display Selectable
Menu Items . .
................................................ 96
Battery Saver On/Battery Saver Mode
Message — Electrical Load Reduction
Actions — If Equipped . .
............................... 99 WARNING LIGHTS AND MESSAGES .
.
............. 100
Red Warning Lights .. ................................. 100
Yellow Warning Lights . . ............................. 103
Green Indicator Lights . . ............................. 106
White Indicator Lights . . ............................. 106
Blue Indicator Lights . . ............................... 106
ONBOARD DIAGNOSTIC SYSTEM — OBD II . . . 107
Onboard Diagnostic System (OBD II)
Cybersecurity . .
........................................... 107
EMISSIONS INSPECTION AND MAINTENANCE
PROGRAMS . .
...................................................... 108
SAFETY
SAFETY FEATURES ............................................ 109
Anti-Lock Brake System (ABS) .. ............... 109
Electronic Brake Control (EBC) System. . .. 110
AUXILIARY DRIVING SYSTEMS . . ...................... 116
Tire Pressure Monitoring System
(TPMS) . ....................................................... 116
O
CCUPANT RESTRAINT SYSTEMS . . ............... 120
Occupant Restraint Systems Features .. .. 120
Important Safety Precautions . . ................. 121
Seat Belt Systems . . .................................. 121
Supplemental Restraint
Systems (SRS) . .
......................................... 130
Child Restraints . . ....................................... 139
Transporting Pets . . ................................... 154
Page 10 of 396

8
HOW TO USE THIS MANUAL
ESSENTIAL INFORMATION
Consult the Table of Contents to determine which section contains the
information you desire.
Since the specification of your vehicle depends on the items of equipment
or
dered, certain descriptions and illustrations may differ from your
vehicle's equipment.
The detailed Index at the back of this Owner's Manual contains a
c o
mplete listing of all subjects.
SYMBOLS
Some vehicle components have colored labels whose symbols indicate
precautions to be observed when using this component. Refer to
“Warning Lights and Messages” in “Getting To Know Your Instrument
Panel” for further information on the symbols used in your vehicle.
WARNINGS AND CAUTIONS
This Owner’s Manual contains WARNINGS against operating procedures
that could result in a collision, bodily injury and/or death. It also contains
CAUTIONS against procedures that could result in damage to your vehicle.
If you do not read this entire Owner’s Manual, you may miss important
information. Observe all Warnings and Cautions.
VEHICLE MODIFICATIONS/ALTERATIONS
WARNING!
Any modifications or alterations to this vehicle could seriously affect its
roadworthiness and safety and may lead to a collision resulting in
serious injury or death.
Page 42 of 396

40 GETTING TO KNOW YOUR VEHICLE
ILLUMINATED VANITY MIRRORS — IF
E
QUIPPED
An illuminated vanity mirror is on each sun
visor. To use the mirror, rotate the sun visor
downward and swing the mirror cover upward.
The light will turn on automatically. Closing the
mirror cover will turn off the light.
Illuminated Vanity Mirror
Sun Visor “Slide-On-Rod” Feature — If
Equipped
The sun visor “Slide-On-Rod” feature allows for
additional flexibility in positioning the sun visor
to block out the sun.
1. Fold down the sun visor.
2
. U nclip the visor from the center clip. 3
. P
ull the sun visor toward the inside rearview
m
irror to extend it.
EXTERIOR LIGHTS
MULTIFUNCTION LEVER
The multifunction lever controls the operation
of the turn signals, headlight beam selection
and passing lights. The multifunction lever is
located on the left side of the steering column.
Multifunction Lever
HEADLIGHTS
The headlight switch is located on the left side
of the instrument panel. This switch controls the
operation of the headlights, parking lights, instrument panel lights, instrument panel light
dimming, interior lights and fog lights
(if equipped).
Headlight Switch
Rotate the headlight switch clockwise to the
f i
rst detent for parking lights and instrument
panel light operation. Rotate the headlight
switch to the second detent for headlight,
parking light and instrument panel light
operation.
1 — Auto
2 — Rotate Headlight Switch
3 — Push Fog Light
4 — Rotate Dimmer
Page 45 of 396

GETTING TO KNOW YOUR VEHICLE 43
INTERIOR LIGHTS
COURTESY/INTERIOR LIGHTING
The interior lights come on when a door is
opened.
To protect the battery, the interior lights will turn
of
f automatically 10 minutes after the ignition is
p l
aced in the OFF position. This will occur if the
interior lights were switched on manually or are
on because a door is open. The battery
protection also includes the glove compartment
light. To restore interior light operation after
automatic battery protection is enabled (lights
off), either place the ignition in the ON/RUN
position or cycle the light switch.
Courtesy Lights
The overhead console has two courtesy lights.
The lights turn on when a front door, a rear door
or the liftgate is opened. If your vehicle is
equipped with Remote Keyless Entry, the lights
will also turn on when the unlock button on the
key fob is pushed. The courtesy lights also
function as reading lights. Push in on each lens
to turn these lights on while inside the vehicle.
Push the lens a second time to turn each light
off. You may adjust the direction of these lights by pushing the outside ring, which is identified
with four directional arrows.
Courtesy/Reading Light
Rear Dome Light
Rotate the instrument panel dimmer control
completely upward to the second detent to turn
on the rear dome light. The rear dome light will
remain on when the dimmer control is in this
position.
Rotate the dimmer control downward to the last
de
tent (off position). The rear dome light will
remain off when the doors are open.
Dimmer Controls
The dimmer control is part of the headlight
switch and is located on the driver’s side of the
instrument panel.
Instrument Panel Dimmer
Rotating the dimmer control upward with the
p a
rking lights or headlights on will increase the
brightness of the instrument panel lights.
Interior Light Defeat (Off)
Rotate the instrument panel dimmer control to
the extreme bottom (O) off position. The interior
lights will remain off when the doors are open.
Parade Mode (Daytime Brightness
Feature)
Rotate the dimmer control upward to the first
detent. This feature brightens all text displays
such as the odometer, instrument cluster
display, and radio when the parking lights or
headlights are on.
2
Page 49 of 396

GETTING TO KNOW YOUR VEHICLE 47
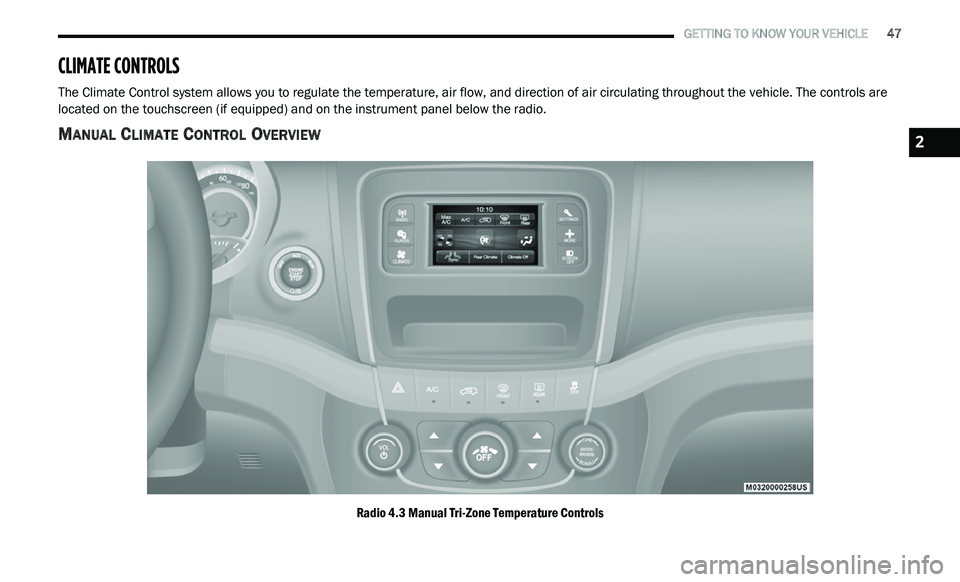
CLIMATE CONTROLS
The Climate Control system allows you to regulate the temperature, air flow, and direction of air circulating throughout the vehicle. The controls are
located on the touchscreen (if equipped) and on the instrument panel below the radio.
MANUAL CLIMATE CONTROL OVERVIEW
Radio 4.3 Manual Tri-Zone Temperature Controls
2
Page 52 of 396

50 GETTING TO KNOW YOUR VEHICLE
SYNC Button
Press the SYNC button on the touchscreen to toggle the SYNC feature on/off. The SYNC indicator illuminates when SYNC is
on
. SYNC synchronizes the front passenger temperature and rear passenger temperature/mode/blower settings with the
driver temperature/mode/blower settings. Changing the front passenger temperature or rear passenger temperature/
mode/blower settings while in SYNC will automatically exit this feature.
NOTE:
The SYNC button is only available on the touchscreen.
Rear Climate Control Button
Press and release this button to access the rear climate controls. The rear climate indicator illuminates when the rear
c li
mate controls screen is on.
Mode Control Mode Control
Select Mode by pressing one of the Mode buttons on the touchscreen to change the airflow distribution mode. The airflow
di
stribution mode can be adjusted so air comes from the instrument panel outlets, floor outlets, defrost outlets and demist
outlets. The Mode settings are as follows:
Panel Mode Panel Mode
Air comes from the outlets in the instrument panel. Each of these outlets can be individually adjusted to direct the flow of
ai
r. The air vents of the center outlets and outboard outlets can be moved up and down or side to side to regulate airflow
direction. There is a shut off wheel located below the air vanes to shut off or adjust the amount of airflow from these
outlets.
Icon Description
Page 53 of 396

GETTING TO KNOW YOUR VEHICLE 51
Bi-Level Mode Bi-Level Mode
Air comes from the instrument panel outlets and floor outlets. A slight amount of air is directed through the defrost and
si
de window demister outlets.
NOTE:
Bi-Level mode is designed under comfort conditions to provide cooler air out of the panel outlets and warmer air from the
f l
oor outlets.
Floor Mode Floor Mode
Air comes from the floor outlets. A slight amount of air is directed through the defrost and side window demister outlets.
Mix Mode Mix Mode
Air is directed through the floor, defrost, and side window demister outlets. This setting works best in cold or snowy
co
nditions that require extra heat to the windshield. This setting is good for maintaining comfort while reducing moisture on
the windshield.
A/C Button
Press and release this button on the touchscreen, or push the button on the faceplate to change the current setting.
The A/C indicator illuminates when A/C is on.
Icon Description
2