2020 DODGE JOURNEY light
[x] Cancel search: lightPage 273 of 396

MULTIMEDIA 271
Auto-On Comfort & Remote Start
After pressing the Auto-On Comfort & Remote Start button on the touchscreen, the following setting will be available:
Engine Off Options
After pressing the Engine Off Options button on the touchscreen, the following settings will be available:
Setting Name Selectable Options
Auto-On Driver Heated Seat & Steering Wheel
With Vehicle Start — If Equipped On
Off
NOTE:
When this feature is selected, the driver’s heated seat and heated steering wheel (if equipped) will automatically turn on when temperatures are
b e
low 40°F (4.4°C).
Setting NameSelectable Options
Engine Off Power Delay 0 sec
45 sec
5 min 10 min
NOTE:
When the “Engine Off Power Delay” feature is selected, the power window switches, radio, Uconnect phone system (if equipped), DVD video system
( i
f equipped), power sunroof (if equipped), and power outlets will remain active for up to 10 minutes after the ignition is cycled to OFF. Opening either
f r
ont door will cancel this feature.
Headlight Off Delay 0 sec
30 sec
60 sec 90 sec
NOTE:
When the “Headlight Off Delay” feature is selected, it allows the adjustment of the amount of time the headlights remain on after the engine is shut off.
9
Page 276 of 396

274 MULTIMEDIA
CUSTOMER PROGRAMMABLE FEATURES —
U
CONNECT 3/ 3 NAV SETTINGS
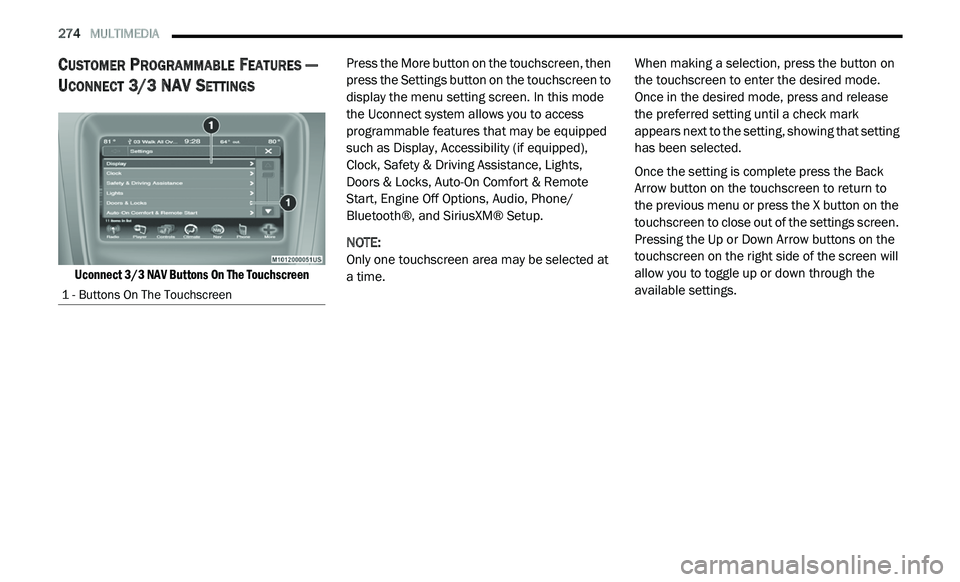
Uconnect 3/3 NAV Buttons On The Touchscreen
Press the More button on the touchscreen, then
p
r
ess the Settings button on the touchscreen to
display the menu setting screen. In this mode
the Uconnect system allows you to access
programmable features that may be equipped
such as Display, Accessibility (if equipped),
Clock, Safety & Driving Assistance, Lights,
Doors & Locks, Auto-On Comfort & Remote
Start, Engine Off Options, Audio, Phone/
Bluetooth®, and SiriusXM® Setup.
NOTE:
Only one touchscreen area may be selected at
a
time. When making a selection, press the button on
t
h
e touchscreen to enter the desired mode.
Once in the desired mode, press and release
the preferred setting until a check mark
appears next to the setting, showing that setting
has been selected.
Once the setting is complete press the Back
A r
row button on the touchscreen to return to
the previous menu or press the X button on the
touchscreen to close out of the settings screen.
Pressing the Up or Down Arrow buttons on the
touchscreen on the right side of the screen will
allow you to toggle up or down through the
available settings.
1 - Buttons On The Touchscreen
Page 277 of 396

MULTIMEDIA 275
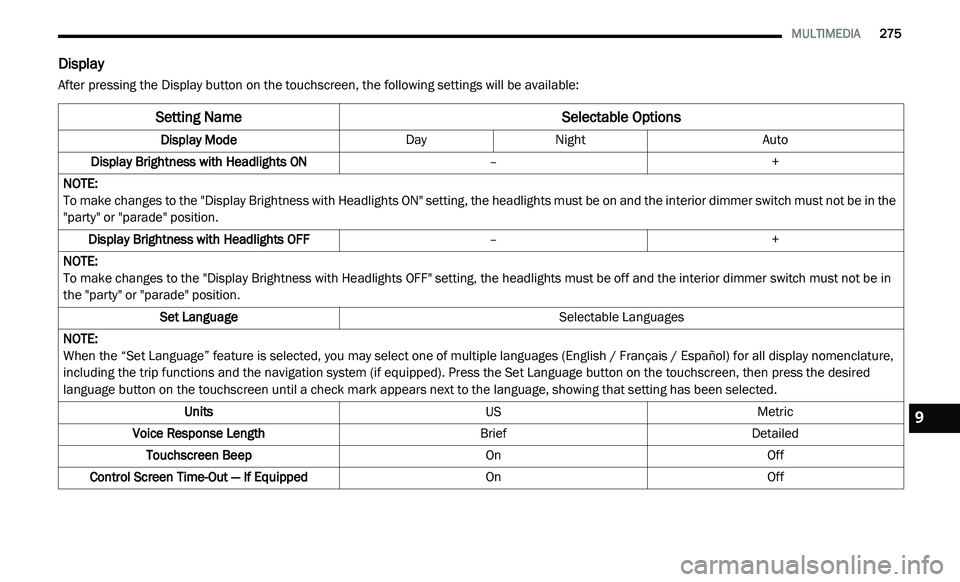
Display
After pressing the Display button on the touchscreen, the following settings will be available:
Setting Name Selectable Options
Display ModeDayNight Auto
Display Brightness with Headlights ON –+
NOTE:
To make changes to the "Display Brightness with Headlights ON" setting, the headlights must be on and the interior dimmer switch must not be in the
" p
arty" or "parade" position.
Display Brightness with Headlights OFF –+
NOTE:
To make changes to the "Display Brightness with Headlights OFF" setting, the headlights must be off and the interior dimmer switch must not be in
th
e "party" or "parade" position.
Set Language Selectable Languages
NOTE:
When the “Set Language” feature is selected, you may select one of multiple languages (English / Français / Español) for all display nomenclature,
in
cluding the trip functions and the navigation system (if equipped). Press the Set Language button on the touchscreen, then press the desired
language button on the touchscreen until a check mark appears next to the language, showing that setting has been selected.
Units USMetric
Voice Response Length BriefDetailed
Touchscreen Beep OnOff
Control Screen Time-Out — If Equipped OnOff
9
Page 280 of 396

278 MULTIMEDIA
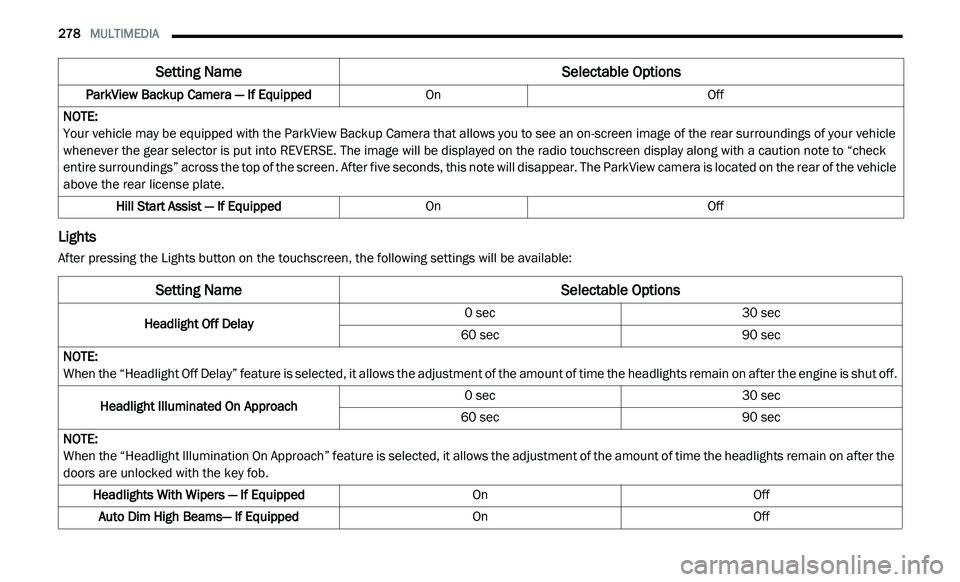
Lights
After pressing the Lights button on the touchscreen, the following settings will be available:ParkView Backup Camera — If Equipped
OnOff
NOTE:
Your vehicle may be equipped with the ParkView Backup Camera that allows you to see an on-screen image of the rear surroundings of your vehicle
w h
enever the gear selector is put into REVERSE. The image will be displayed on the radio touchscreen display along with a caution note to “check
entire surroundings” across the top of the screen. After five seconds, this note will disappear. The ParkView camera is located on the rear of the vehicle
above the rear license plate.
Hill Start Assist — If Equipped OnOff
Setting Name Selectable Options
Setting NameSelectable Options
Headlight Off Delay0 sec
30 sec
60 sec 90 sec
NOTE:
When the “Headlight Off Delay” feature is selected, it allows the adjustment of the amount of time the headlights remain on after the engine is shut off.
Headlight Illuminated On Approach 0 sec
30 sec
60 sec 90 sec
NOTE:
When the “Headlight Illumination On Approach” feature is selected, it allows the adjustment of the amount of time the headlights remain on after the
d o
ors are unlocked with the key fob.
Headlights With Wipers — If Equipped OnOff
Auto Dim High Beams— If Equipped OnOff
Page 281 of 396

MULTIMEDIA 279
Doors & Locks
After pressing the Doors & Locks button on the touchscreen, the following settings will be available:NOTE:
When the “Auto Dim High Beams” feature is selected, the high beam headlights activate/deactivate automatically under certain conditions.
Daytime Running Lights OnOff
NOTE:
When the “Daytime Running Lights” feature is selected, the daytime running lights can be turned On or Off. This feature is only available if allowed by
l a
w in the country of the vehicle purchase.
Steering Directed Headlights — If Equipped OnOff
NOTE:
The “Steering Directed Headlights” feature causes the headlights to turn relative to a change in direction of the steering wheel.
Flash Headlights With Lock OnOff
Setting Name Selectable Options
Setting NameSelectable Options
Auto Door Locks — If EquippedOnOff
NOTE:
When the “Auto Door Locks” feature is selected, all doors will lock automatically when the vehicle reaches a speed of 12 mph (20 km/h).
Auto Unlock On Exit OnOff
NOTE:
When this feature is selected, all doors will unlock when the vehicle is stopped, the transmission is in the PARK or NEUTRAL position and the driver's
d o
or is opened.
Flash Lamps With Lock OnOff
9
Page 283 of 396

MULTIMEDIA 281
Engine Off Options
After pressing the “Engine Off Options” button on the touchscreen, the following settings will be available:NOTE:
When this feature is selected the driver’s heated seat and heated steering wheel (if equipped) will automatically turn on when temperatures are below
40
°F (4.4°C).
Setting Name Selectable Options
Setting NameSelectable Options
Engine Off Power Delay0 sec
45 sec
5 mins 10 mins
NOTE:
When the “Engine Off Power Delay” feature is selected, the power window switches, radio, Uconnect phone system (if equipped), DVD video system
( i
f equipped), power sunroof (if equipped), and power outlets will remain active for up to 10 minutes after the ignition is cycled to OFF. Opening either
f r
ont door will cancel this feature.
Headlight Off Delay -+
NOTE:
When the “Headlight Off Delay” feature is selected, it allows the adjustment of the amount of time the headlights remain on after the engine is shut
of
f. Press the + or - buttons to transition from 0 seconds to 30, 60, or 90 seconds.
9
Page 304 of 396

302 MULTIMEDIA
Uconnect Phone Features
Emergency Assistance
If you are in an emergency and the mobile
ph
one is reachable:
Pick up the phone and manually dial the
emergency number for your area.
If the phone is not reachable and the Uconnect
P h
one is operational, you may reach the
emergency number as follows:
Push the Phone button to begin.
After the “Listening” prompt and the
following beep, say “Emergency” and the
Uconnect Phone will instruct the paired
mobile phone to call the emergency number.
This feature is supported in the US, Canada,
and Mexico.
NOTE:
The emergency number dialed is based on
the country where the vehicle is purchased
(911 for the US and Canada and 060 for
Mexico). The number dialed may not be appli -
cable with the available mobile service and
a r
ea.
The Uconnect Phone slightly lowers your
chances of successfully making a phone call
to the mobile phone directly.
Roadside Assistance/Towing Assistance
If you need roadside/towing assistance:
Push the Phone button to begin.
After the “Listening” prompt and the
following beep, say “Roadside Assistance” or
say “Towing Assistance.”
NOTE:
The roadside/towing assistance number dialed
i s
based on the country where the vehicle is
purchased (1-800-521-2779 for U.S.,
1-800-363-4869 for Canada, 55-14-3454 for
Mexico City and 1-800-712-3040 for outside
Mexico City in Mexico). Please refer to the FCA
US LLC 24-Hour “Roadside Assistance” coverage details in the Warranty Information
Booklet and on the 24-Hour Roadside Assis
-
tance Card.
Voice Mail Calling
To learn how to access your voice mail, refer to
“ W
orking with Automated Systems.”
Working With Automated Systems
This method is used in instances where one
g e
nerally has to push numbers on the mobile
phone keypad while navigating through an
automated telephone system.
You can use your Uconnect Phone to access a
v o
ice mail system or an automated service, such
as a paging service or automated customer
service line. Some services require immediate
response selection. In some instances, that may
be too quick for use of the Uconnect Phone.
When calling a number with your Uconnect
P h
one that normally requires you to enter in a
touch-tone sequence on your mobile phone
keypad, you can utilize the touchscreen or push
the Voice Command button and say the word
“Send” then the sequence you wish to enter.
F o
r example, if required to enter your PIN
followed with a pound, (3 7 4 6 #), you can push
WARNING!
Your phone must be turned on and connected
to the Uconnect Phone to allow use of this
vehicle feature in emergency situations, when
the mobile phone has network coverage and
stays connected
to the Uconnect Phone.
Page 309 of 396

MULTIMEDIA 307
4 — PLAYER
Press the Player button on the touchscreen to
ac
cess media sources such as: Disc, USB
Device, and AUX as long as the requested
media is present.
5 — CONTROLS
Press the Controls button on the touchscreen to
a c
cess the Settings list. Controls such as
Heated Seats, Heated Steering Wheel, Vented
Seats, etc. can be selected or turned on/off by
pressing the corresponding button.
6 — CLIMATE (Touchcreen Controls)
Refer to “Climate Controls” in “Getting To Know
Y o
ur Vehicle” for more information.
7 — NAV (Uconnect 3 NAV Only)
Press the Nav button on the touchscreen to
ac
cess the Navigation feature.
8 — PHONE — If Equipped
Press the Phone button on the touchscreen to
ac
cess the Uconnect Phone feature. Refer to
“Uconnect Phone” in this section for more
information. 9 — MORE
Press the More button on the touchscreen to
a
c
cess additional options. Options available
such as Settings and SiriusXM® Travel Link
(if equipped) can be accessed by pressing the
c o
rresponding button in the More Menu.
10 — ENTER/BROWSE & TUNE/SCROLL
Push the ENTER/BROWSE button to accept a
hi
ghlighted selection on the screen. Rotate the
TUNE/SCROLL rotary knob to scroll through a
list or tune a radio station.
11 — SD CARD SLOT
Insert an SD Card containing audio media files
t o
play them through the vehicle’s sound
system.
12 — DISC SLOT
When inserting a disc, ensure the label is facing
u p
. Push the Eject button to eject the disc.
RADIO MODE
Overview
Radio Mode
The radio is equipped with the following modes:
FM
AM
SAT SiriusXM® Satellite Radio (if equipped)
Press the Radio button, bottom left corner, to
e n
ter the Radio Mode. The different tuner
modes, AM, FM, and SAT, can be selected by
pressing the corresponding buttons in the
Radio mode.9