2020 DODGE CHARGER lock
[x] Cancel search: lockPage 245 of 412

IN CASE OF EMERGENCY243
MANUAL PARK RELEASE — 8 – SPEED
TRANSMISSION
To move the vehicle in cases where the
transmission will not shift out of PARK (such as
a depleted battery), a Manual Park Release is
available.
Follow these steps to use the Manual Park
Release:
1. Firmly apply the parking brake.
2. Remove the console storage bin.
Console Storage Bin
Manual Park Release Cover
3. Remove the plastic cover under the bin by using the slot provided to access the
Manual Park Release lever.
4. Using a small screwdriver or similar tool, fish the tether strap up through the opening
in the console base. 5. Press and maintain firm pressure on the
brake pedal.
6. Insert the screwdriver into the slot in the center of the lever, and disengage the lever
locking tab by pushing it to the right.
Engaging The Lever
7. While holding the locking tab in the disengaged position, pull the tether strap to
rotate the lever up and rearward, until it
locks in place in the vertical position. The
vehicle is now out of PARK and can be
moved. Release the parking brake only
when the vehicle is securely connected to a
tow vehicle.
WARNING!
Always secure your vehicle by fully applying
the parking brake before activating the
Manual Park Release. In addition, you should
be seated in the driver's seat with your foot
firmly on the brake pedal when activating the
Manual Park Release. Activating the Manual
Park Release will allow your vehicle to roll
away if it is not secured by the parking brake,
or by proper connection to a tow vehicle.
Activating the Manual Park Release on an
unsecured vehicle could lead to serious injury
or death for those in or around the vehicle.
6
20_LD_OM_EN_USC_t.book Page 243
Page 246 of 412

244IN CASE OF EMERGENCY
To Reset The Manual Park Release:
1. Push the latch (at the base of the lever, on
the rear side) rearward (away from the
lever) to unlatch the lever.
Disengaging The Lever
2. Rotate the Manual Park Release lever forward and down, to its original position,
until the locking tab snaps into place to
secure the lever. 3. Pull up gently on the tether strap to confirm
that the lever is locked in its stowed
position.
4. Tuck the tether strap into the base of the console. Reinstall the Manual Park Release
cover and the console storage bin.
FREEING A STUCK VEHICLE
If your vehicle becomes stuck in mud, sand, or
snow, it can often be moved using a rocking
motion. Turn the steering wheel right and left to
clear the area around the front wheels. Push
and hold the lock button on the gear selector.
Then, shift back and forth between DRIVE and
REVERSE while gently pressing the accelerator.
Use the least amount of accelerator pedal
pressure that will maintain the rocking motion,
without spinning the wheels or racing the
engine. NOTE:
Shifts between DRIVE and REVERSE can only
be achieved at wheel speeds of 5 mph
(8 km/h) or less. Whenever the transmission
remains in NEUTRAL for more than two
seconds, you must press the brake pedal to
engage DRIVE or REVERSE.
Push the "ESC OFF" switch, to place the Elec
-
tronic Stability Control (ESC) system in
"Partial Off" mode, before rocking the vehicle.
Refer to “Electronic Brake Control System” in
“Safety” for further information. Once the
vehicle has been freed, push the "ESC OFF"
switch again to restore "ESC On" mode.
20_LD_OM_EN_USC_t.book Page 244
Page 279 of 412
SERVICING AND MAINTENANCE277
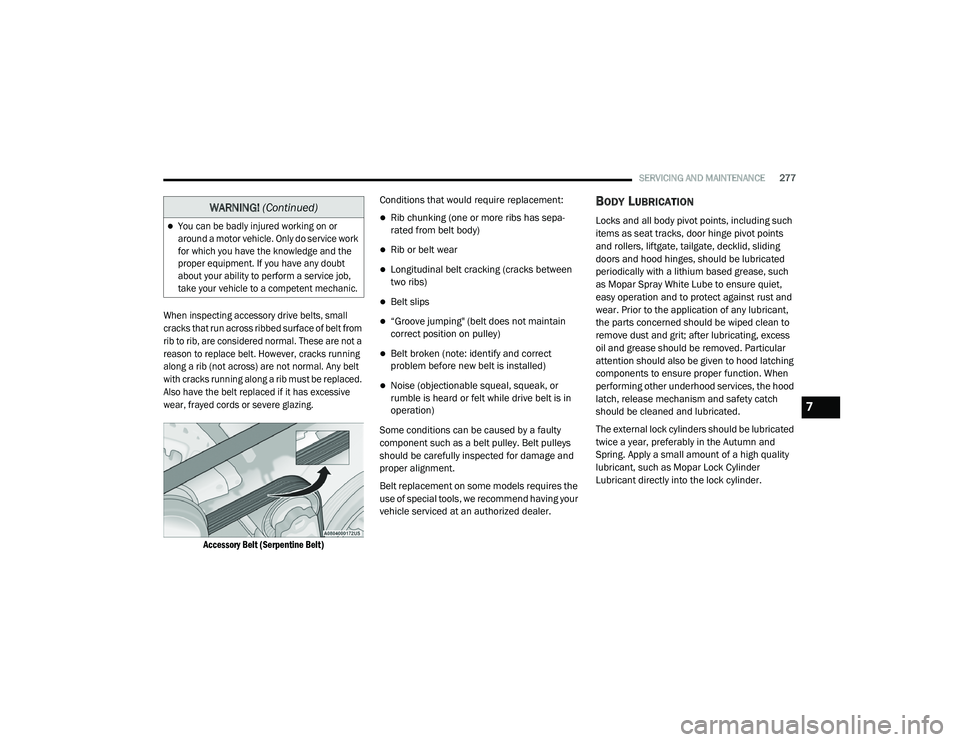
When inspecting accessory drive belts, small
cracks that run across ribbed surface of belt from
rib to rib, are considered normal. These are not a
reason to replace belt. However, cracks running
along a rib (not across) are not normal. Any belt
with cracks running along a rib must be replaced.
Also have the belt replaced if it has excessive
wear, frayed cords or severe glazing.
Accessory Belt (Serpentine Belt)
Conditions that would require replacement:
Rib chunking (one or more ribs has sepa
-
rated from belt body)
Rib or belt wear
Longitudinal belt cracking (cracks between
two ribs)
Belt slips
“Groove jumping" (belt does not maintain
correct position on pulley)
Belt broken (note: identify and correct
problem before new belt is installed)
Noise (objectionable squeal, squeak, or
rumble is heard or felt while drive belt is in
operation)
Some conditions can be caused by a faulty
component such as a belt pulley. Belt pulleys
should be carefully inspected for damage and
proper alignment.
Belt replacement on some models requires the
use of special tools, we recommend having your
vehicle serviced at an authorized dealer.
BODY LUBRICATION
Locks and all body pivot points, including such
items as seat tracks, door hinge pivot points
and rollers, liftgate, tailgate, decklid, sliding
doors and hood hinges, should be lubricated
periodically with a lithium based grease, such
as Mopar Spray White Lube to ensure quiet,
easy operation and to protect against rust and
wear. Prior to the application of any lubricant,
the parts concerned should be wiped clean to
remove dust and grit; after lubricating, excess
oil and grease should be removed. Particular
attention should also be given to hood latching
components to ensure proper function. When
performing other underhood services, the hood
latch, release mechanism and safety catch
should be cleaned and lubricated.
The external lock cylinders should be lubricated
twice a year, preferably in the Autumn and
Spring. Apply a small amount of a high quality
lubricant, such as Mopar Lock Cylinder
Lubricant directly into the lock cylinder.
You can be badly injured working on or
around a motor vehicle. Only do service work
for which you have the knowledge and the
proper equipment. If you have any doubt
about your ability to perform a service job,
take your vehicle to a competent mechanic.
WARNING! (Continued)
7
20_LD_OM_EN_USC_t.book Page 277
Page 280 of 412
278SERVICING AND MAINTENANCE
WINDSHIELD WIPER BLADES
Clean the rubber edges of the wiper blades and
the windshield periodically with a sponge or soft
cloth and a mild nonabrasive cleaner. This will
remove accumulations of salt or road film.
Operation of the wipers on dry glass for long
periods may cause deterioration of the wiper
blades. Always use washer fluid when using the
wipers to remove salt or dirt from a dry
windshield.
Avoid using the wiper blades to remove frost or
ice from the windshield. Keep the blade rubber
out of contact with petroleum products such as
engine oil, gasoline, etc.
NOTE:
Life expectancy of wiper blades varies
depending on geographical area and frequency
of use. Poor performance of blades may be
present with chattering, marks, water lines or
wet spots. If any of these conditions are
present, clean the wiper blades or replace as
necessary.
Wiper Blade Removal/Installation
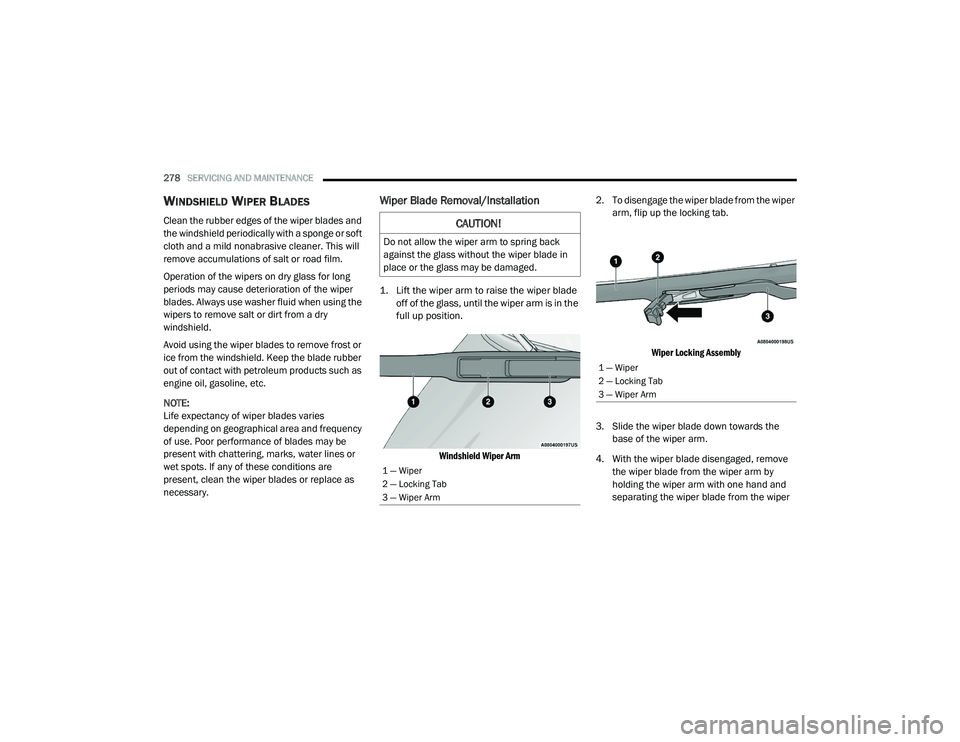
1. Lift the wiper arm to raise the wiper blade
off of the glass, until the wiper arm is in the
full up position.
Windshield Wiper Arm
2. To disengage the wiper blade from the wiper
arm, flip up the locking tab.
Wiper Locking Assembly
3. Slide the wiper blade down towards the base of the wiper arm.
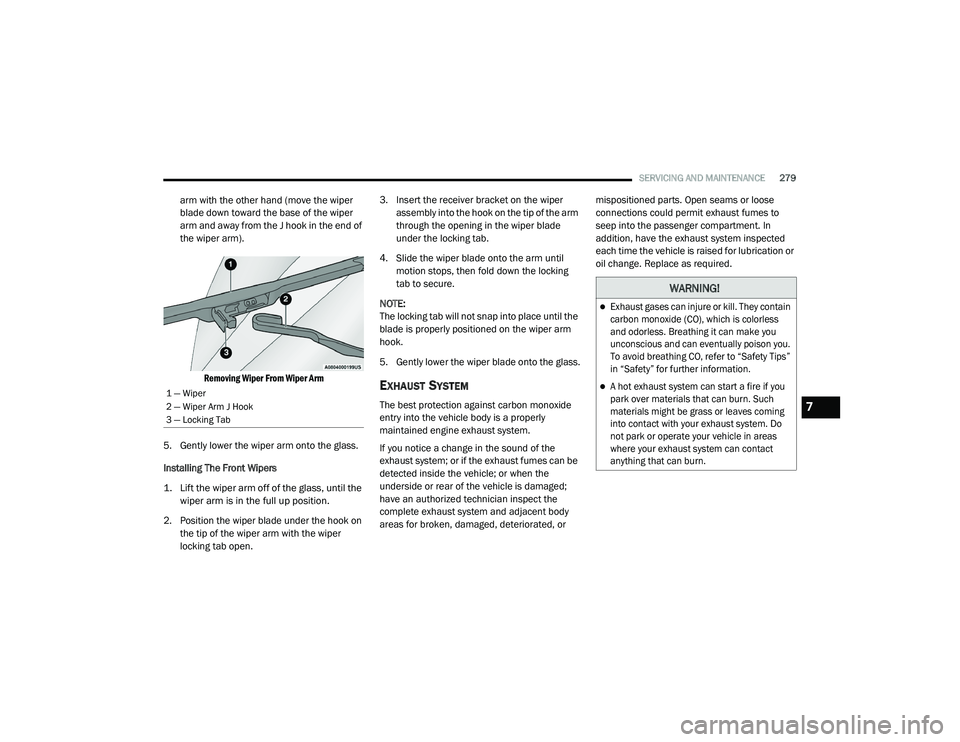
4. With the wiper blade disengaged, remove the wiper blade from the wiper arm by
holding the wiper arm with one hand and
separating the wiper blade from the wiper
CAUTION!
Do not allow the wiper arm to spring back
against the glass without the wiper blade in
place or the glass may be damaged.
1 — Wiper
2 — Locking Tab
3 — Wiper Arm
1 — Wiper
2 — Locking Tab
3 — Wiper Arm
20_LD_OM_EN_USC_t.book Page 278
Page 281 of 412
SERVICING AND MAINTENANCE279
arm with the other hand (move the wiper
blade down toward the base of the wiper
arm and away from the J hook in the end of
the wiper arm).
Removing Wiper From Wiper Arm
5. Gently lower the wiper arm onto the glass.
Installing The Front Wipers
1. Lift the wiper arm off of the glass, until the wiper arm is in the full up position.
2. Position the wiper blade under the hook on the tip of the wiper arm with the wiper
locking tab open. 3. Insert the receiver bracket on the wiper
assembly into the hook on the tip of the arm
through the opening in the wiper blade
under the locking tab.
4. Slide the wiper blade onto the arm until motion stops, then fold down the locking
tab to secure.
NOTE:
The locking tab will not snap into place until the
blade is properly positioned on the wiper arm
hook.
5. Gently lower the wiper blade onto the glass.
EXHAUST SYSTEM
The best protection against carbon monoxide
entry into the vehicle body is a properly
maintained engine exhaust system.
If you notice a change in the sound of the
exhaust system; or if the exhaust fumes can be
detected inside the vehicle; or when the
underside or rear of the vehicle is damaged;
have an authorized technician inspect the
complete exhaust system and adjacent body
areas for broken, damaged, deteriorated, or mispositioned parts. Open seams or loose
connections could permit exhaust fumes to
seep into the passenger compartment. In
addition, have the exhaust system inspected
each time the vehicle is raised for lubrication or
oil change. Replace as required.1 — Wiper
2 — Wiper Arm J Hook
3 — Locking Tab
WARNING!
Exhaust gases can injure or kill. They contain
carbon monoxide (CO), which is colorless
and odorless. Breathing it can make you
unconscious and can eventually poison you.
To avoid breathing CO, refer to “Safety Tips”
in “Safety” for further information.
A hot exhaust system can start a fire if you
park over materials that can burn. Such
materials might be grass or leaves coming
into contact with your exhaust system. Do
not park or operate your vehicle in areas
where your exhaust system can contact
anything that can burn.
7
20_LD_OM_EN_USC_t.book Page 279
Page 328 of 412

326MULTIMEDIA
Clock
After pressing the Clock button on the touchscreen, the following settings will be available:
Camera
After pressing the Camera button on the touchscreen, the following settings will be available:
Setting Name Selectable Options
Sync Time With GPS — If Equipped OnOff
NOTE:
The “Sync Time With GPS” feature will allow you to automatically have the radio set the time. Set Time +–
Set Time Minutes +–
Time Format 12 hrs24 hrs
Show Time In Status Bar — If Equipped OnOff
NOTE:
The “Show Time In Status Bar” feature will allow you to turn on or shut off the digital clock in the status bar.
Setting Name Selectable Options
ParkView Backup Camera Delay OnOff
NOTE:
The “ParkView Backup Camera Delay” setting determines whether or not the screen will display the rear view image with dynamic grid lines for up to
10 seconds after the vehicle is shifted out of REVERSE. This delay will be canceled if the vehicle’s speed exceeds 8 mph (13 km/h), the transmission
is shifted into PARK, or the ignition is switched to the OFF position.
20_LD_OM_EN_USC_t.book Page 326
Page 333 of 412
MULTIMEDIA331
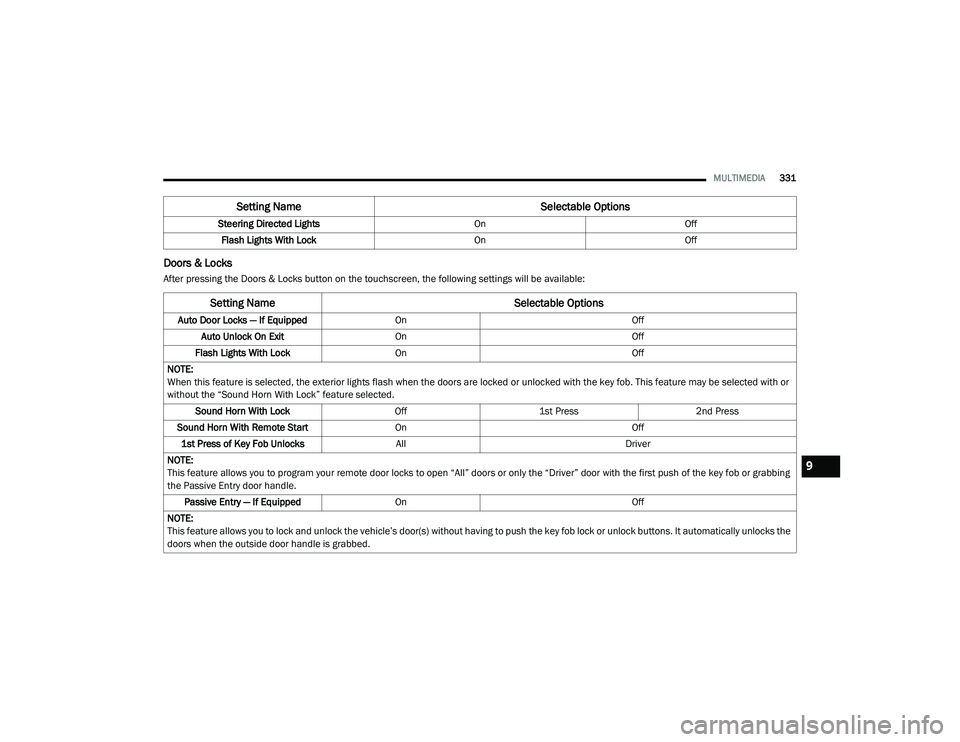
Doors & Locks
After pressing the Doors & Locks button on the touchscreen, the following settings will be available:Steering Directed Lights
OnOff
Flash Lights With Lock OnOff
Setting Name Selectable Options
Setting NameSelectable Options
Auto Door Locks — If EquippedOn Off
Auto Unlock On Exit On Off
Flash Lights With Lock On Off
NOTE:
When this feature is selected, the exterior lights flash when the doors are locked or unlocked with the key fob. This feature may be selected with or
without the “Sound Horn With Lock” feature selected. Sound Horn With Lock Off1st Press 2nd Press
Sound Horn With Remote Start On Off
1st Press of Key Fob Unlocks All Driver
NOTE:
This feature allows you to program your remote door locks to open “All” doors or only the “Driver” door with the first push of the key fob or grabbing
the Passive Entry door handle. Passive Entry — If Equipped On Off
NOTE:
This feature allows you to lock and unlock the vehicle’s door(s) without having to push the key fob lock or unlock buttons. It automatically unlocks the
doors when the outside door handle is grabbed.
9
20_LD_OM_EN_USC_t.book Page 331
Page 334 of 412
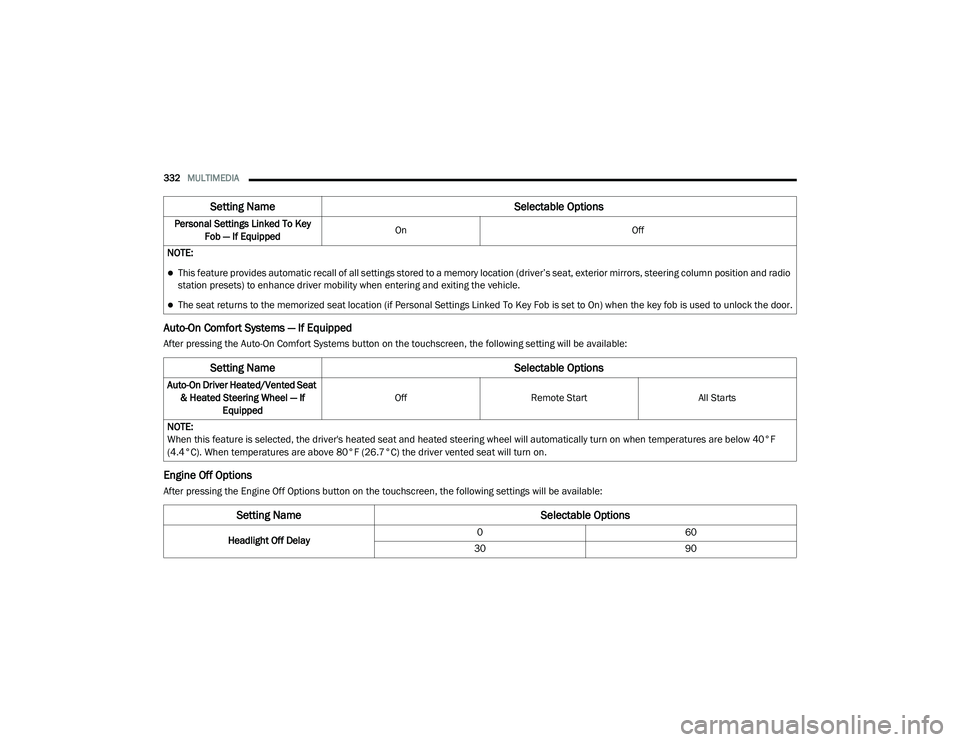
332MULTIMEDIA
Auto-On Comfort Systems — If Equipped
After pressing the Auto-On Comfort Systems button on the touchscreen, the following setting will be available:
Engine Off Options
After pressing the Engine Off Options button on the touchscreen, the following settings will be available:Personal Settings Linked To Key
Fob — If Equipped On
Off
NOTE:
This feature provides automatic recall of all settings stored to a memory location (driver’s seat, exterior mirrors, steering column position and radio
station presets) to enhance driver mobility when entering and exiting the vehicle.
The seat returns to the memorized seat location (if Personal Settings Linked To Key Fob is set to On) when the key fob is used to unlock the door.
Setting Name Selectable Options
Setting NameSelectable Options
Auto-On Driver Heated/Vented Seat
& Heated Steering Wheel — If Equipped Off
Remote Start All Starts
NOTE:
When this feature is selected, the driver's heated seat and heated steering wheel will automatically turn on when temperatures are below 40°F
(4.4°C). When temperatures are above 80°F (26.7°C) the driver vented seat will turn on.
Setting Name Selectable Options
Headlight Off Delay0
60
30 90
20_LD_OM_EN_USC_t.book Page 332