2020 DODGE CHARGER service schedule
[x] Cancel search: service schedulePage 7 of 412

5
PARKSENSE REAR PARK ASSIST —
IF EQUIPPED ....................................................... 191 ParkSense Sensors ...................................192
ParkSense Warning Display ......................192
ParkSense Display ..................................... 192Enabling And Disabling ParkSense ..........194
Service The ParkSense Rear Park
Assist System .............................................195 Cleaning The ParkSense System ..............195
ParkSense System Usage Precautions ....195
LANESENSE — IF EQUIPPED ........................... 196
LaneSense Operation ................................196Turning LaneSense On Or Off ...................196LaneSense Warning Message ..................197
Changing LaneSense Status .....................199
PARKVIEW REAR BACK UP CAMERA ............. 199
REFUELING THE VEHICLE ................................. 200
VEHICLE LOADING ............................................ 202
Vehicle Certification Label ........................ 202Gross Vehicle Weight Rating (GVWR) .......202
Gross Axle Weight Rating (GAWR) ........... 202Overloading ................................................202
Loading ......................................................203
TRAILER TOWING .............................................. 203
Common Towing Definitions .....................203Trailer Hitch Classification ........................ 205Trailer Towing Weights (Maximum Trailer
Weight Ratings) ..........................................205 Trailer And Tongue Weight ....................... 206
Towing Requirements................................ 206
Towing Tips ................................................ 209
RECREATIONAL TOWING (BEHIND MOTORHOME,
ETC.) ....................................................................210
DRIVING TIPS ...................................................... 210
Driving On Slippery Surfaces .................... 210
Driving Through Water .............................. 211
IN CASE OF EMERGENCY
HAZARD WARNING FLASHERS .......................212
ASSIST AND SOS MIRROR — IF EQUIPPED .... 212General Information .................................. 216
BULB REPLACEMENT ........................................ 217
Replacement Bulbs ................................... 217
Replacing Exterior Bulbs ........................... 219
FUSES ..................................................................220
General Information .................................. 220Underhood Fuses ...................................... 221
Rear Interior Fuses .................................... 225
JACKING AND TIRE CHANGING ........................229
Jack Location/Spare Tire Stowage ........... 230
Preparations For Jacking........................... 230
Jacking And Changing A Tire ..................... 231Road Tire Installation ................................ 234 TIRE SERVICE KIT — IF EQUIPPED ................... 234
Tire Service Kit Storage............................. 234
Tire Service Kit Components And
Operation ................................................... 235 Tire Service Kit Usage Precautions .......... 235Sealing A Tire With Tire Service Kit .......... 237
JUMP STARTING ............................................... 240
Preparations For Jump Start ..................... 240
Jump Starting Procedure .......................... 241
IF YOUR ENGINE OVERHEATS ......................... 242
MANUAL PARK RELEASE — 8 – SPEED
TRANSMISSION ................................................. 243
FREEING A STUCK VEHICLE ............................. 244
SRT — TOWING A DISABLED VEHICLE ............ 246
NON SRT — TOWING A DISABLED VEHICLE ... 248 All Wheel Drive (AWD) Models .................. 249Rear-Wheel Drive (RWD) Models ............. 249
ENHANCED ACCIDENT RESPONSE SYSTEM
(EARS) ................................................................ 249
EVENT DATA RECORDER (EDR) ....................... 249
SERVICING AND MAINTENANCE
SCHEDULED SERVICING .................................. 250
3.6L And 5.7L Engines ............................. 250
6.2L Supercharged And 6.4L Engines ..... 254
20_LD_OM_EN_USC_t.book Page 5
Page 252 of 412
250
SERVICING AND MAINTENANCE
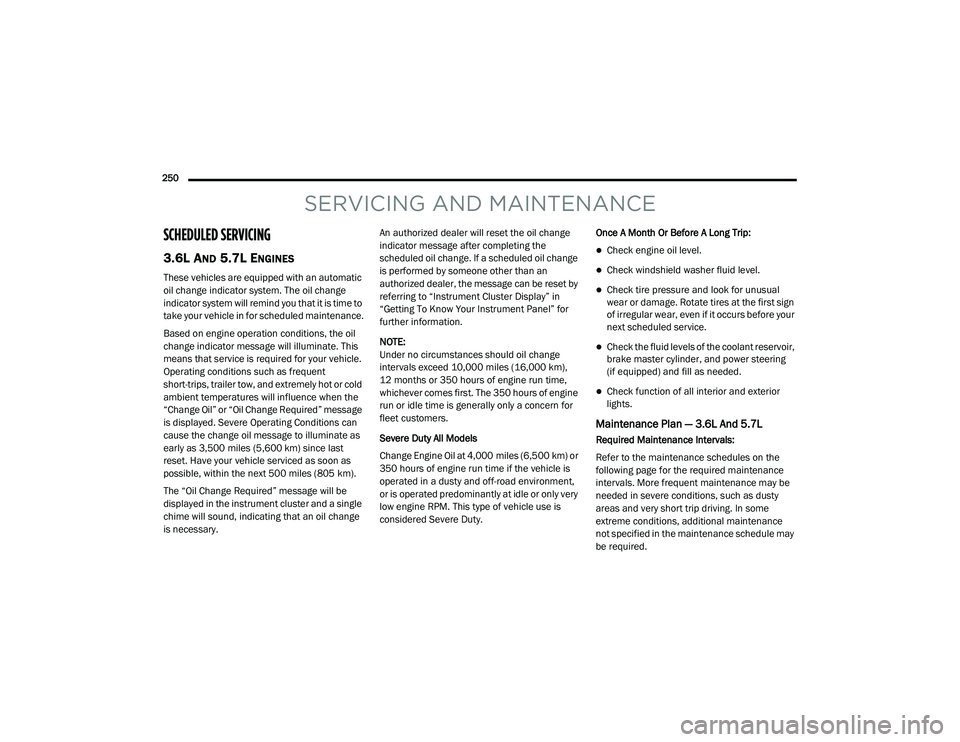
SCHEDULED SERVICING
3.6L AND 5.7L ENGINES
These vehicles are equipped with an automatic
oil change indicator system. The oil change
indicator system will remind you that it is time to
take your vehicle in for scheduled maintenance.
Based on engine operation conditions, the oil
change indicator message will illuminate. This
means that service is required for your vehicle.
Operating conditions such as frequent
short-trips, trailer tow, and extremely hot or cold
ambient temperatures will influence when the
“Change Oil” or “Oil Change Required” message
is displayed. Severe Operating Conditions can
cause the change oil message to illuminate as
early as 3,500 miles (5,600 km) since last
reset. Have your vehicle serviced as soon as
possible, within the next 500 miles (805 km).
The “Oil Change Required” message will be
displayed in the instrument cluster and a single
chime will sound, indicating that an oil change
is necessary.An authorized dealer will reset the oil change
indicator message after completing the
scheduled oil change. If a scheduled oil change
is performed by someone other than an
authorized dealer, the message can be reset by
referring to “Instrument Cluster Display” in
“Getting To Know Your Instrument Panel” for
further information.
NOTE:
Under no circumstances should oil change
intervals exceed 10,000 miles (16,000 km),
12 months or 350 hours of engine run time,
whichever comes first. The 350 hours of engine
run or idle time is generally only a concern for
fleet customers.
Severe Duty All Models
Change Engine Oil at 4,000 miles (6,500 km) or
350 hours of engine run time if the vehicle is
operated in a dusty and off-road environment,
or is operated predominantly at idle or only very
low engine RPM. This type of vehicle use is
considered Severe Duty.
Once A Month Or Before A Long Trip:
Check engine oil level.
Check windshield washer fluid level.
Check tire pressure and look for unusual
wear or damage. Rotate tires at the first sign
of irregular wear, even if it occurs before your
next scheduled service.
Check the fluid levels of the coolant reservoir,
brake master cylinder, and power steering
(if equipped) and fill as needed.
Check function of all interior and exterior
lights.
Maintenance Plan — 3.6L And 5.7L
Required Maintenance Intervals:
Refer to the maintenance schedules on the
following page for the required maintenance
intervals. More frequent maintenance may be
needed in severe conditions, such as dusty
areas and very short trip driving. In some
extreme conditions, additional maintenance
not specified in the maintenance schedule may
be required.
20_LD_OM_EN_USC_t.book Page 250
Page 253 of 412
SERVICING AND MAINTENANCE251
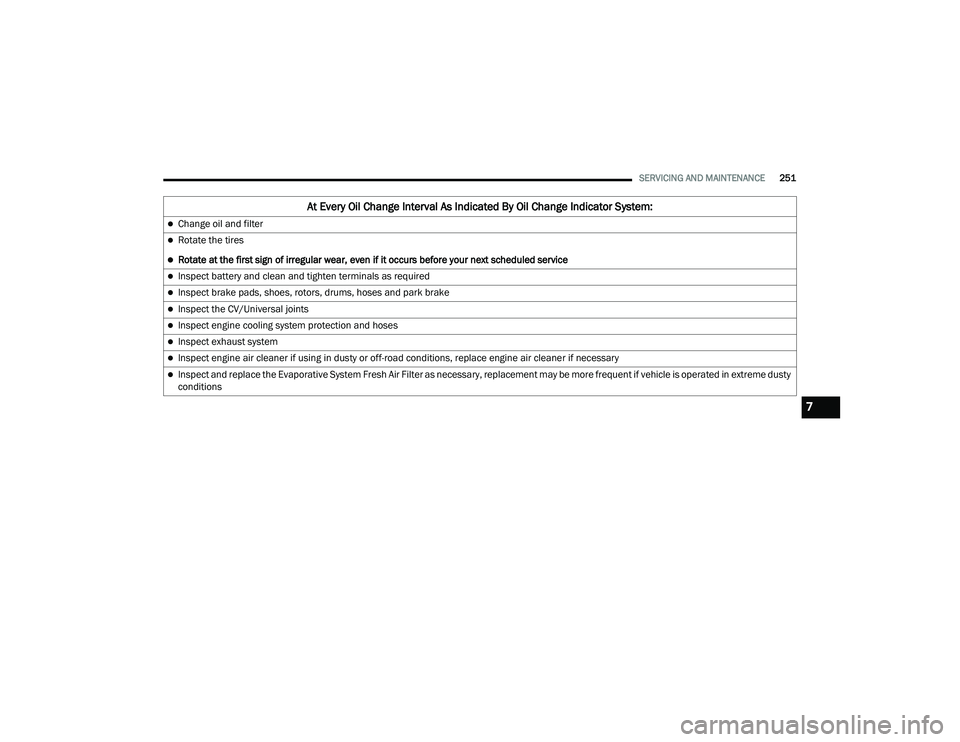
At Every Oil Change Interval As Indicated By Oil Change Indicator System:
Change oil and filter
Rotate the tires
Rotate at the first sign of irregular wear, even if it occurs before your next scheduled service
Inspect battery and clean and tighten terminals as required
Inspect brake pads, shoes, rotors, drums, hoses and park brake
Inspect the CV/Universal joints
Inspect engine cooling system protection and hoses
Inspect exhaust system
Inspect engine air cleaner if using in dusty or off-road conditions, replace engine air cleaner if necessary
Inspect and replace the Evaporative System Fresh Air Filter as necessary, replacement may be more frequent if vehicle is operated in extreme dusty
conditions
7
20_LD_OM_EN_USC_t.book Page 251
Page 256 of 412
254SERVICING AND MAINTENANCE
Heavy Duty Use Of The Vehicle
Change engine oil at 4,000 miles (6,500 km) or
350 hours of engine run time if the vehicle is
operated in a dusty and off road environment or
is operated predominately at idle or only very
low engine RPM. This type of vehicle use is
considered Severe Duty.
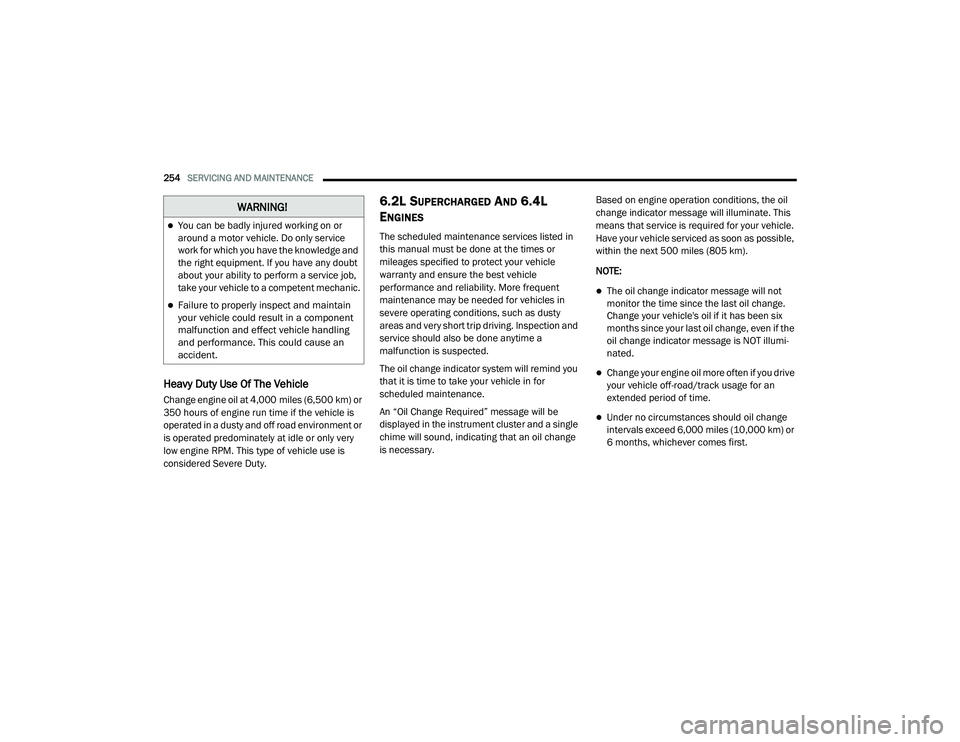
6.2L SUPERCHARGED AND 6.4L
E
NGINES
The scheduled maintenance services listed in
this manual must be done at the times or
mileages specified to protect your vehicle
warranty and ensure the best vehicle
performance and reliability. More frequent
maintenance may be needed for vehicles in
severe operating conditions, such as dusty
areas and very short trip driving. Inspection and
service should also be done anytime a
malfunction is suspected.
The oil change indicator system will remind you
that it is time to take your vehicle in for
scheduled maintenance.
An “Oil Change Required” message will be
displayed in the instrument cluster and a single
chime will sound, indicating that an oil change
is necessary. Based on engine operation conditions, the oil
change indicator message will illuminate. This
means that service is required for your vehicle.
Have your vehicle serviced as soon as possible,
within the next 500 miles (805 km).
NOTE:
The oil change indicator message will not
monitor the time since the last oil change.
Change your vehicle's oil if it has been six
months since your last oil change, even if the
oil change indicator message is NOT illumi-
nated.
Change your engine oil more often if you drive
your vehicle off-road/track usage for an
extended period of time.
Under no circumstances should oil change
intervals exceed 6,000 miles (10,000 km) or
6 months, whichever comes first.
WARNING!
You can be badly injured working on or
around a motor vehicle. Do only service
work for which you have the knowledge and
the right equipment. If you have any doubt
about your ability to perform a service job,
take your vehicle to a competent mechanic.
Failure to properly inspect and maintain
your vehicle could result in a component
malfunction and effect vehicle handling
and performance. This could cause an
accident.
20_LD_OM_EN_USC_t.book Page 254
Page 274 of 412
272SERVICING AND MAINTENANCE
DEALER SERVICE
An authorized dealer has the qualified service
personnel, special tools, and equipment to
perform all service operations in an expert
manner. Service Manuals are available which
include detailed service information for your
vehicle. Refer to these Service Manuals before
attempting any procedure yourself.
NOTE:
Intentional tampering with emissions control
systems may void your warranty and could
result in civil penalties being assessed against
you.
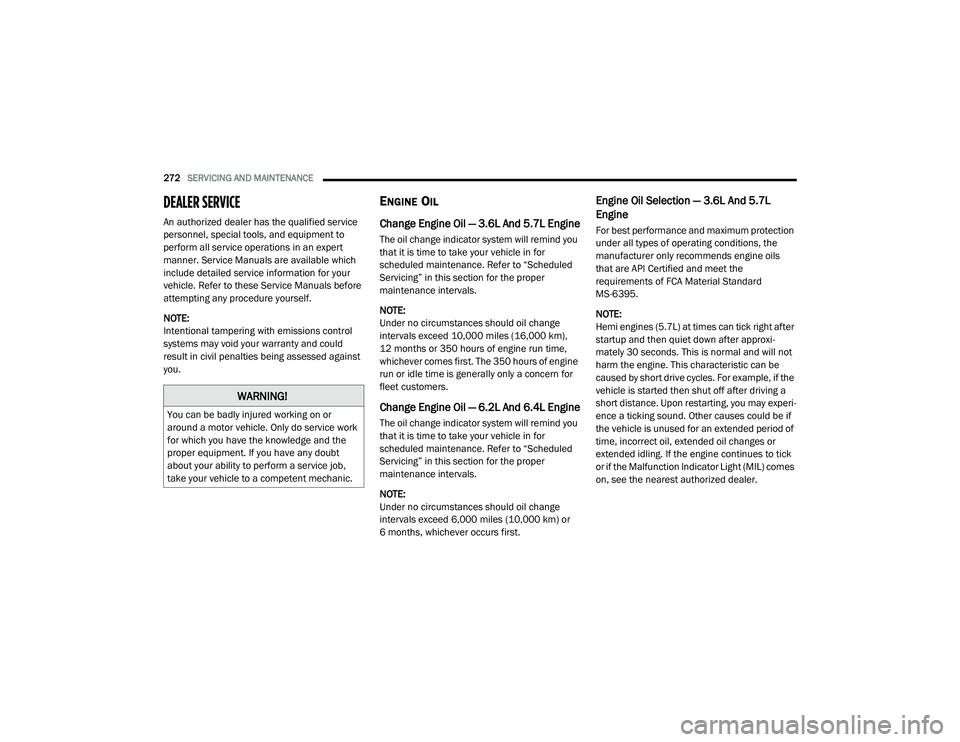
ENGINE OIL
Change Engine Oil — 3.6L And 5.7L Engine
The oil change indicator system will remind you
that it is time to take your vehicle in for
scheduled maintenance. Refer to “Scheduled
Servicing” in this section for the proper
maintenance intervals.
NOTE:
Under no circumstances should oil change
intervals exceed 10,000 miles (16,000 km),
12 months or 350 hours of engine run time,
whichever comes first. The 350 hours of engine
run or idle time is generally only a concern for
fleet customers.
Change Engine Oil — 6.2L And 6.4L Engine
The oil change indicator system will remind you
that it is time to take your vehicle in for
scheduled maintenance. Refer to “Scheduled
Servicing” in this section for the proper
maintenance intervals.
NOTE:
Under no circumstances should oil change
intervals exceed 6,000 miles (10,000 km) or
6 months, whichever occurs first.
Engine Oil Selection — 3.6L And 5.7L
Engine
For best performance and maximum protection
under all types of operating conditions, the
manufacturer only recommends engine oils
that are API Certified and meet the
requirements of FCA Material Standard
MS-6395.
NOTE:
Hemi engines (5.7L) at times can tick right after
startup and then quiet down after approxi -
mately 30 seconds. This is normal and will not
harm the engine. This characteristic can be
caused by short drive cycles. For example, if the
vehicle is started then shut off after driving a
short distance. Upon restarting, you may experi -
ence a ticking sound. Other causes could be if
the vehicle is unused for an extended period of
time, incorrect oil, extended oil changes or
extended idling. If the engine continues to tick
or if the Malfunction Indicator Light (MIL) comes
on, see the nearest authorized dealer.
WARNING!
You can be badly injured working on or
around a motor vehicle. Only do service work
for which you have the knowledge and the
proper equipment. If you have any doubt
about your ability to perform a service job,
take your vehicle to a competent mechanic.
20_LD_OM_EN_USC_t.book Page 272
Page 278 of 412
276SERVICING AND MAINTENANCE
(Continued)
recommends that air conditioning service be
performed by an authorized dealer using
recovery and recycling equipment.
NOTE:
Use only manufacturer approved A/C system
PAG compressor oil, and refrigerants.
A/C Air Filter
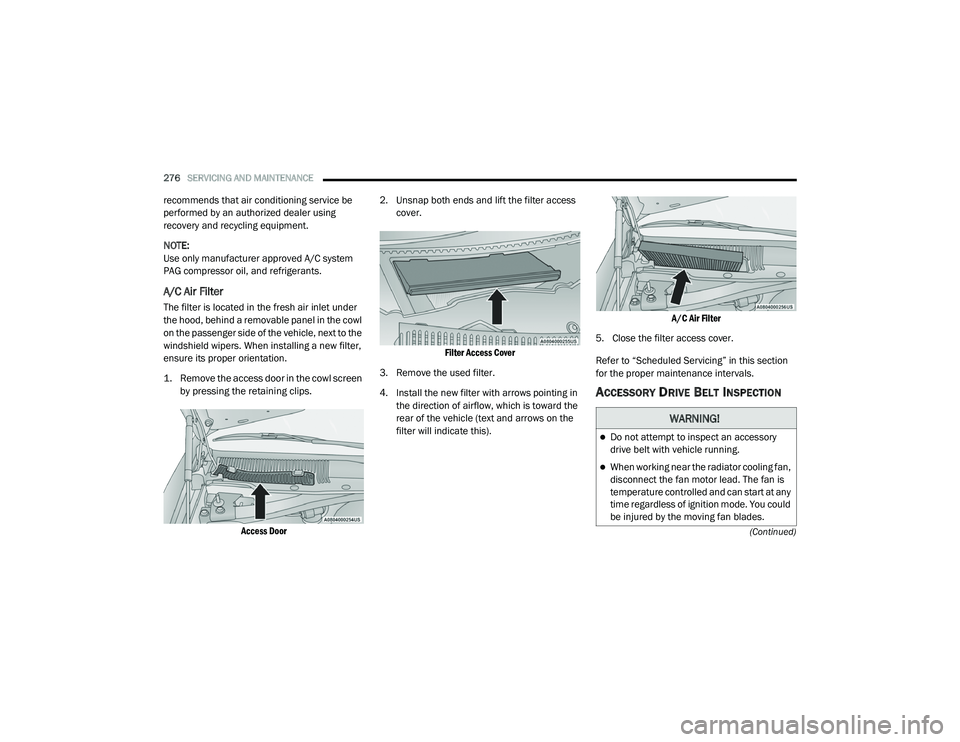
The filter is located in the fresh air inlet under
the hood, behind a removable panel in the cowl
on the passenger side of the vehicle, next to the
windshield wipers. When installing a new filter,
ensure its proper orientation.
1. Remove the access door in the cowl screen by pressing the retaining clips.
Access Door
2. Unsnap both ends and lift the filter access
cover.
Filter Access Cover
3. Remove the used filter.
4. Install the new filter with arrows pointing in the direction of airflow, which is toward the
rear of the vehicle (text and arrows on the
filter will indicate this).
A/C Air Filter
5. Close the filter access cover.
Refer to “Scheduled Servicing” in this section
for the proper maintenance intervals.
ACCESSORY DRIVE BELT INSPECTION
WARNING!
Do not attempt to inspect an accessory
drive belt with vehicle running.
When working near the radiator cooling fan,
disconnect the fan motor lead. The fan is
temperature controlled and can start at any
time regardless of ignition mode. You could
be injured by the moving fan blades.
20_LD_OM_EN_USC_t.book Page 276
Page 298 of 412
296SERVICING AND MAINTENANCE
limited driving capabilities and needs to be
replaced immediately. A Run Flat tire is not
repairable. When a run flat tire is changed after
driving with underinflated tire condition, please
replace the TPM sensor as it is not designed to
be reused when driven under run flat mode 14
psi (96 kPa) condition.
NOTE:
TPM Sensor must be replaced after driving the
vehicle on a flat tire condition.
It is not recommended driving a vehicle loaded
at full capacity or to tow a trailer while a tire is in
the run flat mode.
See the tire pressure monitoring section for
more information.
Tire Spinning
When stuck in mud, sand, snow, or ice conditions,
do not spin your vehicle's wheels above 30 mph
(48 km/h) or for longer than 30 seconds
continuously without stopping.
Refer to “Freeing A Stuck Vehicle” in “In Case Of
Emergency” for further information.
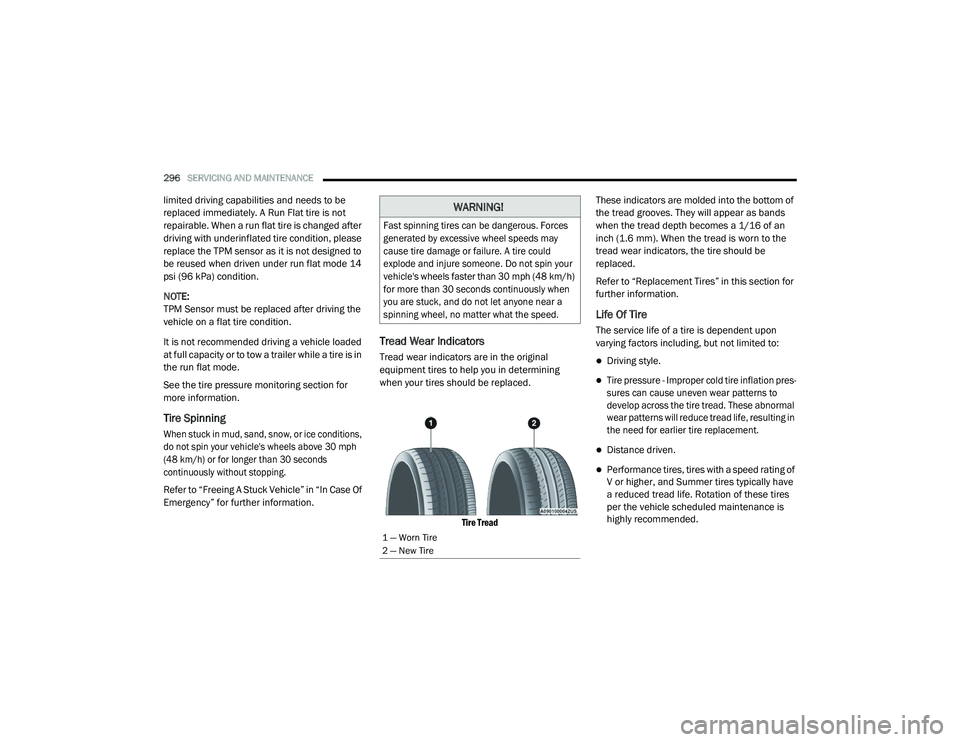
Tread Wear Indicators
Tread wear indicators are in the original
equipment tires to help you in determining
when your tires should be replaced.
Tire Tread
These indicators are molded into the bottom of
the tread grooves. They will appear as bands
when the tread depth becomes a 1/16 of an
inch (1.6 mm). When the tread is worn to the
tread wear indicators, the tire should be
replaced.
Refer to “Replacement Tires” in this section for
further information.
Life Of Tire
The service life of a tire is dependent upon
varying factors including, but not limited to:
Driving style.
Tire pressure - Improper cold tire inflation pres
-
sures can cause uneven wear patterns to
develop across the tire tread. These abnormal
wear patterns will reduce tread life, resulting in
the need for earlier tire replacement.
Distance driven.
Performance tires, tires with a speed rating of
V or higher, and Summer tires typically have
a reduced tread life. Rotation of these tires
per the vehicle scheduled maintenance is
highly recommended.
WARNING!
Fast spinning tires can be dangerous. Forces
generated by excessive wheel speeds may
cause tire damage or failure. A tire could
explode and injure someone. Do not spin your
vehicle's wheels faster than 30 mph (48 km/h)
for more than 30 seconds continuously when
you are stuck, and do not let anyone near a
spinning wheel, no matter what the speed.
1 — Worn Tire
2 — New Tire
20_LD_OM_EN_USC_t.book Page 296
Page 305 of 412

SERVICING AND MAINTENANCE303
TIRE ROTATION RECOMMENDATIONS —
SRT
Tires on the front and rear axles of vehicles
operate at different loads and perform different
steering, driving, and braking functions. For
these reasons, they wear at unequal rates.
These effects can be reduced by timely rotation
of tires. The benefits of rotation are especially
worthwhile with aggressive tread designs such
as those on all season type tires. Rotation will
increase tread life, help to maintain mud, snow
and wet traction levels, and contribute to a
smooth, quiet ride.
Refer to “Scheduled Servicing” in “Servicing
And Maintenance” for the proper maintenance
intervals. The reasons for any rapid or unusual
wear should be corrected prior to rotation being
performed.
Tire Rotation — Same Tire Size On Front And
Rear Axle
The suggested rotation method for vehicles
equipped with non directional three season and
all season tires is the “forward cross” as shown
in the following diagram.
Tire Rotation (Forward Cross)
DEPARTMENT OF TRANSPORTATION
UNIFORM TIRE QUALITY GRADES
The following tire grading categories
were established by the National
Highway Traffic Safety Administration.
The specific grade rating assigned by the
tire's manufacturer in each category is
shown on the sidewall of the tires on
your vehicle.
All passenger vehicle tires must conform
to Federal safety requirements in
addition to these grades.
TREADWEAR
The Treadwear grade is a comparative
rating, based on the wear rate of the tire
when tested under controlled conditions
on a specified government test course.
For example, a tire graded 150 would
wear one and one-half times as well on
the government course as a tire graded
100. The relative performance of tires
depends upon the actual conditions of
their use, however, and may depart
significantly from the norm due to
variations in driving habits, service
practices, and differences in road
characteristics and climate.
TRACTION GRADES
The Traction grades, from highest to
lowest, are AA, A, B, and C. These grades
represent the tire's ability to stop on wet
pavement, as measured under controlled
conditions on specified government test
surfaces of asphalt and concrete. A tire
marked C may have poor traction
performance.
7
20_LD_OM_EN_USC_t.book Page 303