2020 DODGE CHARGER weight
[x] Cancel search: weightPage 7 of 412

5
PARKSENSE REAR PARK ASSIST —
IF EQUIPPED ....................................................... 191 ParkSense Sensors ...................................192
ParkSense Warning Display ......................192
ParkSense Display ..................................... 192Enabling And Disabling ParkSense ..........194
Service The ParkSense Rear Park
Assist System .............................................195 Cleaning The ParkSense System ..............195
ParkSense System Usage Precautions ....195
LANESENSE — IF EQUIPPED ........................... 196
LaneSense Operation ................................196Turning LaneSense On Or Off ...................196LaneSense Warning Message ..................197
Changing LaneSense Status .....................199
PARKVIEW REAR BACK UP CAMERA ............. 199
REFUELING THE VEHICLE ................................. 200
VEHICLE LOADING ............................................ 202
Vehicle Certification Label ........................ 202Gross Vehicle Weight Rating (GVWR) .......202
Gross Axle Weight Rating (GAWR) ........... 202Overloading ................................................202
Loading ......................................................203
TRAILER TOWING .............................................. 203
Common Towing Definitions .....................203Trailer Hitch Classification ........................ 205Trailer Towing Weights (Maximum Trailer
Weight Ratings) ..........................................205 Trailer And Tongue Weight ....................... 206
Towing Requirements................................ 206
Towing Tips ................................................ 209
RECREATIONAL TOWING (BEHIND MOTORHOME,
ETC.) ....................................................................210
DRIVING TIPS ...................................................... 210
Driving On Slippery Surfaces .................... 210
Driving Through Water .............................. 211
IN CASE OF EMERGENCY
HAZARD WARNING FLASHERS .......................212
ASSIST AND SOS MIRROR — IF EQUIPPED .... 212General Information .................................. 216
BULB REPLACEMENT ........................................ 217
Replacement Bulbs ................................... 217
Replacing Exterior Bulbs ........................... 219
FUSES ..................................................................220
General Information .................................. 220Underhood Fuses ...................................... 221
Rear Interior Fuses .................................... 225
JACKING AND TIRE CHANGING ........................229
Jack Location/Spare Tire Stowage ........... 230
Preparations For Jacking........................... 230
Jacking And Changing A Tire ..................... 231Road Tire Installation ................................ 234 TIRE SERVICE KIT — IF EQUIPPED ................... 234
Tire Service Kit Storage............................. 234
Tire Service Kit Components And
Operation ................................................... 235 Tire Service Kit Usage Precautions .......... 235Sealing A Tire With Tire Service Kit .......... 237
JUMP STARTING ............................................... 240
Preparations For Jump Start ..................... 240
Jump Starting Procedure .......................... 241
IF YOUR ENGINE OVERHEATS ......................... 242
MANUAL PARK RELEASE — 8 – SPEED
TRANSMISSION ................................................. 243
FREEING A STUCK VEHICLE ............................. 244
SRT — TOWING A DISABLED VEHICLE ............ 246
NON SRT — TOWING A DISABLED VEHICLE ... 248 All Wheel Drive (AWD) Models .................. 249Rear-Wheel Drive (RWD) Models ............. 249
ENHANCED ACCIDENT RESPONSE SYSTEM
(EARS) ................................................................ 249
EVENT DATA RECORDER (EDR) ....................... 249
SERVICING AND MAINTENANCE
SCHEDULED SERVICING .................................. 250
3.6L And 5.7L Engines ............................. 250
6.2L Supercharged And 6.4L Engines ..... 254
20_LD_OM_EN_USC_t.book Page 5
Page 73 of 412

GETTING TO KNOW YOUR VEHICLE71
GARAGE DOOR OPENER — IF EQUIPPED
HomeLink® replaces up to three hand-held
transmitters that operate devices such as
garage door openers, motorized gates, lighting
or home security systems. The HomeLink® unit
is powered by your vehicle’s battery. The HomeLink® buttons, located on either the
overhead console, headliner or sunvisor,
designate the three different HomeLink®
channels. The HomeLink® indicator is located
above the center button.
Overhead Console HomeLink® Buttons
NOTE:
HomeLink® is disabled when the Vehicle
Security Alarm is active.
BEFORE YOU BEGIN PROGRAMMING
H
OMELINK®
Be sure that your vehicle is parked outside of
the garage before you begin programming.
For more efficient programming and accurate
transmission of the Radio Frequency (RF) signal
it is recommended that a new battery be placed in the hand-held transmitter of the device that is
being programmed to the HomeLink® system.
To erase the channels, place the ignition in the
ON/RUN position, and push and hold the two
outside HomeLink® buttons (I and III) for up to
20 seconds or until the orange indicator
flashes.
NOTE:
Erasing all channels should only be
performed when programming HomeLink®
for the first time. Do not erase channels when
programming additional buttons.
If you have any problems, or require assis
-
tance, please call toll-free 1-800-355-3515
or, on the Internet at HomeLink.com for infor -
mation or assistance.
Programming A Rolling Code
For programming garage door openers that
were manufactured after 1995. These garage
door openers can be identified by the “LEARN”
or “TRAIN” button located where the hanging
antenna is attached to the garage door opener.
The weight and position of cargo and
passengers can change the vehicle center of
gravity and vehicle handling. To avoid loss of
control resulting in personal injury, follow
these guidelines for loading your vehicle:
Always place cargo evenly on the cargo
floor. Put heavier objects as low and as far
forward as possible.
Place as much cargo as possible in front of
the rear axle. Too much weight or improp
-
erly placed weight over or behind the rear
axle can cause the rear of the vehicle to
sway.
Do not pile luggage or cargo higher than the
top of the seatback. This could impair visi-
bility or become a dangerous projectile in a
sudden stop or collision.
WARNING! (Continued)
2
20_LD_OM_EN_USC_t.book Page 71
Page 146 of 412

144SAFETY
(Continued)
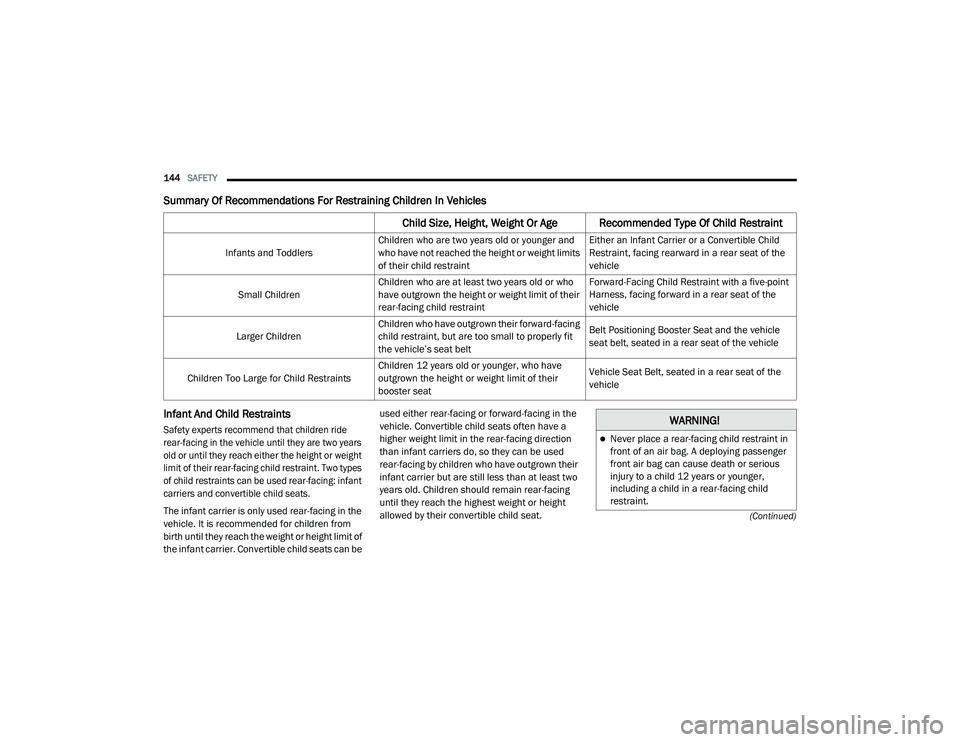
Summary Of Recommendations For Restraining Children In Vehicles
Infant And Child Restraints
Safety experts recommend that children ride
rear-facing in the vehicle until they are two years
old or until they reach either the height or weight
limit of their rear-facing child restraint. Two types
of child restraints can be used rear-facing: infant
carriers and convertible child seats.
The infant carrier is only used rear-facing in the
vehicle. It is recommended for children from
birth until they reach the weight or height limit of
the infant carrier. Convertible child seats can be used either rear-facing or forward-facing in the
vehicle. Convertible child seats often have a
higher weight limit in the rear-facing direction
than infant carriers do, so they can be used
rear-facing by children who have outgrown their
infant carrier but are still less than at least two
years old. Children should remain rear-facing
until they reach the highest weight or height
allowed by their convertible child seat.
Child Size, Height, Weight Or Age Recommended Type Of Child Restraint
Infants and Toddlers
Children who are two years old or younger and
who have not reached the height or weight limits
of their child restraint Either an Infant Carrier or a Convertible Child
Restraint, facing rearward in a rear seat of the
vehicle
Small Children Children who are at least two years old or who
have outgrown the height or weight limit of their
rear-facing child restraint Forward-Facing Child Restraint with a five-point
Harness, facing forward in a rear seat of the
vehicle
Larger Children Children who have outgrown their forward-facing
child restraint, but are too small to properly fit
the vehicle’s seat belt Belt Positioning Booster Seat and the vehicle
seat belt, seated in a rear seat of the vehicle
Children Too Large for Child Restraints Children 12 years old or younger, who have
outgrown the height or weight limit of their
booster seat Vehicle Seat Belt, seated in a rear seat of the
vehicle
WARNING!
Never place a rear-facing child restraint in
front of an air bag. A deploying passenger
front air bag can cause death or serious
injury to a child 12 years or younger,
including a child in a rear-facing child
restraint.
20_LD_OM_EN_USC_t.book Page 144
Page 147 of 412

SAFETY145
(Continued)
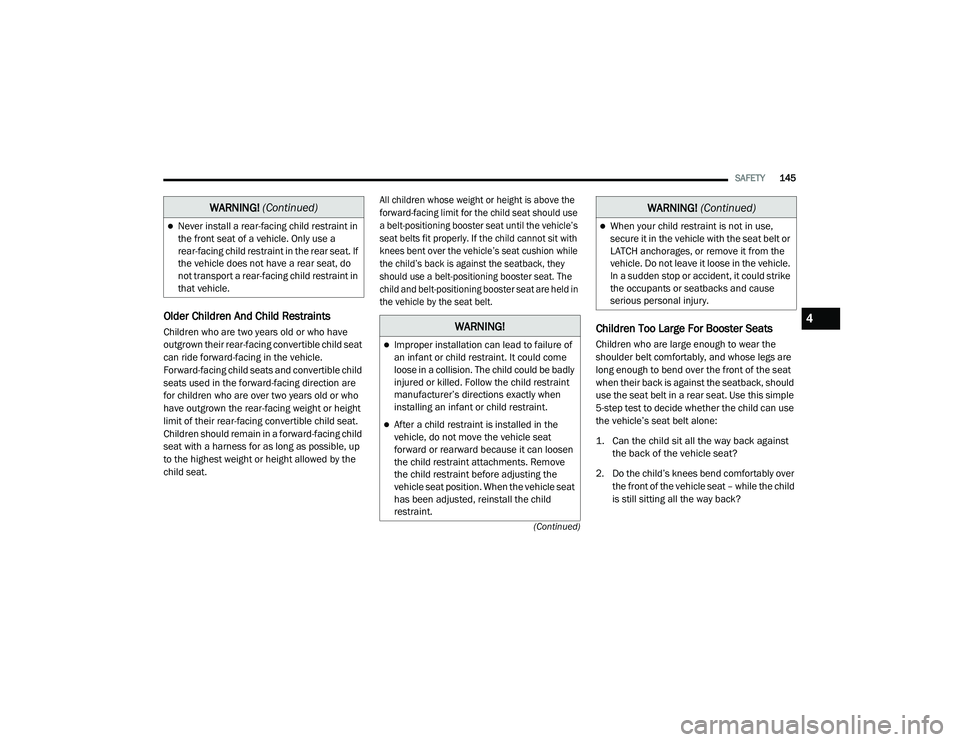
Older Children And Child Restraints
Children who are two years old or who have
outgrown their rear-facing convertible child seat
can ride forward-facing in the vehicle.
Forward-facing child seats and convertible child
seats used in the forward-facing direction are
for children who are over two years old or who
have outgrown the rear-facing weight or height
limit of their rear-facing convertible child seat.
Children should remain in a forward-facing child
seat with a harness for as long as possible, up
to the highest weight or height allowed by the
child seat.
All children whose weight or height is above the
forward-facing limit for the child seat should use
a belt-positioning booster seat until the vehicle’s
seat belts fit properly. If the child cannot sit with
knees bent over the vehicle’s seat cushion while
the child’s back is against the seatback, they
should use a belt-positioning booster seat. The
child and belt-positioning booster seat are held in
the vehicle by the seat belt.
Children Too Large For Booster Seats
Children who are large enough to wear the
shoulder belt comfortably, and whose legs are
long enough to bend over the front of the seat
when their back is against the seatback, should
use the seat belt in a rear seat. Use this simple
5-step test to decide whether the child can use
the vehicle’s seat belt alone:
1. Can the child sit all the way back against
the back of the vehicle seat?
2. Do the child’s knees bend comfortably over the front of the vehicle seat – while the child
is still sitting all the way back?
Never install a rear-facing child restraint in
the front seat of a vehicle. Only use a
rear-facing child restraint in the rear seat. If
the vehicle does not have a rear seat, do
not transport a rear-facing child restraint in
that vehicle.
WARNING! (Continued)
WARNING!
Improper installation can lead to failure of
an infant or child restraint. It could come
loose in a collision. The child could be badly
injured or killed. Follow the child restraint
manufacturer’s directions exactly when
installing an infant or child restraint.
After a child restraint is installed in the
vehicle, do not move the vehicle seat
forward or rearward because it can loosen
the child restraint attachments. Remove
the child restraint before adjusting the
vehicle seat position. When the vehicle seat
has been adjusted, reinstall the child
restraint.
When your child restraint is not in use,
secure it in the vehicle with the seat belt or
LATCH anchorages, or remove it from the
vehicle. Do not leave it loose in the vehicle.
In a sudden stop or accident, it could strike
the occupants or seatbacks and cause
serious personal injury. WARNING! (Continued)
4
20_LD_OM_EN_USC_t.book Page 145
Page 148 of 412

146SAFETY
3. Does the shoulder belt cross the child’s
shoulder between the neck and arm?
4. Is the lap part of the belt as low as possible, touching the child’s thighs and not the
stomach?
5. Can the child stay seated like this for the whole trip? If the answer to any of these questions was “no,
” then the child still needs to use a booster seat
in this vehicle. If the child is using the lap/
shoulder belt, check seat belt fit periodically
and make sure the seat belt buckle is latched.
A child’s squirming or slouching can move the
belt out of position. If the shoulder belt contacts
the face or neck, move the child closer to the
center of the vehicle, or use a booster seat to
position the seat belt on the child correctly.
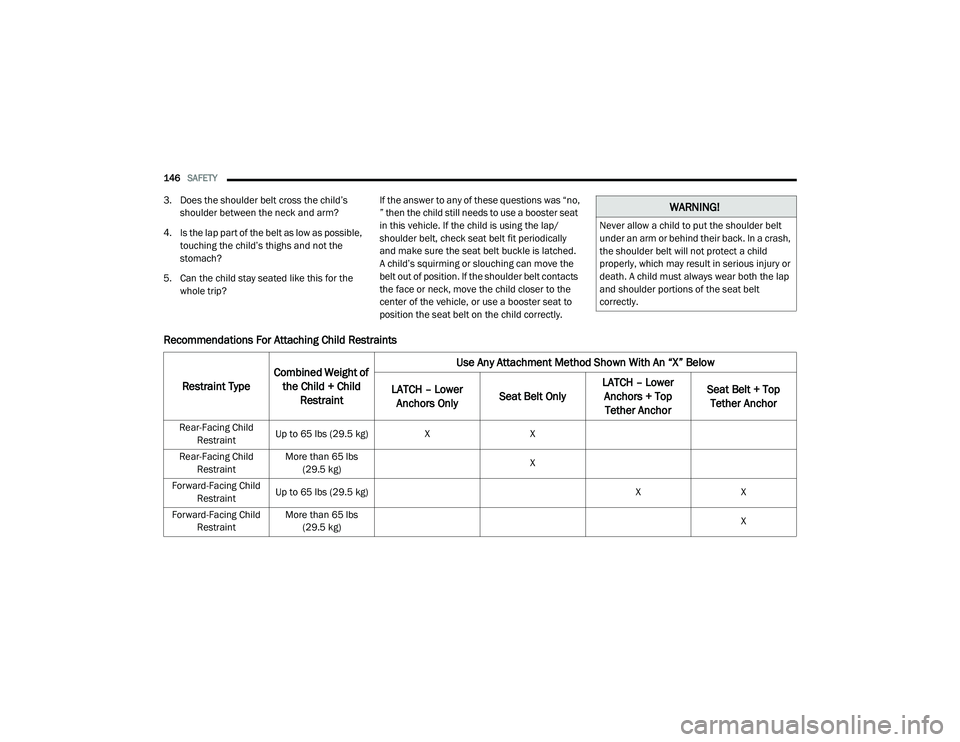
Recommendations For Attaching Child Restraints
WARNING!
Never allow a child to put the shoulder belt
under an arm or behind their back. In a crash,
the shoulder belt will not protect a child
properly, which may result in serious injury or
death. A child must always wear both the lap
and shoulder portions of the seat belt
correctly.
Restraint Type
Combined Weight of
the Child + Child Restraint Use Any Attachment Method Shown With An “X” Below
LATCH – Lower Anchors Only Seat Belt Only LATCH – Lower
Anchors + Top Tether Anchor Seat Belt + Top
Tether Anchor
Rear-Facing Child
Restraint Up to 65 lbs (29.5 kg)
XX
Rear-Facing Child Restraint More than 65 lbs
(29.5 kg) X
Forward-Facing Child Restraint Up to 65 lbs (29.5 kg)
XX
Forward-Facing Child Restraint More than 65 lbs
(29.5 kg) X
20_LD_OM_EN_USC_t.book Page 146
Page 150 of 412

148SAFETY
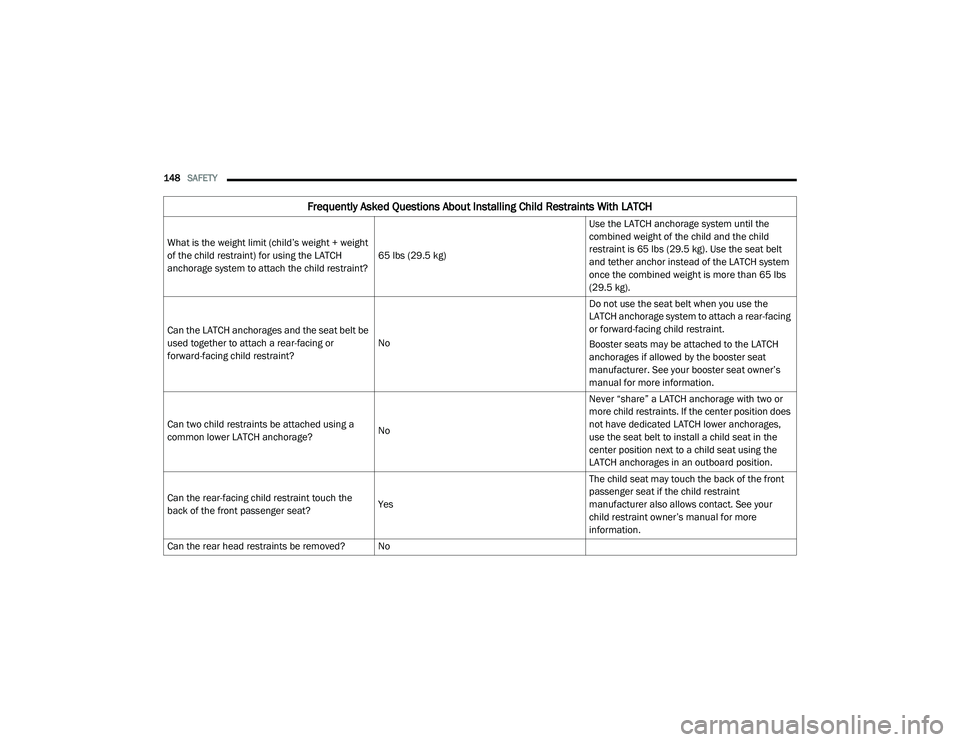
Frequently Asked Questions About Installing Child Restraints With LATCH
What is the weight limit (child’s weight + weight
of the child restraint) for using the LATCH
anchorage system to attach the child restraint? 65 lbs (29.5 kg)Use the LATCH anchorage system until the
combined weight of the child and the child
restraint is 65 lbs (29.5 kg). Use the seat belt
and tether anchor instead of the LATCH system
once the combined weight is more than 65 lbs
(29.5 kg).
Can the LATCH anchorages and the seat belt be
used together to attach a rear-facing or
forward-facing child restraint? NoDo not use the seat belt when you use the
LATCH anchorage system to attach a rear-facing
or forward-facing child restraint.
Booster seats may be attached to the LATCH
anchorages if allowed by the booster seat
manufacturer. See your booster seat owner’s
manual for more information.
Can two child restraints be attached using a
common lower LATCH anchorage? NoNever “share” a LATCH anchorage with two or
more child restraints. If the center position does
not have dedicated LATCH lower anchorages,
use the seat belt to install a child seat in the
center position next to a child seat using the
LATCH anchorages in an outboard position.
Can the rear-facing child restraint touch the
back of the front passenger seat? YesThe child seat may touch the back of the front
passenger seat if the child restraint
manufacturer also allows contact. See your
child restraint owner’s manual for more
information.
Can the rear head restraints be removed? No
20_LD_OM_EN_USC_t.book Page 148
Page 154 of 412

152SAFETY
Installing A Child Restraint With A
Switchable Automatic Locking Retractor
(ALR):
Child restraint systems are designed to be
secured in vehicle seats by lap belts or the lap
belt portion of a lap/shoulder belt.
1. Place the child seat in the center of the
seating position. If the second row seat can
be reclined, you may recline the seat and/
or raise the head restraint (if adjustable) to
get a better fit. If the rear seat can be
moved forward and rearward in the
vehicle, you may wish to move it to its
rear-most position to make room for the
Frequently Asked Questions About Installing Child Restraints With Seat Belts
What is the weight limit (child’s
weight + weight of the child
restraint) for using the Tether
Anchor with the seat belt to attach
a forward facing child restraint? Weight limit of the Child Restraint Always use the tether anchor when
using the seat belt to install a
forward facing child restraint, up to
the recommended weight limit of
the child restraint.
Can the rear-facing child restraint
touch the back of the front
passenger seat? Yes Contact between the front
passenger seat and the child
restraint is allowed, if the child
restraint manufacturer also allows
contact.
Can the rear head restraints be
removed? No
Can the buckle stalk be twisted to
tighten the seat belt against the
belt path of the child restraint? No Do not twist the buckle stalk in a
seating position with an ALR
retractor.
WARNING!
Improper installation or failure to properly
secure a child restraint can lead to failure
of the restraint. The child could be badly
injured or killed.
Follow the child restraint manufacturer’s
directions exactly when installing an infant
or child restraint.
20_LD_OM_EN_USC_t.book Page 152
Page 204 of 412

202STARTING AND OPERATING
VEHICLE LOADING
The load carrying capacity of your vehicle is
shown on the “Vehicle Certification Label”. This
information should be used for passenger and
luggage loading as indicated.
Do not exceed the specified Gross Vehicle
Weight Rating (GVWR) or the Gross Axle Weight
Rating (GAWR).
VEHICLE CERTIFICATION LABEL
Your vehicle has a Vehicle Certification Label
affixed to the drivers side B-pillar or the rear of
the driver’s door.
The label contains the following information:
Name of manufacturer
Month and year of manufacture
Gross Vehicle Weight Rating (GVWR)
Gross Axle Weight Rating (GAWR) front
Gross Axle Weight Rating (GAWR) rear
Vehicle Identification Number (VIN)
Type of vehicle
Month, Day, and Hour of manufacture (MDH)
The bar code allows a computer scanner to read
the VIN.
GROSS VEHICLE WEIGHT RATING
(GVWR)
The GVWR is the total allowable weight of your
vehicle. This includes driver, passengers, and
cargo. The total load must be limited so that you
do not exceed the GVWR.
GROSS AXLE WEIGHT RATING (GAWR)
The GAWR is the maximum capacity of the front
and rear axles. Distribute the load over the front
and rear axles evenly. Make sure that you do
not exceed either front or rear GAWR.
OVERLOADING
The load carrying components (axle, springs,
tires, wheels, etc.) of your vehicle will provide
satisfactory service as long as you do not
exceed the GVWR and the front and rear GAWR.
The best way to figure out the total weight of
your vehicle is to weigh it when it is fully loaded
and ready for operation. Weigh it on a
commercial scale to ensure that it is not over
the GVWR.
Figure out the weight on the front and rear of
the vehicle separately. It is important that you
distribute the load evenly over the front and rear
axles.
CAUTION!
To avoid fuel spillage and overfilling, do not
“top off” the fuel tank after filling.
WARNING!
Because the front wheels steer the vehicle, it
is important that you do not exceed the
maximum front or rear GAWR. A dangerous
driving condition can result if either rating is
exceeded. You could lose control of the
vehicle and have a collision.
20_LD_OM_EN_USC_t.book Page 202