2020 DODGE CHARGER manual radio set
[x] Cancel search: manual radio setPage 32 of 412

30GETTING TO KNOW YOUR VEHICLE
AUTOMATIC DOOR LOCKS —
I
F EQUIPPED
The auto door lock feature default condition is
enabled. When enabled, the door locks will lock
automatically when the vehicle's speed exceeds
15 mph (24 km/h). The auto door lock feature
can be enabled or disabled by an authorized
dealer per written request of the customer.
Please see an authorized dealer for service.
CHILD-PROTECTION DOOR LOCK
S
YSTEM — REAR DOORS
To provide a safer environment for small
children riding in the rear seats, the rear doors
are equipped with Child-Protection Door Lock
system.
To Engage Or Disengage The Child-Protection
Door Lock System
1. Open the rear door.
2. Insert the tip of the emergency key into the
lock and rotate to the lock or unlock
position.
3. Repeat steps one and two for the opposite rear door.
Child-Protection Door Lock Function
NOTE:
For emergency exit from the rear seats when
the Child-Protection Door Lock system is
engaged, manually raise the door lock knob to
the unlocked position, roll down the window,
and open the door using the outside door
handle.
DRIVER MEMORY SETTINGS — IF EQUIPPED
This feature allows the driver to save up to two
different memory profiles for easy recall
through a memory switch. Each memory profile
saves desired position settings for the following
features:
Driver seat
Easy Entry/Exit seat operation (on/off)
(if equipped)
Side mirrors
A set of desired radio station presets
Power tilt/telescoping steering column (if
equipped)
NOTE:
Your vehicle is equipped with two key fobs,
each can be linked to either memory position
1 or 2.
Be sure to program the radio presets prior to
programming the memory settings.
WARNING!
Avoid trapping anyone in a vehicle in a
collision. Remember that the rear doors can
only be opened from the outside with the
Child-Protection locks are engaged (locked).
20_LD_OM_EN_USC_t.book Page 30
Page 325 of 412

MULTIMEDIA323
When making a selection, press the button on
the touchscreen to enter the desired menu.
Once in the desired menu, press and release
the preferred setting “option” until a check
mark appears next to the setting, showing that
setting has been selected. Once the setting is complete, press the X button on the
touchscreen to close out of the settings screen.
Pressing the Up or Down Arrow button on the
right side of the screen will allow you to toggle
up or down through the available settings.
The following tables list the settings that may be
found within the Uconnect 4 with 7-inch display
radio, along with the selectable options
pertaining to each setting.
Language
After pressing the Language button on the touchscreen, the following setting will be available:
Display
After pressing the Display button on the touchscreen, the following settings will be available:
Setting Name
Selectable Options
LanguageEnglishFrançais Español
Setting Name Selectable Options
Display ModeManual Auto
Display Brightness With Headlights ON +
–
NOTE:
When in the “Display Brightness With Headlights ON” display, you may select the brightness with the headlights on. Adjust the brightness from
(1–10) with the + and – buttons on the touchscreen.
To make changes to the "Display Brightness With Headlights ON" setting, the headlights must be on and the interior dimmer switch must not be in
the "party" or "parade" position.
9
20_LD_OM_EN_USC_t.book Page 323
Page 356 of 412

354MULTIMEDIA
SAFETY AND GENERAL INFORMATION
SAFETY GUIDELINES
Ensure that all persons read this manual
carefully before using the system. It contains
instructions on how to use the system in a safe
and effective manner.
Do NOT attach any object to the touchscreen.
Doing so can result in damage to the
touchscreen.
Please read and follow these safety
precautions. Failure to do so may result in injury
or property damage.
Glance at the screen only when safe to do so.
If prolonged viewing of the screen is required,
park in a safe location and set the parking
brake.
Stop use immediately if a problem occurs.
Failure to do so may cause injury or damage
to the product. Return it to an authorized
dealer for repair.
Ensure the volume level of the system is set
to a level that still allows you to hear outside
traffic and emergency vehicles.
Safe Usage Of The Uconnect System
Read all instructions in this manual carefully
before using your system to ensure proper
usage.
The Uconnect system is a sophisticated elec -
tronic device. Do not let young children use
the system.
Permanent hearing loss may occur if you play
your music or the system at loud volumes.
Exercise caution when setting the volume on
the system.
Keep drinks, rain and other sources of mois -
ture away from the system. Besides damage
to the system, moisture can cause electric
shocks as with any electronic device. NOTE:
Many features of this system are speed depen
-
dent. For your own safety, it is not possible to
use some of the touchscreen features while the
vehicle is in motion.
Exposure To Radio Frequency Radiation
The internal wireless radio operates within
guidelines found in radio frequency safety
standards and recommendations, which reflect
the consensus of the scientific community. The
radio manufacturer believes the internal
wireless radio is safe for use by consumers. The
level of energy emitted is far less than the
electromagnetic energy emitted by wireless
devices such as mobile phones. However, the
use of wireless radios may be restricted in some
situations or environments, such as aboard
airplanes. If you are unsure of restrictions, you
are encouraged to ask for authorization before
turning on the wireless radio.Care And Maintenance
Touchscreen
Do not press the touchscreen with any hard
or sharp objects (pen, USB stick, jewelry,
etc.), which could scratch the touchscreen
surface!
WARNING!
ALWAYS drive safely with your hands on the
steering wheel. You have full responsibility
and assume all risks related to the use of the
Uconnect features and applications in this
vehicle. Only use Uconnect when it is safe to
do so. Failure to do so may result in an
accident involving serious injury or death.
20_LD_OM_EN_USC_t.book Page 354
Page 373 of 412

MULTIMEDIA371
USB connections to function, and the
connected device will be unavailable to other
devices when connected using Android Auto™.
Multiple Devices Connecting To The Uconnect
System
It is possible to have multiple devices
connected to the Uconnect system. For
example, if using Android Auto™/Apple
CarPlay®, the connected device will be the one
that will be used to place hands-free phone calls
or send hands-free text messages. However,
another device can also be paired to the
Uconnect system, via Bluetooth®, as an audio
source, so the passenger can stream music.
NOTE:
If using a Samsung device, every time it is
connected to a media USB, and there is
another device plugged in, you will need to
manually change the configuration of the
USB connection in order for the Samsung
device to send data.
The Uconnect 4 built-in media functions will
be unavailable when Android Auto™/Apple
CarPlay® are in use.
PHONE MODE
Overview
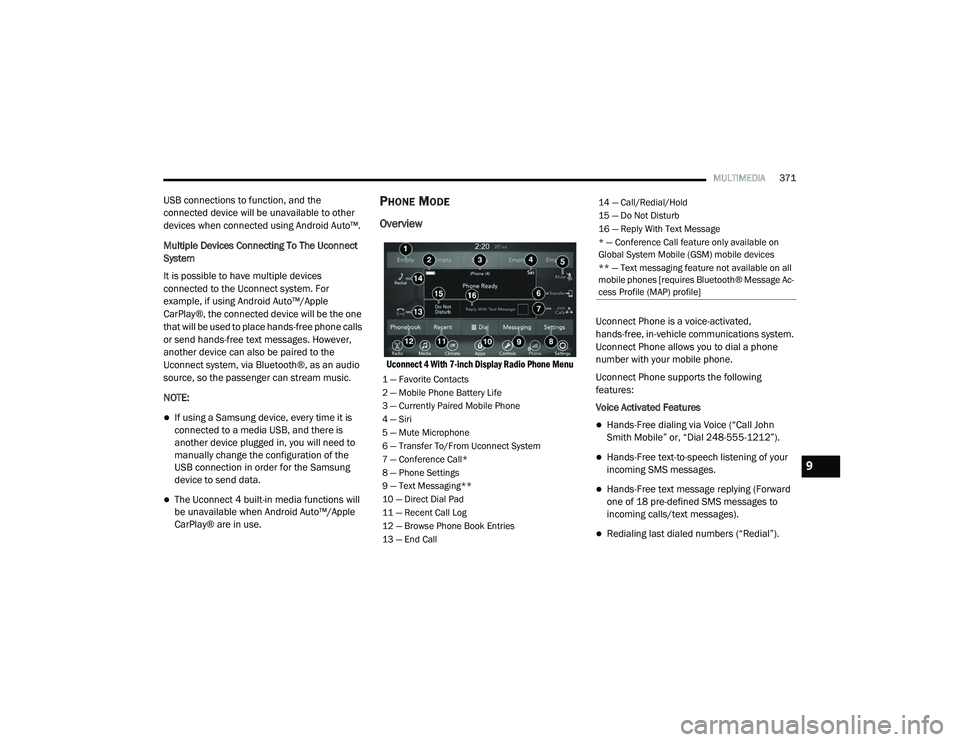
Uconnect 4 With 7-inch Display Radio Phone Menu
Uconnect Phone is a voice-activated,
hands-free, in-vehicle communications system.
Uconnect Phone allows you to dial a phone
number with your mobile phone.
Uconnect Phone supports the following
features:
Voice Activated Features
Hands-Free dialing via Voice (“Call John
Smith Mobile” or, “Dial 248-555-1212”).
Hands-Free text-to-speech listening of your
incoming SMS messages.
Hands-Free text message replying (Forward
one of 18 pre-defined SMS messages to
incoming calls/text messages).
Redialing last dialed numbers (“Redial”).
1 — Favorite Contacts
2 — Mobile Phone Battery Life
3 — Currently Paired Mobile Phone
4 — Siri
5 — Mute Microphone
6 — Transfer To/From Uconnect System
7 — Conference Call*
8 — Phone Settings
9 — Text Messaging**
10 — Direct Dial Pad
11 — Recent Call Log
12 — Browse Phone Book Entries
13 — End Call
14 — Call/Redial/Hold
15 — Do Not Disturb
16 — Reply With Text Message
* — Conference Call feature only available on
Global System Mobile (GSM) mobile devices
** — Text messaging feature not available on all
mobile phones [requires Bluetooth® Message Ac -
cess Profile (MAP) profile]
9
20_LD_OM_EN_USC_t.book Page 371
Page 374 of 412

372MULTIMEDIA
Calling back the last incoming call number
(“Call Back”).
Viewing call logs on screen (“Show incoming
calls,” “Show outgoing calls,” “Show missed
calls,” “Show recent calls”).
Searching contacts phone number (“Search
for John Smith Mobile”).
NOTE:
Examples of Voice Commands are provided
throughout this manual. For quick use, go to the
Voice Command Quick Reference Section.
Screen Activated Features
Dialing via keypad using touchscreen.
Viewing and calling contacts from phone -
books displayed on the touchscreen.
Setting favorite contact phone numbers so they
are easily accessible on the main phone screen.
Viewing and calling contacts from recent call
logs.
Reviewing your recent incoming SMS.
Listening to music on your Bluetooth® device
via the touchscreen.
Pairing up to 10 phones/audio devices for
easy access to connect to them quickly.
NOTE:
Your phone must be capable of SMS messaging
via Bluetooth® for messaging features to work
properly.
Your mobile phone’s audio is transmitted
through your vehicle’s audio system; the system
automatically mutes your radio when using the
Uconnect Phone.
For Uconnect customer support:
US residents - visit UconnectPhone.com or
call:
877-855-8400
Canadian residents - (English) call:
800-465-2001
or (French) call:
800-387-9983
Visit UconnectPhone.com
Uconnect Phone allows you to transfer calls
between the system and your mobile phone as you
enter or exit your vehicle and enables you to mute
the system's microphone for private conversation.
The Uconnect Phone is driven through your
Bluetooth® “Hands-Free Profile” mobile phone.
Uconnect features Bluetooth® technology — the
global standard that enables different electronic
devices to connect to each other without wires or
a docking station, so Uconnect Phone works no
matter where you stow your mobile phone (be it
your purse, pocket, or briefcase), as long as your
phone is turned on and has been paired to the
vehicle's Uconnect Phone. The Uconnect Phone
allows up to 10 mobile phones or audio devices
to be linked to the system. Only one linked (or
paired) mobile phone and one audio device can
be used with the system at a time.
WARNING!
ALWAYS drive safely with your hands on the
steering wheel. You have full responsibility
and assume all risks related to the use of the
Uconnect features and applications in this
vehicle. Only use Uconnect when it is safe to
do so. Failure to do so may result in an
accident involving serious injury or death.
20_LD_OM_EN_USC_t.book Page 372
Page 376 of 412

374MULTIMEDIA
The system utilizes continuous dialog; when the
system requires more information from the user
it will ask a question to which the user can
respond without pushing the Voice Command
button on your steering wheel.
Help Command
If you need assistance at any prompt, or if you
want to know your options at any prompt, say
“Help” following the beep.
To activate the Uconnect Phone from idle,
simply push the Phone button (if active) on your
steering wheel and say a command or say
“Help.” All Uconnect Phone sessions begin with
a push of the VR button or the Phone button (if
active) on the radio control head.
Cancel Command
At any prompt, after the beep, you can say
“Cancel” and you will be returned to the main
menu.
You can also push the VR button or Phone
button (if active) on your steering wheel when
the system is listening for a command and be
returned to the main or previous menu. Pair (Link) Uconnect Phone To A Mobile Phone
To begin using your Uconnect Phone, you must
pair your compatible Bluetooth®-enabled
mobile phone. Mobile phone pairing is the
process of establishing a wireless connection
between a cellular phone and the Uconnect
system.
To complete the pairing process, you need to
reference your mobile phone Owner's Manual.
Please visit UconnectPhone.com for complete
mobile phone compatibility information.
NOTE:
You must have “Bluetooth®” enabled on
your phone to complete this procedure.
The vehicle must be in PARK.
1. Place the ignition in the ACC or ON/RUN position.
2. Press the Phone button in the Menu Bar on the touchscreen.
NOTE:
If there are no phones currently connected with
the system, a pop-up will appear asking if you
would like to pair a mobile phone. 3. Select “Yes” to begin the pairing process.
4. Search for available devices on your
Bluetooth®-enabled mobile phone.
Press the Settings button on your mobile
phone.
Select Bluetooth® and ensure it is
enabled. Once enabled, the mobile
phone will begin to search for Bluetooth®
connections.
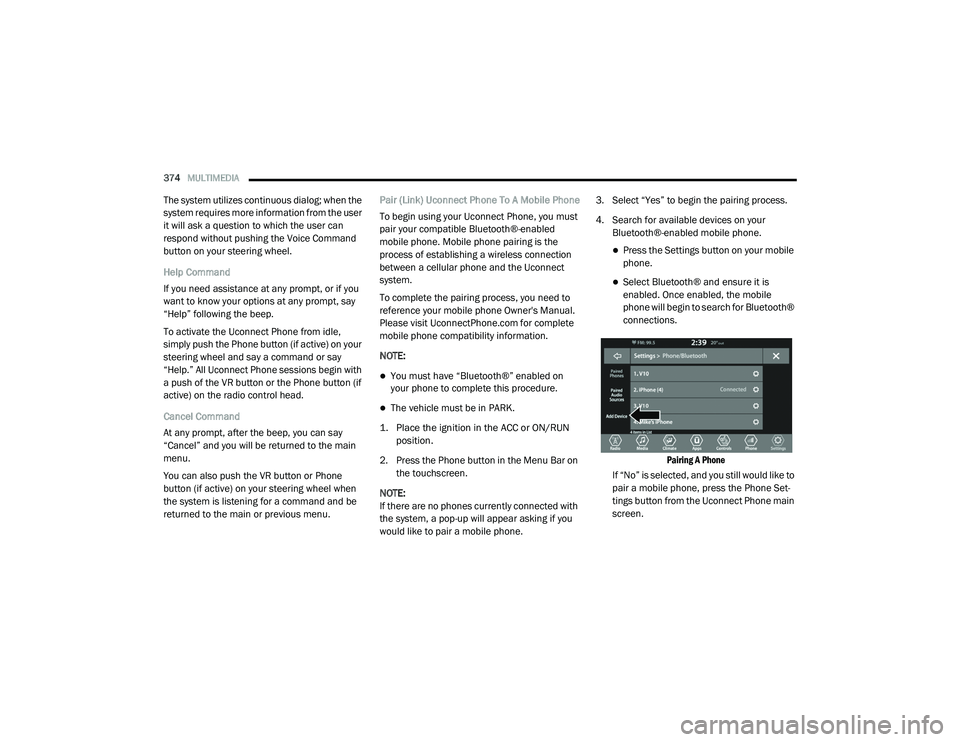
Pairing A Phone
If “No” is selected, and you still would like to
pair a mobile phone, press the Phone Set-
tings button from the Uconnect Phone main
screen.
20_LD_OM_EN_USC_t.book Page 374
Page 404 of 412

402 Operating Instructions
............................... 129Pregnant Women...................................... 132Pretensioners............................................ 132Rear Seat.................................................. 127Reminder.................................................. 126Seat Belt Extender.................................... 131Seat Belt Pretensioner.............................. 132Untwisting Procedure................................ 130Seat Belts Maintenance................................ 306Seats................................................. 32, 34, 36Adjustment........................................... 32, 34Easy Entry................................................... 35Head Restraints................................... 38, 39Heated........................................................ 36Height Adjustment....................................... 34Power.......................................................... 34Rear Folding......................................... 32, 33Seatback Release................................ 32, 33Tilting................................................... 32, 34Vented......................................................... 37Ventilated.................................................... 37Security Alarm.......................................... 24, 98Arm The System.......................................... 24Selection Of Coolant (Antifreeze)......... 315, 318Sentry KeyKey Programming........................................ 23Sentry Key (Immobilizer).................................. 22Sentry Key Replacement.......................... 17, 23Service Assistance......................................... 391Service Contract............................................ 392
Service Manuals........................................... 394Shifting......................................................... 165Automatic Transmission.................. 165, 167Shoulder Belts.............................................. 127Side View Mirror Adjustment............................ 43Signals, Turn................................. 48, 103, 157Siri................................................................ 388Sirius Satellite Radio..................................... 358Favorites................................................... 360Replay...................................................... 359SiriusXM Satellite RadioBrowse in SXM......................................... 360Favorites................................................... 360Replay...................................................... 359Snow Chains (Tire Chains)................... 301, 302Snow Tires.................................................... 298Spare Tires........................ 230, 298, 299, 300Spark Plugs.......................................... 315, 318SpecificationsFuel (Gasoline)................................ 315, 318Oil.................................................... 315, 318Speed ControlAccel/Decel..................................... 176, 177Accel/Decel (ACC Only)............................. 181Cancel...................................................... 177Resume.................................................... 177Set............................................................ 176Speed Control (Cruise Control)............ 175, 177Sport Mode................................................... 174
Starting......................................................... 159Automatic Transmission........................... 159Button..........................................................18Cold Weather............................................ 162Engine Fails To Start................................. 162Starting And Operating.................................. 159Starting Procedures...................................... 159Steering...........................................................40Column Lock................................................40Power........................................................ 174Tilt Column...................................................40Wheel, Heated.............................................41Wheel, Tilt....................................................40Steering Wheel Audio Controls...................... 382Steering Wheel Mounted Sound
System Controls............................................ 382Storage.................................................. 76, 304Storage, Vehicle..................................... 63, 304Store Radio Presets...................................... 357Storing Your Vehicle...................................... 304Stuck, Freeing............................................... 244Sun Roof...................................................66, 68Sunglasses Storage.........................................79Supplemental Restraint System – Air Bag.... 135Synthetic Engine Oil...................................... 274
T
Telescoping Steering Column...........................40Temperature Control, Automatic (ATC).............62Tilt Steering Column.........................................40
20_LD_OM_EN_USC_t.book Page 402