2020 DODGE CHARGER ECO mode
[x] Cancel search: ECO modePage 361 of 412

MULTIMEDIA359
No Subscription
Radios equipped with a Satellite receiver,
require a subscription to the SiriusXM® Service.
When the Radio does not have the necessary
subscription, the Radio is able to receive the
Pre-View channel only.
Acquiring SiriusXM® Subscription
To activate the SiriusXM® Satellite Radio
subscription, US residents call:
1-800-643-2112
Canadian residents call:
1-877-438-9677
NOTE:
You will need to provide the SiriusXM® ID (RID)
located at the bottom of the Channel 0 screen.
The Satellite Mode is activated by a press of the
SXM button on the touchscreen.
When in Satellite mode:
The SXM button on the touchscreen is high -
lighted.
The SiriusXM® Presets are displayed at the
top of the screen.
The Genre is displayed below the Presets
Bar.
The SiriusXM® Channel Number is displayed
in the center.
The Program Information is displayed at the
bottom of the Channel Number.
The SiriusXM® function buttons are
displayed below the Program Information.
Tuning is done by operating the Tune Knob or by
Direct Tune, similar to other Radio Bands, see
Presets, browse, Tune Knob, and Direct Tune.
In addition to the tuning Operation functions
common to all Radio modes, the replay, Traffic/
Weather Jump, and fav button functions are
available in SiriusXM® Mode.
Replay
The replay function provides a means to store
and replay up to 22 minutes of music audio and
48 minutes of talk radio. Once the channel is
switched, content in replay memory is lost.
Press the Replay button on the touchscreen.
The play/pause, rewind/forward and live
buttons will display at the top of the screen,
along with the replay time. You can exit by pressing the Replay button on
the touchscreen, any time during the Replay
mode.
Play/Pause
Press the Pause/Play button on the
touchscreen to pause the playing of live or
rewound content at any time. Play can be
resumed again by pressing of the Pause/Play
button on the touchscreen.
Rewind
Press the RW button on the touchscreen to
rewind the content in steps of five seconds.
Pressing the RW button on the touchscreen for
more than two seconds rewinds the content.
The Radio begins playing the content at the
point at which the press is released.
Forward
Each press of the FW button on the touchscreen
forwards the content in steps of five seconds.
Forwarding of the content can only be done
when the content is previously rewound, and
therefore, can not be done for live content. A
continuous press of the FW button on the
touchscreen also forwards the content. The
Radio begins playing the content at the point at
which the press is released.
9
20_LD_OM_EN_USC_t.book Page 359
Page 366 of 412

364MULTIMEDIA
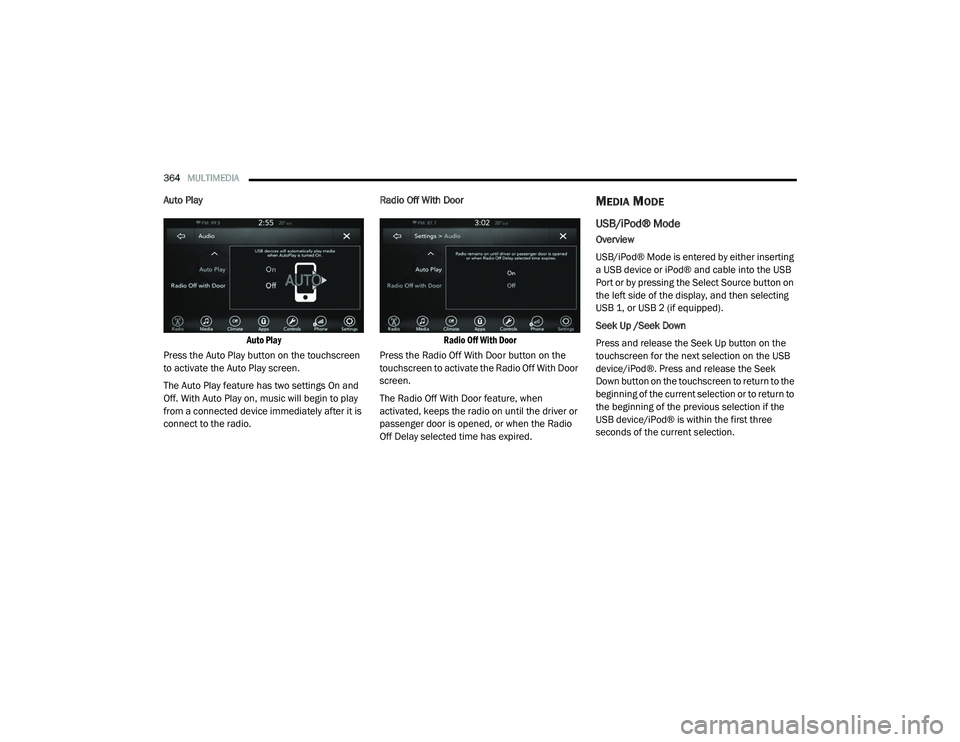
Auto Play
Auto Play
Press the Auto Play button on the touchscreen
to activate the Auto Play screen.
The Auto Play feature has two settings On and
Off. With Auto Play on, music will begin to play
from a connected device immediately after it is
connect to the radio. Radio Off With Door
Radio Off With Door
Press the Radio Off With Door button on the
touchscreen to activate the Radio Off With Door
screen.
The Radio Off With Door feature, when
activated, keeps the radio on until the driver or
passenger door is opened, or when the Radio
Off Delay selected time has expired.MEDIA MODE
USB/iPod® Mode
Overview
USB/iPod® Mode is entered by either inserting
a USB device or iPod® and cable into the USB
Port or by pressing the Select Source button on
the left side of the display, and then selecting
USB 1, or USB 2 (if equipped).
Seek Up /Seek Down
Press and release the Seek Up button on the
touchscreen for the next selection on the USB
device/iPod®. Press and release the Seek
Down button on the touchscreen to return to the
beginning of the current selection or to return to
the beginning of the previous selection if the
USB device/iPod® is within the first three
seconds of the current selection.
20_LD_OM_EN_USC_t.book Page 364
Page 367 of 412

MULTIMEDIA365
Browse
Press the Browse button on the touchscreen to
display the browse window. The left side of the
browse window displays a list of ways you can
browse through the contents of the USB device/
iPod®. If supported by the device, you can
browse by Folders, Artists, Playlists, Albums,
Songs, etc. Press the desired button on the left
side of the screen. The center of the browse
window shows items and its sub-functions,
which can be scrolled by pressing the Up and
Down buttons to the right. The Tune/Scroll knob
can also be used to scroll.
Media Mode
Press the Media button on the touchscreen to
select the desired audio source: USB.
Repeat
Press the Repeat button on the touchscreen to
toggle the repeat functionality. The Repeat
button on the touchscreen is highlighted when
active. The Radio will continue to play the current
track, repeatedly, as long as the repeat is active.
Press the Repeat button on the touchscreen a
second time to turn this feature off.
Shuffle
Press the Shuffle button on the touchscreen to
play the selections on the USB/iPod® device in
random order to provide an interesting change of
pace. Press the Shuffle button on the touchscreen
a second time to turn this feature off.
Info
Press the Info button on the touchscreen to
display the current track information. Press the
Info button on the touchscreen a second time to
cancel this feature.
Tracks
Press the Tracks button on the touchscreen to
display a pop-up with the Song List. The
currently playing song is indicated by an arrow
and lines above and below the song title. When
in the Tracks List screen, you can rotate the
Tune/Scroll knob to highlight a track (indicated
by the line above and below the track name)
and then push the Enter/Browse knob to start
playing that track.
Pressing the Tracks button on the touchscreen
while the pop-up is displayed will close the
pop-up.Audio
Refer to “Radio Mode” for adjusting the audio
settings.
AUX Mode
Overview
AUX (Auxiliary Mode) is entered by inserting an
AUX device using a cable with a 3.5 mm audio
jack into the AUX port or by pressing the AUX
button on the left side of the display.
Inserting Auxiliary Device
Gently insert the Auxiliary device cable into the
AUX Port. If you insert an Auxiliary device with
the ignition and the radio on, the unit will switch
to AUX mode and begin to play when you insert
the device cable.
Controlling The Auxiliary Device
The control of the auxiliary device (e.g.,
selecting playlists, play, fast forward, etc.)
cannot be provided by the radio; use the device
controls instead. Adjust the volume with the
Volume/Mute rotary knob, or with the volume of
the attached device.
9
20_LD_OM_EN_USC_t.book Page 365
Page 368 of 412

366MULTIMEDIA
NOTE:
The radio unit is acting as the amplifier for audio
output from the Auxiliary device. Therefore, if
the volume control on the Auxiliary device is set
too low, there will be insufficient audio signal for
the radio unit to play the music on the device.
Media Mode
Press the Media button on the touchscreen to
select the desired audio source: AUX.
Audio
Refer to “Radio Mode” for adjusting the audio
settings.
BLUETOOTH® MODE
Overview
Bluetooth® Streaming Audio (BTSA) or
Bluetooth® Mode is entered by pairing a
Bluetooth® device, containing music, to the
Uconnect System.
Before proceeding, the Bluetooth® device must
be paired to the Uconnect Phone to
communicate with the Uconnect System.
NOTE:
See the pairing procedure in the Uconnect
Phone section for more details. To access Bluetooth® mode, press the Select
Source button on the left side of the display,
and then select Bluetooth®.
Bluetooth® Mode
Seek Up /Down
Press and release the Seek Up button on the
touchscreen for the next selection on the
Bluetooth® device. Press and release the Seek
Down button on the touchscreen to return to
the beginning of the current selection, or return
to the beginning of the previous selection if the
Bluetooth® device is within the first second of
the current selection.
Media Mode
Press the Media button on the touchscreen to
select the desired audio source: Bluetooth®. Tracks
If the Bluetooth® device supports this feature,
press the Tracks button on the touchscreen to
display a pop-up with the Song List. The
currently playing song is indicated by a red
arrow and lines above and below the song title.
Pressing the Tracks button on the touchscreen
while the pop-up is displayed will close the
pop-up.
Audio
Refer to “Radio Mode” for adjusting the audio
settings.
Android Auto™ & Apple CarPlay® —
If Equipped
Android Auto™
NOTE:
Feature availability depends on your carrier and
mobile phone manufacturer. Some Android
Auto™ features may or may not be available in
every region and/or language.
Android Auto™ is a feature of your Uconnect
system, and your Android™ 5.0 or higher
powered smartphone with a data plan, that
allows you to project your smartphone and a
20_LD_OM_EN_USC_t.book Page 366
Page 375 of 412

MULTIMEDIA373
Uconnect Phone Button
The Uconnect Phone button on your steering
wheel is used to get into the phone mode and
make calls, show recent, incoming, outgoing
calls, view phonebook etc.
Uconnect Voice Command Button
The Uconnect Voice Command button on your
steering wheel is only used for “barge in” and
when you are already in a call and you want to
send tones or make another call.
The button on your steering wheel is also used
to access the Voice Commands for the
Uconnect Voice Command features if your
vehicle is equipped. Please see the Uconnect
Voice Command section for direction on how to
use the button.
The Uconnect Phone is fully integrated with the
vehicle's audio system. The volume of the
Uconnect Phone can be adjusted either from
the radio volume control knob or from the
steering wheel radio control.
Phone Operation
Operation
Voice commands can be used to operate the
Uconnect Phone and to navigate through the Uconnect Phone menu structure. Voice
commands are required after most Uconnect
Phone prompts. There are two general methods
for how Voice Command works:
1. Say compound commands like “Call John
Smith mobile”.
2. Say the individual commands and allow the system to guide you to complete the task.
You will be prompted for a specific command
and then guided through the available options.
Prior to giving a voice command, one must
wait for the beep, which follows the “Listen”
prompt or another prompt.
For certain operations, compound
commands can be used. For example,
instead of saying “Call” and then “John
Smith” and then “mobile”, the following
compound command can be said: “Call John
Smith mobile.”
For each feature explanation in this section,
only the compound command form of the voice
command is given. You can also break the
commands into parts and say each part of the
command when you are asked for it. For
example, you can use the compound command form voice command “Search for John Smith,”
or you can break the compound command form
into two voice commands: “Search Contact”
and when asked “John Smith.” Please
remember, the Uconnect Phone works best
when you talk in a normal conversational tone,
as if speaking to someone sitting a few feet/
meters away from you.
Natural Speech
Your Uconnect Phone Voice system uses a
Natural Language Voice Recognition (VR)
engine.
Natural speech allows the user to speak
commands in phrases or complete sentences.
The system filters out certain non-word
utterances and sounds such as “ah” and “eh.”
The system handles fill-in words such as “I
would like to.”
The system handles multiple inputs in the same
phrase or sentence such as “make a phone
call” and “to Kelly Smith”. For multiple inputs in
the same phrase or sentence, the system
identifies the topic or context and provides the
associated follow-up prompt such as “Who do
you want to call?” in the case where a phone
call was requested but the specific name was
not recognized.
9
20_LD_OM_EN_USC_t.book Page 373
Page 384 of 412

382MULTIMEDIA
Fully Closed Windows
Dry Weather Conditions
Operation From The Driver's Seat
Performance such as audio clarity, echo, and
loudness to a large degree rely on the phone
and network, and not the Uconnect Phone.
Echo at the far end can sometimes be reduced
by lowering the in-vehicle audio volume.
Bluetooth® Communication Link
Mobile phones have been found to lose
connection to the Uconnect Phone. When this
happens, the connection can generally be
re-established by switching the mobile phone
OFF/ON. Your mobile phone is recommended to
remain in Bluetooth® ON mode.
Power-Up
After switching the ignition key from OFF to
either the ON/RUN or ACC position, or after a
language change, you must wait at least 15
seconds prior to using the system.
STEERING WHEEL AUDIO CONTROLS —
IF EQUIPPED
The remote sound system controls are located
on the rear surface of the steering wheel. Reach
behind the wheel to access the switches.
Steering Wheel Audio Controls (Back View Of Steering Wheel)
The right-hand control is a rocker-type switch
with a push button in the center and controls
the volume and mode of the sound system.
Pushing the top of the rocker switch will
increase the volume, and pushing the bottom of
the rocker switch will decrease the volume.
Pushing the center button will make the radio
switch between the various modes available
(AM/FM/SAT/AUX, etc.). The left-hand control is a rocker-type switch with
a push button in the center. The function of the
left-hand control is different depending on
which mode you are in.
The following describes the left-hand control
operation in each mode.
RADIO OPERATION
Pushing the top of the switch will “Seek” up for
the next listenable station and pushing the
bottom of the switch will “Seek” down for the
next listenable station.
The button located in the center of the left-hand
control will tune to the next preset station that
you have programmed in the radio preset button.
MEDIA MODE
Pushing the top of the switch once goes to the
next track on the selected media (AUX/USB/
Bluetooth®). Pushing the bottom of the switch
once goes to the beginning of the current track,
or to the beginning of the previous track if it is
within eight seconds after the current track
begins to play.
NOTE:
While In Media Mode, the center button on the
left rocker switch is nonfunctional.
20_LD_OM_EN_USC_t.book Page 382
Page 397 of 412

395
INDEX
A
About Your Brakes......................................... 308Adaptive Cruise Control (ACC)
(Cruise Control).............................................. 177Adding Engine Coolant (Antifreeze)............... 282Adding Fuel.................................................... 200Adding Washing Fluid.................................... 270Additives, Fuel............................................... 310AdjustForward....................................................... 34Rearward..................................................... 34Air Bag........................................................... 135Advance Front Air Bag............................... 135Air Bag Operation...................................... 136Air Bag Warning Light................................ 134Driver Knee Air Bag................................... 137Enhanced Accident Response......... 141, 249Event Data Recorder (EDR)....................... 249Front Air Bag............................................. 135If Deployment Occurs................................ 140Knee Impact Bolsters................................ 137Maintaining Your Air Bag System.............. 142Maintenance............................................. 142Redundant Air Bag Warning Light.............135Side Air Bags............................................. 137Transporting Pets...................................... 155
Air Bag Light.................................. 95, 134, 156
Air Cleaner, Engine (Engine Air Cleaner Filter)... 275
Air Conditioner Maintenance........................ 275Air Conditioner Refrigerant........................... 275Air Conditioner System................................. 275Air Conditioning.................................. 53, 57, 61Air Conditioning Filter..............................63, 276Air Conditioning, Operating Tips....................... 62Air Filter........................................................ 275Air PressureTires......................................................... 294AlarmArm The System................................... 24, 25Panic........................................................... 15Rearm The System...................................... 25Security Alarm...................................... 24, 98Alarm SystemSecurity Alarm............................................. 24All Wheel DriveTowing...................................................... 249Alterations/ModificationsVehicle........................................................... 9Android Auto................................................. 389Antifreeze (Engine Coolant)........ 281, 313, 314Disposal................................................... 283
Anti-Lock Brake System (ABS)....................... 106Anti-Lock Warning Light................................ 101Apple CarPlay................................................ 389Arming SystemSecurity Alarm.............................................24Assist, Hill Start............................................. 111Audio Settings............................................... 361Audio Systems (Radio).................................. 321Auto Down Power Windows..............................65Auto Up Power Windows..................................65Automatic Door Locks...............................29, 30Automatic Headlights.......................................47Automatic High Beams.....................................46Automatic Temperature Control (ATC).......57, 62Automatic Transmission....................... 167, 286Adding Fluid......... 286, 315, 317, 318, 320Fluid And Filter Change............................. 286Fluid Change............................................. 286Fluid Level Check...................................... 285Fluid Type............ 285, 315, 317, 318, 320Special Additives...................................... 285Automatic Transmission
Limp Home Mode................................... 29, 171AutoPark....................................................... 16011
20_LD_OM_EN_USC_t.book Page 395
Page 398 of 412

396 Autostick Operation
.................................................. 172AUX Cord........................................................ 383Aux Mode....................................................... 365Auxiliary Electrical Outlet (Power Outlet).......... 78AWDTowing....................................................... 249Axle Fluid........................... 315, 317, 318, 320Axle Lubrication................. 315, 317, 318, 320
B
Back-Up......................................................... 199Battery.................................................... 96, 271Charging System Light................................. 96Keyless Key Fob Replacement.................... 15Location.................................................... 271Belts, Seat..................................................... 156BluetoothConnect Or Disconnect Link Between the Uconnect Phone And Mobile Phone
...... 381Connecting To A Particular Mobile Phone Or Audio Device After Pairing................376Bluetooth Mode............................................. 366Body Mechanism Lubrication........................ 277B-Pillar Location............................................. 290Brake Assist System...................................... 107Brake Control System.................................... 107Brake Fluid...............284, 315, 317, 318, 320
Brake System...................................... 284, 308Fluid Check.......... 284, 315, 317, 318, 320Master Cylinder........................................ 284Parking..................................................... 164Warning Light.....................................95, 308Brake/Transmission Interlock...................... 167Break-In Recommendations, New Vehicle.... 163Brightness, Interior Lights................................ 50Bulb Replacement........................................ 217Bulbs, Light.......................................... 157, 217
C
Camera, Rear................................................ 199Capacities, Fluid.................................. 313, 314Caps, FillerOil (Engine)...................................... 266, 274Radiator (Coolant Pressure)..................... 282Car Washes................................................... 305Carbon Monoxide Warning................... 155, 312CargoVehicle Loading........................................ 202Cargo Area Cover............................................. 70Cargo Compartment........................................ 70Cellular Phone.............................................. 383Certification Label......................................... 202Chains, Tire.......................................... 301, 302Changing A Flat Tire...................................... 286Chart, Tire Sizing........................................... 287
Check Engine Light (Malfunction
Indicator Light).............................................. 105Checking Your Vehicle For Safety.................. 155Checks, Safety.............................................. 155Child Restraint.............................................. 143Child RestraintsBooster Seats........................................... 145Child Seat Installation............................... 152How To Stow An unused ALR Seat Belt..... 150Infant And Child Restraints....................... 144Lower Anchors And Tethers For Children.. 147Older Children And Child Restraints.......... 145Seating Positions...................................... 146Child Safety Locks............................................30Clean Air Gasoline......................................... 310CleaningWheels...................................................... 300Climate Control................................................52Automatic....................................................57Manual........................................................53Coin Holder......................................................76Cold Weather Operation................................ 162Compact Spare Tire...................................... 299ConsoleFloor............................................................76Contract, Service........................................... 392Cooling Pressure Cap (Radiator Cap)............ 282
20_LD_OM_EN_USC_t.book Page 396