2020 DODGE CHARGER ECO mode
[x] Cancel search: ECO modePage 298 of 412

296SERVICING AND MAINTENANCE
limited driving capabilities and needs to be
replaced immediately. A Run Flat tire is not
repairable. When a run flat tire is changed after
driving with underinflated tire condition, please
replace the TPM sensor as it is not designed to
be reused when driven under run flat mode 14
psi (96 kPa) condition.
NOTE:
TPM Sensor must be replaced after driving the
vehicle on a flat tire condition.
It is not recommended driving a vehicle loaded
at full capacity or to tow a trailer while a tire is in
the run flat mode.
See the tire pressure monitoring section for
more information.
Tire Spinning
When stuck in mud, sand, snow, or ice conditions,
do not spin your vehicle's wheels above 30 mph
(48 km/h) or for longer than 30 seconds
continuously without stopping.
Refer to “Freeing A Stuck Vehicle” in “In Case Of
Emergency” for further information.
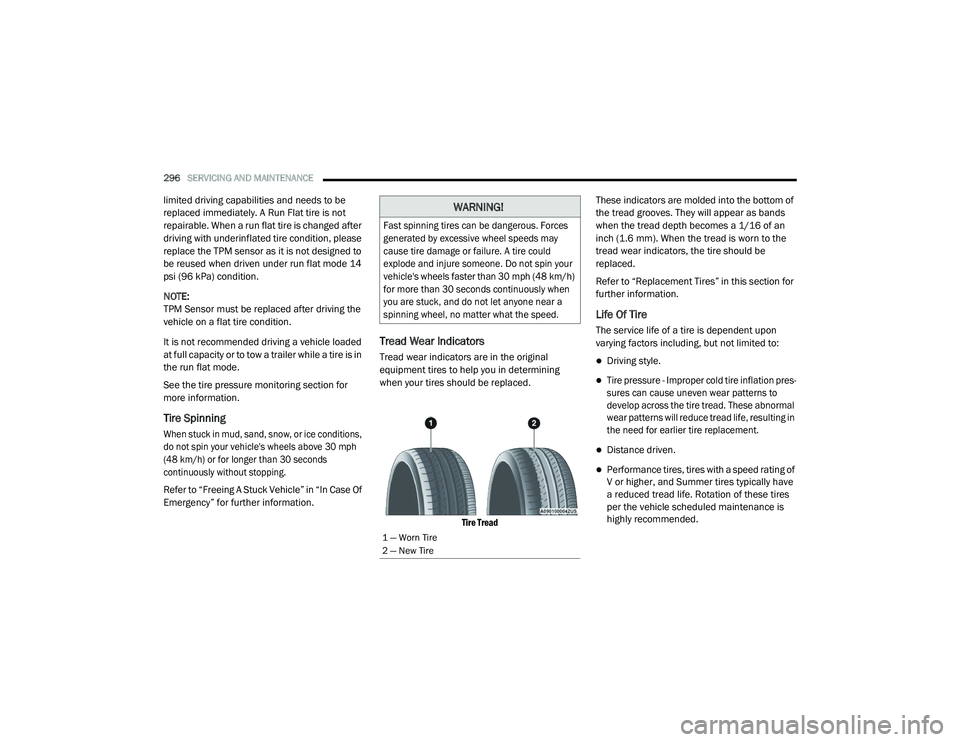
Tread Wear Indicators
Tread wear indicators are in the original
equipment tires to help you in determining
when your tires should be replaced.
Tire Tread
These indicators are molded into the bottom of
the tread grooves. They will appear as bands
when the tread depth becomes a 1/16 of an
inch (1.6 mm). When the tread is worn to the
tread wear indicators, the tire should be
replaced.
Refer to “Replacement Tires” in this section for
further information.
Life Of Tire
The service life of a tire is dependent upon
varying factors including, but not limited to:
Driving style.
Tire pressure - Improper cold tire inflation pres
-
sures can cause uneven wear patterns to
develop across the tire tread. These abnormal
wear patterns will reduce tread life, resulting in
the need for earlier tire replacement.
Distance driven.
Performance tires, tires with a speed rating of
V or higher, and Summer tires typically have
a reduced tread life. Rotation of these tires
per the vehicle scheduled maintenance is
highly recommended.
WARNING!
Fast spinning tires can be dangerous. Forces
generated by excessive wheel speeds may
cause tire damage or failure. A tire could
explode and injure someone. Do not spin your
vehicle's wheels faster than 30 mph (48 km/h)
for more than 30 seconds continuously when
you are stuck, and do not let anyone near a
spinning wheel, no matter what the speed.
1 — Worn Tire
2 — New Tire
20_LD_OM_EN_USC_t.book Page 296
Page 303 of 412

SERVICING AND MAINTENANCE301
When cleaning extremely dirty wheels including
excessive brake dust, care must be taken in the
selection of tire and wheel cleaning chemicals
and equipment to prevent damage to the wheels.
Mopar Wheel Treatment or Mopar Chrome
Cleaner or their equivalent is recommended or
select a non-abrasive, non-acidic cleaner for
aluminum or chrome wheels.
NOTE:
If you intend parking or storing your vehicle for
an extended period after cleaning the wheels
with wheel cleaner, drive your vehicle and apply
the brakes to remove the water droplets from
the brake components. This activity will remove
the red rust on the brake rotors and prevent
vehicle vibration when braking. Dark Vapor Chrome, Black Satin Chrome, or
Low Gloss Clear Coat Wheels
TIRE CHAINS AND TRACTION DEVICES —
N
ON-SRT
Use of traction devices require sufficient
tire-to-body clearance. Due to limited clearance,
the following traction devices are
recommended. Follow these recommendations
to guard against damage.
Traction device must be of proper size for the
tire, as recommended by the traction device
manufacturer.
No other tire sizes are recommended for use
with a tire chain or traction device.
Install on rear tires only.
Rear Wheel Drive (RWD) Models
For a P215/65R17 tire, use a Peerless Chain
Super Z6 low profile traction device or
equivalent is recommended.
All Wheel Drive (AWD) Models
For a P235/55R19 tire, use of an S Class
traction device or equivalent is recommended.
CAUTION!
Do not use scouring pads, steel wool, a bristle
brush, metal polishes or oven cleaner. These
products may damage the wheel's protective
finish. Such damage is not covered by the
New Vehicle Limited Warranty. Only car wash
soap, Mopar Wheel Cleaner or equivalent is
recommended.
CAUTION!
If your vehicle is equipped with these
specialty wheels, DO NOT USE wheel
cleaners, abrasives, or polishing compounds.
They will permanently damage this finish and
such damage is not covered by the New
Vehicle Limited Warranty. HAND WASH ONLY
USING MILD SOAP AND WATER WITH A SOFT
CLOTH. Used on a regular basis; this is all that
is required to maintain this finish.
WARNING!
Using tires of different size and type (M+S,
Snow) between front and rear axles can
cause unpredictable handling. You could lose
control and have a collision.
7
20_LD_OM_EN_USC_t.book Page 301
Page 311 of 412

TECHNICAL SPECIFICATIONS309
SRT Model Vehicle
**Use only authorized dealer recommended lug
nuts/bolts and clean or remove any dirt or oil before
tightening.
Inspect the wheel mounting surface prior to
mounting the tire and remove any corrosion or
loose particles.
Wheel Mounting Surface
Tighten the lug nuts/bolts in a star pattern until
each nut/bolt has been tightened twice. Ensure
that the socket is fully engaged on the lug nut/
bolt (do not insert it halfway). NOTE:
If in doubt about the correct tightness, have
them checked with a torque wrench by an
authorized dealer or service station.
After 25 miles (40 km), check the lug nut/bolt
torque to be sure that all the lug nuts/bolts are
properly seated against the wheel.
Torque Patterns
FUEL REQUIREMENTS
3.6L ENGINE
This engine is designed to meet all
emissions regulations and provide
excellent fuel economy and
performance when using high-quality
unleaded “Regular” gasoline having an octane
rating of 87 as specified by the (R+M)/2 method.
The use of higher octane “Premium” gasoline will
not provide any benefit over “Regular” gasoline in
these engines.
While operating on gasoline with an octane
number of 87, hearing a light knocking sound
from the engine is not a cause for concern.
However, if the engine is heard making a heavy
knocking sound, see a dealer immediately. Use
of gasoline with an octane number lower than
87 can cause engine failure and may void or not
be covered by the New Vehicle Limited
Warranty.
Poor quality gasoline can cause problems such
as hard starting, stalling, and hesitations. If you
experience these symptoms, try another brand
of gasoline before considering service for the
vehicle.
Lug Nut/Bolt
Torque
**Lug Nut/
Bolt SizeLug Nut/Bolt
Socket Size
111 Ft-Lbs
(150 N·m) M14 x 1.50 22 mm
WARNING!
To avoid the risk of forcing the vehicle off the
jack, do not tighten the lug nuts/bolts fully
until the vehicle has been lowered. Failure to
follow this warning may result in personal
injury.
8
20_LD_OM_EN_USC_t.book Page 309
Page 313 of 412

TECHNICAL SPECIFICATIONS311
Designated TOP TIER Detergent
Gasoline contains a higher level of
detergents to further aide in
minimizing engine and fuel system
deposits. When available, the usage of TOP
TIER Detergent gasoline is recommended. Visit
www.toptiergas.com for a list of TOP TIER
Detergent Gasoline Retailers.
Indiscriminate use of fuel system cleaning
agents should be avoided. Many of these
materials intended for gum and varnish
removal may contain active solvents or similar
ingredients. These can harm fuel system gasket
and diaphragm materials.
GASOLINE/OXYGENATE BLENDS
Some fuel suppliers blend unleaded gasoline
with oxygenates such as ethanol. Problems that result from using gasoline
containing more than 15% ethanol (E-15) or
gasoline containing methanol are not the
responsibility of the manufacturer and may void
or not be covered under New Vehicle Limited
Warranty.
DO NOT USE E-85 IN NON-FLEX FUEL
V
EHICLES
Non-Flex Fuel Vehicles (FFV) are compatible
with gasoline containing up to 15% ethanol
(E-15). Use of gasoline with higher ethanol
content may void the New Vehicle Limited
Warranty.
If a Non-FFV vehicle is inadvertently fueled with
E-85 fuel, the engine will have some or all of
these symptoms:
Operate in a lean mode.
OBD II Malfunction Indicator Light on.
Poor engine performance.
Poor cold start and cold drivability.
Increased risk for fuel system component
corrosion.
CAUTION!
DO NOT use E-85, gasoline containing
methanol, or gasoline containing more than
15% ethanol (E-15). Use of these blends may
result in starting and drivability problems,
damage critical fuel system components,
cause emissions to exceed the applicable
standard, and/or cause the Malfunction
Indicator Light to illuminate. Please observe
pump labels as they should clearly
communicate if a fuel contains greater than
15% ethanol (E-15).
8
20_LD_OM_EN_USC_t.book Page 311
Page 331 of 412

MULTIMEDIA329
Blind Spot Alert — If Equipped OffLightsLights and Chime
NOTE:
When this feature is selected, the Blind Spot Alert feature provides alerts, visual and/or audible, to indicate objects in your blind spot. The Blind
Spot Alert feature can be activated in “Lights” mode. When this mode is selected, the Blind Spot Monitor (BSM) system is activated and will only
show a visual alert in the exterior mirrors. When “Lights & Chime” mode is activated, BSM will show a visual alert in the exterior mirrors as well as
sounds an audible alert when the turn signal is on. When “Off” is selected, the BSM system is deactivated.
If your vehicle has experienced any damage in the area where the sensor is located, even if the fascia is not damaged, the sensor may have become
misaligned. Take your vehicle to an authorized dealer to verify sensor alignment. Having a sensor that is misaligned will result in the BSM not oper -
ating to specification.
ParkView Backup Camera Active Guidelines On
Off
NOTE:
Your vehicle may be equipped with the “ParkView Backup Camera Active Guidelines” that allows you to see active guidelines over the ParkView
Backup camera display whenever the gear selector is put into REVERSE. The image will be displayed on the radio touchscreen display along with a
caution note to “check entire surroundings” across the top of the screen. After five seconds, this note will disappear. ParkView Backup Camera Delay On Off
NOTE:
When the vehicle is shifted out of REVERSE (with camera delay turned Off), the rear camera mode is exited and the navigation or audio screen appears
again. When the vehicle is shifted out of REVERSE (with camera delay turned On), the rear view image with dynamic grid lines will be displayed for up
to 10 seconds after shifting out of “REVERSE” unless the forward vehicle speed exceeds 8 mph (12 km/h), the transmission is shifted into “PARK”
or the ignition is switched to the OFF position. To set the ParkView Backup Camera Delay, press the Controls button on the touchscreen, the Settings
button on the touchscreen, then the Safety & Driving Assistance button on the touchscreen.
Setting Name Selectable Options
9
20_LD_OM_EN_USC_t.book Page 329
Page 346 of 412

344MULTIMEDIA
Mirrors & Wipers — If Equipped
After pressing the Mirrors & Wipers button on the touchscreen, the following settings will be available:Blind Spot Alert — If Equipped
OffLightsLights & Chime
NOTE:
When this feature is selected, the Blind Spot Alert feature provides alerts, visual and/or audible, to indicate objects in your blind spot. The Blind
Spot Alert feature can be activated in “Lights” mode. When this mode is selected, the Blind Spot Monitor (BSM) system is activated and will only
show a visual alert in the exterior mirrors. When “Lights & Chime” mode is activated, BSM will show a visual alert in the exterior mirrors as well as
sound an audible alert when the turn signal is on. When “Off” is selected, the BSM system is deactivated.
If your vehicle has experienced any damage in the area where the sensor is located, even if the fascia is not damaged, the sensor may have become
misaligned. Take your vehicle to an authorized dealer to verify sensor alignment. Having a sensor that is misaligned will result in the BSM not oper -
ating to specification.
Hill Start Assist — If Equipped On Off
NOTE:
When this feature is selected, the Hill Start Assist (HSA) system is active. Paddle Shifters — If Equipped On Off
Setting Name Selectable Options
Setting NameSelectable Options
Rain Sensing Auto WipersOnOff
NOTE:
When this feature is selected and the wipers are on, the system will automatically activate the windshield wipers if it senses moisture on the wind -
shield.
20_LD_OM_EN_USC_t.book Page 344
Page 358 of 412

356MULTIMEDIA
Drag & Drop Menu Bar
The Uconnect features and services in the main
menu bar are easily changed for your
convenience. Simply follow these steps:
Uconnect 4 Main Menu
1. Press the Apps button to open the App screen.
2. Press and hold, then drag the selected App to replace an existing shortcut in the main
menu bar.
The new app shortcut, that was dragged down
onto the main menu bar, will now be an active
App/shortcut.
NOTE:
This feature is only available if the vehicle is in
PARK.
RADIO MODE
Radio Controls
The radio is equipped with the following modes:
AM
FM
SiriusXM® Satellite Radio – If Equipped
Press the Radio button on the touchscreen,
bottom left corner, to enter the Radio Mode. The
different tuner modes, AM, FM, and SXM, can
then be selected by pressing the corresponding
buttons in the Radio mode.
Volume/Power Control
Push the Volume/Power control knob to turn off
the screen and mute the radio. Push the
Volume/Power control knob a second time to
turn the screen back on and unmute the radio.
The electronic volume control turns
continuously (360 degrees) in either direction,
without stopping. Turning the Volume/Power
control knob clockwise increases the volume,
and counterclockwise decreases it. Tune/Scroll Control
When the audio system is turned on, the sound
will be set at the same volume level as last played.
Turn the rotary Tune/Scroll control knob
clockwise to increase or counterclockwise to
decrease the radio station frequency. Push the
Enter/Browse button to choose a selection.
Screen Close
The X button on the touchscreen at the top right,
provides a means to close the Direct Tune
Screen. The Direct Tune Screen also auto
closes if no activity occurs within a few seconds.
Seek And Direct Tune Functions
The Seek Up and Down functions are activated
by pressing the double arrow buttons on the
touchscreen to the right and left of the radio
station display or by pressing the left Steering
Wheel Audio Control up or down.
Seek Up
Press and release the Seek Up button on the
touchscreen to tune the radio to the next
listenable station or channel. During a Seek Up
function, if the radio reaches the starting station
after passing through the entire band two times,
the radio will stop at the station where it began.
20_LD_OM_EN_USC_t.book Page 356
Page 359 of 412

MULTIMEDIA357
Fast Seek Up
Press and hold the Seek Up button on the
touchscreen to advance the radio through the
available stations or channels at a faster rate. The
radio stops at the next available station or channel
when the button on the touchscreen is released.
Seek Down
Press and release the Seek Down button on the
touchscreen to tune the radio to the next
listenable station or channel. During a Seek
Down function, if the radio reaches the starting
station after passing through the entire band
two times, the radio will stop at the station
where it began.
Fast Seek Down
Press and hold the Seek Down button on the
touchscreen to advance the radio through the
available stations or channel at a faster rate. The
radio stops at the next available station or channel
when the button on the touchscreen is released.
Direct Tune
Press the Tune button on the touchscreen
located at the bottom of the radio screen. The
Direct Tune button on the touchscreen is
available in AM, FM, and SXM radio modes and can be used to direct tune the radio to a desired
station or channel.
Press the available number button on the
touchscreen to begin selecting a desired
station. Once a number has been entered, any
numbers that are no longer possible (stations
that cannot be reached) will become
deactivated/grayed out.
Undo
You can backspace an entry by pressing the
bottom left on the touchscreen.
OK
Once the last digit of a station has been
entered, press the OK button, and the Direct
Tune screen will close. The system will
automatically tune to that station.
The selected Station or Channel number is
displayed in the Direct Tune text box.
Setting Presets
The Presets are available for all Radio Modes,
and are activated by pressing any of the six
Preset buttons on the touchscreen, located at
the top of the screen.
When you are receiving a station that you wish
to commit into memory, press and hold the
desired numbered button on the touchscreen
for more than two seconds or until you hear a
confirmation beep.
The Radio stores up to 12 presets in each of the
Radio modes. A set of six presets are visible at
the top of the radio screen.
You can switch between the two radio presets
by pressing the Arrow button located in the
upper right of the radio touchscreen.
Browse In AM/FM
When in either AM or FM, the Browse Screen
provides a means to edit the Presets List and is
entered by pushing the ENTER/BROWSE
button.
Scrolling Preset List
Once in the Browse Presets screen, you can
scroll the preset list by rotation of the TUNE/
SCROLL knob, or by pressing the Up and Down
arrow keys, located on the right of the screen.
9
20_LD_OM_EN_USC_t.book Page 357