2020 CITROEN RELAY Service
[x] Cancel search: ServicePage 104 of 196
102
Practical information
If the AdBlue® tank is completely empty
– which is confirmed by the message
"Top up AdBlue: Starting impossible" – it is
essential to add at least 5 litres.
After refilling
► Refit the blue cap to the tank filler and turn it
clockwise as far as it will go (one sixth of a turn).
► Close the fuel filler flap.
Do not dispose of AdBlue® containers in
the household waste.
Place them in a container reserved for this
purpose or take them back to where you
bought them.
Never store AdBlue® containers in your
vehicle.
Precautions for use
AdBlue® is a urea-based solution. This fluid is
non-flammable, colourless and odourless (when
kept in a cool place).
In the event of contact with the skin, wash the
affected area with soap and running water. In the
event of contact with the eyes, immediately rinse
the eyes with large amounts of water or with an
eye wash solution for at least 15 minutes. Seek
medical attention if you feel a persistent burning
sensation or irritation.
If swallowed, immediately wash out the mouth
with clean water and then drink plenty of water.
In certain conditions (high temperature, for
example), the risk of release of ammonia cannot
be excluded: do not inhale the fluid. Ammonia
vapours have an irritant effect on mucous
membranes (eyes, nose and throat).
Store AdBlue® out of the reach of
children, in its original container.
Procedure
Before starting the top-up procedure, ensure that
the vehicle is parked on a flat and level surface.
In wintry conditions, ensure that the temperature
of the vehicle is above -11 °C. Otherwise the
AdBlue
® may be frozen and so cannot be poured
into its tank. Park the vehicle in a warmer area
for a few hours to allow the top-up to be carried
out.
Never put the AdBlue® into the Diesel
fuel tank.
If any AdBlue® is splashed, or if there are
any spillages on the bodywork, rinse
immediately with cold water or wipe with a
damp cloth.
If the fluid has crystallised, clean it off using a
sponge and hot water.
Important: in the event of a top-up after
an AdBlue breakdown, you must wait
about 5 minutes before switching on the
ignition, without opening the driver's door,
unlocking the vehicle or bringing the
electronic key into the passenger
compartment.
Switch on the ignition, then wait for 10
seconds before starting the engine.
► Switch off the ignition and remove the key
from the switch to switch off the engine.
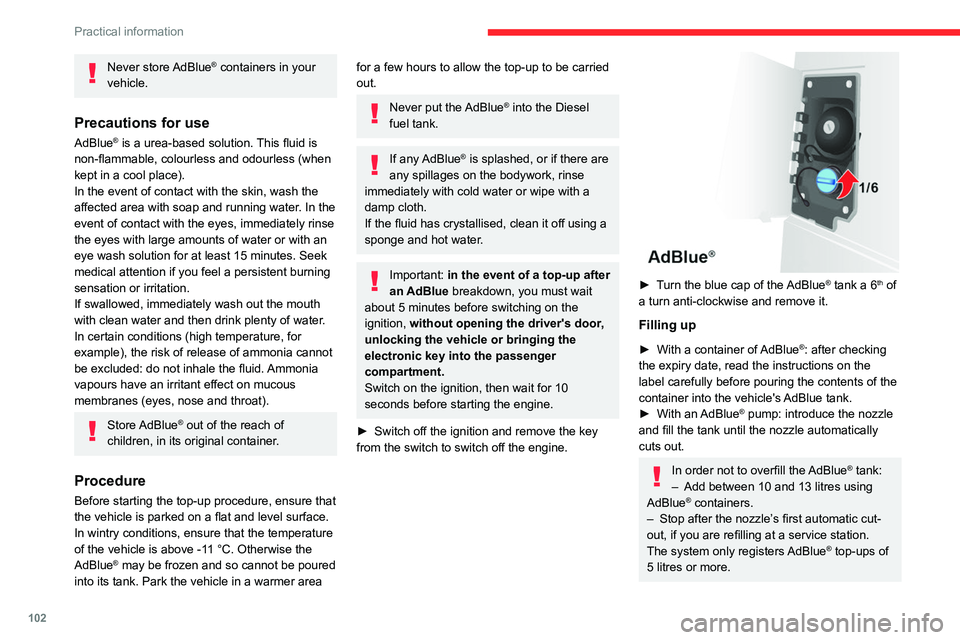
► Turn the blue cap of the AdBlue® tank a 6th of
a turn anti-clockwise and remove it.
Filling up
► With a container of AdBlue®: after checking
the expiry date, read the instructions on the
label carefully before pouring the contents of the
container into the vehicle's AdBlue tank.
► With an AdBlue
® pump: introduce the nozzle
and fill the tank until the nozzle automatically
cuts out.
In order not to overfill the AdBlue® tank:
– Add between 10 and 13 litres using
AdBlue
® containers.
– Stop after the nozzle’s first automatic cut-
out, if you are refilling at a service station.
The system only registers AdBlue
® top-ups of
5 litres or more.
Page 124 of 196

122
In the event of a breakdown
► Connect the red cable to metallic terminal A,
then to the (+) terminal of backup battery B.
► Connect one end of the green or black cable
to the negative (-) terminal of backup battery B.
► Connect the other end of the green or black
cable to earth point C of your vehicle.
► Operate the starter, let the engine run.
► Wait for the engine to return to idle and
disconnect the cables.
Charging the battery using a
battery charger
► Access the battery, located in the left-hand
front floor.
► Disconnect the battery.
► Follow the instructions for use provided by
the manufacturer of the charger.
► Reconnect starting with the (-) terminal.
► Check the cleanliness of the terminals. If they
are covered with sulphate (whitish or greenish
deposit), remove and clean them.
The charging operation must be carried out in a well-ventilated area and away
from naked flames and any sources of sparks
so as to avoid the risk of explosion or fire.
Do not try to recharge a frozen battery: it
must first be thawed to avoid the risk of
explosion. If it has frozen, before charging it,
have the battery checked by a specialist who
will check that the interior components have
not been damaged and that the container is
not cracked, which would involve a risk of
leakage of toxic and corrosive acid.
Perform a slow charge at low amperage for
about 24 hours maximum to avoid damaging
the battery.
The presence of this label, in particular with the Stop & Start system, indicates
the use of a 12 V lead-acid battery with
special technology and specification; the
involvement of a CITROËN dealer or a
qualified workshop is essential when
replacing or disconnecting the battery.
After refitting the battery at a CITROËN dealer or a qualified workshop, the Stop
& Start system will only be active after a
continuous period of immobilisation of the
vehicle, a period which depends on the
climatic conditions and the state of charge of
the battery (up to about 8 hours).
Towing
General recommendations
Observe the legislation in force in the
country where you are driving.
Ensure that the weight of the towing vehicle is
higher than that of the towed vehicle.
The driver must remain at the wheel of the
towed vehicle and must have a valid driving
licence.
When towing a vehicle with all four wheels on
the ground, always use an approved towing
arm; rope and straps are prohibited.
The towing vehicle must move off gently.
When the vehicle is towed with its engine
off, there is no longer braking and steering
assistance.
A professional towing service must be
called if:
– Broken down on a motorway or main road.
– Not possible to put the gearbox into neutral,
unlock the steering, or release the parking
brake.
– Not possible to tow a vehicle with an
automatic gearbox, with the engine running.
– Towing with only two wheels on the ground.
– Four-wheel drive vehicle.
– No approved towbar available.
Towing your vehicle
The removable towing eye is located in the tool
box under the front passenger seat.
► Unclip the cover using a flat tool.
► Screw the removable towing eye in fully.
► Attach the approved towbar to the removable
towing eye.
► Place the gear lever in neutral.
Page 150 of 196
148
Special features
– Never work under a tipper body that is not
supported,
– Switch off the power supply to the electro-
hydraulic unit using the circuit breaker,
– Vehicle stationary, engine off.
For safety reasons, we very strongly
advise against doing anything under the
tipper body while it is being operated or while
it is being serviced.
Maintenance
Reservoir
Regularly check and top up the engine oil level.
Change the oil once a year. If the oil contains
water, change it.
Regularly check the condition of the hose and
ensure the hydraulic system is properly sealed.
Pump and motor
No servicing required. The rolling elements are
permanently lubricated and the bearings are
lubricated by the pumped oil.
Lubrication
The pins of the tipper truck and the ram do not
contain lubricant. Regularly lubricate the hinges
and the grab handles of the side boards as well
as the retaining hooks of the rear board.
Sub-frame and tipper truck
For maximum service life, you are advised to
maintain your tipper truck by regularly washing it
using a power washer.
Carry out any required paint touch-ups quickly to
prevent the spread of rust.
After 8 months of use, check the tightening torque of the connection
between the chassis and the underbody (in
accordance with the manufacturer's
bodybuilding recommendations).
Cleaning the slide valve
► Loosen cap 244A, taking care with the ball
and retrieving it.
► Using a wide screwdriver, unscrew the banjo
bolt/piston assembly.
► Check that the piston slides freely and
remove any foreign bodies. Use a magnet to
remove any metal filings.
► Refit the assembly and make sure that the
piston slides freely. Retain the ball with a little
grease on the cap for refitting.
► Bleed the hydraulic unit.
Bleeding the hydraulic unit
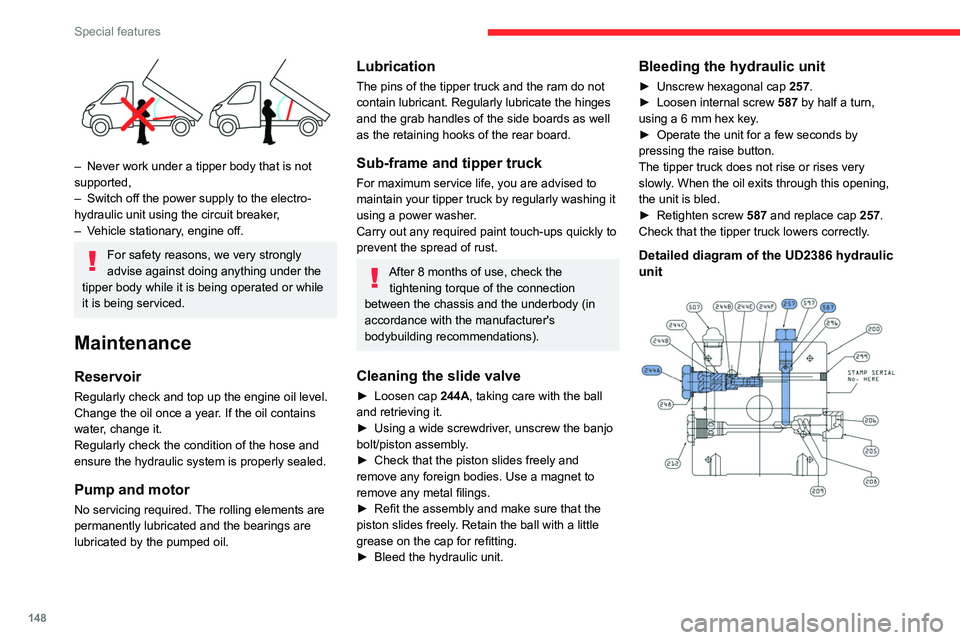
► Unscrew hexagonal cap 257.
► Loosen internal screw 587 by half a turn,
using a 6 mm hex key.
► Operate the unit for a few seconds by
pressing the raise button.
The tipper truck does not rise or rises very
slowly. When the oil exits through this opening,
the unit is bled.
► Retighten screw 587 and replace cap 257.
Check that the tipper truck lowers correctly.
Detailed diagram of the UD2386 hydraulic
unit
Diagnostics
Symptoms ElectricHydraulic Verification/Check
The hydraulic unit does not work. XPower harness and unit relay.
X Control harness (control unit).
X Circuit-breaker.
Very noisy unit, rises slowly. XSuction strainer clogged or crushed at the bottom of the tank.
Very noisy new unit, rises quickly. XPump alignment, change the unit.
The ram lowers by itself. XLowering valve crushed or blocked.
The ram does not lower. XYes, check the slide valve and bleed.
Refer to the "Maintenance" section.
X No, check the coil and the electrical connections of the valve.
X No, replace the solenoid valve.
X No, check the alignment of the ram.
The unit works but its pressure does
not increase. X
Slide valve jammed if no solenoid valve on the unit.
Refer to the "Maintenance" section.
X Pressure relief device, setting, dirt.
X Pump seal out of service.
X Motor/pump coupling.
X Pump loose from its support.
The hydraulic unit does not work. XSolenoid valve blocked, replace it or retighten the nut behind the strainer .
The control unit does not work. XCheck connection and contacts.
Emulsion in the tank. XIncorrectly positioned return pipe.
X Insufficient oil level.
Page 151 of 196
149
Special features
10Diagnostics
SymptomsElectricHydraulic Verification/Check
The hydraulic unit does not work. XPower harness and unit relay.
X Control harness (control unit).
X Circuit-breaker.
Very noisy unit, rises slowly. XSuction strainer clogged or crushed at the bottom of the tank.
Very noisy new unit, rises quickly. XPump alignment, change the unit.
The ram lowers by itself. XLowering valve crushed or blocked.
The ram does not lower. XYes, check the slide valve and bleed.
Refer to the "Maintenance" section.
X No, check the coil and the electrical connections of the valve.
X No, replace the solenoid valve.
X No, check the alignment of the ram.
The unit works but its pressure does
not increase. X
Slide valve jammed if no solenoid valve on the unit.
Refer to the "Maintenance" section.
X Pressure relief device, setting, dirt.
X Pump seal out of service.
X Motor/pump coupling.
X Pump loose from its support.
The hydraulic unit does not work. XSolenoid valve blocked, replace it or retighten the nut behind the strainer .
The control unit does not work. XCheck connection and contacts.
Emulsion in the tank. XIncorrectly positioned return pipe.
X Insufficient oil level.
Page 158 of 196
156
Audio system
Play the audio book "Book 1”.
Listen to track number > "5"
Play track number “5”.
Select > "USB"
Select the USB media support as the active
audio source.
Browse > "Album"
View the list of available albums.
"Text message" voice
commands
The following commands can be made
from each main screen after pressing the
telephone button located on the steering wheel,
as long as there is no telephone call in progress.
Send a text message to > 0123456789
Start the voice procedure to send a preset text
message using the system.
Send a text message to > Henri Dupont >
Mobile phone
Start the voice procedure to send a preset text
message using the system.
View text message > Henri Dupont > Mobile
phone
View the list of text messages downloaded by
the phone.
"Hands-free calls" voice
commands
The following commands are available
when a call is in progress.
It is possible to replace the "Mobile
phone" tag with three other available
tags: "Home"; "Office"; "Other".
Call* > Henri Dupont
Dial the telephone number associated with the
contact Henri Dupont.
Call* > Henri Dupont > Mobile phone
Dial the telephone number with the mobile phone
tag associated with the contact Henri Dupont.
Call number > 0123456789
Call number 0123456789.
Redial
Call the number or contact of the last call made.
Call back
Call the number or contact of the last call
received.
Recent calls*
View the complete list of recent calls: outgoing,
missed and incoming.
Outgoing calls *
View the list of outgoing calls.
Missed calls*
View the list of missed calls.
Incoming calls *
View the list of incoming calls.
Directory *
View the directory of the connected telephone.
* This function is available only if the telephone connected to the system supports downloading of contacts and recent calls and if the corresponding
download has been performed.
** This function is available only if the telephone connected to the system supports the text message reading function.
*** It is possible to replace "Magic" with any other FM station name received by the radio. Not all radio stations provide this service.
Search* > Henri Dupont
View Henri Dupont's contact information in the
directory with all of the numbers saved.
Search* > Henri Dupont > Mobile phone
View the telephone number with the mobile
phone tag associated with the contact Henri
Dupont.
View messages **
View the list of text messages received by the
connected telephone.
If the telephone allows the recording of
the "First Name" (Henri) and the
"Surname" (Dupont) in two separate fields,
perform the following voice commands:
– "Call" > "Henri" > "Dupont" or "Call" >
"Dupont" > "Henri".
– "Search" > "Henri" > "Dupont" or "Search"
> "Dupont" > "Henri".
"AM/FM radio” voice
commands
The following commands can be made
from any main screen page after pressing
the voice recognition button located on the
steering wheel, as long as there is no telephone
call in progress. Tune to
> 105.5 > FM
Tune the radio to the 105.5 frequency of the FM
band.
Tune to > 940 > AM
Tune the radio to the 940 frequency of the AM
band.
Tune to *** > Magic > FM
Tune the radio to the station Magic.
"Media" voice commands
The following commands can be made from any main screen page after pressing
the voice recognition button located on the
steering wheel, as long as there is no telephone
call in progress.
Listen to track > "Track 1 "
Play the track “Track 1”.
Listen to album > "Album 1"
Play the songs of the album “Album 1”.
Listen to artist > "Artist 1"
Play the songs of the artist “Artist 1”.
Listen to music style > "Jazz"
Play the songs of the music style “Jazz”.
Listen to playlist > "Playlist 1"
Play the songs of the playlist “Playlist1”.
Listen to podcast > "Radio 1"
Play the podcast “Podcast 1”.
Listen to audio book > "Book 1"
Page 165 of 196
163
Touch screen audio and telematics system
12To protect the system, do not use a USB hub.
The system does not support the simultaneous connection of two identical
devices (two memory sticks or two
Apple
® players) but it is possible to connect
one memory stick and one Apple® player at
the same time.
It is recommended that you use genuine
Apple® USB cables to guarantee correct
operation.
Bluetooth® Streaming
Streaming allows music files on the telephone to
be played via the vehicle's speakers.
Active the Bluetooth
® function on the device.Press "MEDIA".
If there is a media source active, press
the "Source" button.
Select the "Bluetooth®" media source
then press the "Add device” button.
If no device has yet been paired with the system,
a special page is displayed on the screen.
Select "Yes" to start the pairing procedure, and
then search for the name of the system on the
device.
Select the name of the system on the device
and, when requested by the audio system,
enter the PIN code displayed on the screen of
the system or confirm the PIN displayed on the
device.
During pairing, a screen page is displayed
showing the progress of the operation.
If the pairing procedure fails, we recommend
deactivating and then reactivating the Bluetooth
®
function on your device.
Once the pairing procedure is complete, a
screen page appears:
– if you reply "Yes" to the question, the
Bluetooth
® audio device will be saved as
favourite (the device will have priority over other
devices paired later).
– if you reply "No", the priority will be determined
by the order of connection. The last device
connected has the highest priority.
Some Bluetooth® devices do not allow
you to scroll through the tracks and
information on the telephone using all of the
categories present in the system.
Connecting Apple® players
Connect the Apple® player to the USB
socket using a suitable cable (not
supplied).
Play starts automatically.
Control is via the audio system.
The classifications available are those of the portable device connected (artists/
albums/types/tracks/playlists/audio books/
podcasts).
The default classification is sorting by artist.
To change the classification used, return to
the first level of the menu and then select the
desired classification (playlists for example)
and confirm to browse the tree to the desired
track.
The audio system software version may not be compatible with the generation of
your Apple
® player.
Navigation
Press "N AV " and then at the centre or
bottom of the screen to display the
settings and navigation menus:
Go to...
Select "Go to" to set the destination in several
ways and not just by entering the address.
Display the map
Display the route map for an overview using the
map's navigator.
Plan a route
Use the navigation system to plan a route in
advance by selecting the starting point and the
destination.
Services
Use traffic information to minimise the impact of
traffic delays on your route.
Settings
Page 166 of 196
164
Touch screen audio and telematics system
Change the appearance and behaviour of the
navigation system.
Most system settings can be accessed by
touching "Settings" in the main menu.
Help
Access information about assistance services
and other specialised services.
Finish
Validate the settings.
Limitation
Speed limitation (if known).
To see the difference between the desired arrival
time and the estimated arrival time.
Switch between a 3D map and a 2D map.
Go to..., Display the map, Plan a route,
Services, Settings, Help, Finish.
When the navigation system starts for the first
time, the "Driving mode" as well as detailed
information on the current position is displayed.
Touch the centre of the screen to open the main
menu.
Details
The route summary provides an overview of the
route, the remaining distance to the destination
and an estimate of the remaining travel time.
With the RDS-TMC data, the route summary
also shows the traffic information concerning
delays along the route.
Modify route
The navigation system helps you to get to your
destination as quickly as possible by displaying a
faster alternative route when it is available.
FinishValidate the settings.
Instructions
Navigation instructions for the next part of the
trip and the distance to the next instruction. If the
second instruction is less than 150 metres from
the first one, it is immediately displayed instead
of the distance.
Touch this part of the status bar to repeat the last
voice instruction.
Updating maps
To get a map update, you can proceed as follows:
– Map refresh guarantee: if a new map
becomes available within 90 days of the first
use of the system, you can download it once
for free.
– Map update: you can buy a new version of
your system’s map.
To install a map update on your system, perform
the following four steps:
– Prepare a USB device.
– Install TomTom HOME and create a
MyTomTom account.
– Download the map.
– Install the new map.
Use a USB device instead of a mass
storage device (telephone or media
player).
To protect the system, do not use a USB hub.
Prepare a USB device
The preparation of the USB device
must be done with the engine running
and the vehicle stationary.
In order to update the map, you must have
a USB device that meets the following
requirements:
– The USB device must be empty.
– The USB device has 16 GB of available
space.
– Use only USB devices in FAT32 format (File
Allocation Table).
– Do not lock the USB device and check that
files can be saved on it.
To prepare the USB device, proceed as follows:
► Make sure that the map you want to update is
active on your navigation system.
If the navigation system has multiple maps and
you want to update a map that is not currently
active, start by activating it.
► Select “Change map” in the “Settings” menu
of the navigation application.
► Select “Navigation updates” from the
“Settings” menu.
► You must indicate whether you want to
prepare a USB device to download updates.
► Select "Ye s ".
Page 169 of 196
167
Touch screen audio and telematics system
12system or confirm the PIN displayed on the
mobile phone.
During pairing, a screen page is displayed
showing the progress of the operation.
If the pairing procedure fails, it is
recommended that you deactivate and
then reactivate the Bluetooth function on your
telephone.
Once the pairing procedure is complete, a
screen page appears:
– answer "Yes" to the question; the mobile
phone is registered as the favourite (the mobile
phone will have priority over other mobile
phones, which may be registered later).
– if no other device is associated, the system
considers the first associated device as the
favourite.
For mobile phones that are not set as
favourites, priority is determined by the
connection order. The last phone
connected will have the highest priority.
The services available depend on the
network, the SIM card and the compatibility
of the Bluetooth
® devices used. Refer to your
telephone’s user guide and your service provider
to check which services you are able to access.
When you return to the vehicle, the last
phone connected reconnects automatically,
within approximately 30 seconds of switching the
ignition on (with Bluetooth
® activated).
To change the automatic connection profile,
select the phone from the list then select the
desired parameters.
The profiles compatible with the system are:
HFP, OPP, PBAP, A2DP, AVRCP, MAP.
Automatic reconnection
When the ignition is switched on, the telephone
connected when the ignition was last switched
off reconnects automatically, if this connection
mode had been set during the pairing procedure
(see previous pages).
The connection is confirmed by the display of a
message and the name of the telephone.
Managing paired telephones
This function allows a device to be connected or disconnected, as well as a
pairing to be deleted.
Press "Settings".
Select “Telephone/Bluetooth
®” then select the
telephone from the list of paired devices.
Select “Connect” or “Disconnect”, “Delete
device” or “Add device”, “Memorise
Favourite”, “Text on”, “Download ” from the list
of available options.
Receiving a call
An incoming call is announced by a ring and a
display overlaid on the screen.
Make a short press on this steering-
mounted button to accept an incoming
call.
or
Press the "Answer“ button displayed on the
screen.
If two calls are in progress (one in progress and
one on hold), it is possible to switch from one to
the other by pressing the " Call toggle” button or
unite the two calls in a conference by pressing
the "Confer." button.
Ending a call
To refuse a call, press this steering- mounted button.
or
Press the “Ignore” button displayed on the
screen.
Making a call
Calling a new number
You are strongly advised NOT to use the telephone while driving. We recommend
that you park safely or make use of the
steering-mounted controls.
Press “PHONE".
Press the keypad button.