2020 CHRYSLER 300 maintenance schedule
[x] Cancel search: maintenance schedulePage 7 of 328

5
Service The ParkSense Park Assist
System ........................................................ 182 Cleaning The ParkSense System ..............182
ParkSense System Usage Precautions ....182
LANESENSE — IF EQUIPPED ........................... 183
LaneSense Operation ................................183Turning LaneSense On Or Off ...................184LaneSense Warning Message ..................184
Changing LaneSense Status .....................186
PARKVIEW REAR BACK UP CAMERA ............. 186
REFUELING THE VEHICLE ................................. 188
Emergency Fuel Filler Door Release.........189
VEHICLE LOADING ............................................ 190
Vehicle Certification Label ........................ 190Gross Vehicle Weight Rating (GVWR) .......190
Gross Axle Weight Rating (GAWR) ........... 190Overloading ................................................190
Loading ......................................................190
TRAILER TOWING .............................................. 191
Common Towing Definitions .....................191Trailer Hitch Classification ........................ 193Trailer Towing Weights (Maximum Trailer
Weight Ratings) .........................................194 Trailer And Tongue Weight .......................194
Towing Requirements ................................195Towing Tips ................................................197 RECREATIONAL TOWING
(BEHIND MOTORHOME, ETC.) .......................... 198
DRIVING TIPS ...................................................... 198
Driving On Slippery Surfaces .................... 198
Driving Through Water .............................. 199
IN CASE OF EMERGENCY
HAZARD WARNING FLASHERS .......................201
ASSIST AND SOS MIRROR —
IF EQUIPPED ....................................................... 201General Information .................................. 205
BULB REPLACEMENT ........................................ 206
Replacement Bulbs ................................... 206
Replacing Exterior Bulbs ........................... 207
FUSES ..................................................................209
General Information .................................. 210Underhood Fuses ...................................... 210
Rear Interior Fuses .................................... 213
JACKING AND TIRE CHANGING ........................217
Jack Location/Spare Tire Stowage ........... 218
Preparations For Jacking .......................... 218Jacking And Changing A Tire .................... 219
Road Tire Installation ................................ 222
JUMP STARTING ................................................ 222
Preparations For Jump Start ..................... 222Jump Starting Procedure .......................... 223 REFUELING IN EMERGENCY –
IF EQUIPPED ...................................................... 224
IF YOUR ENGINE OVERHEATS ......................... 225
MANUAL PARK RELEASE ................................ 225
FREEING A STUCK VEHICLE ............................. 227
TOWING A DISABLED VEHICLE ........................ 228 All Wheel Drive (AWD) Models .................. 229Rear-Wheel Drive (RWD) Models ............. 229
ENHANCED ACCIDENT RESPONSE
SYSTEM (EARS) ................................................. 230
EVENT DATA RECORDER (EDR) ....................... 230
SERVICING AND MAINTENANCE
SCHEDULED SERVICING .................................. 231
Maintenance Plan ..................................... 232
ENGINE COMPARTMENT .................................. 236
3.6L Engine ............................................... 236
5.7L Engine ............................................... 237
Checking Oil Level .................................... 238Adding Washer Fluid ................................. 238Maintenance-Free Battery ....................... 238Pressure Washing...................................... 239
20_LX_OM_EN_USC_t.book Page 5
Page 12 of 328

10
GETTING TO KNOW YOUR VEHICLE
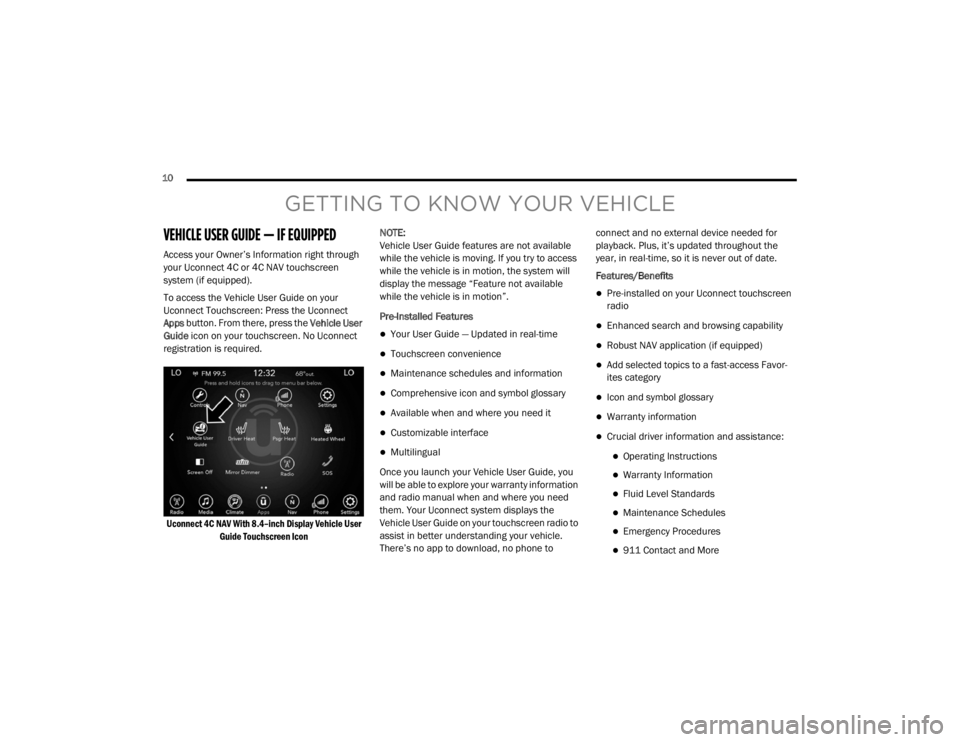
VEHICLE USER GUIDE — IF EQUIPPED
Access your Owner’s Information right through
your Uconnect 4C or 4C NAV touchscreen
system (if equipped).
To access the Vehicle User Guide on your
Uconnect Touchscreen: Press the Uconnect
Apps button. From there, press the Vehicle User
Guide icon on your touchscreen. No Uconnect
registration is required.
Uconnect 4C NAV With 8.4–inch Display Vehicle User Guide Touchscreen Icon
NOTE:
Vehicle User Guide features are not available
while the vehicle is moving. If you try to access
while the vehicle is in motion, the system will
display the message “Feature not available
while the vehicle is in motion”.
Pre-Installed Features
Your User Guide — Updated in real-time
Touchscreen convenience
Maintenance schedules and information
Comprehensive icon and symbol glossary
Available when and where you need it
Customizable interface
Multilingual
Once you launch your Vehicle User Guide, you
will be able to explore your warranty information
and radio manual when and where you need
them. Your Uconnect system displays the
Vehicle User Guide on your touchscreen radio to
assist in better understanding your vehicle.
There’s no app to download, no phone to connect and no external device needed for
playback. Plus, it’s updated throughout the
year, in real-time, so it is never out of date.
Features/Benefits
Pre-installed on your Uconnect touchscreen
radio
Enhanced search and browsing capability
Robust NAV application (if equipped)
Add selected topics to a fast-access Favor
-
ites category
Icon and symbol glossary
Warranty information
Crucial driver information and assistance:
Operating Instructions
Warranty Information
Fluid Level Standards
Maintenance Schedules
Emergency Procedures
911 Contact and More
20_LX_OM_EN_USC_t.book Page 10
Page 81 of 328

GETTING TO KNOW YOUR INSTRUMENT PANEL79
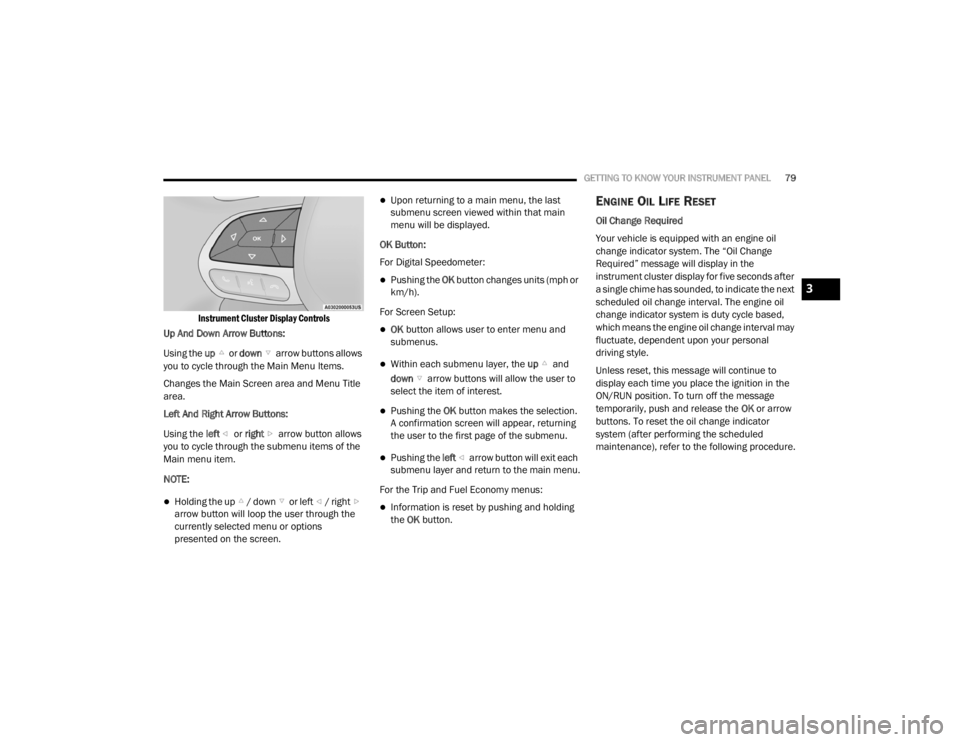
Instrument Cluster Display Controls
Up And Down Arrow Buttons:
Using the up or down arrow buttons allows
you to cycle through the Main Menu Items.
Changes the Main Screen area and Menu Title
area.
Left And Right Arrow Buttons:
Using the left or right arrow button allows
you to cycle through the submenu items of the
Main menu item.
NOTE:
Holding the up / down or left / right arrow button will loop the user through the
currently selected menu or options
presented on the screen.
Upon returning to a main menu, the last
submenu screen viewed within that main
menu will be displayed.
OK Button:
For Digital Speedometer:
Pushing the OK button changes units (mph or
km/h).
For Screen Setup:
OK button allows user to enter menu and
submenus.
Within each submenu layer, the up and
down arrow buttons will allow the user to
select the item of interest.
Pushing the OK button makes the selection.
A confirmation screen will appear, returning
the user to the first page of the submenu.
Pushing the left arrow button will exit each
submenu layer and return to the main menu.
For the Trip and Fuel Economy menus:
Information is reset by pushing and holding
the OK button.
ENGINE OIL LIFE RESET
Oil Change Required
Your vehicle is equipped with an engine oil
change indicator system. The “Oil Change
Required” message will display in the
instrument cluster display for five seconds after
a single chime has sounded, to indicate the next
scheduled oil change interval. The engine oil
change indicator system is duty cycle based,
which means the engine oil change interval may
fluctuate, dependent upon your personal
driving style.
Unless reset, this message will continue to
display each time you place the ignition in the
ON/RUN position. To turn off the message
temporarily, push and release the OK or arrow
buttons. To reset the oil change indicator
system (after performing the scheduled
maintenance), refer to the following procedure.
3
20_LX_OM_EN_USC_t.book Page 79
Page 197 of 328

STARTING AND OPERATING195
(Continued)
TOWING REQUIREMENTS
To promote proper break-in of your new vehicle
drivetrain components, the following guidelines
are recommended. Perform the maintenance listed in the
“Scheduled Servicing”. Refer to “Scheduled
Servicing” in “Servicing And Maintenance” for
the proper maintenance intervals. When towing
a trailer, never exceed the GAWR or GCWR
ratings.
Towing Requirements — Tires
Do not attempt to tow a trailer while using a
compact spare tire.
Do not drive more than 50 mph (80 km/h) when towing while using a full size spare tire.
Proper tire inflation pressures are essential
to the safe and satisfactory operation of your
vehicle. Refer to “Tires” in “Servicing And
Maintenance” for proper tire inflation proce -
dures.
Check the trailer tires for proper tire inflation
pressures before trailer usage.
WARNING!
Make certain that the load is secured in the
trailer and will not shift during travel. When
trailering cargo that is not fully secured,
dynamic load shifts can occur that may be diffi -
cult for the driver to control. You could lose
control of your vehicle and have a collision.
When hauling cargo or towing a trailer, do
not overload your vehicle or trailer. Over -
loading can cause a loss of control, poor
performance or damage to brakes, axle,
engine, transmission, steering, suspension,
chassis structure or tires.
Safety chains must always be used
between your vehicle and trailer. Always
connect the chains to the hook retainers of
the vehicle hitch. Cross the chains under
the trailer tongue and allow enough slack
for turning corners.
Vehicles with trailers should not be parked
on a grade. When parking, apply the
parking brake on the tow vehicle. Put the
tow vehicle transmission in PARK. Always,
block or "chock" the trailer wheels.
GCWR must not be exceeded.
Total weight must be distributed between
the tow vehicle and the trailer such that the
following four ratings are not exceeded :
Max loading as defined on the “Tire and
Loading Information” placard.
GTW
GAWR
Tongue weight rating for the trailer
hitch utilized.
WARNING! (Continued)CAUTION!
Do not tow a trailer at all during the first
500 miles (805 km) the new vehicle is
driven. The engine, axle or other parts could
be damaged.
Then, during the first 500 miles (805 km)
that a trailer is towed, do not drive over
50 mph (80 km/h) and do not make starts
at full throttle. This helps the engine and
other parts of the vehicle wear in at the
heavier loads.
5
20_LX_OM_EN_USC_t.book Page 195
Page 233 of 328

231
SERVICING AND MAINTENANCE
SCHEDULED SERVICING
This vehicle is equipped with an automatic oil
change indicator system. The oil change
indicator system will remind you that it is time to
take your vehicle in for scheduled maintenance.
Based on engine operation conditions, the oil
change indicator message will illuminate. This
means that service is required for the vehicle.
Operating conditions such as frequent
short-trips, trailer tow, and extremely hot or cold
ambient temperatures will influence when the
“Change Oil” or “Oil Change Required” message
is displayed. Severe Operating Conditions can
cause the change oil message to illuminate as
early as 3,500 miles (5,600 km) since last
reset. Have your vehicle serviced as soon as
possible, within the next 500 miles (805 km).
The “Oil Change Required” message will be
displayed in the instrument cluster and a single
chime will sound, indicating that an oil change
is necessary.An authorized dealer will reset the oil change
indicator message after completing the
scheduled oil change. If a scheduled oil change
is performed by someone other than an
authorized dealer, the message can be reset by
referring to “Instrument Cluster Display” in
“Getting To Know Your Instrument Panel” for
further information.
NOTE:
Under no circumstances should oil change
intervals exceed 10,000 miles (16,000 km),
12 months or 350 hours of engine run time,
whichever comes first. The 350 hours of engine
run or idle time is generally only a concern for
fleet customers.
Severe Duty All Models
Change Engine Oil at 4,000 miles (6,500 km) or
350 hours of engine run time if the vehicle is
operated in a dusty and off-road environment,
or is operated predominantly at idle or only very
low engine RPM. This type of vehicle use is
considered Severe Duty.Once A Month Or Before A Long Trip:Check engine oil level.
Check windshield washer fluid level.
Check tire pressure and look for unusual
wear or damage. Rotate tires at the first sign
of irregular wear, even if it occurs before your
next scheduled service.
Check the fluid levels of the coolant reservoir,
brake master cylinder, and power steering (if
equipped) and fill as needed.
Check function of all interior and exterior
lights.
7
20_LX_OM_EN_USC_t.book Page 231
Page 234 of 328

232SERVICING AND MAINTENANCE
MAINTENANCE PLAN
Required Maintenance Intervals:
Refer to the maintenance schedules on the following page for the required maintenance intervals.
At Every Oil Change Interval As Indicated By Oil Change Indicator System:
Change oil and filter
Rotate the tires
Rotate at the first sign of irregular wear, even if it occurs before your next scheduled service
Inspect battery and clean and tighten terminals as required
Inspect the CV/Universal joints
Inspect brake pads, shoes, rotors, drums, hoses and parking brake
Inspect engine cooling system protection and hoses
Inspect exhaust system
Inspect engine air cleaner if using in dusty or off-road conditions, replace engine air cleaner filter if necessary.
20_LX_OM_EN_USC_t.book Page 232
Page 242 of 328

240SERVICING AND MAINTENANCE
ENGINE OIL
Change Engine Oil
The oil change indicator system will remind you
that it is time to take your vehicle in for scheduled
maintenance. Refer to “Scheduled Servicing” in
this section for the proper maintenance intervals.
NOTE:
Under no circumstances should oil change
intervals exceed 10,000 miles (16,000 km),
12 months or 350 hours of engine run time,
whichever comes first. The 350 hours of engine
run or idle time is generally only a concern for
fleet customers.
Engine Oil Selection — 3.6L And 5.7L
Engine
For best performance and maximum protection
under all types of operating conditions, the
manufacturer only recommends engine oils
that are API Certified and meet the
requirements of FCA Material Standard
MS-6395.
NOTE:
Hemi engines (5.7L) at times can tick right after
startup and then quiet down after approxi -
mately 30 seconds. This is normal and will not harm the engine. This characteristic can be
caused by short drive cycles. For example, if the
vehicle is started then shut off after driving a
short distance. Upon restarting, you may experi
-
ence a ticking sound. Other causes could be if
the vehicle is unused for an extended period of
time, incorrect oil, extended oil changes or
extended idling. If the engine continues to tick
or if the Malfunction Indicator Light (MIL) comes
on, see the nearest authorized dealer
American Petroleum Institute (API) Engine
Oil Identification Symbol
This symbol means that the oil has
been certified by the American
Petroleum Institute (API). The
manufacturer only recommends
API Certified engine oils.
This symbol certifies 0W-20, 5W-20, 0W-30,
5W-30 and 10W-30 engine oils.
Engine Oil Viscosity (SAE Grade) — 3.6L
Engine
Mopar SAE 5W-20 engine oil approved to FCA
Material Standard MS-6395 such as Pennzoil,
Shell Helix Ultra or equivalent is recommended
for all operating temperatures. This engine oil
improves low temperature starting and vehicle
fuel economy.
The engine oil filler cap also shows the
recommended engine oil viscosity for your
engine. For information on engine oil filler cap
location, refer to the “Engine Compartment”
illustration in this section.
NOTE:
Mopar SAE 5W-30 engine oil approved to FCA
Material Standard MS-6395 such as Pennzoil,
Shell Helix Ultra or equivalent may be used
when SAE 5W-20 engine oil meeting MS-6395
is not available.
Lubricants which do not have both the engine
oil certification mark and the correct SAE
viscosity grade number should not be used.
CAUTION!
Do not use chemical flushes in your engine oil
as the chemicals can damage your engine.
Such damage is not covered by the New
Vehicle Limited Warranty.
20_LX_OM_EN_USC_t.book Page 240
Page 245 of 328

SERVICING AND MAINTENANCE243
NOTE:
Use only manufacturer approved A/C system
PAG compressor oil, and refrigerants.
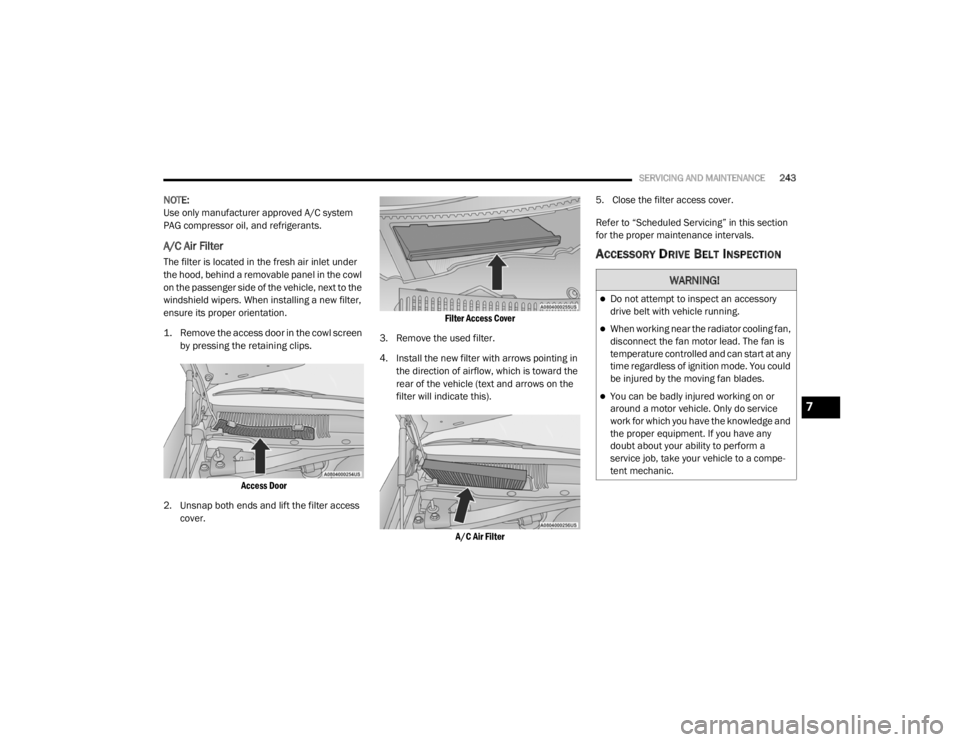
A/C Air Filter
The filter is located in the fresh air inlet under
the hood, behind a removable panel in the cowl
on the passenger side of the vehicle, next to the
windshield wipers. When installing a new filter,
ensure its proper orientation.
1. Remove the access door in the cowl screen
by pressing the retaining clips.
Access Door
2. Unsnap both ends and lift the filter access cover.
Filter Access Cover
3. Remove the used filter.
4. Install the new filter with arrows pointing in the direction of airflow, which is toward the
rear of the vehicle (text and arrows on the
filter will indicate this).
A/C Air Filter
5. Close the filter access cover.
Refer to “Scheduled Servicing” in this section
for the proper maintenance intervals.ACCESSORY DRIVE BELT INSPECTION
WARNING!
Do not attempt to inspect an accessory
drive belt with vehicle running.
When working near the radiator cooling fan,
disconnect the fan motor lead. The fan is
temperature controlled and can start at any
time regardless of ignition mode. You could
be injured by the moving fan blades.
You can be badly injured working on or
around a motor vehicle. Only do service
work for which you have the knowledge and
the proper equipment. If you have any
doubt about your ability to perform a
service job, take your vehicle to a compe
-
tent mechanic.7
20_LX_OM_EN_USC_t.book Page 243