2020 CHRYSLER 300 radio
[x] Cancel search: radioPage 205 of 328
IN CASE OF EMERGENCY203
(Continued)
vehicle occupants and hear sounds occurring
in the vehicle. The vehicle’s SOS Call system
will attempt to remain connected with the
SOS operator until the SOS operator termi -
nates the connection.
5. The SOS operator may attempt to contact appropriate emergency responders and
provide them with important vehicle
information and GPS coordinates. SOS Call System Limitations
Vehicles sold in Mexico
DO NOT have SOS Call
system capabilities.
SOS or other emergency line operators in
Mexico may not answer or respond to SOS
system calls.
If the SOS Call system detects a malfunction,
any of the following may occur at the time the
malfunction is detected, and at the beginning of
each ignition cycle:
The Rearview Mirror light located between
the ASSIST and SOS buttons will continuously
illuminate red.
The Device Screen will display the following
message “Vehicle device requires service.
Please contact an authorized dealer.”
An In-Vehicle Audio message will state
“Vehicle device requires service. Please
contact an authorized dealer.”
WARNING!
If anyone in the vehicle could be in danger
(e.g., fire or smoke is visible, dangerous
road conditions or location), do not wait for
voice contact from an Emergency Services
Agent. All occupants should exit the vehicle
immediately and move to a safe location.
Never place anything on or near the
vehicle’s operable network and GPS
antennas. You could prevent operable
network and GPS signal reception, which
can prevent your vehicle from placing an
emergency call. An operable network and
GPS signal reception is required for the SOS
Call system to function properly.
The SOS Call system is embedded into the
vehicle’s electrical system. Do not add
aftermarket electrical equipment to the
vehicle’s electrical system. This may
prevent your vehicle from sending a signal
to initiate an emergency call. To avoid inter -
ference that can cause the SOS Call system
to fail, never add aftermarket equipment
(e.g., two-way mobile radio, CB radio, data
recorder, etc.) to your vehicle’s electrical
system or modify the antennas on your
vehicle. IF YOUR VEHICLE LOSES BATTERY
POWER FOR ANY REASON (INCLUDING
DURING OR AFTER AN ACCIDENT), THE
UCONNECT FEATURES, APPS AND
SERVICES, AMONG OTHERS, WILL NOT
OPERATE.
Modifications to any part of the SOS Call
system could cause the air bag system to
fail when you need it. You could be injured
if the air bag system is not there to help
protect you.
WARNING! (Continued)
6
20_LX_OM_EN_USC_t.book Page 203
Page 207 of 328
IN CASE OF EMERGENCY205
GENERAL INFORMATION
The following regulatory statement applies to all
Radio Frequency (RF) devices equipped in this
vehicle:
This device complies with Part 15 of the FCC
Rules and with Innovation, Science and
Economic Development Canada license-exempt
RSS standard(s). Operation is subject to the
following two conditions:
1. This device may not cause harmful
interference, and
2. This device must accept any interference received, including interference that may
cause undesired operation. Le présent appareil est conforme aux CNR
d`Innovation, Science and Economic
Development applicables aux appareils radio
exempts de licence. L'exploitation est autorisée
aux deux conditions suivantes:
1. l'appareil ne doit pas produire de
brouillage, et
2. l'utilisateur de l'appareil doit accepter tout brouillage radioélectrique subi, même si le
brouillage est susceptible d'en compro -
mettre le fonctionnement.
La operación de este equipo está sujeta a las
siguientes dos condiciones:
1. es posible que este equipo o dispositivo no cause interferencia perjudicial y
2. este equipo o dispositivo debe aceptar cualquier interferencia, incluyendo la que
pueda causar su operación no deseada. NOTE:
Changes or modifications not expressly
approved by the party responsible for compli
-
ance could void the user’s authority to operate
the equipment.
6
20_LX_OM_EN_USC_t.book Page 205
Page 217 of 328

IN CASE OF EMERGENCY215
2130 Amp Pink –Fuel Pump (Non 6.2L SRT)
22 –5 Amp Tan Cyber Gateway Module
23 –10 Amp Red Fuel Door – If Equipped/Diagnostic Port
24 –10 Amp Red Integrated Center Stack
25 –10 Amp Red Tire Pressure Monitor System
26 –15 Amp Blue Cygnus Transmission Module (Charger Non - Police/300)
27 –25 Amp Clear Amplifier – If Equipped
31 –25 Amp Breaker Power Seats – If Equipped
32 –15 Amp Blue HVAC Module/Cluster
33 –15 Amp BlueIgnition Switch/RF Hub Module/Steering Column Lock (300) –
If Equipped / Remote Start – If Equipped
34 –10 Amp Red Steering Column Module/Clock (300)
35 –5 Amp Tan Battery Sensor
36 –15 Amp Blue Electronic Exhaust Valve – If Equipped
37 –20 Amp Yellow Radio
38 –20 Amp Yellow Media Hub / Console APO
40 30 Amp Pink –Fuel Pump (6.2L SRT – If Equipped)
41 30 Amp Pink –Fuel Pump (6.2L SRT – If Equipped)
42 30 Amp Pink –Rear Defrost
Cavity Cartridge Fuse Mini-FuseDescription
6
20_LX_OM_EN_USC_t.book Page 215
Page 225 of 328
IN CASE OF EMERGENCY223
1. Apply the parking brake, shift the
automatic transmission into PARK and
cycle the ignition to OFF.
2. Turn off the heater, radio, and all electrical accessories.
3. If using another vehicle to jump start the battery, park the vehicle within the jumper
cables’ reach, set the parking brake and
make sure the ignition is OFF.
JUMP STARTING PROCEDURE
NOTE:
Make sure at all times that unused ends of
jumper cables are not contacting each other or
either vehicle while making connections.
Connecting The Jumper Cables
1. Connect the positive
(+) end of the jumper
cable to the remote positive (+)
post of the
discharged vehicle.
2. Connect the opposite end of the positive (+)
jumper cable to the positive (+) post of the
booster battery. 3. Connect the negative end
(-) of the jumper
cable to the negative (-) post of the booster
battery.
4. Connect the opposite end of the negative (-)
jumper cable to a good engine ground. A
“ground” is an exposed metallic/unpainted
part of the engine, frame or chassis, such as
an accessory bracket or large bolt. The
ground must be away from the battery and
the fuel injection system.
5. Start the engine in the vehicle that has the booster battery, let the engine idle a few
minutes, and then start the engine in the
vehicle with the discharged battery.
Remove any metal jewelry such as rings,
watch bands and bracelets that could
make an inadvertent electrical contact. You
could be seriously injured.
Batteries contain sulfuric acid that can
burn your skin or eyes and generate
hydrogen gas which is flammable and
explosive. Keep open flames or sparks
away from the battery.
WARNING!
Do not allow vehicles to touch each other as
this could establish a ground connection and
personal injury could result.
WARNING! (Continued)
WARNING!
Failure to follow this jump starting procedure
could result in personal injury or property
damage due to battery explosion.
CAUTION!
Failure to follow these procedures could
result in damage to the charging system of
the booster vehicle or the discharged vehicle.
WARNING!
Do not connect the jumper cable to the
negative (-) post of the discharged battery.
The resulting electrical spark could cause the
battery to explode and could result in
personal injury.
6
20_LX_OM_EN_USC_t.book Page 223
Page 276 of 328

274SERVICING AND MAINTENANCE
PLASTIC AND COATED PARTS
Use Mopar Total Clean to clean vinyl upholstery.
Cleaning Plastic Instrument Cluster
Lenses
The lenses in front of the instruments in this
vehicle are molded in clear plastic. When
cleaning the lenses, care must be taken to
avoid scratching the plastic.
1. Clean with a wet soft cloth. A mild soap
solution may be used, but do not use high
alcohol content or abrasive cleaners. If soap
is used, wipe clean with a clean damp cloth.
2. Dry with a soft cloth.
LEATHER PARTS
Mopar Total Clean is specifically recommended
for leather upholstery.
Your leather upholstery can be best preserved
by regular cleaning with a damp soft cloth.
Small particles of dirt can act as an abrasive
and damage the leather upholstery and should
be removed promptly with a damp cloth.
Stubborn soils can be removed easily with a soft
cloth and Mopar Total Clean. Care should be
taken to avoid soaking your leather upholstery
with any liquid. Please do not use polishes, oils,
cleaning fluids, solvents, detergents, or
ammonia-based cleaners to clean your leather
upholstery. Application of a leather conditioner
is not required to maintain the original
condition.
NOTE:
If equipped with light colored leather, it tends to
show any foreign material, dirt, and fabric dye
transfer more so than darker colors. The leather
is designed for easy cleaning, and FCA recom -
mends Mopar total care leather cleaner applied
on a cloth to clean the leather seats as needed.
GLASS SURFACES
All glass surfaces should be cleaned on a
regular basis with Mopar Glass Cleaner, or any
commercial household-type glass cleaner.
Never use an abrasive type cleaner. Use caution
when cleaning the inside rear window equipped
with electric defrosters or windows equipped
with radio antennas. Do not use scrapers or
other sharp instruments that may scratch the
elements.
When cleaning the rear view mirror, spray
cleaner on the towel or cloth that you are using.
Do not spray cleaner directly on the mirror.
CAUTION!
Direct contact of air fresheners, insect
repellents, suntan lotions, or hand sani -
tizers to the plastic, painted, or decorated
surfaces of the interior may cause perma -
nent damage. Wipe away immediately.
Damage caused by these type of products
may not be covered by your New Vehicle
Limited Warranty.
CAUTION!
Do not use Alcohol and Alcohol-based and/or
Ketone based cleaning products to clean
leather seats, as damage to the seat may
result.
20_LX_OM_EN_USC_t.book Page 274
Page 287 of 328
MULTIMEDIA285
consent. For further information, refer to “Data
Collection & Privacy” in your Uconnect Owner’s
Manual Supplement or “Onboard Diagnostic
System (OBD II) Cybersecurity” in “Getting To
Know Your Instrument Panel”.
UCONNECT SETTINGS
The Uconnect system uses a combination of
buttons on the touchscreen and buttons on the
faceplate located on the center of the
instrument panel. These buttons allow you to
access and change the Customer
Programmable Features. Many features can
vary by vehicle.
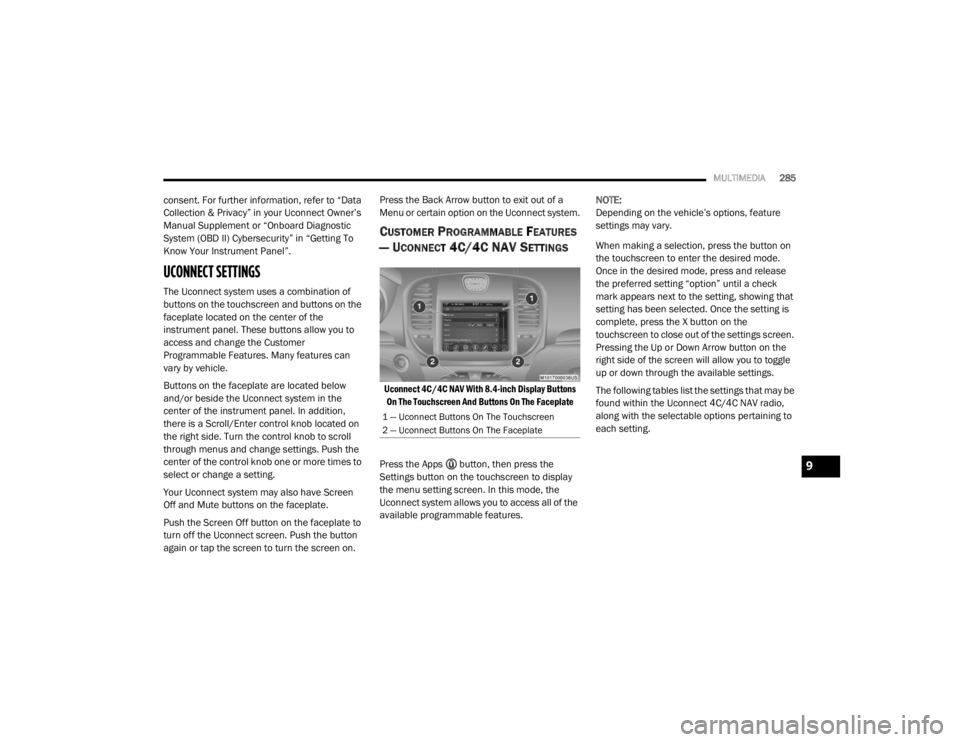
Buttons on the faceplate are located below
and/or beside the Uconnect system in the
center of the instrument panel. In addition,
there is a Scroll/Enter control knob located on
the right side. Turn the control knob to scroll
through menus and change settings. Push the
center of the control knob one or more times to
select or change a setting.
Your Uconnect system may also have Screen
Off and Mute buttons on the faceplate.
Push the Screen Off button on the faceplate to
turn off the Uconnect screen. Push the button
again or tap the screen to turn the screen on. Press the Back Arrow button to exit out of a
Menu or certain option on the Uconnect system.
CUSTOMER PROGRAMMABLE FEATURES
— U
CONNECT 4C/4C NAV SETTINGS
Uconnect 4C/4C NAV With 8.4-inch Display Buttons
On The Touchscreen And Buttons On The Faceplate
Press the Apps button, then press the
Settings button on the touchscreen to display
the menu setting screen. In this mode, the
Uconnect system allows you to access all of the
available programmable features. NOTE:
Depending on the vehicle’s options, feature
settings may vary.
When making a selection, press the button on
the touchscreen to enter the desired mode.
Once in the desired mode, press and release
the preferred setting “option” until a check
mark appears next to the setting, showing that
setting has been selected. Once the setting is
complete, press the X button on the
touchscreen to close out of the settings screen.
Pressing the Up or Down Arrow button on the
right side of the screen will allow you to toggle
up or down through the available settings.
The following tables list the settings that may be
found within the Uconnect 4C/4C NAV radio,
along with the selectable options pertaining to
each setting.
1 — Uconnect Buttons On The Touchscreen
2 — Uconnect Buttons On The Faceplate
9
20_LX_OM_EN_USC_t.book Page 285
Page 290 of 328

288MULTIMEDIA
Voice
After pressing the Voice button on the touchscreen, the following settings will be available:
Clock
After pressing the Clock button on the
touchscreen, the following settings will be
available:
Setting Name Selectable Options
Voice Response LengthBrief Detailed
Show Command List Neverw/Help Always
Setting Name Selectable Options
Sync Time With GPS — If Equipped OnOff
NOTE:
The “Sync Time With GPS” feature will allow you to automatically have the radio set the time. Set Time Hours +–
Set Time Minutes +–
Time Format 12 hrs
24 hrs
AM PM
Show Time In Status Bar — If Equipped OnOff
NOTE:
The “Show Time In Status Bar” feature will allow you to turn on or shut off the digital clock in the status bar.
20_LX_OM_EN_USC_t.book Page 288
Page 297 of 328
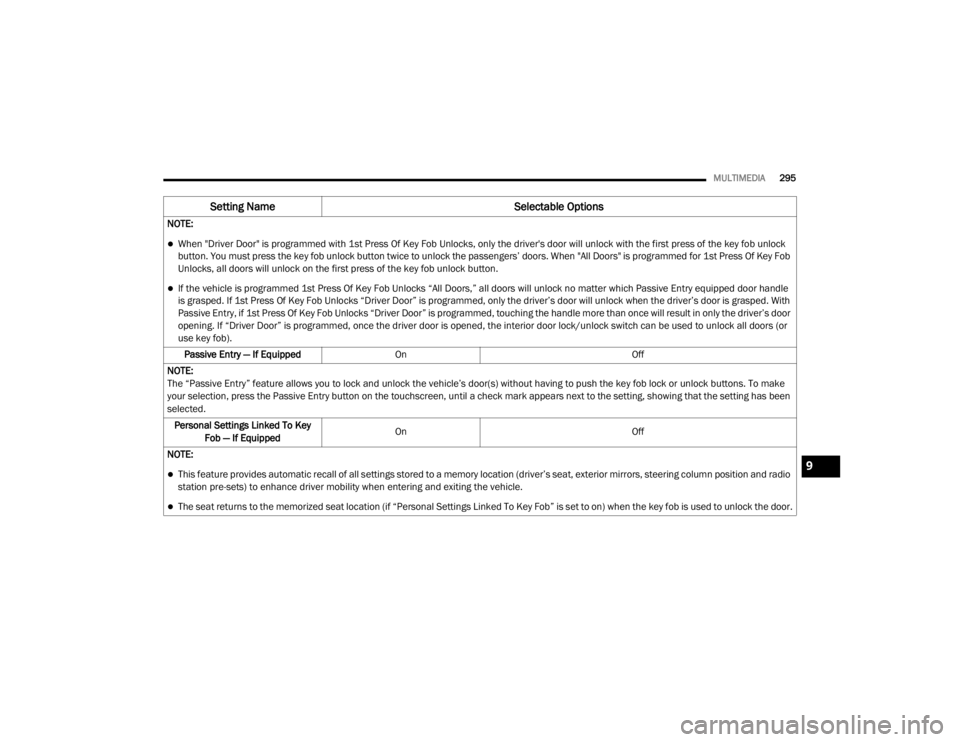
MULTIMEDIA295
NOTE:
When "Driver Door" is programmed with 1st Press Of Key Fob Unlocks, only the driver's door will unlock with the first press of the key fob unlock
button. You must press the key fob unlock button twice to unlock the passengers’ doors. When "All Doors" is programmed for 1st Press Of Key Fob
Unlocks, all doors will unlock on the first press of the key fob unlock button.
If the vehicle is programmed 1st Press Of Key Fob Unlocks “All Doors,” all doors will unlock no matter which Passive Entry equipped door handle
is grasped. If 1st Press Of Key Fob Unlocks “Driver Door” is programmed, only the driver’s door will unlock when the driver’s door is grasped. With
Passive Entry, if 1st Press Of Key Fob Unlocks “Driver Door” is programmed, touching the handle more than once will result in only the driver’s door
opening. If “Driver Door” is programmed, once the driver door is opened, the interior door lock/unlock switch can be used to unlock all doors (or
use key fob).
Passive Entry — If Equipped On Off
NOTE:
The “Passive Entry” feature allows you to lock and unlock the vehicle’s door(s) without having to push the key fob lock or unlock buttons. To make
your selection, press the Passive Entry button on the touchscreen, until a check mark appears next to the setting, showing that the setting has been
selected. Personal Settings Linked To Key Fob — If Equipped On
Off
NOTE:
This feature provides automatic recall of all settings stored to a memory location (driver’s seat, exterior mirrors, steering column position and radio
station pre-sets) to enhance driver mobility when entering and exiting the vehicle.
The seat returns to the memorized seat location (if “Personal Settings Linked To Key Fob” is set to on) when the key fob is used to unlock the door.
Setting Name Selectable Options
9
20_LX_OM_EN_USC_t.book Page 295