2020 CHRYSLER 300 trunk
[x] Cancel search: trunkPage 146 of 328

144SAFETY
(Continued)
(Continued)
illuminate with a single chime when a fault with
the Air Bag System has been detected. It will
stay on until the fault is removed. If the light
comes on intermittently or remains on while
driving, have an authorized dealer service the
vehicle immediately.
Refer to “Occupant Restraint Systems” in
“Safety” for further information.
Defroster
Check operation by selecting the defrost mode
and place the blower control on high speed. You
should be able to feel the air directed against
the windshield. See an authorized dealer for
service if your defroster is inoperable.
Floor Mat Safety Information
Always use floor mats designed to fit your
vehicle. Only use a floor mat that does not
interfere with the operation of the accelerator,
brake or clutch pedals. Only use a floor mat that
is securely attached using the floor mat
fasteners so it cannot slip out of position and interfere with the accelerator, brake or clutch
pedals or impair safe operation of your vehicle
in other ways.
WARNING!
An improperly attached, damaged, folded, or
stacked floor mat, or damaged floor mat
fasteners may cause your floor mat to
interfere with the accelerator, brake, or clutch
pedals and cause a loss of vehicle control. To
prevent SERIOUS INJURY or DEATH:
ALWAYS securely attach your floor mat
using the floor mat fasteners. DO NOT
install your floor mat upside down or turn
your floor mat over. Lightly pull to confirm
mat is secured using the floor mat
fasteners on a regular basis.
ALWAYS REMOVE THE EXISTING FLOOR
MAT FROM THE VEHICLE before
installing any other floor mat. NEVER install
or stack an additional floor mat on top of an
existing floor mat.
ONLY install floor mats designed to fit your
vehicle. NEVER install a floor mat that
cannot be properly attached and secured to
your vehicle. If a floor mat needs to be
replaced, only use a FCA approved floor
mat for the specific make, model, and year
of your vehicle.
ONLY use the driver’s side floor mat on the
driver’s side floor area. To check for inter
-
ference, with the vehicle properly parked
with the engine off, fully depress the accel -
erator, the brake, and the clutch pedal (if
present) to check for interference. If your
floor mat interferes with the operation of
any pedal, or is not secure to the floor,
remove the floor mat from the vehicle and
place the floor mat in your trunk.
WARNING! (Continued)
20_LX_OM_EN_USC_t.book Page 144
Page 191 of 328

STARTING AND OPERATING189
(Continued)
7. Remove the fuel nozzle and close the fuel door.
NOTE:
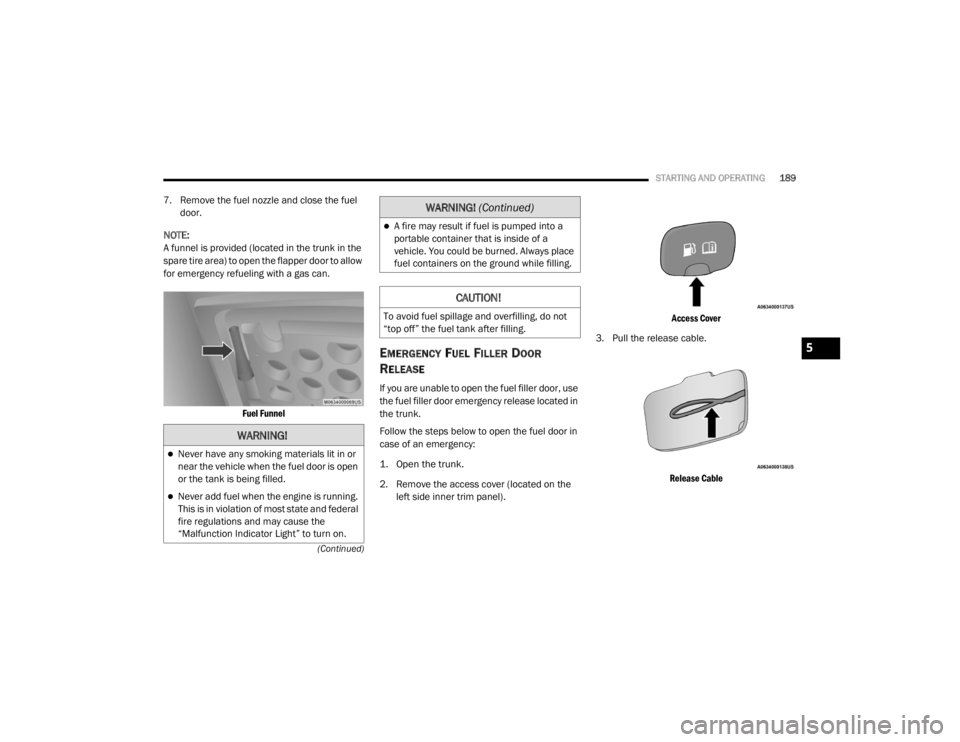
A funnel is provided (located in the trunk in the
spare tire area) to open the flapper door to allow
for emergency refueling with a gas can.
Fuel Funnel
EMERGENCY FUEL FILLER DOOR
R
ELEASE
If you are unable to open the fuel filler door, use
the fuel filler door emergency release located in
the trunk.
Follow the steps below to open the fuel door in
case of an emergency:
1. Open the trunk.
2. Remove the access cover (located on the
left side inner trim panel).
Access Cover
3. Pull the release cable.
Release Cable
WARNING!
Never have any smoking materials lit in or
near the vehicle when the fuel door is open
or the tank is being filled.
Never add fuel when the engine is running.
This is in violation of most state and federal
fire regulations and may cause the
“Malfunction Indicator Light” to turn on.
A fire may result if fuel is pumped into a
portable container that is inside of a
vehicle. You could be burned. Always place
fuel containers on the ground while filling.
CAUTION!
To avoid fuel spillage and overfilling, do not
“top off” the fuel tank after filling.
WARNING! (Continued)
5
20_LX_OM_EN_USC_t.book Page 189
Page 208 of 328

206IN CASE OF EMERGENCY
BULB REPLACEMENT
REPLACEMENT BULBS
All of the interior bulbs are glass wedge base or glass cartridge types. Aluminum base bulbs are not approved and should not be used for replacement.
Interior Bulbs
Bulb Name Bulb Number
Rear Courtesy/Reading Lamps W5W
Rear Compartment (Trunk) Lamp 562
Overhead Console Reading Lamps 578
Visor Vanity Lamps A6220
Glove Compartment Lamp – If Equipped 194
Door Courtesy 562
Shift Indicator Lamp JKLE14140
Optional Door Map Pocket/Cupholder LED (Serviced at an authorized dealer)
For lighted switches, see an authorized dealer for replacement instructions.
Exterior Bulbs
Bulb Name Bulb Number
Low Beam/High Beam (Bi-Halogen Headlamp) 9005HL+
Low Beam/High Beam (Bi-Xenon Headlamp) D3S (Serviced at an authorized dealer)
Front Turn Signal Lamp PSY24WSV
20_LX_OM_EN_USC_t.book Page 206
Page 215 of 328

IN CASE OF EMERGENCY213
REAR INTERIOR FUSES
There is also a power distribution center located
in the trunk under the spare tire access panel.
This center contains fuses and relays. Fuse
cavity location and descriptions are printed on
the inside of the power distribution center
cover.
Rear Power Distribution Center
48
–10 Amp Red AWD Module / Front Axle Disconnect – If Equipped
49 – –Fuse – Spare
50 – –Fuse – Spare
51 –20 Amp Yellow Vacuum Pump – If Equipped
52 –5 Amp Tan Adaptive Cruise – If Equipped
53 – –Fuse – Spare
Cavity Cartridge Fuse Mini-FuseDescription
CAUTION!
When installing the power distribution
center cover, it is important to ensure the
cover is properly positioned and fully
latched. Failure to do so may allow water to
get into the power distribution center and
possibly result in an electrical system
failure.
When replacing a blown fuse, it is important
to use only a fuse having the correct
amperage rating. The use of a fuse with a
rating other than indicated may result in a
dangerous electrical system overload. If a
properly rated fuse continues to blow, it
indicates a problem in the circuit that must
be corrected.
6
20_LX_OM_EN_USC_t.book Page 213
Page 220 of 328

218IN CASE OF EMERGENCY
JACK LOCATION/SPARE TIRE STOWAGE
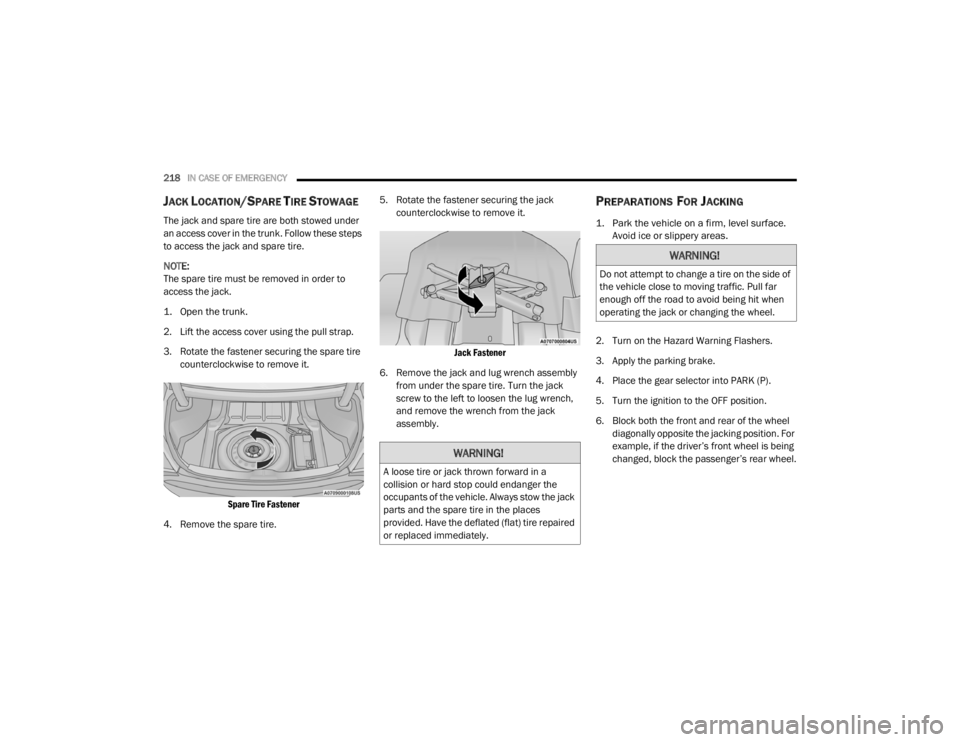
The jack and spare tire are both stowed under
an access cover in the trunk. Follow these steps
to access the jack and spare tire.
NOTE:
The spare tire must be removed in order to
access the jack.
1. Open the trunk.
2. Lift the access cover using the pull strap.
3. Rotate the fastener securing the spare tire
counterclockwise to remove it.
Spare Tire Fastener
4. Remove the spare tire. 5. Rotate the fastener securing the jack
counterclockwise to remove it.
Jack Fastener
6. Remove the jack and lug wrench assembly from under the spare tire. Turn the jack
screw to the left to loosen the lug wrench,
and remove the wrench from the jack
assembly.
PREPARATIONS FOR JACKING
1. Park the vehicle on a firm, level surface. Avoid ice or slippery areas.
2. Turn on the Hazard Warning Flashers.
3. Apply the parking brake.
4. Place the gear selector into PARK (P).
5. Turn the ignition to the OFF position.
6. Block both the front and rear of the wheel diagonally opposite the jacking position. For
example, if the driver’s front wheel is being
changed, block the passenger’s rear wheel.
WARNING!
A loose tire or jack thrown forward in a
collision or hard stop could endanger the
occupants of the vehicle. Always stow the jack
parts and the spare tire in the places
provided. Have the deflated (flat) tire repaired
or replaced immediately.
WARNING!
Do not attempt to change a tire on the side of
the vehicle close to moving traffic. Pull far
enough off the road to avoid being hit when
operating the jack or changing the wheel.
20_LX_OM_EN_USC_t.book Page 218
Page 224 of 328

222IN CASE OF EMERGENCY
(Continued)
ROAD TIRE INSTALLATION
1. Mount the road tire on the axle.
2. Install the remaining lug nuts with the cone shaped end of the nut toward the wheel.
Lightly tighten the lug nuts.
3. Lower the vehicle to the ground by turning the jack handle counterclockwise.
4. Refer to “Wheel And Tire Torque Specifi -
cations” in “Technical Specifications” for
proper lug nut torque.
5. After 25 miles (40 km), check the lug nut torque with a torque wrench to ensure that
all lug nuts are properly seated against the
wheel.
JUMP STARTING
If your vehicle has a discharged battery, it can
be jump started using a set of jumper cables
and a battery in another vehicle, or by using a
portable battery booster pack. Jump starting
can be dangerous if done improperly, so please
follow the procedures in this section carefully.
NOTE:
When using a portable battery booster pack,
follow the manufacturer's operating instruc -
tions and precautions.
PREPARATIONS FOR JUMP START
The battery is stored under an access cover in
the trunk. Remote battery posts are located on
the right side of the engine compartment for
jump starting.
Jump Starting Locations
WARNING!
To avoid the risk of forcing the vehicle off the
jack, do not tighten the wheel nuts fully until
the vehicle has been lowered. Failure to
follow this warning may result in serious
injury.WARNING!
Do not attempt jump starting if the battery is
frozen. It could rupture or explode and cause
personal injury.
CAUTION!
Do not use a portable battery booster pack or
any other booster source with a system
voltage greater than 12 Volts or damage to
the battery, starter motor, alternator or
electrical system may occur.Remote Positive (+) Post
Remote Negative (-) Post
WARNING!
Take care to avoid the radiator cooling fan
whenever the hood is raised. It can start
anytime the ignition switch is ON. You can
be injured by moving fan blades.
20_LX_OM_EN_USC_t.book Page 222
Page 240 of 328

238SERVICING AND MAINTENANCE
CHECKING OIL LEVEL
To ensure proper engine lubrication, the engine
oil must be maintained at the correct level.
Check the oil level at regular intervals, such as
every month. The best time to check the engine
oil level is about five minutes after a fully
warmed up engine is shut off.
Checking the oil while the vehicle is on level
ground will improve the accuracy of the oil level
readings.
There are three possible dipstick types:
Crosshatched zone.
Crosshatched zone marked SAFE.
Crosshatched zone marked with MIN at the
low end of the range and MAX at the high end
of the range.
NOTE:
Always maintain the oil level within the cross -
hatch markings on the dipstick.
Adding 1 quart (1.0 liters) of oil when the reading
is at the low end of the dipstick range will raise
the oil level to the high end of the range marking.
ADDING WASHER FLUID
The windshield washer fluid reservoir is located
in the front of the engine compartment. Be sure
to check the fluid level at regular intervals. Fill
the reservoir with windshield washer solvent
(not radiator antifreeze) and operate the system
for a few seconds to flush out the residual
water.
When refilling the washer fluid reservoir, apply
some washer fluid to a cloth or towel and wipe
the wiper blades clean. This will help blade
performance.
To prevent freeze-up of your windshield washer
system in cold weather, select a solution or
mixture that meets or exceeds the temperature
range of your climate. This rating information
can be found on most washer fluid containers. The fluid reservoir will hold nearly 1 gallon
(4 liters) of washer fluid when the message
“Low Washer Fluid” appears in the instrument
cluster.
MAINTENANCE-FREE BATTERY
Your vehicle is equipped with a
maintenance-free battery. You will never have
to add water, nor is periodic maintenance
required.
NOTE:
The battery is stored under an access cover in
the trunk. Remote battery terminals are located
in the engine compartment for jump starting.
Refer to “Jump Starting Procedures” in “In Case
Of Emergency” for further information.
CAUTION!
Overfilling or underfilling the crankcase will
cause aeration or loss of oil pressure. This
could damage your engine.
WARNING!
Commercially available windshield washer
solvents are flammable. They could ignite and
burn you. Care must be exercised when filling
or working around the washer solution.
20_LX_OM_EN_USC_t.book Page 238
Page 275 of 328

SERVICING AND MAINTENANCE273
Special Care
If you drive on salted or dusty roads or if you
drive near the ocean, hose off the undercar -
riage at least once a month.
It is important that the drain holes in the
lower edges of the doors, rocker panels, and
trunk be kept clear and open.
If you detect any stone chips or scratches in
the paint, touch them up immediately. The
cost of such repairs is considered the respon -
sibility of the owner.
If your vehicle is damaged due to a collision
or similar cause that destroys the paint and
protective coating, have your vehicle repaired as soon as possible. The cost of such repairs
is considered the responsibility of the owner.
If you carry special cargo such as chemicals,
fertilizers, de-icer salt, etc., be sure that such
materials are well packaged and sealed.
If a lot of driving is done on gravel roads,
consider mud or stone shields behind each
wheel.
Use Mopar Touch Up Paint on scratches as
soon as possible. An authorized dealer has
touch up paint to match the color of your
vehicle.
INTERIORS
SEATS AND FABRIC PARTS
Use Mopar Total Clean to clean fabric
upholstery and carpeting.
Seat Belt Maintenance
Do not bleach, dye, or clean the belts with
chemical solvents or abrasive cleaners. This will
weaken the fabric. Sun damage can also
weaken the fabric.
If the belts need cleaning, use Mopar Total
Clean, a mild soap solution, or lukewarm water.
Do not remove the belts from the vehicle to
wash them. Dry with a soft cloth.
Replace the belts if they appear frayed or worn
or if the buckles do not work properly.CAUTION!
Do not use abrasive or strong cleaning
materials such as steel wool or scouring
powder that will scratch metal and painted
surfaces.
Use of power washers exceeding 1,200 psi
(8,274 kPa) can result in damage or
removal of paint and decals.
WARNING!
Do not use volatile solvents for cleaning
purposes. Many are potentially flammable,
and if used in closed areas they may cause
respiratory harm.
WARNING!
A frayed or torn belt could rip apart in a
collision and leave you with no protection.
Inspect the belt system periodically, checking
for cuts, frays, or loose parts. Damaged parts
must be replaced immediately. Do not
disassemble or modify the system. Seat belt
assemblies must be replaced after a collision
if they have been damaged (i.e., bent
retractor, torn webbing, etc.).
7
20_LX_OM_EN_USC_t.book Page 273