2020 CHRYSLER 300 trunk
[x] Cancel search: trunkPage 28 of 328
26GETTING TO KNOW YOUR VEHICLE
detected outside the vehicle. The vehicle will
not unlock the doors when any of the following
conditions are true:
The doors are locked manually using the door
lock knobs.
There is a valid Passive Entry key fob outside
the vehicle and within 5 ft (1.5 m) of either
Passive Entry door handle.
Three attempts are made to lock the doors
using the door panel switch and then the
doors are closed.
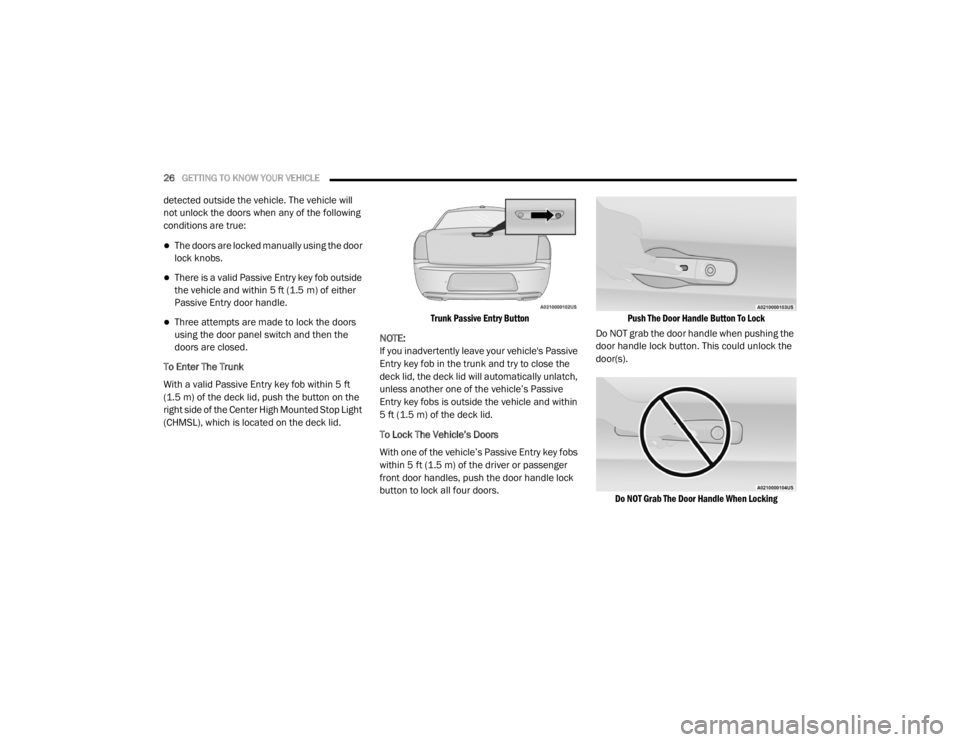
To Enter The Trunk
With a valid Passive Entry key fob within 5 ft
(1.5 m) of the deck lid, push the button on the
right side of the Center High Mounted Stop Light
(CHMSL), which is located on the deck lid.
Trunk Passive Entry Button
NOTE:
If you inadvertently leave your vehicle's Passive
Entry key fob in the trunk and try to close the
deck lid, the deck lid will automatically unlatch,
unless another one of the vehicle’s Passive
Entry key fobs is outside the vehicle and within
5 ft (1.5 m) of the deck lid.
To Lock The Vehicle’s Doors
With one of the vehicle’s Passive Entry key fobs
within 5 ft (1.5 m) of the driver or passenger
front door handles, push the door handle lock
button to lock all four doors.
Push The Door Handle Button To Lock
Do NOT grab the door handle when pushing the
door handle lock button. This could unlock the
door(s).
Do NOT Grab The Door Handle When Locking
20_LX_OM_EN_USC_t.book Page 26
Page 48 of 328
46GETTING TO KNOW YOUR VEHICLE
TURN SIGNALS
Move the multifunction lever up or down and
the arrows on each side of the instrument
cluster display flash to show proper operation of
the front and rear turn signal lights.
NOTE:
If either light remains on and does not flash,
or there is a very fast flash rate, check for a
defective outside light bulb. If an indicator
fails to light when the lever is moved, it would
suggest that the indicator bulb is defective.
A “Turn Signal On” message will appear in the
instrument cluster display and a continuous
chime will sound if the vehicle is driven more
than 1 mile (1.6 km) with either turn signal on.
LANE CHANGE ASSIST — IF EQUIPPED
Tap the multifunction lever up or down once,
without moving beyond the detent, and the turn
signal (right or left) will flash three times then
automatically turn off.
INTERIOR LIGHTS
The interior lights come on when a door is
opened.
To protect the battery, the interior lights will turn
off automatically 10 minutes after the ignition is
placed in the OFF position. This will occur if the
interior lights were switched on manually or are
on because a door is open. The Battery
Protection also includes the glove compartment
light and the trunk light. To restore interior light
operation after automatic battery protection is
enabled (lights off), either place the ignition in
the ON/RUN position, or cycle the light switch.
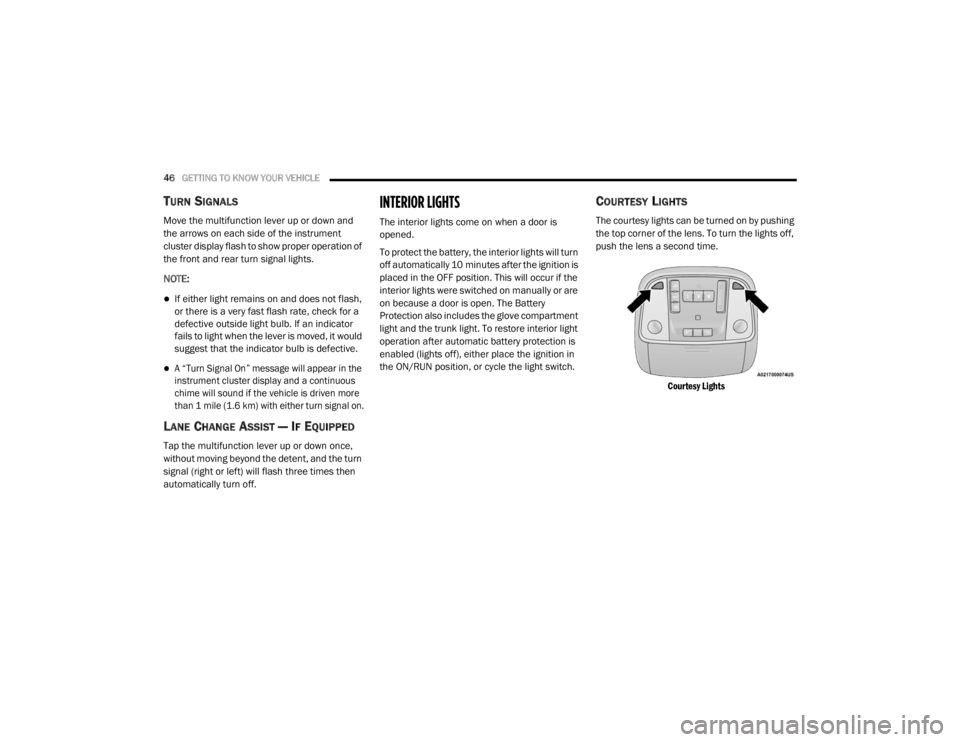
COURTESY LIGHTS
The courtesy lights can be turned on by pushing
the top corner of the lens. To turn the lights off,
push the lens a second time.
Courtesy Lights
20_LX_OM_EN_USC_t.book Page 46
Page 64 of 328
62GETTING TO KNOW YOUR VEHICLE
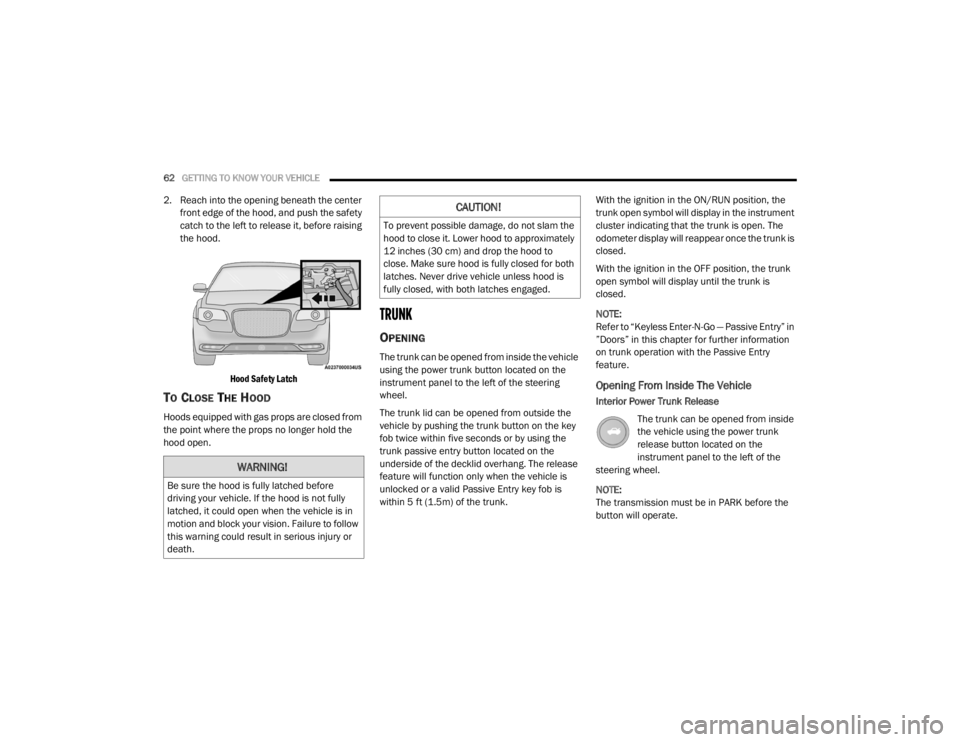
2. Reach into the opening beneath the center
front edge of the hood, and push the safety
catch to the left to release it, before raising
the hood.
Hood Safety Latch
TO CLOSE THE HOOD
Hoods equipped with gas props are closed from
the point where the props no longer hold the
hood open.
TRUNK
OPENING
The trunk can be opened from inside the vehicle
using the power trunk button located on the
instrument panel to the left of the steering
wheel.
The trunk lid can be opened from outside the
vehicle by pushing the trunk button on the key
fob twice within five seconds or by using the
trunk passive entry button located on the
underside of the decklid overhang. The release
feature will function only when the vehicle is
unlocked or a valid Passive Entry key fob is
within 5 ft (1.5m) of the trunk. With the ignition in the ON/RUN position, the
trunk open symbol will display in the instrument
cluster indicating that the trunk is open. The
odometer display will reappear once the trunk is
closed.
With the ignition in the OFF position, the trunk
open symbol will display until the trunk is
closed.
NOTE:
Refer to “Keyless Enter-N-Go — Passive Entry” in
”Doors” in this chapter for further information
on trunk operation with the Passive Entry
feature.
Opening From Inside The Vehicle
Interior Power Trunk Release
The trunk can be opened from inside
the vehicle using the power trunk
release button located on the
instrument panel to the left of the
steering wheel.
NOTE:
The transmission must be in PARK before the
button will operate.
WARNING!
Be sure the hood is fully latched before
driving your vehicle. If the hood is not fully
latched, it could open when the vehicle is in
motion and block your vision. Failure to follow
this warning could result in serious injury or
death.
CAUTION!
To prevent possible damage, do not slam the
hood to close it. Lower hood to approximately
12 inches (30 cm) and drop the hood to
close. Make sure hood is fully closed for both
latches. Never drive vehicle unless hood is
fully closed, with both latches engaged.
20_LX_OM_EN_USC_t.book Page 62
Page 65 of 328
GETTING TO KNOW YOUR VEHICLE63
Opening From Outside The Vehicle
To Unlock/Open The Trunk
The trunk may be unlocked/opened using
either of the following methods:
Key Fob Trunk Release Button
Passive Entry Button
Key Fob Trunk Release Button Push the power trunk button on the
key fob twice within five seconds to
open the trunk.
Passive Entry Button
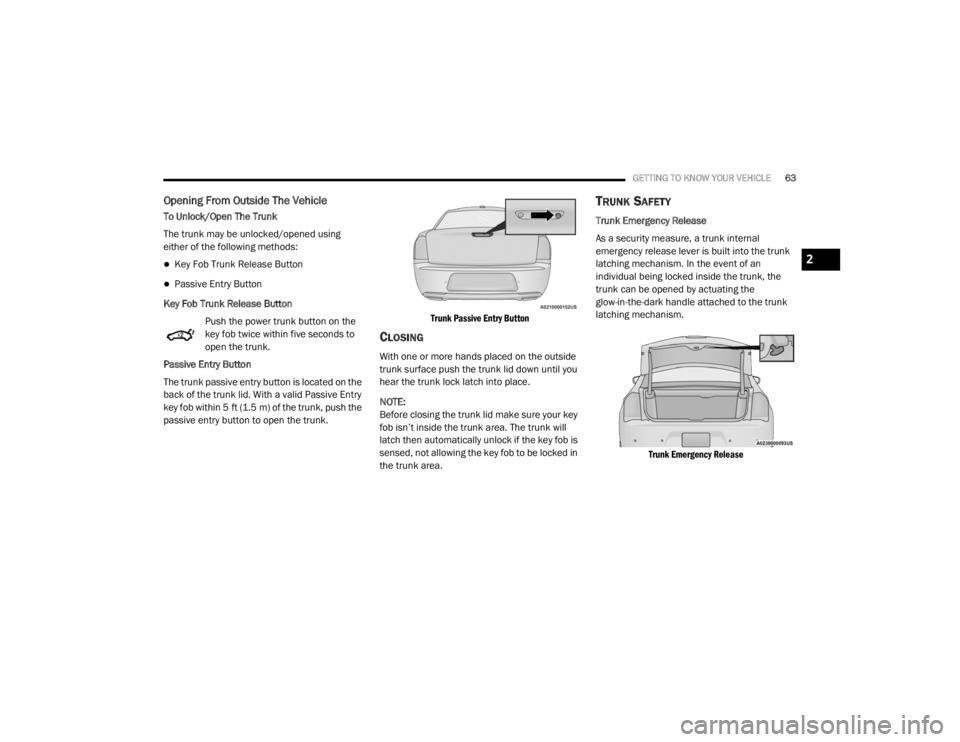
The trunk passive entry button is located on the
back of the trunk lid. With a valid Passive Entry
key fob within 5 ft (1.5 m) of the trunk, push the
passive entry button to open the trunk.
Trunk Passive Entry Button
CLOSING
With one or more hands placed on the outside
trunk surface push the trunk lid down until you
hear the trunk lock latch into place.
NOTE:
Before closing the trunk lid make sure your key
fob isn’t inside the trunk area. The trunk will
latch then automatically unlock if the key fob is
sensed, not allowing the key fob to be locked in
the trunk area.
TRUNK SAFETY
Trunk Emergency Release
As a security measure, a trunk internal
emergency release lever is built into the trunk
latching mechanism. In the event of an
individual being locked inside the trunk, the
trunk can be opened by actuating the
glow-in-the-dark handle attached to the trunk
latching mechanism.
Trunk Emergency Release
2
20_LX_OM_EN_USC_t.book Page 63
Page 66 of 328
64GETTING TO KNOW YOUR VEHICLE
(Continued)
CARGO AREA FEATURES
Cargo Area — Vehicles Equipped With 60/
40 Split-Folding Rear Seat
The 60/40 split-folding rear seat provides
cargo-carrying versatility. The seatbacks fold
down easily by pulling nylon tabs between the
seatbacks and the bolsters. When the seats are
folded down, they provide a continuous,
nearly-flat extension of the load floor.
When the seatback is folded to the upright
position, make sure it is latched by strongly
pulling on the top of the seatback above the
seat strap.
Trunk Mat — If Equipped
A trunk mat covers the bottom of the cargo
area. The trunk mat is used to protect the
interior of the trunk from mud, snow, and
debris.
WARNING!
Do not allow children to have access to the
trunk, either by climbing into the trunk from
outside, or through the inside of the vehicle.
Always close the trunk lid when your vehicle is
unattended. Once in the trunk, young children
may not be able to escape, even if they
entered through the rear seat. If trapped in
the trunk, children can die from suffocation
or heat stroke.
WARNING!
Be certain that the seatback is securely
locked into position. If the seatback is not
securely locked into position, the seat will
not provide the proper stability for child
seats and/or passengers. An improperly
latched seat could cause serious injury.
The cargo area in the rear of the vehicle
(with the rear seatbacks in the locked-up or
folded down position) should not be used
as a play area by children at any time. They
could be seriously injured in a collision.
Children should be seated and using the
proper restraint system.
To help protect against personal injury,
passengers should not be seated in the
rear cargo area. The rear cargo space is
intended for load carrying purposes only,
not for passengers, who should sit in seats
and use seat belts.
The weight and position of cargo and
passengers can change the vehicle center of
gravity and vehicle handling. To avoid loss of
control resulting in personal injury, follow
these guidelines for loading your vehicle:
Always place cargo evenly on the cargo
floor. Put heavier objects as low and as far
forward as possible.
Place as much cargo as possible in front of
the rear axle. Too much weight or improp-
erly placed weight over or behind the rear
axle can cause the rear of the vehicle to
sway.
Do not pile luggage or cargo higher than the
top of the seatback. This could impair visi-
bility or become a dangerous projectile in a
sudden stop or collision.
WARNING! (Continued)
20_LX_OM_EN_USC_t.book Page 64
Page 76 of 328

74GETTING TO KNOW YOUR VEHICLE
ELECTRICAL POWER OUTLETS
Your vehicle is equipped with one 12 Volt
(13 Amp) power outlet on the instrument panel
and one 12 Volt (13 Amp) power outlet in the
center console that can be used to power
cellular phones, small electronics and other low
powered electrical accessories. The power
outlets are labeled with either a “key” or a
“battery” symbol to indicate how the outlet is
powered. Power outlets labeled with a “key” are
powered when the ignition switch is in the ACC
or ON/RUN position, while the outlets labeled
with a “battery” are connected directly to the
battery and powered at all times.
NOTE:
All accessories connected to the “battery”
powered outlets should be removed or turned
off when the vehicle is not in use to protect the
battery against discharge.
The front power outlet is located inside the
storage area on the center stack of the
instrument panel.
Front Power Outlet
In addition to the front power outlet, there is
also a power outlet located in the storage area
of the center console.
Center Console Power Outlet
NOTE:
If the Media Hub is in use, do not exceed the
maximum power of 100 Watts (8 Amps) for the
center console power outlet. When the Media
Hub is not in use, the outlet can deliver up to
120 Watts (10 Amps). If the power rating is
exceeded, the fuse protecting the system will
need to be replaced.
The instrument panel power outlet and dual
rear console USB ports can be changed to
“battery” (powered at all times) by moving the
#12 20 Amp fuse from “IGN” to “B+”. These
fuses are located in the fuse box in the trunk,
below the load floor.
WARNING!
Do not place ashes inside the cubby bin
located on the center console on vehicles not
equipped with the ash receiver tray. A fire
leading to bodily injury could result.
20_LX_OM_EN_USC_t.book Page 74
Page 89 of 328

GETTING TO KNOW YOUR INSTRUMENT PANEL87
Refer to “If Your Engine Overheats” in “In Case
Of Emergency” for further information.
Oil Pressure Warning Light
This warning light will illuminate to
indicate low engine oil pressure. If the
light turns on while driving, stop the
vehicle, shut off the engine as soon as
possible, and contact an authorized dealer. A
chime will sound when this light turns on.
Do not operate the vehicle until the cause is
corrected. This light does not indicate how
much oil is in the engine. The engine oil level
must be checked under the hood.
Oil Temperature Warning Light
This warning light will illuminate to
indicate the engine oil temperature is
high. If the light turns on while driving,
stop the vehicle and shut off the
engine as soon as possible. Wait for oil
temperature to return to normal levels.
Seat Belt Reminder Warning Light
This warning light indicates when the
driver or passenger seat belt is
unbuckled. When the ignition is first
placed in the ON/RUN or ACC/ON/ RUN position and if the driver’s seat belt is
unbuckled, a chime will sound and the light will
turn on. When driving, if the driver or front
passenger seat belt remains unbuckled, the
Seat Belt Reminder Light will flash or remain on
continuously and a chime will sound.
Refer to “Occupant Restraint Systems” in
“Safety” for further information.
Transmission Temperature Warning Light
— If Equipped
This warning light will illuminate to
warn of a high transmission fluid
temperature. This may occur with
strenuous usage such as trailer
towing. If this light turns on, stop the vehicle and
run the engine at idle or slightly faster, with the
transmission in PARK or NEUTRAL, until the
light turns off. Once the light turns off, you may
continue to drive normally.
Trunk Open Warning Light
This indicator will illuminate when the
trunk is open and not fully closed.
NOTE:
If the vehicle is moving, there will also be a
single chime.
Vehicle Security Warning Light — If
Equipped
This light will flash at a fast rate for
approximately 15 seconds when the
vehicle security alarm is arming, and
then will flash slowly until the vehicle
is disarmed.
WARNING!
If you continue operating the vehicle when
the Transmission Temperature Warning Light
is illuminated you could cause the fluid to boil
over, come in contact with hot engine or
exhaust components and cause a fire.
CAUTION!
Continuous driving with the Transmission
Temperature Warning Light illuminated will
eventually cause severe transmission
damage or transmission failure.
3
20_LX_OM_EN_USC_t.book Page 87
Page 145 of 328

SAFETY143
(Continued)
EXHAUST GAS The best protection against carbon monoxide
entry into the vehicle body is a properly
maintained engine exhaust system.
Whenever a change is noticed in the sound of
the exhaust system, when exhaust fumes can
be detected inside the vehicle, or when the
underside or rear of the vehicle is damaged,
have a competent mechanic inspect the
complete exhaust system and adjacent body
areas for broken, damaged, deteriorated, or
mispositioned parts. Open seams or loose
connections could permit exhaust fumes to
seep into the passenger compartment. In
addition, inspect the exhaust system each time
the vehicle is raised for lubrication or oil
change. Replace as required.
SAFETY CHECKS YOU SHOULD MAKE
I
NSIDE THE VEHICLE
Seat Belts
Inspect the seat belt system periodically,
checking for cuts, frays, and loose parts.
Damaged parts must be replaced immediately.
Do not disassemble or modify the system.
Front seat belt assemblies must be replaced
after a collision. Rear seat belt assemblies must
be replaced after a collision if they have been
damaged (i.e., bent retractor, torn webbing,
etc.). If there is any question regarding seat belt
or retractor condition, replace the seat belt.
Air Bag Warning Light
The Air Bag warning light will turn on for four
to eight seconds as a bulb check when the
ignition switch is first turned to ON/RUN. If the
light is either not on during starting, stays on, or
turns on while driving, have the system
inspected at an authorized dealer as soon as
possible. After the bulb check, this light will
Do not allow people to ride in any area of
your vehicle that is not equipped with seats
and seat belts.
Be sure everyone in your vehicle is in a seat
and using a seat belt properly.
WARNING!
Exhaust gases can injure or kill. They contain
carbon monoxide (CO), which is colorless and
odorless. Breathing it can make you
unconscious and can eventually poison you.
To avoid breathing (CO), follow these safety
tips:
Do not run the engine in a closed garage or
in confined areas any longer than needed
to move your vehicle in or out of the area.
If you are required to drive with the trunk/
liftgate/rear doors open, make sure that all
windows are closed and the climate control
BLOWER switch is set at high speed. DO
NOT use the recirculation mode.
WARNING! (Continued)
If it is necessary to sit in a parked vehicle
with the engine running, adjust your
heating or cooling controls to force outside
air into the vehicle. Set the blower at high
speed.
WARNING! (Continued)
4
20_LX_OM_EN_USC_t.book Page 143