2020 CHRYSLER 300 air filter
[x] Cancel search: air filterPage 8 of 328

6
DEALER SERVICE .............................................. 239 Engine Oil .................................................. 240Engine Oil Filter ..........................................241Engine Air Cleaner Filter ...........................241
Air Conditioner Maintenance ...................242Accessory Drive Belt Inspection................243Body Lubrication ........................................244
Windshield Wiper Blades ..........................244
Exhaust System .........................................246
Cooling System .........................................247
Brake System ............................................250
Automatic Transmission ...........................251
All Wheel Drive (AWD) — If Equipped .......253
Rear Axle ....................................................253
RAISING THE VEHICLE ...................................... 253
TIRES ................................................................... 253
Tire Safety Information .............................253Tires — General Information .....................261Tire Types ...................................................265
Spare Tires — If Equipped .........................266
Wheel And Wheel Trim Care ....................268
Tire Chains and Traction Devices .............269
Tire Rotation Recommendations .............270 DEPARTMENT OF TRANSPORTATION
UNIFORM TIRE QUALITY GRADES .................. 270
Treadwear .................................................. 270
Traction Grades ......................................... 271
Temperature Grades ................................. 271
VEHICLE STORAGE .............................................271
BODYWORK ........................................................ 272
Protection From Atmospheric Agents....... 272
Body And Underbody Maintenance .......... 272Preserving The Bodywork .......................... 272
INTERIORS ......................................................... 273
Seats And Fabric Parts .............................. 273
Plastic And Coated Parts ........................... 274
Leather Parts ............................................. 274
Glass Surfaces .......................................... 274
TECHNICAL SPECIFICATIONS
IDENTIFICATION DATA .......................................275Vehicle Identification Number .................. 275
BRAKE SYSTEM ................................................. 275
WHEEL AND TIRE TORQUE
SPECIFICATIONS ................................................ 275
Torque Specifications ................................ 275 FUEL REQUIREMENTS ...................................... 276
3.6L Engine ................................................ 276
5.7L Engine ................................................ 276
Reformulated Gasoline ............................ 277Materials Added To Fuel ........................... 277
Gasoline/Oxygenate Blends ..................... 277
Do Not Use E-85 In Non-Flex Fuel
Vehicles ...................................................... 278 CNG And LP Fuel System Modifications .. 278MMT In Gasoline........................................ 278
Fuel System Cautions................................ 279
Carbon Monoxide Warnings...................... 279
FLUID CAPACITIES ............................................ 280
FLUIDS AND LUBRICANTS ............................... 281
Engine ........................................................ 281
Chassis ...................................................... 283MULTIMEDIA
UCONNECT SYSTEMS ....................................... 284
CYBERSECURITY ............................................... 284
UCONNECT SETTINGS ...................................... 285 Customer Programmable Features —
Uconnect 4C/4C NAV Settings ................ 285
20_LX_OM_EN_USC_t.book Page 6
Page 59 of 328

GETTING TO KNOW YOUR VEHICLE57
Cabin Air Filter
The climate control system filters out dust and
pollen from the air. Contact an authorized
dealer to service your cabin air filter, and to
have it replaced when needed.
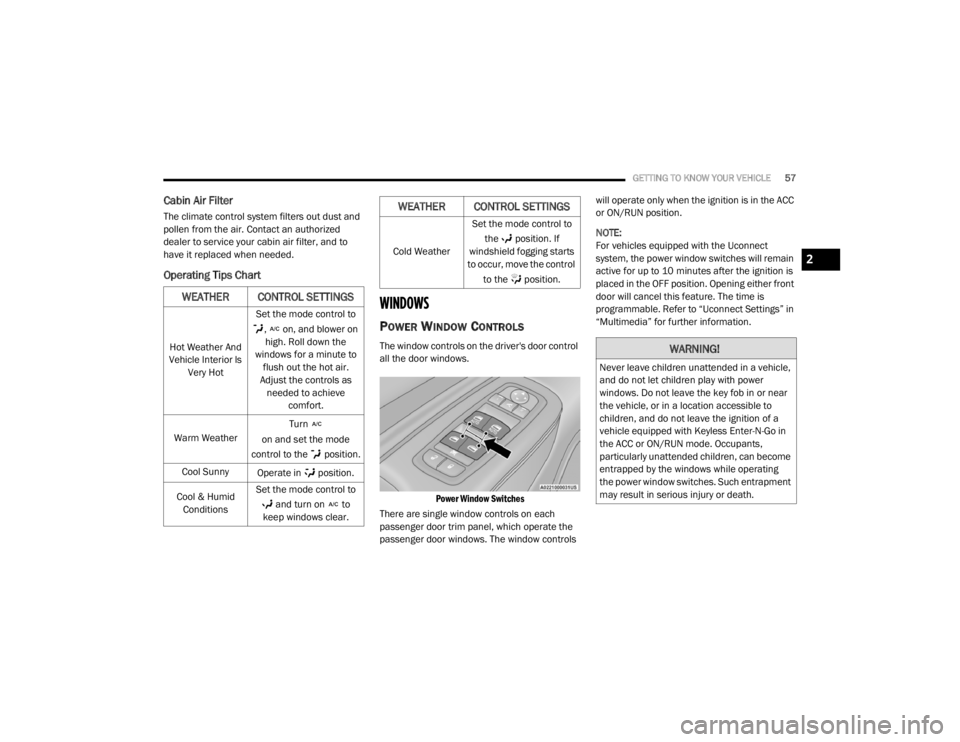
Operating Tips Chart
WINDOWS
POWER WINDOW CONTROLS
The window controls on the driver's door control
all the door windows.
Power Window Switches
There are single window controls on each
passenger door trim panel, which operate the
passenger door windows. The window controls will operate only when the ignition is in the ACC
or ON/RUN position.
NOTE:
For vehicles equipped with the Uconnect
system, the power window switches will remain
active for up to 10 minutes after the ignition is
placed in the OFF position. Opening either front
door will cancel this feature. The time is
programmable. Refer to “Uconnect Settings” in
“Multimedia” for further information.
WEATHER CONTROL SETTINGS
Hot Weather And
Vehicle Interior Is Very Hot Set the mode control to
, on, and blower on high. Roll down the
windows for a minute to flush out the hot air.
Adjust the controls as needed to achieve comfort.
Warm Weather Turn
on and set the mode
control to the position.
Cool Sunny Operate in position.
Cool & Humid Conditions Set the mode control to
and turn on to
keep windows clear.
Cold Weather Set the mode control to
the position. If
windshield fogging starts
to occur, move the control
to the position.
WEATHER CONTROL SETTINGS
WARNING!
Never leave children unattended in a vehicle,
and do not let children play with power
windows. Do not leave the key fob in or near
the vehicle, or in a location accessible to
children, and do not leave the ignition of a
vehicle equipped with Keyless Enter-N-Go in
the ACC or ON/RUN mode. Occupants,
particularly unattended children, can become
entrapped by the windows while operating
the power window switches. Such entrapment
may result in serious injury or death.
2
20_LX_OM_EN_USC_t.book Page 57
Page 131 of 328

SAFETY129
(Continued)
Enhanced Accident Response System
In the event of an impact, if the communication
network remains intact, and the power remains
intact, depending on the nature of the event,
the ORC will determine whether to have the
Enhanced Accident Response System perform
the following functions:
Cut off fuel to the engine (if equipped).
Cut off battery power to the electric motor (if
equipped).
Flash hazard lights as long as the battery has
power.
Turn on the interior lights, which remain on
as long as the battery has power or for
15 minutes from the intervention of the
Enhanced Accident Response System.
Unlock the power door locks.
Your vehicle may also be designed to perform
any of these other functions in response to the
Enhanced Accident Response System:
Turn off the Fuel Filter Heater, Turn off the
HVAC Blower Motor, Close the HVAC Circula -
tion Door
Cut off battery power to the:
Engine
Electric Motor (if equipped)
Electric power steering
Brake booster
Electric park brake
Automatic transmission gear selector
Horn
Front wiper
Headlamp washer pump
NOTE:
After an accident, remember to cycle the igni -
tion to the STOP (OFF/LOCK) position and
remove the key from the ignition switch to avoid
draining the battery. Carefully check the vehicle
for fuel leaks in the engine compartment and on
the ground near the engine compartment and
fuel tank before resetting the system and
starting the engine. If there are no fuel leaks or
damage to the vehicle electrical devices (e.g.
headlights) after an accident, reset the system by following the procedure described below. If
you have any doubt, contact an authorized
dealer.
Enhanced Accident Response System
Reset Procedure
In order to reset the Enhanced Accident
Response System functions after an event, the
ignition switch must be changed from ignition
START or ON/RUN to ignition OFF. Carefully
check the vehicle for fuel leaks in the engine
compartment and on the ground near the
engine compartment and fuel tank before
resetting the system and starting the engine.
Maintaining Your Air Bag System
WARNING!
Modifications to any part of the air bag system
could cause it to fail when you need it. You
could be injured if the air bag system is not
there to protect you. Do not modify the
components or wiring, including adding any
kind of badges or stickers to the steering
wheel hub trim cover or the upper passenger
side of the instrument panel. Do not modify
the front bumper, vehicle body structure, or
add aftermarket side steps or running boards.
4
20_LX_OM_EN_USC_t.book Page 129
Page 210 of 328

208IN CASE OF EMERGENCY
Bi - Halogen Low Beam And High Beam
Headlamp — If Equipped
1. Open the hood.
NOTE:
Removal of the air cleaner filter housing may be
necessary prior to replacing bulbs in the head -
lamp assembly on the driver side of the vehicle.
2. Reach behind the headlamp housing to access the headlamp (outboard) bulb cap.
Headlamp Bulb Cap
3. Firmly grasp the cap and rotate it counter -
clockwise to unlock it. 4. Twist the headlamp bulb assembly counter
-
clockwise, and then pull it out of the
headlamp assembly.
Headlamp Bulb Location
5. Disconnect the bulb from the wiring assembly and install the replacement bulb.
6. Reinstall the bulb and wiring assembly into the headlamp assembly, and then turn it
clockwise.
7. Install the headlamp bulb cap in the headlamp housing and rotate it clockwise to
lock it.
Front Turn Signal Lamps
1. Open the hood.
NOTE:
Removal of the air cleaner filter housing may be
necessary prior to replacing bulbs in the head -
lamp assembly on the driver side of the vehicle.
2. Reach behind the headlamp housing to access the turn signal (inboard) bulb cap.
Turn Signal Bulb Cap
CAUTION!
Do not touch the new bulb with your fingers.
Oil contamination will severely shorten bulb
life. If the bulb comes in contact with any oily
surface, clean the bulb with rubbing alcohol.
20_LX_OM_EN_USC_t.book Page 208
Page 234 of 328

232SERVICING AND MAINTENANCE
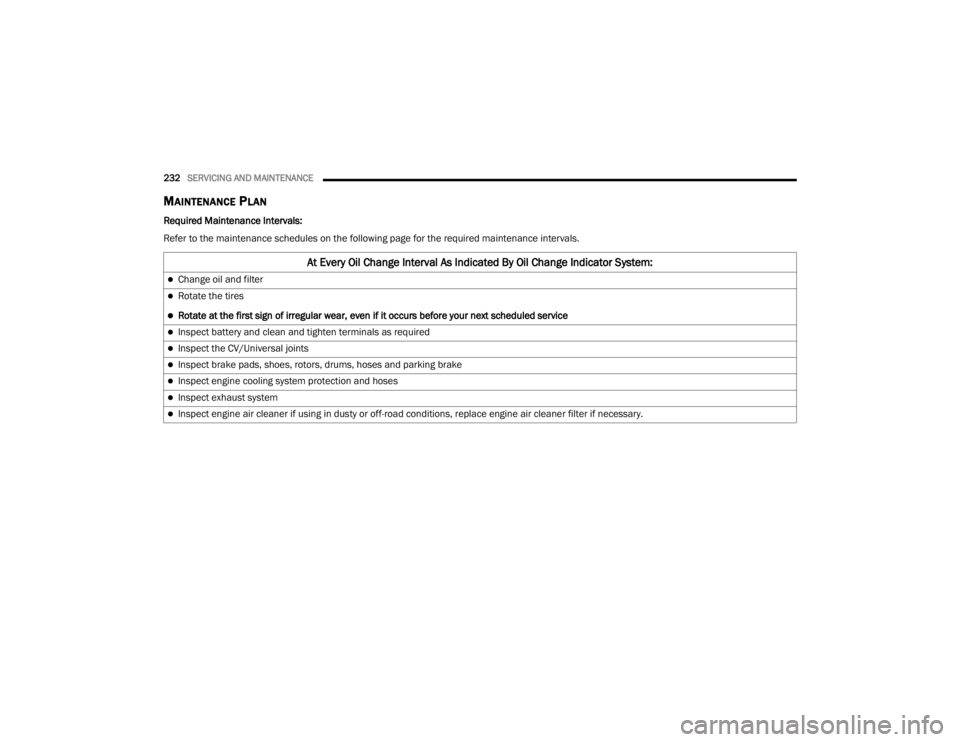
MAINTENANCE PLAN
Required Maintenance Intervals:
Refer to the maintenance schedules on the following page for the required maintenance intervals.
At Every Oil Change Interval As Indicated By Oil Change Indicator System:
Change oil and filter
Rotate the tires
Rotate at the first sign of irregular wear, even if it occurs before your next scheduled service
Inspect battery and clean and tighten terminals as required
Inspect the CV/Universal joints
Inspect brake pads, shoes, rotors, drums, hoses and parking brake
Inspect engine cooling system protection and hoses
Inspect exhaust system
Inspect engine air cleaner if using in dusty or off-road conditions, replace engine air cleaner filter if necessary.
20_LX_OM_EN_USC_t.book Page 232
Page 236 of 328

234SERVICING AND MAINTENANCE
Additional Maintenance
Replace engine air filter. XX XXX
Replace cabin/air conditioning filter. X X X X XX X
Replace spark plugs.
1X
Flush and replace the engine coolant at 10 years or 150,
000 miles (240,000 km) whichever comes first. X
X
Change the transfer case fluid; if using your vehicle for any of
the following: police, taxi, fleet, off-road, or frequent trailer
towing. (All Wheel Drive Only). X
X
Mileage or time passed (whichever comes first)
20,000
30,000
40,000
50,000
60,000
70,000
80,000
90,000
100,000
110,000
120,000
130,000
140,000
150,000
Or Years: 2 3 4 5 6 7 8 9 10 11 12 13 14 15
Or Kilometers:
32,000
48,000
64,000
80,000
96,000
112,000
128,000
144,000
160,000
176,000
192,000
208,000
224,000
240,000
20_LX_OM_EN_USC_t.book Page 234
Page 238 of 328

236SERVICING AND MAINTENANCE
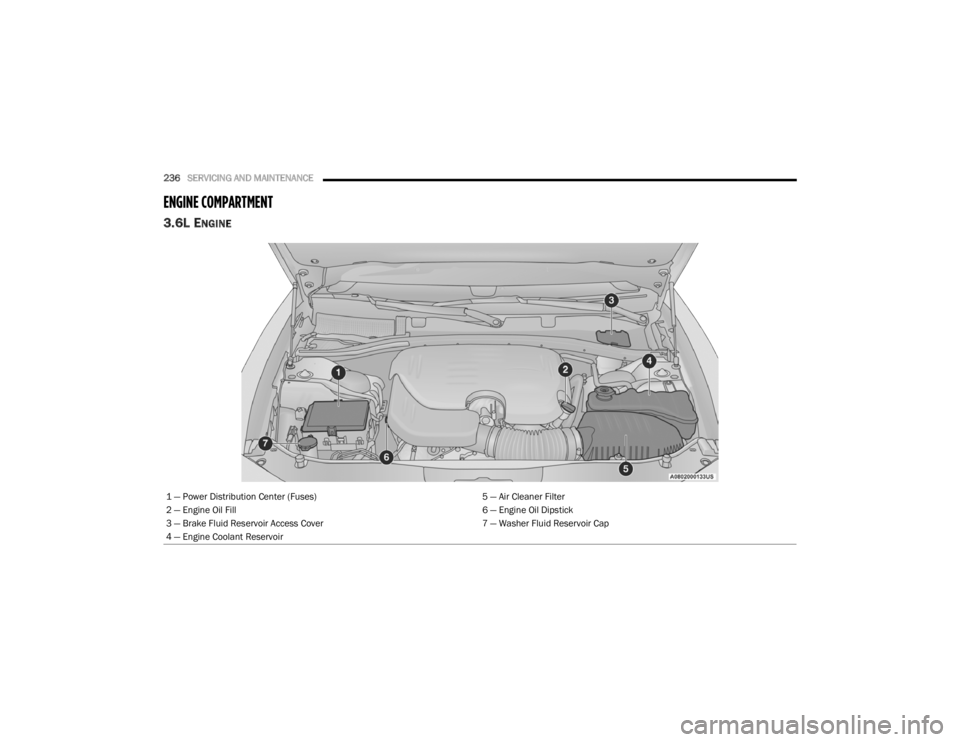
ENGINE COMPARTMENT
3.6L ENGINE
1 — Power Distribution Center (Fuses) 5 — Air Cleaner Filter
2 — Engine Oil Fill 6 — Engine Oil Dipstick
3 — Brake Fluid Reservoir Access Cover 7 — Washer Fluid Reservoir Cap
4 — Engine Coolant Reservoir
20_LX_OM_EN_USC_t.book Page 236
Page 239 of 328

SERVICING AND MAINTENANCE237
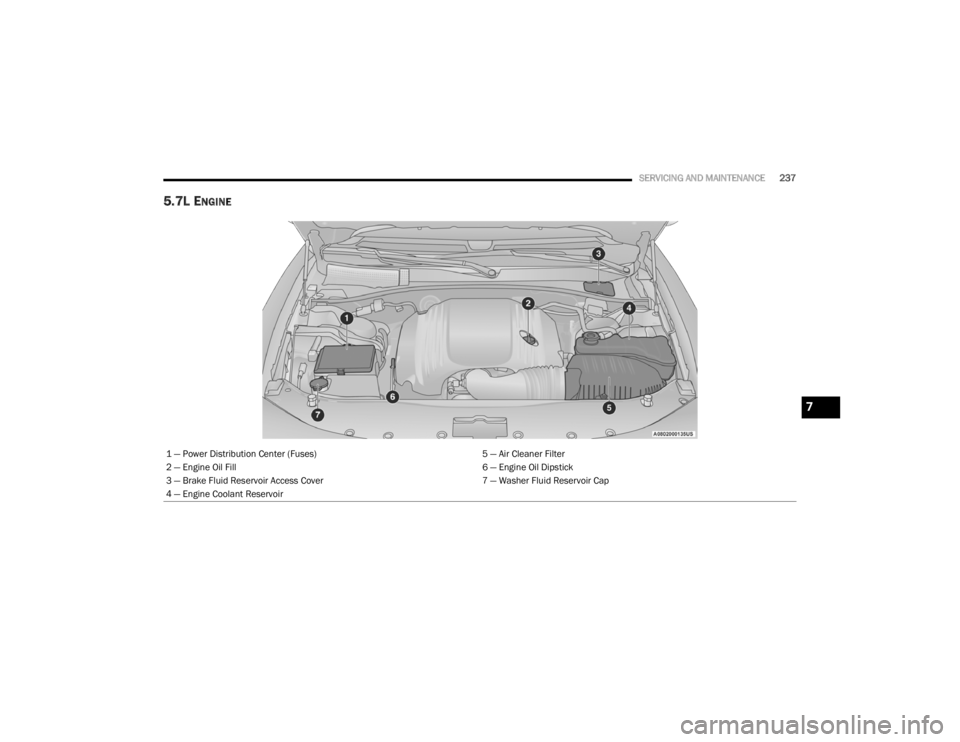
5.7L ENGINE
1 — Power Distribution Center (Fuses) 5 — Air Cleaner Filter
2 — Engine Oil Fill 6 — Engine Oil Dipstick
3 — Brake Fluid Reservoir Access Cover 7 — Washer Fluid Reservoir Cap
4 — Engine Coolant Reservoir
7
20_LX_OM_EN_USC_t.book Page 237