2020 CHEVROLET MALIBU battery
[x] Cancel search: batteryPage 169 of 358
Chevrolet Malibu Owner Manual (GMNA-Localizing-U.S./Canada/Mexico-
13555849) - 2020 - CRC - 8/16/19
168 Driving and Operating
Electric Parking Brake
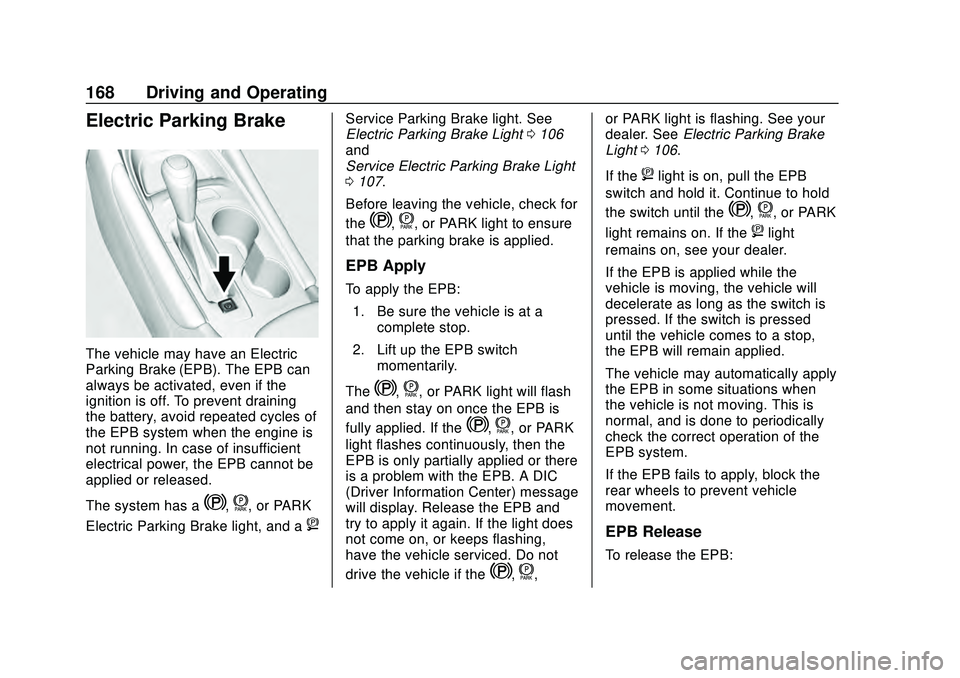
The vehicle may have an Electric
Parking Brake (EPB). The EPB can
always be activated, even if the
ignition is off. To prevent draining
the battery, avoid repeated cycles of
the EPB system when the engine is
not running. In case of insufficient
electrical power, the EPB cannot be
applied or released.
The system has a
Y,f, or PARK
Electric Parking Brake light, and a
8
Service Parking Brake light. See
Electric Parking Brake Light 0106
and
Service Electric Parking Brake Light
0 107.
Before leaving the vehicle, check for
the
Y,f, or PARK light to ensure
that the parking brake is applied.
EPB Apply
To apply the EPB:
1. Be sure the vehicle is at a complete stop.
2. Lift up the EPB switch momentarily.
The
Y,f, or PARK light will flash
and then stay on once the EPB is
fully applied. If the
Y,f, or PARK
light flashes continuously, then the
EPB is only partially applied or there
is a problem with the EPB. A DIC
(Driver Information Center) message
will display. Release the EPB and
try to apply it again. If the light does
not come on, or keeps flashing,
have the vehicle serviced. Do not
drive the vehicle if the
Y,f, or PARK light is flashing. See your
dealer. See
Electric Parking Brake
Light 0106.
If the
8light is on, pull the EPB
switch and hold it. Continue to hold
the switch until the
Y,f, or PARK
light remains on. If the
8light
remains on, see your dealer.
If the EPB is applied while the
vehicle is moving, the vehicle will
decelerate as long as the switch is
pressed. If the switch is pressed
until the vehicle comes to a stop,
the EPB will remain applied.
The vehicle may automatically apply
the EPB in some situations when
the vehicle is not moving. This is
normal, and is done to periodically
check the correct operation of the
EPB system.
If the EPB fails to apply, block the
rear wheels to prevent vehicle
movement.
EPB Release
To release the EPB:
Page 211 of 358
Chevrolet Malibu Owner Manual (GMNA-Localizing-U.S./Canada/Mexico-
13555849) - 2020 - CRC - 8/16/19
210 Driving and Operating
Conversions and
Add-Ons
Add-On Electrical
Equipment
{Warning
The Data Link Connector (DLC) is
used for vehicle service and
Emission Inspection/Maintenance
testing. SeeMalfunction Indicator
Lamp (Check Engine Light) 0104
. A device connected to the DLC
— such as an aftermarket fleet or
driver-behavior tracking device —
may interfere with vehicle
systems. This could affect vehicle
operation and cause a crash.
Such devices may also access
information stored in the vehicle’s
systems.
Caution
Some electrical equipment can
damage the vehicle or cause
components to not work and
would not be covered by the
vehicle warranty. Always check
with your dealer before adding
electrical equipment.
Add-on equipment can drain the
vehicle's 12-volt battery, even if the
vehicle is not operating.
The vehicle has an airbag system.
Before attempting to add anything
electrical to the vehicle, see
Servicing the Airbag-Equipped
Vehicle 064 and
Adding Equipment to the
Airbag-Equipped Vehicle 064.
Page 212 of 358

Chevrolet Malibu Owner Manual (GMNA-Localizing-U.S./Canada/Mexico-
13555849) - 2020 - CRC - 8/21/19
Vehicle Care 211
Vehicle Care
General Information
General Information . . . . . . . . . . 212
California Proposition65 Warning . . . . . . . . . . . . . . . . . 213
California Perchlorate Materials Requirements . . . . . 213
Accessories and Modifications . . . . . . . . . . . . . . . . 213
Vehicle Checks
Doing Your OwnService Work . . . . . . . . . . . . . . . 214
Hood . . . . . . . . . . . . . . . . . . . . . . . . . 214
Engine Compartment Overview . . . . . . . . . . . . . . . . . . . . 216
Engine Oil . . . . . . . . . . . . . . . . . . . . 219
Engine Oil Life System . . . . . . . 221
Automatic Transmission Fluid . . . . . . . . . . . . . . . . . . . . . . . . 222
Engine Air Filter Life System . . . . . . . . . . . . . . . . . . . . . . 223
Engine Air Cleaner/Filter . . . . . . 223
Cooling System . . . . . . . . . . . . . . 225
Engine Overheating . . . . . . . . . . 228
Washer Fluid . . . . . . . . . . . . . . . . . 229
Brakes . . . . . . . . . . . . . . . . . . . . . . . 230
Brake Fluid . . . . . . . . . . . . . . . . . . . 231 Battery - North America . . . . . . 232
Starter Switch Check . . . . . . . . . 234
Automatic Transmission Shift
Lock Control Function
Check . . . . . . . . . . . . . . . . . . . . . . . 234
Park Brake and P (Park) Mechanism Check . . . . . . . . . . 235
Wiper Blade Replacement . . . . 235
Windshield Replacement . . . . . 236
Gas Strut(s) . . . . . . . . . . . . . . . . . . 236
Headlamp Aiming
Front Headlamp Aiming . . . . . . 237
Bulb Replacement
Bulb Replacement . . . . . . . . . . . . 238
Halogen Bulbs . . . . . . . . . . . . . . . . 238
LED Lighting . . . . . . . . . . . . . . . . . 238
Headlamps, Front Turn Signal, Sidemarker, and Parking
Lamps . . . . . . . . . . . . . . . . . . . . . . 238
Taillamps, Turn Signal, Stoplamps, and Back-Up
Lamps (LS and LT) . . . . . . . . . . 239
Taillamps, Turn Signal, Stoplamps, and Back-Up
Lamps (LT and Premier) . . . . . 240
License Plate Lamp . . . . . . . . . . 240
Electrical System
High Voltage Devices and Wiring . . . . . . . . . . . . . . . . . . . . . . . 241
Electrical System Overload . . . 242
Fuses and Circuit Breakers . . . 242
Engine Compartment Fuse Block . . . . . . . . . . . . . . . . . . . . . . . . 243
Instrument Panel Fuse Block . . . . . . . . . . . . . . . . . . . . . . . . 247
Wheels and Tires
Tires . . . . . . . . . . . . . . . . . . . . . . . . . . 250
All-Season Tires . . . . . . . . . . . . . . 251
Winter Tires . . . . . . . . . . . . . . . . . . 251
Low-Profile Tires . . . . . . . . . . . . . 251
Summer Tires . . . . . . . . . . . . . . . . 252
Tire Sidewall Labeling . . . . . . . . 252
Tire Designations . . . . . . . . . . . . . 254
Tire Terminology andDefinitions . . . . . . . . . . . . . . . . . . 255
Tire Pressure . . . . . . . . . . . . . . . . . 257
Tire Pressure for High-Speed Operation . . . . . . . . . . . . . . . . . . . 259
Tire Pressure Monitor System . . . . . . . . . . . . . . . . . . . . . . 259
Tire Pressure Monitor Operation . . . . . . . . . . . . . . . . . . . 260
Tire Inspection . . . . . . . . . . . . . . . . 264
Tire Rotation . . . . . . . . . . . . . . . . . 265
Page 214 of 358
Chevrolet Malibu Owner Manual (GMNA-Localizing-U.S./Canada/Mexico-
13555849) - 2020 - CRC - 8/21/19
Vehicle Care 213
California Proposition
65 Warning
{Warning
Most motor vehicles, including
this one, as well as many of its
service parts and fluids, contain
and/or emit chemicals known to
the State of California to cause
cancer and birth defects or other
reproductive harm. Engine
exhaust, many parts and
systems, many fluids, and some
component wear by-products
contain and/or emit these
chemicals. For more information
go to www.P65Warnings.ca.gov/
passenger-vehicle.
See Battery - North America 0232
and
Jump Starting - North America
0 286 and the back cover.
California Perchlorate
Materials Requirements
Certain types of automotive
applications, such as airbag
initiators, seat belt pretensioners,
and lithium batteries contained in
electronic keys, may contain
perchlorate materials. Perchlorate
Material –special handling may
apply. See www.dtsc.ca.gov/
hazardouswaste/perchlorate.
Accessories and
Modifications
Adding non-dealer accessories or
making modifications to the vehicle
can affect vehicle performance and
safety, including such things as
airbags, braking, stability, ride and
handling, emissions systems,
aerodynamics, durability, and
electronic systems like antilock
brakes, traction control, and stability
control. These accessories or
modifications could even cause
malfunction or damage not covered
by the vehicle warranty. Damage to suspension components
caused by modifying vehicle height
outside of factory settings will not be
covered by the vehicle warranty.
Damage to vehicle components
resulting from modifications or the
installation or use of non-GM
certified parts, including control
module or software modifications, is
not covered under the terms of the
vehicle warranty and may affect
remaining warranty coverage for
affected parts.
GM Accessories are designed to
complement and function with other
systems on the vehicle. See your
dealer to accessorize the vehicle
using genuine GM Accessories
installed by a dealer technician.
Also, see
Adding Equipment to the
Airbag-Equipped Vehicle 064.
Page 218 of 358
Chevrolet Malibu Owner Manual (GMNA-Localizing-U.S./Canada/Mexico-
13555849) - 2020 - CRC - 8/21/19
Vehicle Care 217
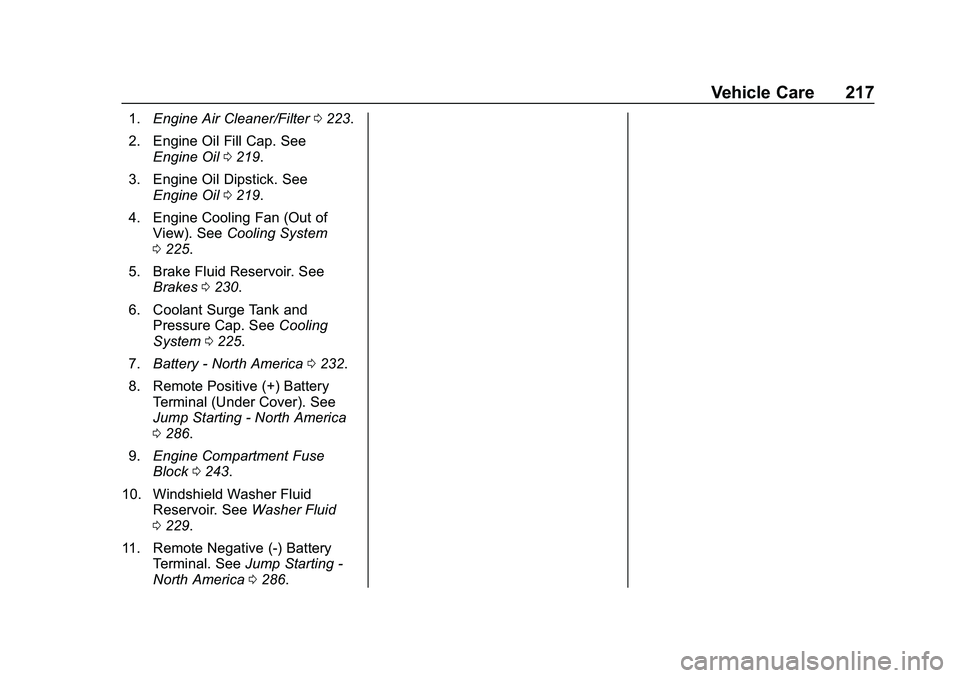
1.Engine Air Cleaner/Filter 0223.
2. Engine Oil Fill Cap. See Engine Oil 0219.
3. Engine Oil Dipstick. See Engine Oil 0219.
4. Engine Cooling Fan (Out of View). See Cooling System
0 225.
5. Brake Fluid Reservoir. See Brakes 0230.
6. Coolant Surge Tank and Pressure Cap. See Cooling
System 0225.
7. Battery - North America 0232.
8. Remote Positive (+) Battery Terminal (Under Cover). See
Jump Starting - North America
0286.
9. Engine Compartment Fuse
Block 0243.
10. Windshield Washer Fluid Reservoir. See Washer Fluid
0 229.
11. Remote Negative (-) Battery Terminal. See Jump Starting -
North America 0286.
Page 220 of 358
Chevrolet Malibu Owner Manual (GMNA-Localizing-U.S./Canada/Mexico-
13555849) - 2020 - CRC - 8/21/19
Vehicle Care 219
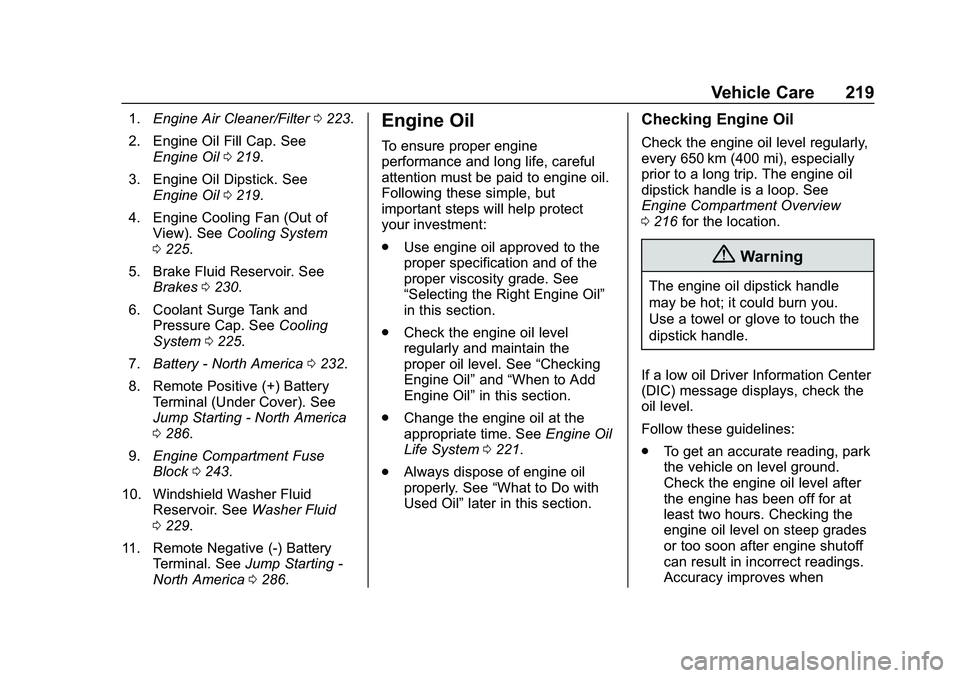
1.Engine Air Cleaner/Filter 0223.
2. Engine Oil Fill Cap. See Engine Oil 0219.
3. Engine Oil Dipstick. See Engine Oil 0219.
4. Engine Cooling Fan (Out of View). See Cooling System
0 225.
5. Brake Fluid Reservoir. See Brakes 0230.
6. Coolant Surge Tank and Pressure Cap. See Cooling
System 0225.
7. Battery - North America 0232.
8. Remote Positive (+) Battery Terminal (Under Cover). See
Jump Starting - North America
0286.
9. Engine Compartment Fuse
Block 0243.
10. Windshield Washer Fluid Reservoir. See Washer Fluid
0 229.
11. Remote Negative (-) Battery Terminal. See Jump Starting -
North America 0286.Engine Oil
To ensure proper engine
performance and long life, careful
attention must be paid to engine oil.
Following these simple, but
important steps will help protect
your investment:
.
Use engine oil approved to the
proper specification and of the
proper viscosity grade. See
“Selecting the Right Engine Oil”
in this section.
. Check the engine oil level
regularly and maintain the
proper oil level. See “Checking
Engine Oil” and“When to Add
Engine Oil” in this section.
. Change the engine oil at the
appropriate time. See Engine Oil
Life System 0221.
. Always dispose of engine oil
properly. See “What to Do with
Used Oil” later in this section.
Checking Engine Oil
Check the engine oil level regularly,
every 650 km (400 mi), especially
prior to a long trip. The engine oil
dipstick handle is a loop. See
Engine Compartment Overview
0216 for the location.
{Warning
The engine oil dipstick handle
may be hot; it could burn you.
Use a towel or glove to touch the
dipstick handle.
If a low oil Driver Information Center
(DIC) message displays, check the
oil level.
Follow these guidelines:
. To get an accurate reading, park
the vehicle on level ground.
Check the engine oil level after
the engine has been off for at
least two hours. Checking the
engine oil level on steep grades
or too soon after engine shutoff
can result in incorrect readings.
Accuracy improves when
Page 233 of 358
Chevrolet Malibu Owner Manual (GMNA-Localizing-U.S./Canada/Mexico-
13555849) - 2020 - CRC - 8/21/19
232 Vehicle Care
When the brake fluid falls to a low
level, the brake warning light comes
on. SeeBrake System Warning
Light 0106.
Brake fluid absorbs water over time
which degrades the effectiveness of
the brake fluid. Replace brake fluid
at the specified intervals to prevent
increased stopping distance. See
Maintenance Schedule 0304.
What to Add
Use only GM approved DOT 3
brake fluid from a clean, sealed
container. See Recommended
Fluids and Lubricants 0313.
{Warning
The wrong or contaminated brake
fluid could result in damage to the
brake system. This could result in
the loss of braking leading to a
possible injury. Always use the
proper GM approved brake fluid.
Caution
If brake fluid is spilled on the
vehicle's painted surfaces, the
paint finish can be damaged.
Immediately wash off any painted
surface.
Battery - North America
The original equipment battery is
maintenance free. Do not remove
the cap and do not add fluid.
The vehicle has a standard 12-volt
battery under the hood. See Engine
Compartment Overview 0216.
Refer to the replacement number
shown on the original battery label
when a new 12-volt battery is
needed.
Stop/Start System
If equipped with the 1.5L L4 engine,
the vehicle has a Stop/Start system
to shut off the engine to help
conserve fuel. See Stop/Start
System 0158. Vehicles with a 1.5L engine have an
Absorbed Glass Mat (AGM) 12-volt
battery. Installation of a standard
12-volt battery will result in reduced
12-volt battery life.
When using a 12-volt battery
charger on the 12-volt AGM battery,
some chargers have an AGM
battery setting on the charger.
If available, use the AGM setting on
the charger, to limit charge voltage
to 14.8 volts.
{Warning
WARNING:
Battery posts,
terminals, and related
accessories contain lead and lead
compounds, chemicals known to
the State of California to cause
cancer and birth defects or other
reproductive harm. Batteries also
contain other chemicals known to
the State of California to cause
cancer. WASH HANDS AFTER
HANDLING. For more information
go to www.P65Warnings.ca.gov/
passenger-vehicle.
Page 234 of 358
Chevrolet Malibu Owner Manual (GMNA-Localizing-U.S./Canada/Mexico-
13555849) - 2020 - CRC - 8/21/19
Vehicle Care 233
SeeCalifornia Proposition
65 Warning 0213 and the back
cover.
Vehicle Storage
{Warning
Batteries have acid that can burn
you and gas that can explode.
You can be badly hurt if you are
not careful. See Jump Starting -
North America 0286 for tips on
working around a battery without
getting hurt.
Infrequent Usage: Remove the
12-volt battery black, negative (−)
cable from the battery to keep the
battery from running down.
Extended Storage: Remove the
12-volt battery black, negative (−)
cable from the battery or use a
battery trickle charger.
Remember to reconnect the battery
when ready to drive the vehicle.
Negative Battery Cable
Disconnection
{Warning
Before disconnecting the negative
battery cable, turn off all features,
turn the ignition off, and remove
the key, if equipped, from the
vehicle. If this is not done, you or
others could be injured, and the
vehicle could be damaged.
Caution
If the battery is disconnected with
the ignition on or the vehicle in
Retained Accessory Power
(RAP), the OnStar back-up
battery will be permanently
discharged and will need to be
replaced.
1. Make sure the lamps, features, and accessories are turned off.
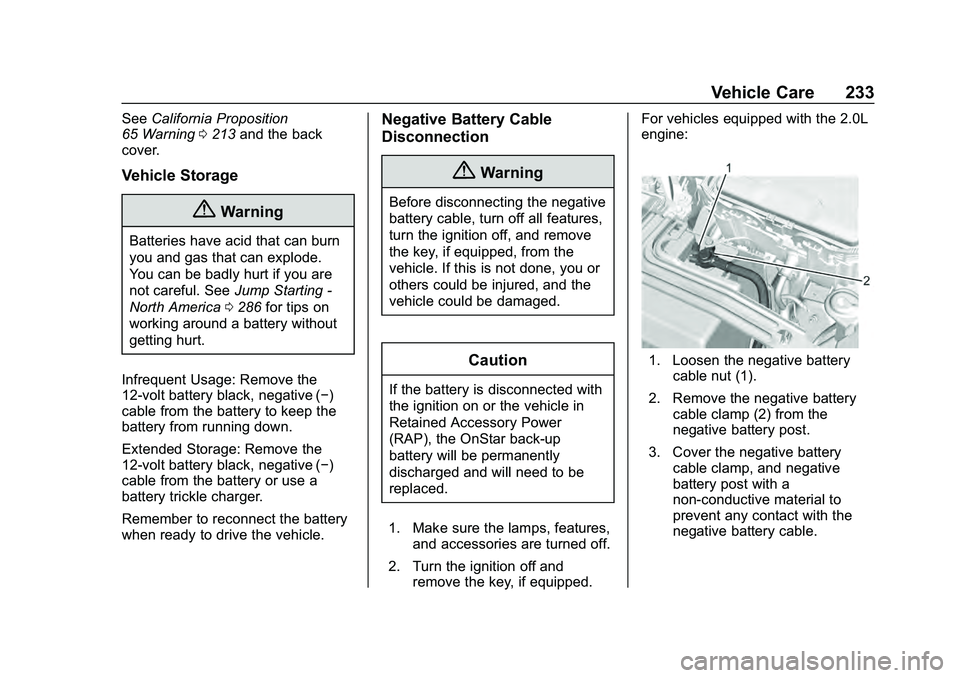
2. Turn the ignition off and remove the key, if equipped. For vehicles equipped with the 2.0L
engine:
1. Loosen the negative battery
cable nut (1).
2. Remove the negative battery cable clamp (2) from the
negative battery post.
3. Cover the negative battery cable clamp, and negative
battery post with a
non-conductive material to
prevent any contact with the
negative battery cable.