2020 CHEVROLET MALIBU fold seats
[x] Cancel search: fold seatsPage 28 of 358

Chevrolet Malibu Owner Manual (GMNA-Localizing-U.S./Canada/Mexico-
13555849) - 2020 - CRC - 8/16/19
Keys, Doors, and Windows 27
Power Mirrors
To adjust the mirrors:1. Press
}or|to select the
driver or passenger side mirror.
The indicator light will
illuminate.
2. Press the arrows on the control pad to move the mirror in the
desired direction.
3. Adjust each outside mirror so that a little of the vehicle and
the area behind it can be seen.
4. Press
}or|again to
deselect the mirror. Memory Mirrors
The vehicle may have memory
mirrors. See
Memory Seats 038.
Side Blind Zone Alert (SBZA)
The vehicle may have SBZA. See
Side Blind Zone Alert (SBZA) 0193.
Lane Change Alert (LCA)
The vehicle may have LCA. See
Lane Change Alert (LCA) 0194.
Turn Signal Indicator
The vehicle may have a turn signal
indicator on the mirror housings.
The indicator will flash when a turn
signal or the hazard warning
flashers are used.
Folding Mirrors
Manual Folding Mirrors
The mirrors can be folded inward
toward the vehicle to prevent
damage when going through an
automatic car wash. Push the mirror
outward to return it to the original
position.
Heated Mirrors
If equipped with heated mirrors:
K: The rear window defogger also
heats the outside mirrors.
See Dual Automatic Climate Control
System 0137.
Reverse Tilt Mirrors
If equipped with memory seats, the
passenger and/or driver mirror tilts
to a preselected position when the
vehicle is in R (Reverse). This
allows the curb to be seen when
parallel parking.
The mirror(s) return to the original
position when:
.
The vehicle is shifted out of
R (Reverse), or remains in
R (Reverse) for about
30 seconds.
. The ignition is turned off.
. The vehicle is driven in
R (Reverse) above a set speed.
To turn this feature on or off, see
Vehicle Personalization 0120.
Page 35 of 358
Chevrolet Malibu Owner Manual (GMNA-Localizing-U.S./Canada/Mexico-
13555849) - 2020 - CRC - 8/16/19
34 Seats and Restraints
To lower the head restraint, press
the button, located on the top of the
seatback, and push the head
restraint down. Try to move the
head restraint after the button is
released to make sure that it is
locked in place.
The rear seat outboard head
restraints are not intended to be
removed. If removal is required see
your dealer for assistance with
removal. In the event of an
emergency, the following can be
used as removal and installation
instructions. Store the removed
head restraints in a secure place.
Reinstall the head restraints before
the seating position is occupied.
Head Restraint Removal and
Reinstallation
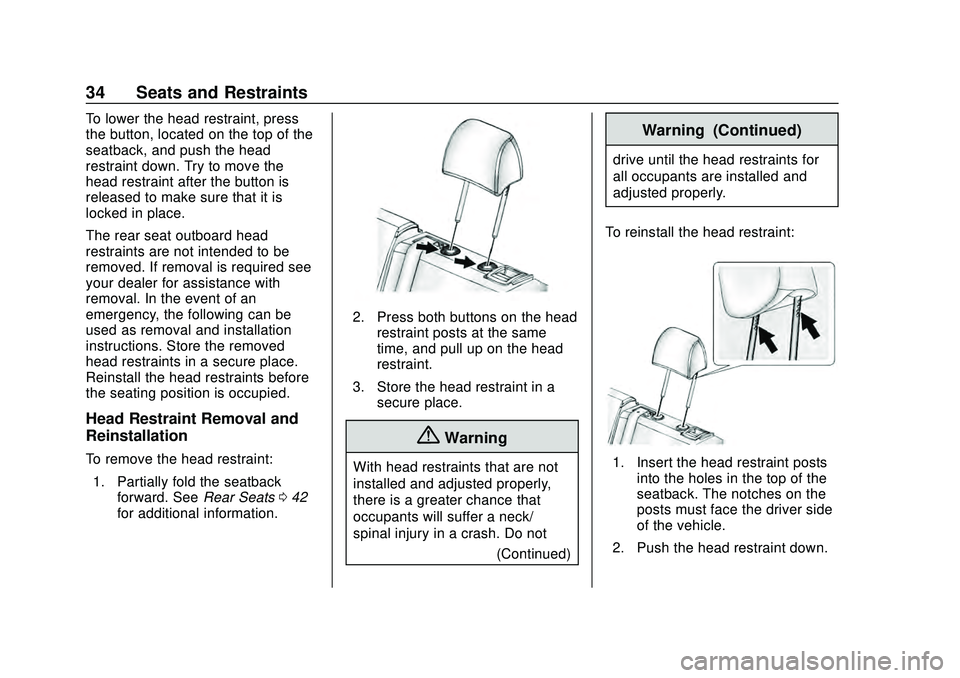
To remove the head restraint:1. Partially fold the seatback forward. See Rear Seats042
for additional information.
2. Press both buttons on the head restraint posts at the same
time, and pull up on the head
restraint.
3. Store the head restraint in a secure place.
{Warning
With head restraints that are not
installed and adjusted properly,
there is a greater chance that
occupants will suffer a neck/
spinal injury in a crash. Do not
(Continued)
Warning (Continued)
drive until the head restraints for
all occupants are installed and
adjusted properly.
To reinstall the head restraint:
1. Insert the head restraint posts into the holes in the top of the
seatback. The notches on the
posts must face the driver side
of the vehicle.
2. Push the head restraint down.
Page 44 of 358
Chevrolet Malibu Owner Manual (GMNA-Localizing-U.S./Canada/Mexico-
13555849) - 2020 - CRC - 8/16/19
Seats and Restraints 43
the vehicle through the rear door
and left the vehicle without the
vehicle being shut off.
The feature can be turned on or off.
SeeVehicle Personalization 0120.
Folding the Seatback
Either side of the seatback can be
folded down for more cargo space.
Fold a seatback only when the
vehicle is not moving.
Caution
Folding a rear seat with the seat
belts still fastened may cause
damage to the seat or the seat
belts. Always unbuckle the seat
belts and return them to their
normal stowed position before
folding a rear seat.
The release levers for folding the
rear seatbacks are located in the
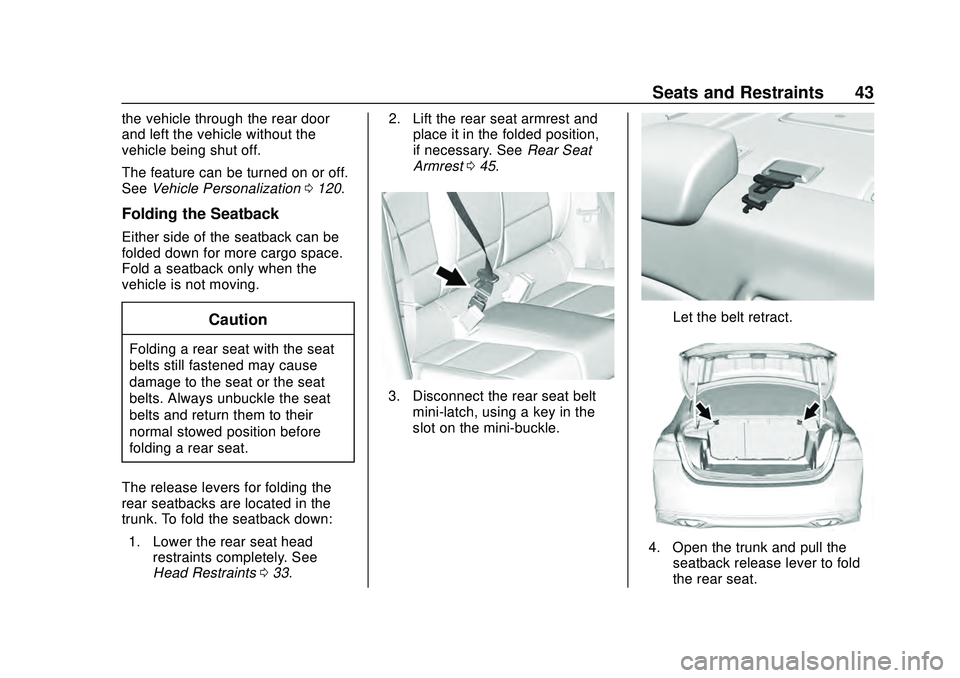
trunk. To fold the seatback down: 1. Lower the rear seat head restraints completely. See
Head Restraints 033. 2. Lift the rear seat armrest and
place it in the folded position,
if necessary. See Rear Seat
Armrest 045.
3. Disconnect the rear seat belt
mini-latch, using a key in the
slot on the mini-buckle.
Let the belt retract.
4. Open the trunk and pull theseatback release lever to fold
the rear seat.
Page 45 of 358
Chevrolet Malibu Owner Manual (GMNA-Localizing-U.S./Canada/Mexico-
13555849) - 2020 - CRC - 8/16/19
44 Seats and Restraints
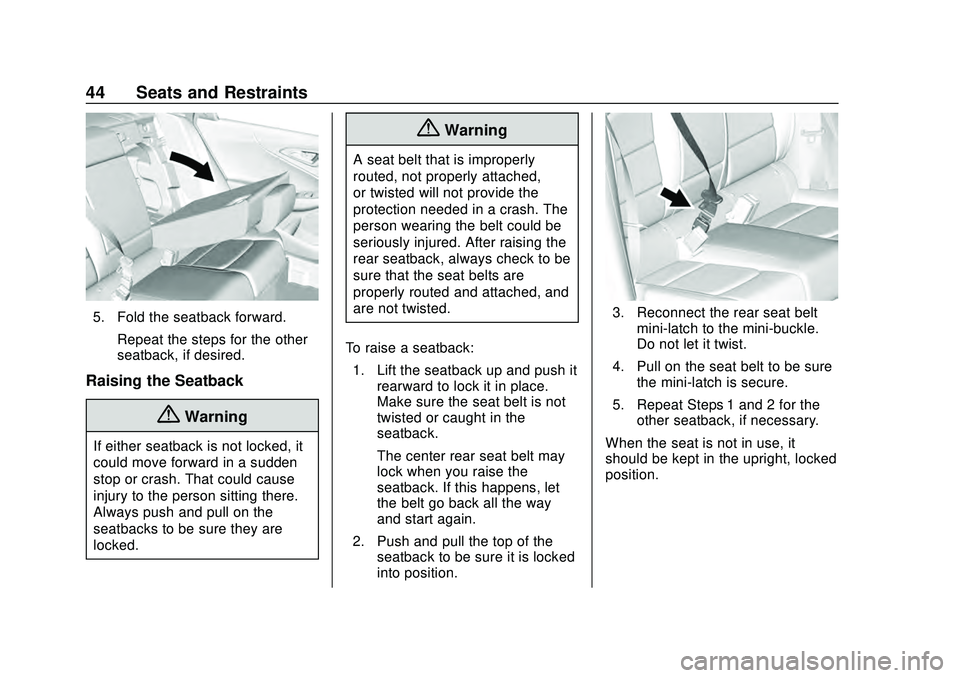
5. Fold the seatback forward.Repeat the steps for the other
seatback, if desired.
Raising the Seatback
{Warning
If either seatback is not locked, it
could move forward in a sudden
stop or crash. That could cause
injury to the person sitting there.
Always push and pull on the
seatbacks to be sure they are
locked.
{Warning
A seat belt that is improperly
routed, not properly attached,
or twisted will not provide the
protection needed in a crash. The
person wearing the belt could be
seriously injured. After raising the
rear seatback, always check to be
sure that the seat belts are
properly routed and attached, and
are not twisted.
To raise a seatback: 1. Lift the seatback up and push it rearward to lock it in place.
Make sure the seat belt is not
twisted or caught in the
seatback.
The center rear seat belt may
lock when you raise the
seatback. If this happens, let
the belt go back all the way
and start again.
2. Push and pull the top of the seatback to be sure it is locked
into position.
3. Reconnect the rear seat beltmini-latch to the mini-buckle.
Do not let it twist.
4. Pull on the seat belt to be sure the mini-latch is secure.
5. Repeat Steps 1 and 2 for the other seatback, if necessary.
When the seat is not in use, it
should be kept in the upright, locked
position.
Page 46 of 358
Chevrolet Malibu Owner Manual (GMNA-Localizing-U.S./Canada/Mexico-
13555849) - 2020 - CRC - 8/16/19
Seats and Restraints 45
Rear Seat Armrest
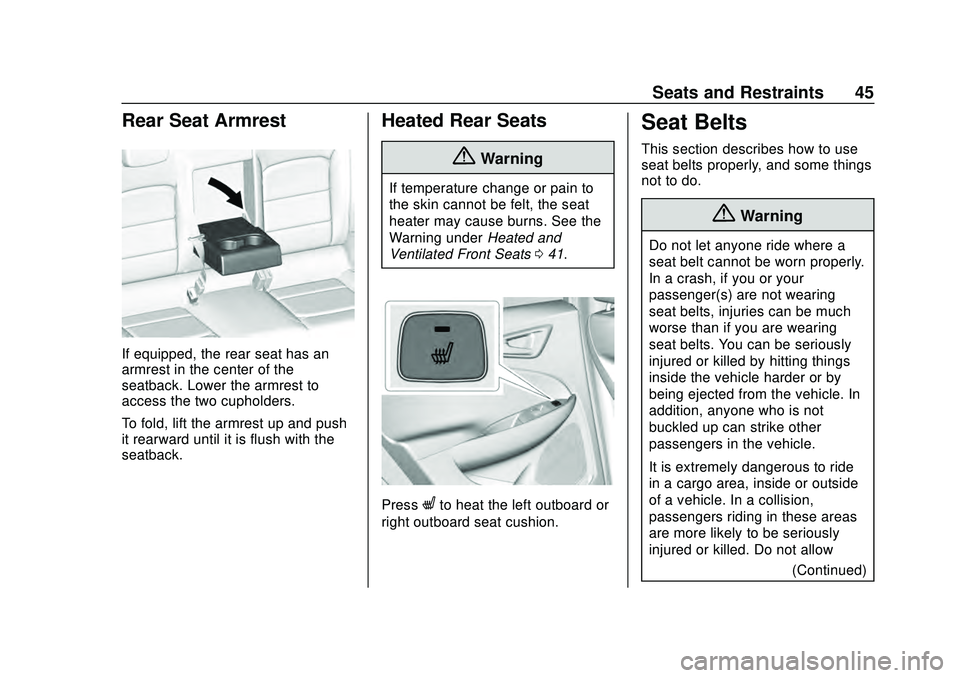
If equipped, the rear seat has an
armrest in the center of the
seatback. Lower the armrest to
access the two cupholders.
To fold, lift the armrest up and push
it rearward until it is flush with the
seatback.
Heated Rear Seats
{Warning
If temperature change or pain to
the skin cannot be felt, the seat
heater may cause burns. See the
Warning underHeated and
Ventilated Front Seats 041.
PressLto heat the left outboard or
right outboard seat cushion.
Seat Belts
This section describes how to use
seat belts properly, and some things
not to do.
{Warning
Do not let anyone ride where a
seat belt cannot be worn properly.
In a crash, if you or your
passenger(s) are not wearing
seat belts, injuries can be much
worse than if you are wearing
seat belts. You can be seriously
injured or killed by hitting things
inside the vehicle harder or by
being ejected from the vehicle. In
addition, anyone who is not
buckled up can strike other
passengers in the vehicle.
It is extremely dangerous to ride
in a cargo area, inside or outside
of a vehicle. In a collision,
passengers riding in these areas
are more likely to be seriously
injured or killed. Do not allow
(Continued)
Page 50 of 358

Chevrolet Malibu Owner Manual (GMNA-Localizing-U.S./Canada/Mexico-
13555849) - 2020 - CRC - 8/16/19
Seats and Restraints 49
Never route the lap or shoulder belt
over an armrest.
{Warning
The seat belt can be pinched if it
is routed under plastic trim on the
seat, such as trim around the rear
seatback folding handle or side
airbag. In a crash, pinched seat
belts might not be able to provide
adequate protection. Never allow
seat belts to be routed under
plastic trim pieces.
Lap-Shoulder Belt
All seating positions in the vehicle
have a lap-shoulder belt.
If you are using a rear seating
position with a detachable seat belt
and the seat belt is not attached,
seeRear Seats 042 for instructions
on reconnecting the seat belt to the
mini-buckle.
The following instructions explain
how to wear a lap-shoulder belt
properly.
1. Adjust the seat, if the seat is adjustable, so you can sit up
straight. To see how, see
“Seats” in the Index.
2. Pick up the latch plate and pull
the belt across you. Do not let
it get twisted.
The lap-shoulder belt may lock
if you pull the belt across you
very quickly. If this happens, let
the belt go back slightly to
unlock it. Then pull the belt
across you more slowly.
If the shoulder portion of a
passenger belt is pulled out all
the way, the child restraint
locking feature may be
engaged. See Child Restraint
Systems 070. If this occurs, let
the belt go back all the way
and start again. If the locking
Page 78 of 358
Chevrolet Malibu Owner Manual (GMNA-Localizing-U.S./Canada/Mexico-
13555849) - 2020 - CRC - 8/16/19
Seats and Restraints 77
Securing a Child Restraint
Designed for the LATCH
System
{Warning
A child could be seriously injured
or killed in a crash if the child
restraint is not properly attached
to the vehicle using either the
LATCH anchors or the vehicle
seat belt. Follow the instructions
that came with the child restraint
and the instructions in this
manual.
{Warning
To reduce the risk of serious or
fatal injuries during a crash, do
not attach more than one child
restraint to a single anchor.
Attaching more than one child
restraint to a single anchor could
cause the anchor or attachment(Continued)
Warning (Continued)
to come loose or even break
during a crash. A child or others
could be injured.
{Warning
Children can be seriously injured
or strangled if a shoulder belt is
wrapped around their neck. The
shoulder belt can tighten but
cannot be loosened if it is locked.
The shoulder belt locks when it is
pulled all the way out of the
retractor. It unlocks when the
shoulder belt is allowed to go all
the way back into the retractor,
but it cannot do this if it is
wrapped around a child’s neck.
If the shoulder belt is locked and
tightened around a child’s neck,
the only way to loosen the belt is
to cut it.(Continued)
Warning (Continued)
Buckle any unused seat belts
behind the child restraint so
children cannot reach them. Pull
the shoulder belt all the way out
of the retractor to set the lock,
and tighten the belt behind the
child restraint after the child
restraint has been installed.
Caution
Do not let the LATCH
attachments rub against the
vehicle’s seat belts. This may
damage these parts. If necessary,
move buckled seat belts to avoid
rubbing the LATCH attachments.
Do not fold the rear seatback
when the seat is occupied. Do not
fold the empty rear seat with a
seat belt buckled. This could
damage the seat belt or the seat.(Continued)
Page 79 of 358

Chevrolet Malibu Owner Manual (GMNA-Localizing-U.S./Canada/Mexico-
13555849) - 2020 - CRC - 8/16/19
78 Seats and Restraints
Caution (Continued)
Unbuckle and return the seat belt
to its stowed position, before
folding the seat.
If you need to secure more than one
child restraint in the rear seat, see
Where to Put the Restraint 071.
1. Attach and tighten the lower attachments to the lower
anchors. If the child restraint
does not have lower
attachments or the desired
seating position does not have
lower anchors, secure the child
restraint with the top tether and
the seat belt. Refer to the child
restraint manufacturer
instructions and the
instructions in this manual.
1.1. Find the lower anchors for the desired seating
position.
1.2. Put the child restraint on the seat. 1.3. Attach and tighten the
lower attachments on the
child restraint to the lower
anchors.
2. If the child restraint manufacturer recommends that
the top tether be attached,
attach and tighten the top
tether to the top tether anchor,
if equipped. Refer to the child
restraint instructions and the
following steps:
2.1. Find the top tether
anchor.
Open the cover to expose
the anchor.
2.2. Route, attach, and tighten the top tether according
to the child restraint
instructions and the
following instructions:
If the position you are
using does not have a
headrest or head restraint
and you are using a
single tether, route the
tether over the seatback.
If the position you are
using does not have a
headrest or head restraint