2020 AUDI TT COUPE tow
[x] Cancel search: towPage 70 of 280

Stowing and using
driving characteristics by shifting the center
of gravity and/or the increasing the surface
area exposed to wind. You may need to adapt
your driving style and speed to the current
conditions.
Make sure the luggage compartment lid does
not hit the cargo on the roof rack when you
open it.
Energy usage will increase because of the in-
creased wind resistance. Remove the roof rack
when you are no longer using it.
Installing the roof rack
Applies to: vehicles with roof rack mount
When installing the support feet, make sure they
are only placed in the positioning bolt area be-
tween the side wall frame and the roof frame
trim > page 67, fig. 76. The positioning bolt is
visible as soon as you push the sealing lip back
from the room frame trim using the designated
tool.
Follow the installation instructions provided
with the roof rack system. If you do not secure
the roof rack system and objects on the roof
correctly, they could come loose from the ve-
hicle and cause an accident.
68
Page 76 of 280

Driving
Driving
General information
A new vehicle must be broken in within the first
1,000 miles (1,500 km) so that all moving parts
work smoothly together, which helps to increase
the service life of the engine and other drive com-
ponents.
Do not drive higher than two-thirds of the maxi-
mum permitted engine RPM during the first 600
miles (1,000 km) and do not use full accelera-
tion. The engine can be increased RPM gradually
during the next 300 miles (S00 km).
® Note
Your Audi is not designed for towing a trailer.
Damage caused by towing a trailer is not cov-
ered by the warranty.
Reducing the risk of vehicle damage
@) Note
When driving on poor roads, over curbs, and
on steep ramps, make sure that components
that hang below the vehicle, such as the spoil-
er and exhaust system, are not struck because
they could be damaged. This especially ap-
plies
to vehicles with low ground clearance
and vehicles that are heavily loaded.
Driving through water
If you must drive through water, follow these in-
structions:
— Check the stability of the ground, the current,
and the water depth. If the ground is unstable,
there is a strong current, or there are waves,
the water must only reach up to the lower edge
of the body at the most.
— Drive carefully and no faster than at walking
speeds to prevent the front of the vehicle from
creating waves, because they could splash
74
above the lower edge of the body. Oncoming
vehicles could also create waves.
— Do not stop the vehicle while in the water.
— Drive in reverse.
— Do not turn the engine off.
ZA\ WARNING
After driving through water, press the brake
pedal carefully to dry the brakes so that the
full braking effect will be restored.
C) Note
Vehicle components such as the engine, drive
system, suspension, or electrical system can
be severely damaged by driving through wa-
wel
G@) Tips
If possible, avoid driving through salt water
because it increases the risk of corrosion. Use
fresh water to clean any vehicle components
that come into contact with salt water.
aire leaden ated Neade(Talel A
driving
The amount of fuel consumption, the environ-
mental impact, and the wear to the engine,
brakes, and tires depends mostly on your driving
style. Note the following information for efficient
and environmentally-conscious driving:
— Turn off electrical equipment that is not need-
ed, for example seat heating*.
— Anticipate upcoming traffic situations while
driving to avoid unnecessary acceleration and
braking.
— Avoid driving at high speeds.
— Avoid adding extra weight to the vehicle if pos-
sible, for example by not leaving roof racks or
bike racks installed when they are not needed.
— Make sure the tire pressure is correct.
— Have maintenance performed regularly on the
vehicle.
— Do not let the engine run while the vehicle
parked.
— Do not drive with winter tires during the summ-
er.
Page 85 of 280

8S1012721BB
Driving
— If the engine must run while you are work-
ing in the engine compartment with the
hood open, make sure a gear is not engaged.
The selector lever must be firmly in the
P position and locked in place and the park-
ing brake must be set > page 200. Other-
wise, the vehicle could begin moving when
increasing the engine speed, even with the
parking brake set.
() Note
— If you have to stop on an incline, always
press the brake pedal to hold the vehicle in
place to reduce the risk of the vehicle rolling
backward. Do not try to hold the vehicle in
place by pressing and holding the accelera-
tor pedal. The transmission can overheat,
which increases the risk of damage.
— Allowing the vehicle to roll when the engine
is stopped and the selector lever is in the N
position will damage the automatic trans-
mission because it is not lubricated under
those circumstances.
— The transmission can overheat and be dam-
aged under certain driving and traffic condi-
tions such as frequent starts, creeping for a
long time, or stop-and-go traffic. When the
i or ij indicator light turns on, stop the
vehicle at the next opportunity and let the
transmission cool > page 85.
— Allowing the vehicle to roll when the engine
is stopped will damage the S tronic trans-
mission because it is not lubricated
=> page 249, Towing.
@® Tips
For safety reasons, the parking brake is re-
leased automatically only when the driver's
safety belt is fastened.
Hill descent control
The hill descent control system assists the driver
when driving down hills.
Hill descent control is activated when the selec-
tor lever is in the "D" or "S" position and you
press the brake pedal. The transmission automat-
ically selects a gear that is suitable for the hill.
Hill descent control tries to maintain the speed
that was selected at the time of braking, within
physical and technical limitations. If may still be
necessary to adjust the speed with the brakes.
Because hill descent control cannot shift down
farther than 3rd gear, it may be necessary to shift
into tiptronic mode in very steep areas. In this
case, shift manually into 1st or 2nd gear in tip-
tronic mode to use the engine's braking force to
relieve the brakes.
Hill descent control switches off once the hill lev-
els
out or if you press the accelerator pedal.
On vehicles with a cruise control system*
= page 87, hill descent control is also activated
when the speed is set.
ZX WARNING
Hill descent control may not be able to main-
tain a constant speed under all conditions. Al-
ways be ready to apply the brakes.
Shifting manually (tiptronic mode)
The tiptronic mode allows the driver to shift the
gears manually.
| 8Fv-0114]
Fig. 88 Center console: shifting manually with the selector
lever
Fig. 89 Steering wheel: shift paddles*
83
Page 86 of 280

Driving
You can shift the gears manually when in “D”
mode. The transmission must be in tiptronic
mode.
Shifting with the selector lever
You can shift into manual shifting mode while the
vehicle is stationary or while driving.
> To switch to manual shifting mode, tilt the se-
lector lever toward the front passenger's side
=> fig. 88. “M” will be displayed in the instru-
ment cluster.
> Upshifting: push the selector lever forward ().
> Downshifting: push the selector lever toward
the rear ().
> To switch back to automatic mode, tilt the se-
lector lever toward the driver's side.
Shifting with the shift paddles
Applies to: vehicles with shift paddles
> Upshifting: press the @) shift paddle > fig. 89.
> Downshifting: press the ©) shift paddle.
> Applies to: RS models: To select the lowest/
highest possible gear, press and hold down the
shift paddle @)/@).
If the shift paddles are tapped while in the D/S
selector lever position, automatic mode switches
off briefly. To switch from manually shifting back
to automatic shifting immediately, tap the shift
paddle @) © fig. 89 for 1 second.
To keep shifting manually, tilt the selector lever
toward the front passenger's side.
@ Tips
— The transmission only allows manual shift-
ing when the engine speed is within the per-
mitted range.
— The transmission automatically shifts up or
down before critical engine speed is
reached.
— Applies to: RS models: When accelerating,
the transmission will not automatically shift
to the next gear shortly before the maxi-
mum permitted engine RPM is reached.
Shift to the next highest gear at the right
time.
84
Kick-down enables maximum acceleration.
When you press the accelerator pedal down be-
yond the resistance point, the automatic trans-
mission downshifts into a lower gear and the en-
gine utilizes its full power, if the vehicle speed
and engine RPM permit. It shifts up into the next
higher gear once the maximum permitted engine
RPM is reached.
ZX WARNING
Please note that the wheels could spin on
slick or slippery roads when kick-down is ac-
tive.
Launch Control
Launch Control provides the best possible accel-
eration when starting from a stop.
Requirements
— The engine must be at operating temperature.
— The steering wheel must not be turned.
— ESC must be limited > page 106.
— Driving program “S” > page 80 or the Audi
drive select* Dynamic mode must be selected
=> page 96.
Using Launch Control
— Press the brake pedal with your left foot and
hold it all the way down for at least one second.
— With the brake pedal pressed, press the accel-
erator pedal all the way down with your right
foot at the same time.
— Once the engine reaches a constant speed, re-
move your foot from the brake pedal.
Once the vehicle has started moving, reactivate
the ESC so that it is fully functional.
Z\ WARNING
Only use Launch Control when road and traffic
conditions allow it and other road users will
not be endangered or impacted by your driv-
ing and the vehicle's acceleration. The driving
wheels could spin and the vehicle could
swerve, especially on slick or slippery road
Page 90 of 280

Assist systems
Switching the system on
Applies to: vehicles with cruise control system
@ #
©
f°
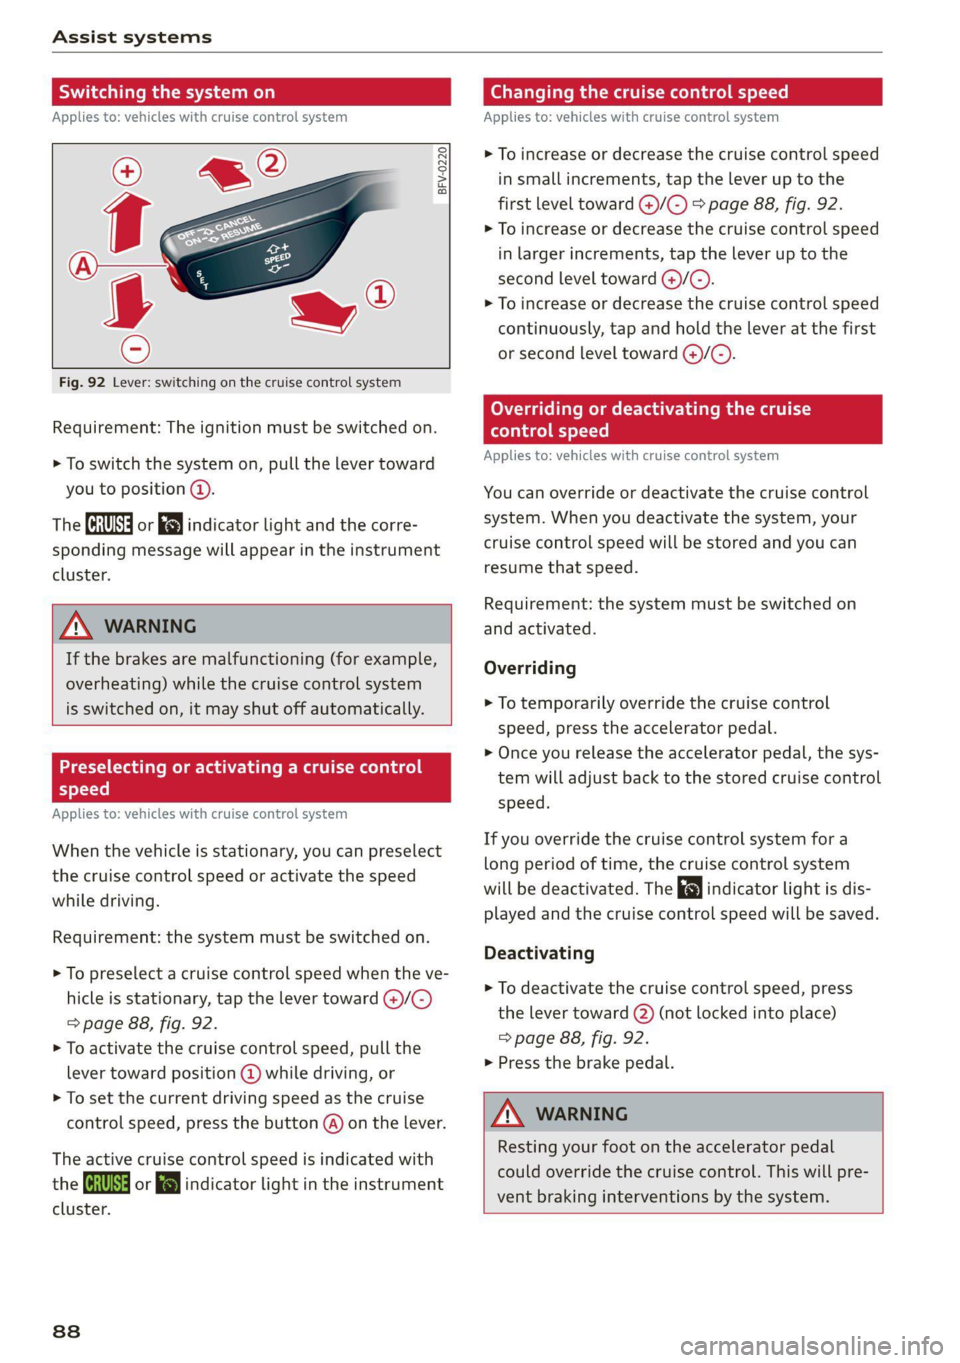
Fig. 92 Lever: switching on the cruise control system
Requirement: The ignition must be switched on.
> To switch the system on, pull the lever toward
you to position @).
The (a or 8] indicator light and the corre-
sponding message will appear in the instrument
cluster.
ZA WARNING
If the brakes are malfunctioning (for example,
overheating) while the cruise control system
is switched on, it may shut off automatically.
Preselecting or activating a cruise control
Cy ey-t-te)
Applies to: vehicles with cruise control system
When the vehicle is stationary, you can preselect
the cruise control speed or activate the speed
while driving.
Requirement: the system must be switched on.
> To preselect a cruise control speed when the ve-
hicle is stationary, tap the lever toward @)/G)
=> page 88, fig. 92.
> To activate the cruise control speed, pull the
lever toward position @ while driving, or
> To set the current driving speed as the cruise
control speed, press the button @) on the lever.
The active cruise control speed is indicated with
the ICRUISE| or i=} indicator light in the instrument
cluster.
838
Changing the cruise control speed
Applies to: vehicles with cruise control system
> To increase or decrease the cruise control speed
in small increments, tap the lever up to the
first level toward @)/G) > page 88, fig. 92.
> To increase or decrease the cruise control speed
in larger increments, tap the lever up to the
second level toward ()/C).
> To increase or decrease the cruise control speed
continuously, tap and hold the lever at the first
or second level toward @/G).
Overriding or deactivating the cruise
control speed
Applies to: vehicles with cruise control system
You can override or deactivate the cruise control
system. When you deactivate the system, your
cruise control speed will be stored and you can
resume that speed.
Requirement: the system must be switched on
and activated.
Overriding
> To temporarily override the cruise control
speed, press the accelerator pedal.
> Once you release the accelerator pedal, the sys-
tem will adjust back to the stored cruise control
speed.
If you override the cruise control system for a
long period of time, the cruise control system
will be deactivated. The indicator light is dis-
played and the cruise control speed will be saved.
Deactivating
> To deactivate the cruise control speed, press
the lever toward (2) (not locked into place)
=> page 88, fig. 92.
> Press the brake pedal.
A WARNING
Resting your foot on the accelerator pedal
could override the cruise control. This will pre-
vent braking interventions by the system.
Page 91 of 280

8S1012721BB
Assist systems
Switching the system off
Applies to: vehicles with cruise control system
When you switch the system off completely, the
cruise control speed will be deleted.
Requirement: the system must be switched on.
> To switch the system off, press the lever toward
@ (locked into place) > page 88, fig. 92, or
> Switch the ignition off.
Applies to: vehicles with cruise control system
ICRUISE| / 3) Speed control system: currently un-
available. See owner's manual
If the indicator light turns on and this message
appears, the cruise control system has been deac-
tivated. There is a temporary malfunction, for ex-
ample the brakes are overheating. Switch the
cruise control system on again later.
Audi active lane assist
Applies to: vehicles with Audi active lane assist
Active lane assist detects lane marker lines with-
in the limits of the system using a camera in the
windshield. If you are approaching a detected
lane marker line and it appears likely that you
will leave the lane, the system will warn you with
corrective steering. You can override this steering
at any time. If you pass over a line, the steering
wheel will vibrate lightly. In order for this warn-
ing vibration to occur, it must first be switched
on in the Infotainment system. Active lane assist
is ready for operation when the lane marker line
is detected on at least one side of the vehicle.
The system is designed for driving on express-
ways and highways and so it only activates at
speeds above approximately 40 mph (65 km/h)
(depending on the market).
Applies to vehicles with side assist*: If you acti-
vate a turn signal when active lane assist is ready
and it classifies a lane change as critical because
D_ The corrective steering function is not available in all mar-
kets.
of vehicles traveling alongside you or approach-
ing you, there will be noticeable corrective steer-
ing shortly before you leave the lane. This will at-
tempt to keep your vehicle in the lane.
Applies to vehicles without side assist*: When
the system is ready, it will not warn you if you ac-
tivate the turn signal before crossing the lane
marker line. In this case, it assumes that you are
changing lanes intentionally.
Z\ WARNING
— The system warns the driver that the vehicle
is leaving the lane using corrective steering.
The
driver is always responsible for keeping
the vehicle within the lane.
— The system can assist the driver in keeping
the vehicle in the lane, but it does not drive
by itself. Always keep your hands on the
steering wheel.
— Corrective steering may not occur in certain
situations, such as during heavy braking.
— There may be cases where the camera does
not recognize all lane marker lines. Correc-
tive steering can only take place on the side
of the vehicle where lane marker lines are
detected.
— Other road structures or objects could possi-
bly be identified unintentionally as lane
marker lines. As a result, corrective steering
may be unexpected or may not occur.
— The camera view can be restricted, for exam-
ple by vehicles driving ahead or by rain,
snow, heavy spray light shining into the
camera or by dirt on the window. This can
result in active lane assist not detecting the
lane marker lines or detecting them incor-
rectly.
— In certain situations where visibility is low,
the vehicle may switch internally from “ear-
ly” to “late” steering correction )).
— Under certain conditions such as ruts in the
road, an inclined roadway or crosswinds, the
corrective steering alone may not be enough
to keep the vehicle in the middle of the lane.
89
Page 96 of 280

Assist systems
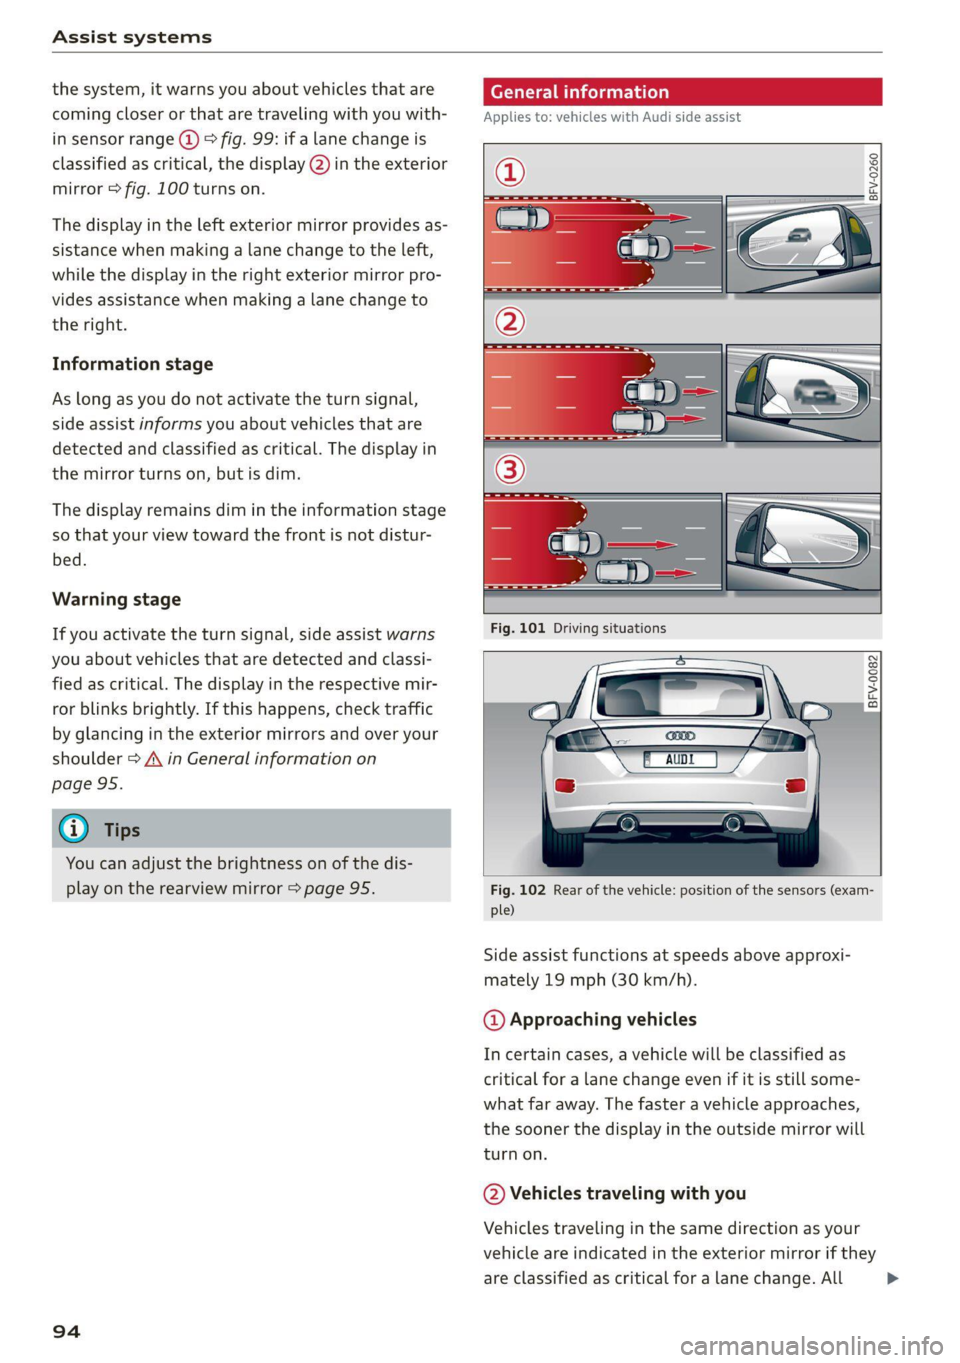
the system, it warns you about vehicles that are
coming closer or that are traveling with you with-
in sensor range @) > fig. 99: if a lane change is
classified as critical, the display @) in the exterior
mirror > fig. 100 turns on.
The display in the left exterior mirror provides as-
sistance when making a lane change to the left,
while the display in the right exterior mirror pro-
vides assistance when making a lane change to
the right.
Information stage
As long as you do not activate the turn signal,
side assist informs you about vehicles that are
detected and classified as critical. The display in
the mirror turns on, but is dim.
The display remains dim in the information stage
so that your view toward the front is not distur-
bed.
Warning stage
If you activate the turn signal, side assist warns
you about vehicles that are detected and classi-
fied as critical. The display in the respective mir-
ror blinks brightly. If this happens, check traffic
by glancing in the exterior mirrors and over your
shoulder > A\ in General information on
page 95.
@ Tips
You can adjust the brightness on of the dis-
play on the rearview mirror > page 95.
94
General information
Applies to: vehicles with Audi side assist
BFV-0260
BFV-0082
Fig. 102 Rear of the vehicle: position of the sensors (exam-
ple)
Side assist functions at speeds above approxi-
mately 19 mph (30 km/h).
@ Approaching vehicles
In certain cases, a vehicle will be classified as
critical for a lane change even if it is still some-
what far away. The faster a vehicle approaches,
the sooner the display in the outside mirror will
turn on.
@ Vehicles traveling with you
Vehicles traveling in the same direction as your
vehicle are indicated in the exterior mirror if they
are classified as critical for a lane change. All >
Page 104 of 280

Parking aid
General information
Applies to: vehicles with rearview camera
© © 3
S cz o
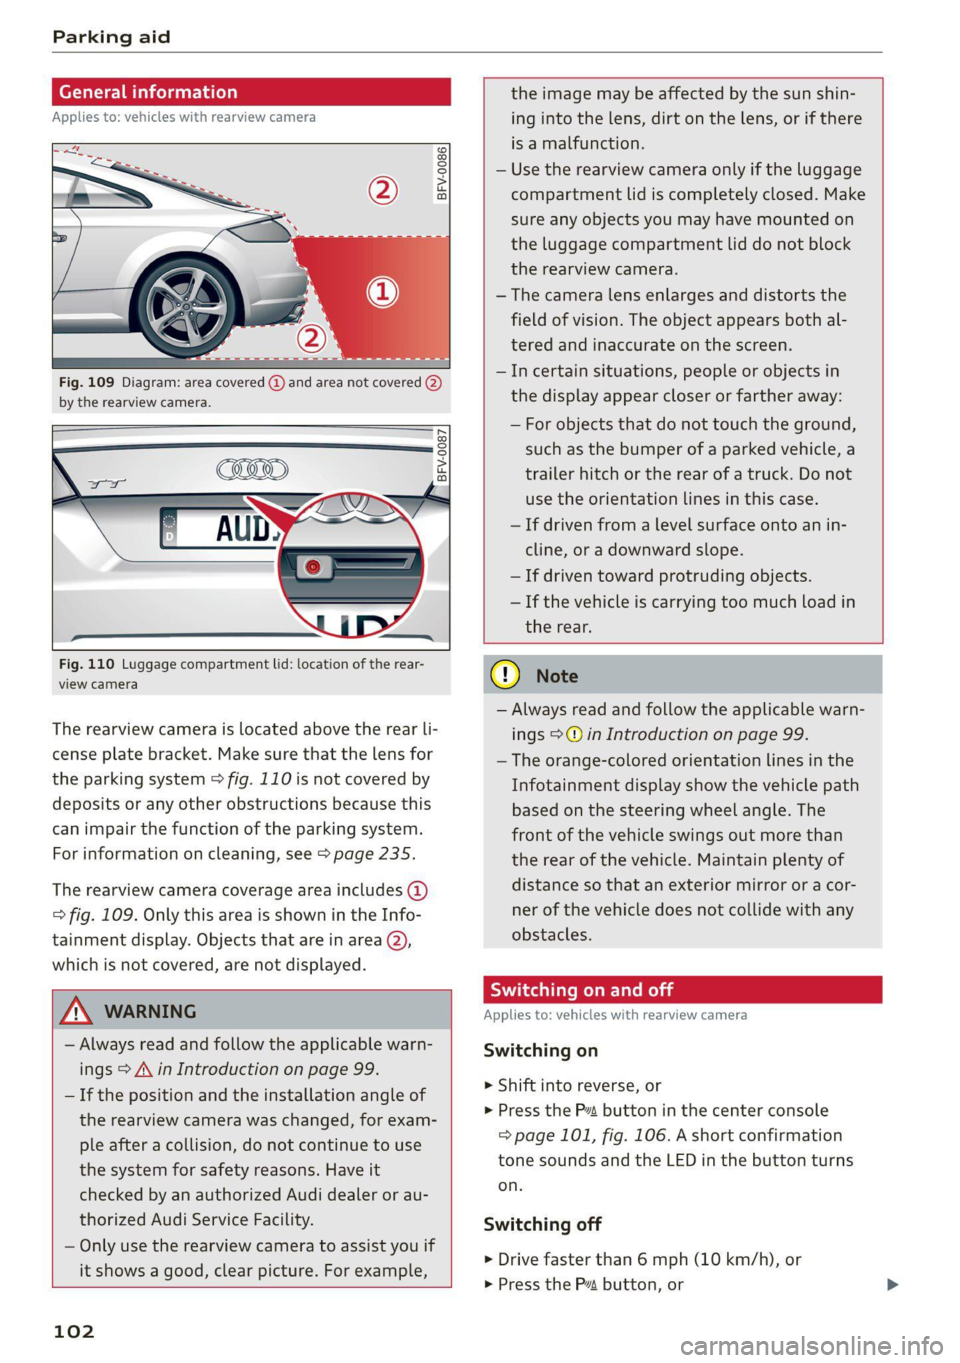
Fig. 109 Diagram: area covered @) and area not covered (2)
by the rearview camera.
BFV-0087
Fig. 110 Luggage compartment lid: location of the rear-
view camera
The rearview camera is located above the rear li-
cense plate bracket. Make sure that the lens for
the parking system > fig. 110 is not covered by
deposits or any other obstructions because this
can impair the function of the parking system.
For information on cleaning, see > page 235.
The rearview camera coverage area includes (4)
=> fig. 109. Only this area is shown in the Info-
tainment display. Objects that are in area Q),
which is not covered, are not displayed.
ZA\ WARNING
— Always read and follow the applicable warn-
ings > A in Introduction on page 99.
— If the position and the installation angle of
the rearview camera was changed, for exam-
ple after a collision, do not continue to use
the system for safety reasons. Have it
checked by an authorized Audi dealer or au-
thorized Audi Service Facility.
— Only use the rearview camera to assist you if
it
shows a good, clear picture. For example,
102
the image may be affected by the sun shin-
ing into the lens, dirt on the lens, or if there
is a malfunction.
— Use the rearview camera only if the luggage
compartment lid is completely closed. Make
sure any objects you may have mounted on
the luggage compartment lid do not block
the rearview camera.
— The camera lens enlarges and distorts the
field of vision. The object appears both al-
tered and inaccurate on the screen.
—Incertain situations, people or objects in
the display appear closer or farther away:
— For objects that do not touch the ground,
such as the bumper of a parked vehicle, a
trailer hitch or the rear of a truck. Do not
use the orientation lines in this case.
—If driven from a level surface onto an in-
cline, or a downward slope.
— If driven toward protruding objects.
— If the vehicle is carrying too much load in
the rear.
@) Note
— Always read and follow the applicable warn-
ings >@ in Introduction on page 99.
— The orange-colored orientation lines in the
Infotainment display show the vehicle path
based on the steering wheel angle. The
front
of the vehicle swings out more than
the rear of the vehicle. Maintain plenty of
distance so that an exterior mirror or a cor-
ner of the vehicle does not collide with any
obstacles.
Sct Rolal
Applies to: vehicles with rearview camera
Switching on
> Shift into reverse, or
> Press the Pz button in the center console
=> page 101, fig. 106. A short confirmation
tone sounds and the LED in the button turns
on.
Switching off
> Drive faster than 6 mph (10 km/h), or
> Press the Pa button, or