2020 AUDI TT COUPE homelink
[x] Cancel search: homelinkPage 30 of 280

Opening and closing
Garage door opener
Applies to: vehicles with garage door opener
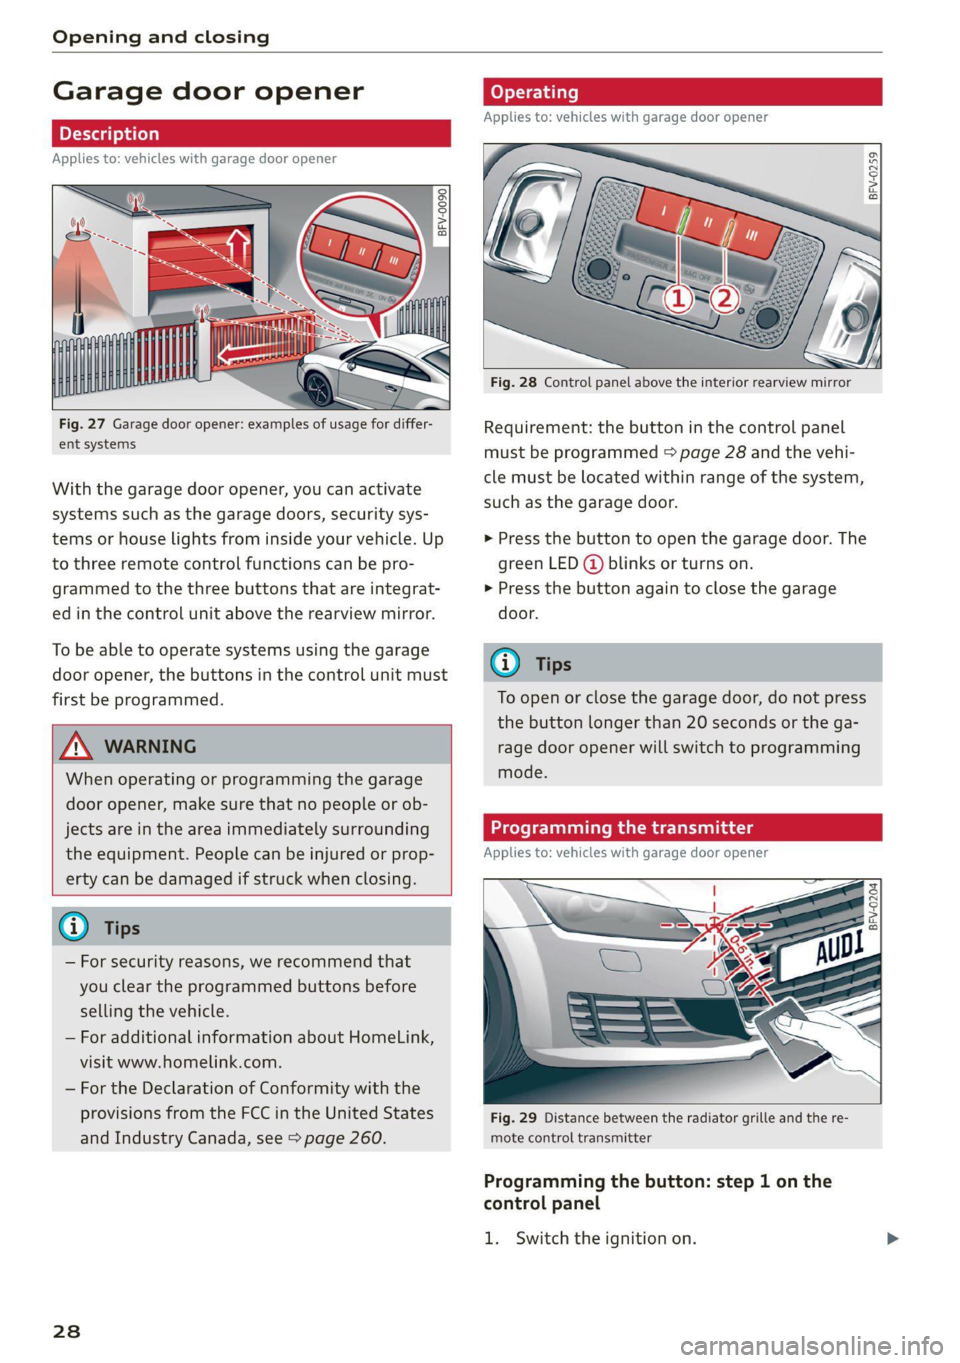
aH
Fig. 27 Garage door opener: examples of usage for differ-
ent systems
With the garage door opener, you can activate
systems such as the garage doors, security sys-
tems or house lights from inside your vehicle. Up
to three remote control functions can be pro-
grammed to the three buttons that are integrat-
ed in the control unit above the rearview mirror.
To be able to operate systems using the garage
door opener, the buttons in the control unit must
first be programmed.
ZX WARNING
When operating or programming the garage
door opener, make sure that no people or ob-
jects are in the area immediately surrounding
the equipment. People can be injured or prop-
erty can be damaged if struck when closing.
— For security reasons, we recommend that
you clear the programmed buttons before
selling the vehicle.
— For additional information about HomeLink,
visit www.homelink.com.
— For the Declaration of Conformity with the
provisions from the FCC in the United States
and Industry Canada, see > page 260.
238
Operating
Applies to: vehicles with garage door opener
a a
aq
g >
i o
Fig. 28 Control panel above the interior rearview mirror
Requirement: the button in the control panel
must be programmed > page 28 and the vehi-
cle must be located within range of the system,
such as the garage door.
> Press the button to open the garage door. The
green LED (@ blinks or turns on.
» Press the button again to close the garage
door.
@ Tips
To open or close the garage door, do not press
the button longer than 20 seconds or the ga-
rage door opener will switch to programming
mode.
Programming the transmitter
Applies to: vehicles with garage door opener
BFV-0204
Fig. 29 Distance between the radiator grille and the re-
mote control transmitter
Programming the button: step 1 on the
control panel
1. Switch the ignition on.
Page 31 of 280

8S1012721BB
Opening and closing
Press both of the outer buttons on the con-
trol unit > page 28, fig. 28 until the yellow
LED (2) turns off and the green LED @ blinks.
This procedure clears the standard codes that
were set at the factory and does not need to
be repeated again to program the other but-
tons.
Briefly press the button in the control panel
that you want to program.
Wait until the yellow LED (2) blinks. The pro-
gramming mode is active for five minutes.
Go in front of the vehicle with the original re-
mote control transmitter for the system that
you are programming to the control panel
button.
Programming the button: step 2 at the
radiator grille
6. Hold the remote control transmitter at the
vehicle radiator grille > fig. 29.
Now press the remote control transmitter
until the turn signals on your vehicle blink.
This can take up to 30 seconds.
If the emergency flashers blink three times,
the programming was successful. If the
emergency flashers only blink one time, the
five-minute time limit for programming has
expired or the programming was unsuccess-
ful. Repeat the programming procedure
starting from the third step or change the
distance to the radiator grille.
If the garage door or other systems do not
open with the HomeLink buttons even if the
programming was successful, the system
may use a rolling code instead of a fixed
code. You must also then perform rolling
code programming > page 29.
The other two buttons in the control panel can be
programmed using the instructions given above.
Start with step 3.
Deleting button programming
The programmed buttons cannot be deleted indi-
vidually. They must be deleted all at once. Repro-
gram the buttons if necessary.
> Switch the ignition on.
> Press both of the outer buttons on the control
unit until the yellow LED (2) turns off and the
green LED (@ blinks.
Reprogramming buttons
> Switch the ignition on.
> To reprogram an individual button, press the
desired button until the green LED (@) turns off
and the yellow LED (2) starts to blink (after ap-
proximately 20 seconds). Release the button
immediately. The programming mode is active
for five minutes.
> Continue with step 5.
@ Tips
— The distance needed between the remote
control transmitter and the garage door
opener module in the radiator grille
=> fig. 29 depends on the system you are
programming.
— Depending on the system model, you may
need to release the button on the remote
control transmitter while it is programming
and press it again. Hold every position you
try when programming for at least 15 sec-
onds before trying a new position. Keep an
eye on the vehicle turn signals while doing
this.
Rolling code programming
Applies to: vehicles with garage door opener
On some systems, programming a rolling code is
also necessary.
Identifying a rolling code
> Press the button in the control unit that is al-
ready programmed again and hold it down.
>» Watch the green LED @) & page 28, fig. 28. If
the green LED blinks quickly, the system (such
as a garage door) has a rolling code.
> Program the rolling code as follows:
Activating the system motor unit
> Locate the programming button on the system
motor unit. The exact location and color of the
button may vary depending on the brand.
> Press the programming button on the system
motor unit (usually this will activate a “display” >
29
Page 262 of 280

Accessories and technical changes
or write to:
Administrator NHTSA
1200 New Jersey Ave.,
S.E. West Building
Washington, DC
20590.
You can also obtain other infor-
mation about motor vehicle safe-
ty from http://www.safercar.gov.
Applicable to Canada
If you live in Canada and you be-
lieve that your vehicle has a de-
fect that could cause a crash, in-
jury or death, you should immedi-
ately inform Transport Canada,
Defect Investigations and Recalls.
You should also notify Audi Cana-
da.
Canadian customers who wish to
report a safety-related defect to
Transport Canada, Defect Investi-
gations and Recalls, may either
call Transport Canada toll-free at:
Tel.: 1-800-333-0510 or
Tel.: 1-819-994-3328 (Ottawa re-
gion and from other countries)
TTY for hearing impaired:
1-888-675-6863
or contact Transport Canada by
mail at:
260
Transport Canada
Motor Vehicle Safety Investiga-
tions Laboratory
80 Noel Street
Gatineau, QC
J8Z OA1
For additional road safety infor-
mation, please visit the Road
Safety website at:
English:
http://www.tc.gc.ca/eng/
motorvehiclesafety/menu.htm
French:
http://www.tc.gc.ca/fra/
securiteautomobile/menu.htm
Declaration of
compliance for telecom-
munications equipment
and electronic systems
The manufacturer is not liable for radio malfunc-
tions that are caused by unauthorized changes to
the equipment.
Equipment
The following equipment complies with FCC sec-
tion 15 and RSS-Gen:
— Audi side assist*
— Remote control key
— Cell phone package*
— Garage door opener (HomeLink)*
— Tire pressure monitoring system*
— WLAN hotspot*
FCC Part 15.19
This device complies with part 15 of the FCC
Rules. Operation is subject to the following two
conditions: (1) This device may not cause harmful
interference, and (2) this device must accept any >
Page 270 of 280

Index
Frequency bande. «2 sews 6s eomeos vo eee 165, 167
also refer to Frequency band........... 165
Fuel... eee eee eee 195
ACGITIVES= 5 sas 3 ogan & & Gaiee G o He aE 196
Current fuel consumption............... 15
Fueldisplay......... ccc cece eee ee eens 10
Fuel gauge............. eee eee eee eee 12
Fuel tank capacity’. « csc0. s cees ss roses 263
GaSOLIMe. « esowwse « smemns = 9 soswer ¢ onemeeere «ser 195
Reducing fuel consumption............. 74
Saving fuel saws x ¢ ewe + o eew + oe cae > yee 96
Fueling
Fuel filler door emergency release....... 199
Fuel gauge......... eee cece ee eee eee 12
Fuel tank capacity................00-5 263
Opening the fuel filler door............ 196
With reserve canister (emergency fueling) . 198
Fuses
Assignment... ..... 0.0 e cece neces 253
Replacing « cass < sews « < een 6 x eee 8 t mew 252
G
GALA
refer to Speed dependent volume control. 193
Garage door opener... 1.2... see e eee eee 28
Garment hooks swears « ¢ saws a 2 eee 2 o new ¥ ea 64
GaSOliNGeu: + ¢ sews & e eee Fo Rw Ee OS ee 195
TACGIRIVES eo ceive = caves oe wastes 8 ermeoon wae 196
Gasoline mixture. ..............000005 195
GAWR
refer to Gross Axle Weight Rating (GAWR) . 263
Global commands (voice recognition sys-
TON) s ewe & 5 eee ¢ Homen Boe Heme gy dem go oe 124
Glossary of tire and loading terminology... 216
Glove compartment..............-00000- 64
G meter
referito Sport displaySius « s news « » eeu ges 15
Gross Axle Weight Rating (GAWR)........ 263
Gross Vehicle Weight Rating (GVWR)...... 263
GVWR
refer to Gross Vehicle Weight
Rating (GVWR) « essise << assess wo astm ¥ a ave 263
H
Hand streets s snscn « + sassems xo amueces ov omen + 8 ose 130
Hands'Free Profiles. s «swe «case as news oe 130
268
Headlight range control system........... 36
Headlights ss swes ¢ saves 2 0 rene 2 arenes owe 37
Cleaning.......... 02. c eee eee eee 236
Headlight range control system.......... 36
Washer system...........-.00 02 eee 41
Heated
Exterior MiMnOnsis » essa 2 5 sicawus sx osnaee 5 exe 40
Rear window............ 0c eee eee ee 71
SOatSiex x x ners x ¥ poueE +e SRUOS FE EF 71
Washer nozZles « csisrs s ocsuri s waniee a 6 sassere 41
Hexisockets wsiia ce neve a mie ao eawen © oa 241
HFP
refer to Hands Free Profile............. 129
Hill.descent control... = cscs ss comers ve econ ve 83
Hill:hold:assists. scciia s weea as row a meee ae 78
also refer to Hill hold assist............. 78
Home address...........0.0000005 151,155
HomeLink
refer to Garage door opener............. 28
HOM... eee 6
Hotspot
refer to Wi-Fi.............-.000- 147,174
I
Ignition (indicator light)................- 16
Imbalance (wheels) ..........-.000 eee ae 222
Immobilizer
refer to Electronic immobilizer........... 19
Importing and exporting (contacts)....... 139
Tndicator liGhts:. . .raceca a soesnae o 4 oxonese 6 6 ounce 0 a 7
Input
Using the MMI touch.................. 113
Using the:spellet cows + 5 yewig sy seme & 3 ee 117
Input
level. (media) wis « ¢ wees ss opus 5 2 ee 181
Inspection interval..............022-00- 212
Instrument cluster...............-.000-5 10
GleaniG ies + + same x x wees x HEEE EE ROR GES 238
Failure isc se sonics ao accnena ae asuies 2 a ctewera wa one 10
MessageS... 0.6... cece eee ee eee eee 16
OPGhAtiniGis « s wows se wows se wows ge eee ae 12
Service interval display................ 212
Switching tabs.......... 0... e eee eee 12
Instruments
Adjusting the lighting.................. 39
Interior lighting.................000 eee 39
Interior monitoring.............-.0-005- 24