Page 249 of 302
?
Front Rear Front Rear
PSI")
8W7012721BA
Wheels
Model/ Tire designation Tire pressure
Engine Normal load Maximum load
(up to 2/3* people)?
Front Rear Front Rear
PSI | kPA | PSI | kPA | PSI | kPA | PSI | kPA
A5 Sportback: | 225/50 R17 94Y 32 | 220 | 29 | 200 | 35 | 240 | 35 | 240
2.0L 245/40 R18 93Y 32 | 220 | 29 | 200 | 35 | 240) 35 | 240
4-cylinder 245/40R1897H | 32 | 220 | 32 | 220 | 35 | 240 | 38 | 260
255/35 R19 96Y 32. | 220 | 32 | 220 | 35 | 240 | 35 | 240
265/30 R20 94Y 33. | 230 | 33 | 230 | 38 | 260| 38 | 260
S5 Sportback: | 245/40 R18 97H 35 | 240 | 32 | 220 | 39 | 270 | 39 | 270
3.0L 245/40 R18 97Y 36 | 250 | 33 | 230] 41 | 280) 41 | 280
G-cylinder 255/35R1996Y | 38 | 260 | 35 | 240 | 42 | 290| 42 | 290
265/30 R20 94Y 41 | 280 | 38 | 260 / 45 | 310 | 45 | 310
@) Vehicles with four seating positions: two people in the front, Vehicles with five seat-
Z\ WARNING
Please note the important safe-
ty precautions regarding tire
pressure > page 244 and load
limits > page 247.
Tires and vehicle load limits
There are limits to the amount of
load or weight that any vehicle
and any tire can carry. A vehicle
that is overloaded will not handle
well and is more difficult to stop.
Overloading can not only lead to
loss of vehicle control, but can al-
so damage important parts of the
vehicle and can lead to sudden
tire failure, including a blowout
and sudden deflation that can
cause the vehicle to crash.
ing positions: two people in the front, one person in the rear
Your safety and that of your pas-
sengers also depends on making
sure that load limits are not ex-
ceeded. Vehicle load includes ev-
erybody and everything in and on
the vehicle. These load limits are
technically referred to as the vehi-
cle’s Gross Vehicle Weight Rating
(“GVWR”).
The “GVWR” includes the weight
of the basic vehicle, all factory in-
stalled accessories, a full tank of
fuel, oil, coolant and other fluids
plus maximum load. The maxi-
mum load includes the number of
passengers that the vehicle is in-
tended to carry (“seating capaci-
ty”) with an assumed weight of
150 lbs. (68 kg) for each
247
Page 250 of 302

Wheels
passenger at a designated seating
position and the total weight of
any luggage in the vehicle. If you
tow a trailer, the weight of the
trailer hitch and the tongue
weight of the loaded trailer must
be included as part of the vehicle
load.
The Gross Axle Weight Rating
(“GAWR”) is the maximum load
that can be applied at each of the
vehicle’s two axles.
The fact that there is an upper
limit to your vehicle’s Gross Vehi-
cle Weight Rating means that the
total weight of whatever is being
carried in the vehicle (including
the weight of a trailer hitch and
the tongue weight of the loaded
trailer) is limited. The more pas-
sengers in the vehicle or passen-
gers who are heavier than the
standard weights assumed mean
that less weight can be carried as
luggage.
The Gross Vehicle Weight Rating
and the Gross Axle Weight Rating
are listed on the safety compli-
ance sticker on the front end of
the driver's door.
248
Z\ WARNING
Overloading a vehicle can cause
loss of vehicle control, a crash
or other accident, serious per-
sonal injury, and even death.
—Carrying more weight than
your vehicle was designed to
carry will prevent the vehicle
from handling properly and in-
crease the risk of the loss of
vehicle control.
—The brakes on a vehicle that
has been overloaded may not
be able to stop the vehicle
within a safe distance.
—Tires on a vehicle that has
been overloaded can fail sud-
denly, including a blowout and
sudden deflation, causing loss
of control and a crash.
—Always make sure that the to-
tal load being transported -
including the weight of a trail-
er hitch and the tongue
weight of a loaded trailer -
does not make the vehicle
heavier than the vehicle’s
Gross Vehicle Weight Rating.
Page 251 of 302

8W7012721BA
Wheels
Determining correct load
Talis
Use the example below to calcu-
late the total weight of the pas-
sengers and luggage or other
things that you plan to transport
so that you can make sure that
your vehicle will not be overload-
ed.
Steps for Determining Correct
Load Limit
1. Locate the statement “THE
COMBINED WEIGHT OF OCCU-
PANTS AND CARGO SHOULD
NEVER EXCEED XXX KG OR XXX
LBS” on your vehicle’s placard
(tire inflation pressure label)
=> page 244, fig. 176.
2. Determine the combined
weight of the driver and pas-
sengers that will be riding in
your vehicle.
3. Subtract the combined weight
of the driver and passengers
from “XXX” kilograms or “XXX”
pounds shown on the sticker
=> page 244, fig. 176.
4. The resulting figure equals the
available amount of cargo and
luggage load capacity. For ex-
ample, if the “XXX” amount
equals 1400 lbs. and there will
be five 150 lbs. passengers in
your vehicle, the amount of
available cargo and luggage
load capacity is 650 lbs.
(1400-750 (5 x 150) = 650
lbs.)
5. Determine the combined
weight of luggage and cargo
being loaded on the vehicle.
That weight may not safely ex-
ceed the available cargo and
luggage load capacity calculat-
ed in Step 4.
6. If your vehicle will be towing a
trailer, load from your trailer
will be transferred to your vehi-
cle. Consult this manual to de-
termine how this reduces the
available cargo and luggage
load capacity of your vehicle.
> Check the tire sidewall
(=> page 235, fig. 173) to deter-
mine the designated load rating
for a specific tire.
Wheel bolts and rims
Wheel bolts
Wheel bolts must be clean and loosen/tighten
easily.
Rims
Rims with a bolted rim ring* or with bolted wheel
covers* consist of multiple pieces. These compo-
nents were bolted together using special bolts
and a special procedure. You must not repair or
disassemble them > A\.
249
>
Page 252 of 302

Wheels
ZA WARNING
Wheel bolts that are tightened or repaired in-
correctly can become loose and result in loss
of vehicle control, which increases the risk of
an accident. For the correct tightening specifi-
cation, see > page 265, Finishing.
— Always keep the wheel bolts and the threads
in the wheel hub clean and free of grease.
— Only use wheel bolts that fit the rim.
— Always have damaged rims repaired by an
authorized Audi dealer or authorized Audi
Service Facility. Never repair or disassemble
rims yourself, because this increases the risk
of an accident.
Winter tires significantly improve the vehicle's
handling when driving in winter conditions. Be-
cause of their construction (width, compound,
tread pattern), summer tires provide less traction
on ice and snow.
>» Use winter tires on all four wheels.
> Only use winter tires that are approved for your
vehicle.
> Please note that the maximum permitted
speed may be lower with winter tires > A\ in
General information on page 234. An author-
ized Audi dealer or authorized Audi Service Fa-
cility can inform you about the maximum per-
mitted speed for your tires.
> Check the tire pressure after installing wheels
> page 244.
The effectiveness of winter tires is reduced great-
ly when the tread is worn down to a depth of
0.16 in (4 mm). The characteristics of winter tires
also decrease greatly as the tire ages, regardless
of the remaining tread.
@ For the sake of the environment
Reinstall summer tires at the appropriate
time, because they provide better handling
when roads are free of snow and ice. Summer
tires cause less road noise, tire wear, and fuel
consumption.
250
G) Tips
You can also use all season tires instead of
winter tires. Please note that in some coun-
tries where winter tires are required, only win-
ter tires with the 44 symbol may be permit-
ted.
Snow chains improve both driving and braking in
winter road conditions.
> Only install snow chains on the front wheels.
> Check and correct the seating of the snow
chains after driving a few feet, if necessary. Fol-
low the instructions from the manufacturer.
> Note the maximum speed of 30 mph
(50 km/h). Observe the local regulations.
Use of snow chains is only permitted with certain
rim/tire combinations due to technical reasons.
Check with an authorized Audi dealer or author-
ized Audi Service Facility to see if you may use
snow chains.
Use fine-mesh snow chains. They must not add
more than 0.53 in (13.5 mm) in height, including
the chain lock.
You must remove the snow chains on roads with-
out snow. Otherwise, you could impair driving
ability and damage the tires.
ZX WARNING
Using incorrect snow chains or installing snow
chains incorrectly can result in loss of vehicle
control, which increases the risk of an acci-
dent.
C) Note
Snow chains can damage the rims and wheel
covers* if the chains come into direct contact
with them. Remove the wheel covers* first.
Use coated snow chains.
G) Tips
When using snow chains, it may be advisable
to limit the ESC > page 118.
Page 253 of 302

8W7012721BA
Wheels
Low-profile tires
Applies to: vehicles with low-profile tires
Compared to other tire/rim combinations, low-
profile tires offer a wider tread surface and a
larger rim diameter with shorter tire sidewalls.
This results in an agile driving style. However, it
may reduce the level of comfort and increase
road noise when driving on roads in poor condi-
tion.
Low-profile tires can become damaged more
quickly than standard tires when driving over
large bumps, potholes, manhole covers, and
curbs. Therefore, it is particularly important to
maintain the correct tire pressure > page 244.
To reduce the risk of damage to the tires and
rims, drive very carefully on poor roads.
Check your wheels regularly every 2,000 mi
(3,000 km) for damage. For example, check for
bulges/cracks on the tires or deformations/cracks
on the rims.
After a heavy impact or damage, have the tires
and rims inspected or replaced immediately by
an authorized Audi dealer or authorized Audi
Service Facility.
Low-profile tires can wear out faster than stand-
ard tires.
Uniform tire quality grading
— Tread wear
— Traction AAABC
— Temperature ABC
Quality grades can be found where applicable on
the tire side wall between tread shoulder and
maximum section width > page 235, fig. 173.
For example: Tread wear 200, Traction AA, Tem-
perature A.
All passenger car tires must conform to Federal
Safety Requirements in addition to these grades.
Tread wear
The tread wear grade is a comparative rating
based on the wear rate of the tire when tested
under controlled conditions on a specified gov-
ernment test course.
For example, a tire graded 150 would wear one
and one half (1 1/2) times as well on the govern-
ment course as a tire graded 100.
The relative performance of tires depends upon
the actual conditions of their use, however, and
may depart significantly from the norm due to
variations in driving habits, service practices and
differences in road characteristics and climate.
Traction
The traction grades, from highest to lowest, are
AA, A, Band C. Those grades represent the tire's
ability to stop on wet pavement as measured un-
der controlled conditions on specified govern-
ment test surfaces of asphalt and concrete. A tire
marked C may have poor traction performance
SA.
Temperature
The temperature grades are A (the highest), B,
and C, representing the tire's resistance to the
generation of heat and its ability to dissipate
heat when tested under controlled conditions on
a specified indoor laboratory test wheel.
Sustained high temperature can cause the mate-
rial of the tire to degenerate and reduce tire life,
and excessive temperature can lead to sudden
tire failure > A\.
The grade C corresponds to a level of perform-
ance which all passenger car tires must meet un-
der the Federal Motor Vehicle Safety Standard
No. 109. Grades B and A represent higher levels
of performance on the laboratory test wheel than
the minimum required by law.
ZA WARNING
The traction grade assigned to this tire is
based on straight-ahead braking traction
tests, and does not include acceleration, cor-
nering, hydroplaning or peak traction charac-
teristics. >
251
Page 254 of 302

Wheels
ZA WARNING
The temperature grade for this tire is estab-
lished for a tire that is properly inflated and
not overloaded. Excessive speed, underinfla-
tion, or excessive loading, either separately or
in combination, can cause heat buildup and
possible tire failure.
A WARNING
Temperature grades apply to tires that are
properly inflated and not over or underinflat-
ed.
Tire pressure monitoring
system
(1) General notes
Each tire, including the spare (if provided),
should be checked monthly when cold and inflat-
ed to the inflation pressure recommended by the
vehicle manufacturer on the vehicle placard or
tire
inflation pressure label. (If your vehicle has
tires of a different size than the size indicated on
the vehicle placard or tire inflation pressure la-
bel, you should determine the proper tire infla-
tion pressure for those tires).
As an added safety feature, your vehicle has been
equipped with a tire pressure monitoring system
(TPMS)
that illuminates a low tire pressure tell-
tale when one or more of your tires is significant-
ly under-inflated. Accordingly, when the low tire
pressure telltale illuminates, you should stop and
check your tires as soon as possible, and inflate
them to the proper pressure. Driving ona signifi-
cantly under-inflated tire causes the tire to over-
heat and can lead to tire failure. Under-inflation
also reduces fuel efficiency and tire tread life,
and may affect the vehicle's handling and stop-
ping
ability.
Please note that the TPMS is not a substitute for
proper tire maintenance, and it is the driver's re-
sponsibility to maintain correct tire pressure,
even if under-inflation has not reached the level
to trigger illumination of the TPMS low tire pres-
sure telltale.
252
Your vehicle has also been equipped with a TPMS
malfunction indicator to indicate when the sys-
tem is not operating properly. The TPMS mal-
function indicator is combined with the low tire
pressure telltale. When the system detects a
malfunction, the telltale will flash for approxi-
mately one minute and then remain continuously
illuminated. This sequence will continue upon
subsequent vehicle start-ups as long as the mal-
function exists.
When the malfunction indicator is illuminated,
the system may not be able to detect or signal
low tire pressure as intended. TPMS malfunctions
may occur for a variety of reasons, including the
installation of replacement or alternate tires or
wheels on the vehicle that prevent the TPMS
from functioning properly. Always check the
TPMS malfunction telltale after replacing one or
more tires or wheels on your vehicle to ensure
that the replacement or alternate tires and
wheels allow the TPMS to continue to function
properly.
a male emia)
appears
Applies to: vehicles with Tire Pressure Monitoring System in-
dicator
g indicator
The tire pressure indicator in the instrument
cluster informs you if the tire pressure is too low
or if there is a system malfunction.
Using the ABS sensors, the tire pressure monitor-
ing system compares the tire tread circumference
and vibration characteristics of the individual
tires. If the pressure changes in one or more
tires, this is indicated in the instrument cluster
display with an indicator light @ and a message.
If only one tire is affected, the location of that
tire will be indicated.
The tire pressures must be stored again each
time you change the pressures (switching be-
tween partial and full load pressure) or after
changing or replacing a tire on your vehicle
=> page 253. The tire pressure monitoring system
only monitors the tire pressure you have stored.
Refer to the tire pressure label for the recom-
mended tire pressure for your vehicle
=> page 244, fig. 176.
Page 255 of 302

8W7012721BA
Wheels
Tire tread circumference and vibration character-
istics can change and cause a tire pressure warn-
ing if:
— The tire pressure in one or more tires is too low
— The tires have structural damage
— The tire was replaced or the tire pressure was
changed and it was not stored > page 253
— Tires that are only partially used are replaced
with new tires
Indicator lights
If the @ indicator light turns on, there is a loss
of pressure in at least one tire .> A\ Check the
tires and replace or repair if necessary. Check and
correct the pressures of all four tires and store
the pressure again > page 253.
iis Tire pressure: malfunction! See owner's
manual
If fe appears after switching the ignition on or
while driving and the @) indicator light in the in-
strument cluster blinks for approximately one
minute and then stays on, there is system mal-
function. Try to store the correct tire pressures
=> page 253. In some cases, you must drive for
several minutes after storing the pressures until
the indicator light turns off. If the indicator light
does turn off or turns on again after a short peri-
od of time, drive to an authorized Audi dealer or
authorized Audi Service Facility immediately to
have the malfunction corrected.
ZA WARNING
— If the tire pressure indicator appears in the
display, reduce your speed immediately and
avoid any hard steering or braking maneu-
vers. Stop as soon as possible and check the
tires and their pressure.
— The driver is responsible for maintaining the
correct tire pressure. You must check the
tire pressure regularly.
— Under certain conditions (such as a sporty
driving style, winter conditions, or unpaved
roads), the tire pressure monitoring system
indicator may be delayed.
@) Tips
—The tire pressure monitoring system can al-
so stop working when there is an ESC mal-
function.
— Using snow chains may result in a system
malfunction.
—The tire pressure monitoring system in your
Audi was calibrated with “Audi Original
Tires” > page 241. Using these tires is rec-
ommended.
Syed elite tee eee
Applies to: vehicles with Tire Pressure Monitoring System in-
dicator
If the tire pressure changes or a tire is replaced,
it must be confirmed in the system.
> Before storing the tire pressures, make sure the
tire pressures in all four tires meet the speci-
fied values and are adapted to the load
=> page 244.
> Switch the ignition on.
> Applies to: MMI: Select on the home screen:
VEHICLE > Settings & Service > Tire pressure
monitoring > Store tire pressure > Yes, store
now.
G) Tips
Do not store the tire pressures if snow chains
are installed.
253
Page 256 of 302

Care and cleaning
Care and cleaning
General information
Regular, proper care helps to maintain your vehi-
cle's value. It can also be a requirement when
submitting warranty claims for corrosion damage
and paint defects on the body.
The required cleaning and care products can be
obtained from an authorized Audi dealer or au-
thorized Service Facility. Read and follow the in-
structions for use on the packaging.
ZA\ WARNING
— Using cleaning and care products incorrectly
can be dangerous to your health.
— Always store cleaning and care products out
of reach of children to reduce the risk of poi-
soning.
@ For the sake of the environment
— Purchase environmentally-friendly cleaning
products if possible.
— Do not dispose of cleaning and care prod-
ucts with household trash.
Car washes
The longer that deposits such as insects, bird
droppings, tree sap or road salt remain on the ve-
hicle, the more the surface can be damaged. High
temperatures such as those caused by sunlight
increase the damaging effect.
Before washing, rinse off heavy deposits with
plenty of water.
Stubborn deposits such as bird droppings or tree
sap are best removed with plenty of water and a
microfiber cloth.
Also, wash the underside of your vehicle once
road salt stops being used for the season.
Pressure washers
When washing your vehicle with a pressure wash-
er, always follow the operating instructions pro-
vided with the pressure washer. This is especially
important in regard to the pressure and spraying
distance. Do not aim the spray directly at seals on
254
side windows, doors, the hood, the luggage com-
partment lid, or the panoramic glass roof* or at
tires, rubber hoses, insulating material, the pow-
er top*, sensors*, or camera lenses*. Keep a dis-
tance of at least 16 in (40 cm).
Do not remove snow and ice with a pressure
washer.
Never use cone nozzles or high pressure nozzles.
The water temperature must not be above 140 °F
(60 °C).
Automatic car wash
Spray off the vehicle before washing.
Make sure that the windows, the panoramic glass
roof*, and the power top” are closed and the
windshield wipers are off. Follow instructions
from the car wash operator, especially if there are
accessories attached to your vehicle.
If possible, use car washes that do not have
brushes.
Washing by hand
Clean the vehicle starting from the top and work-
ing downward using a soft sponge or cleaning
brush. Use solvent-free cleaning products.
Washing vehicles with matte finish paint by
hand
To reduce the risk of damaging the paint when
washing, first remove dust and large particles
from your vehicle. Insects, grease spots, and fin-
gerprints are best removed with a special cleaner
for matte finish paint.
Apply the product using a microfiber cloth. To re-
duce the risk of damaging the paint surface, do
not use too much pressure.
Rinse the vehicle thoroughly with water. Then
clean using a neutral shampoo and a soft micro-
fiber cloth.
Rinse the vehicle thoroughly again and let it air
dry. Remove any water residue using a chamois.
ZA WARNING
—To reduce the risk of accidents, only wash
the vehicle when the ignition is off and
 1
1 2
2 3
3 4
4 5
5 6
6 7
7 8
8 9
9 10
10 11
11 12
12 13
13 14
14 15
15 16
16 17
17 18
18 19
19 20
20 21
21 22
22 23
23 24
24 25
25 26
26 27
27 28
28 29
29 30
30 31
31 32
32 33
33 34
34 35
35 36
36 37
37 38
38 39
39 40
40 41
41 42
42 43
43 44
44 45
45 46
46 47
47 48
48 49
49 50
50 51
51 52
52 53
53 54
54 55
55 56
56 57
57 58
58 59
59 60
60 61
61 62
62 63
63 64
64 65
65 66
66 67
67 68
68 69
69 70
70 71
71 72
72 73
73 74
74 75
75 76
76 77
77 78
78 79
79 80
80 81
81 82
82 83
83 84
84 85
85 86
86 87
87 88
88 89
89 90
90 91
91 92
92 93
93 94
94 95
95 96
96 97
97 98
98 99
99 100
100 101
101 102
102 103
103 104
104 105
105 106
106 107
107 108
108 109
109 110
110 111
111 112
112 113
113 114
114 115
115 116
116 117
117 118
118 119
119 120
120 121
121 122
122 123
123 124
124 125
125 126
126 127
127 128
128 129
129 130
130 131
131 132
132 133
133 134
134 135
135 136
136 137
137 138
138 139
139 140
140 141
141 142
142 143
143 144
144 145
145 146
146 147
147 148
148 149
149 150
150 151
151 152
152 153
153 154
154 155
155 156
156 157
157 158
158 159
159 160
160 161
161 162
162 163
163 164
164 165
165 166
166 167
167 168
168 169
169 170
170 171
171 172
172 173
173 174
174 175
175 176
176 177
177 178
178 179
179 180
180 181
181 182
182 183
183 184
184 185
185 186
186 187
187 188
188 189
189 190
190 191
191 192
192 193
193 194
194 195
195 196
196 197
197 198
198 199
199 200
200 201
201 202
202 203
203 204
204 205
205 206
206 207
207 208
208 209
209 210
210 211
211 212
212 213
213 214
214 215
215 216
216 217
217 218
218 219
219 220
220 221
221 222
222 223
223 224
224 225
225 226
226 227
227 228
228 229
229 230
230 231
231 232
232 233
233 234
234 235
235 236
236 237
237 238
238 239
239 240
240 241
241 242
242 243
243 244
244 245
245 246
246 247
247 248
248 249
249 250
250 251
251 252
252 253
253 254
254 255
255 256
256 257
257 258
258 259
259 260
260 261
261 262
262 263
263 264
264 265
265 266
266 267
267 268
268 269
269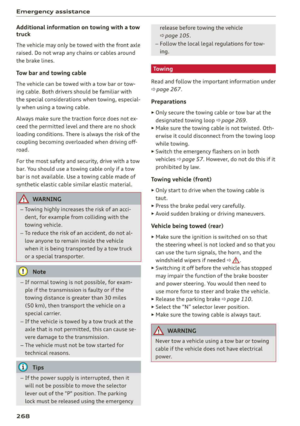 270
270 271
271 272
272 273
273 274
274 275
275 276
276 277
277 278
278 279
279 280
280 281
281 282
282 283
283 284
284 285
285 286
286 287
287 288
288 289
289 290
290 291
291 292
292 293
293 294
294 295
295 296
296 297
297 298
298 299
299 300
300 301
301