Page 57 of 302

8W7012721BA
Lights and Vision
Turn signal and high beam lever
BFV-0012
Fig. 52 Lever: switching on the turn signal and high beams
The lever operates the turn signals, the high
beams and the headlight flasher.
Turn signals 15>
The turn signal activates when you move the lev-
er into a turn signal position when the ignition is
switched on. The respective a or B indicator
light flashes.
@ Right turn signal
@® Left turn signal
The turn signal blinks three times if you tap the
lever (convenience turn signal).
If an indicator light blinks twice as fast as usual,
a turn signal bulb has failed. Carefully drive to an
authorized Audi dealer or authorized Audi Service
Facility immediately to have the malfunction cor-
rected.
High beams 20 and headlight flasher
> Move the lever to the corresponding position:
@) High beams on (vehicles with high beam assis-
tant*) > page 55
@ High beams off or headlight flasher
The
=o) indicator light in the instrument cluster
will turn on.
Z\ WARNING
High beams can cause glare for other drivers,
which increases the risk of an accident. For
this reason, only use the high beams or the
headlight flasher when they will not create
glare for other drivers.
teh m eu ielad
Applies to: vehicles with high beam assistant
The high beam assistant automatically turns the
high beams on or off depending on the surround-
ing conditions.
A camera on the rearview mirror mount can de-
tect light sources from other road users. The high
beams switch on or off automatically depending
on the position of vehicles driving ahead and on-
coming vehicles, the vehicle speed as well as oth-
er environmental factors and traffic conditions.
Switching on the high beam assistant
Requirement: the light switch must be in the AU-
TO position and the high beam assistant must be
switched on in the MMI > page 57.
> To activate the high beam assistant, tap the
lever forward @) > page 55, fig. 52. The faa in-
dicator light appears in the instrument cluster
display and the high beams are switched on or
off automatically. The Ea indicator light turns
on if the high beams are switched on.
Switching the high beams on or off manually
If the high beams did not switch on or off auto-
matically as expected, you may switch them on or
off manually instead:
> To switch the high beams on manually, tap the
lever
forward @) > page 55, fig. 52. The Ea in-
dicator light turns on.
> To switch the high beams off manually, pull the
lever back @) > page 55, fig. 52. The high beam
assistant is deactivated.
Operating the headlight flasher
> To operate the headlight flashers, pull the lever
back @) > page 55, fig. 52. If the high beam as-
sistant is activated, but the high beams were
not turned off, the high beam assistant remains
activated.
ZA WARNING
— Follow the safety precautions and note the
limits of the assist systems, sensors, and
cameras > page 121. >
55
Page 58 of 302

Lights and Vision
— High beam assistant is only intended to as-
sist the driver. The driver is still responsible
for controlling the headlights and may need
to switch them on and off manually depend-
ing on light and visibility conditions.
— High beams can cause glare for other driv-
ers, which increases the risk of an accident.
For this reason, only use the high beams or
the headlight flasher when they will not cre-
ate glare for other drivers.
@ Tips
Certain settings are automatically stored and
assigned to the active user.
Applies to: vehicles sam laser lighting
RAZ-0948,
Fig. 53 Headlights: label
The laser high beams increase the range of the
headlights.
Technical
changes to the headlights have signifi-
cantly increased the range. An additional module
integrated in the headlight converts a blue laser
light into a white light using a luminescent mate-
rial.
56
Switching laser lights on and off
The high beam is controlled by the high beam as-
sistant. The laser high beams switch on shortly
after activating the LED high beams if the re-
quirements that follow are met.
Requirement: the AUTO light function must be
set, and the high beam assistant and the laser
lights must be switched on in the MMI
=> page 57.
> To switch on the high beam assistant, tap the
lever
forward @) > page 55, fig. 52. The fa in-
dicator light appears in the instrument cluster
display and the high beams are switched on or
off automatically.
The laser high beams are switched on at speeds
above approximately 44 mph (70 km/h), when
the high beams are activated. The Ed indicator
light turns on if the high beams are switched on.
The +2] indicator light turns on if the laser lights
are switched on.
The laser beam is switched back off when the
speed decreases below approximately 30 mph
(50 km/h) or when the high beam assistant
switches the LED headlights off.
Z\ WARNING
— Follow the safety precautions and note the
limits of the assist systems, sensors, and
cameras > page 121.
— All repair procedures on the headlights must
be performed by an authorized Audi dealer
or authorized Audi Service Facility that will
perform the work according to Audi factory
specifications. Incorrect repairs could result
in eye injury, impair the function, and may
void the vehicle's operating license.
— Opening the laser module is not permitted
and could cause permanent injuries to the
eyes.
— Dangerous exposure to laser beams may oc-
cur if the covers are removed or if the head-
lamp module housing is opened.
Page 59 of 302
 Tips
— The headlight contains a class 2 laser. The
technical design converts the laser beam so
that there is no danger when it is used for
its intended pur")
8W7012721BA
Lights and Vision
@) Tips
— The headlight contains a class 2 laser. The
technical design converts the laser beam so
that there is no danger when it is used for
its intended purpose.
— The laser beam emission from the head-
lamp has been classified in accordance with
IEC 60825-1:2007.
— The possible emission is below the thresh-
old for laser class 2.
— Maximum laser beam output: 5W (continu-
ous emission), wavelength range A= 400 nm
-700 nm.
— The headlamp light functions are rated in
accordance with IEC 62471-5:2015.
— The beam emitted from the headlamp was
classified as risk group 2.
—
Certain settings are stored automatically in
the active personal profile.
Adjusting the exterior lighting
You can adjust the exterior lighting separately.
The settings depend on the vehicle equipment.
> Applies to: MMI: Select on the home screen:
VEHICLE > Light & Visibility > Exterior light-
ing.
Automatic headlights
You can adjust the following settings in the Auto-
matic
headlights menu:
Activation time - You can adjust if the headlights
switch on Early, Medium, or Late based on the
sensitivity of the light sensor.
Headlight assistant - You can switch the high
beam assistant on and off.
Laser lights - You can switch the laser lights on
and off.
Entry/exit lighting
When it is dark, the Entry/exit lighting illumi-
nates the area around the vehicle when unlocking
the vehicle and after switching off the ignition
and opening the driver's door. The entry/exit
lighting only works when it is dark and the light
switch is in the AUTO position.
Daytime running lights
USA models: the daytime running lights can be
switched on and off.
Canada models: this function cannot be switched
off. They activate automatically each time the ig-
nition is switched on.
@) Tips
Certain settings are automatically stored and
assigned to the active user.
Emergency flashers
Fig. 54 Center console: emergency flashers
The emergency flashers help to make other driv-
ers aware of your vehicle in dangerous situations.
> Press the A @ button to switch the emergency
flashers on or off.
When the emergency flashers are turned on, the
a and B indicator lights will flash at the same
time.
You can indicate a lane change or a turn when the
emergency flashers are switched on by using the
turn signal lever. The emergency flashers stop
temporarily.
The emergency flashers also work when the igni-
tion is turned off.
@) Tips
You should switch the emergency flashers on
if:
— you are the last car in a traffic jam so that
all other vehicles approaching from behind
can see your vehicle
57
Page 60 of 302

Lights and Vision
— your vehicle has broken down or you are
having an emergency
— your vehicle is being towed or if you are tow-
ing another vehicle
Messages
If the & indicator light turns on, a bulb has
failed. The displayed message indicates the cause
and possible solutions. If one of the messages
does not turn off, drive immediately to an author-
ized Audi dealer or authorized Audi Service Facili-
ty to have the malfunction repaired.
BB) Audi adaptive light: malfunction! See own-
er's manual
Adaptive light* is not working. The headlights
still function. Drive immediately to an authorized
Audi dealer or authorized Audi Service Facility to
have the malfunction repaired.
Ba Headlight range control: malfunction! See
owner's manual
There is a malfunction in the headlight range
control system, which may cause glare for other
drivers. Drive to an authorized Audi dealer or au-
thorized Audi Service Facility immediately to have
the malfunction corrected.
High beam assistant: malfunction! See own-
er's manual
You can still switch the high beams on or off
manually. Drive immediately to an authorized
Audi dealer or authorized Audi Service Facility to
have the malfunction repaired.
High beam assistant: currently unavailable.
Camera view limited due to surroundings.
This message appears if the camera's visual field
is blocked. The system will switch itself off. Try
switching the systems on again Later.
BB automatic headlights: malfunction! See
owner's manual
The light/rain sensor is malfunctioning. The low
beams remain switched on at all times for safety
reasons with the AUTO light function. Drive im-
mediately to an authorized Audi dealer or author-
58
ized Audi Service Facility to have the malfunction
repaired.
Interior lighting
terior light
Fig. 55 Headliner: front interior lighting
Interior lighting buttons
axs* — Interior lighting on/off
4 - Door contact switch on/off. The interior light-
ing is controlled automatically.
Touch-sensitive reading lights
> To turn a reading light on or off, touch the sur-
face @ briefly.
> To activate the manual dimming function,
touch the surface @) when the light is switched
off and keep touching it until the desired
brightness is reached.
Tam OL Ue LL)
Fig. 56 Headliner: rear reading lights
Reading lights
> To switch the reading lamp on or off, press the
“S button @.
Page 61 of 302

8W7012721BA
Lights and Vision
> To activate the manual dimming function*,
touch the surface while the light is switched off
“¥ @ and keep touching it until the desired
brightness is reached.
Interior lighting
Applies to: vehicles with interior lighting
The ambient lighting turns on when the ignition
is switched on. The ambient lighting is deactivat-
ed when the light function is OFF.
You can adjust the interior lighting individually.
The settings depend on the vehicle equipment.
> Applies to: MMI: Select on the home screen:
VEHICLE > Light & Visibility > Interior light-
ing.
You can choose among predefined color profiles,
such as Maritime.
Additional settings and profiles:
— Brightness: you can adjust the brightness for
all of the interior lighting.
— Individual: you can adjust the brightness and
color of the interior lighting separately, divided
into contour and surface lighting.
— Drive select: the contour and surface lighting
color changes depending on the selected Audi
drive select* mode.
G) Tips
— Depending on vehicle equipment, when the
Drive select function is activated, the color
of the contour and surface lighting may
briefly change to red or blue when the inte-
rior temperature is manually increased or
decreased.
— Certain settings are automatically stored
and assigned to the active user.
Display brightness
You can adjust the instrument and display illumi-
nation separately. The settings depend on the ve-
hicle equipment.
> Applies to: MMI: Select on the home screen:
SETTINGS > Display & brightness.
Possible settings in the MMI:
— Cockpit dimming
— Head-up display
—MMI
— Virtual cockpit
stiide aaa tela)
Fig. 57 Light switch: instrument illumination
You can adjust the background brightness of the
instruments and display illumination.
> Press the knob (@ to release it.
> Turn the knob toward "-" or "+" to reduce or in-
crease the brightness.
> Press the knob again to return it to its original
Position.
@ Tips
Depending on vehicle equipment, the instru-
ment illumination (needles and gauges) may
turn on when the lights are off and the igni-
tion is switched on. The illumination for the
gauges reduces automatically and eventually
turns off as brightness outside increases. This
function reminds the driver to turn the low
beams on at the appropriate time.
s9
Page 62 of 302

Lights and Vision
Vision
Adjusting exterior mirrors
RAZ-0150
Fig. 58 Driver's door: knob for the exterior mirrors
> Turn the knob in the driver's door to the desired
position:
0 - All adjustment functions are deactivated.
Q/ §- Selects the left or right exterior mirror.
To adjust the mirror glass in a mirror, press the
knob in the desired direction.
GA - Heats the mirror glass depending on the out-
side temperature.
©) - Folds the exterior mirrors*. To fold the mir-
rors out, turn the knob to one of the other posi-
tions. In the MMI, you can select if the mirrors
fold in automatically when you lock the vehicle
=> page 31.
Front passenger's exterior mirror tilt
function*
Requirement: the knob must be in the position
for the front passenger’s exterior mirror.
To help you see the curb when backing into a
parking space, the surface of the mirror will tilt
slightly when reverse gear is selected.
You can adjust the mirror surface by turning the
knob in the desired direction.
The mirror moves from the reversing position
back to the original position:
—When you switch the ignition off
— Once you drive forward at speeds faster than 9
mph (15 km/h)
— When the knob is no longer in the position for
the front passenger exterior mirror
60
Z\ WARNING
Curved mirror surfaces (for example convex)
enlarge the field of vision. However, they
make objects in the mirror appear smaller and
farther away. When using these mirrors to es-
timate your distance to vehicles behind you
when changing lanes, you could estimate in-
correctly, which increases the risk of an acci-
dent.
@) Note
— Applies to: vehicles with power folding exte-
rior mirrors: If the mirror housing was
moved by outside forces (such as an impact
when maneuvering), you must use the pow-
er folding function to fold the mirror all the
way out. The mirrors will make a loud noise
when they latch into place. The mirror hous-
ing must not be moved back into place by
hand because this could impair the function
of the mirror mechanism.
— Applies to: vehicles without power folding
exterior mirrors: If the mirror housing was
moved by outside forces (such as an impact
when maneuvering), you must move it back
in place by hand.
— If you wash the vehicle in an automatic car
wash, you must fold the exterior mirrors in
to reduce the risk of damage to the mirrors.
Never fold power folding exterior mirrors*
by hand. Only fold them in and out using
the power controls.
G) Tips
— If the power adjusting function malfunc-
tions, the glass in both mirrors can be ad-
justed by pressing on the edge of it by hand.
— Certain settings are automatically stored
and assigned to the active user.
Dimming the mirrors
Manual dimming rearview mirror
> Pull the lever on the bottom of the mirror back. >
Page 63 of 302

8W7012721BA
Lights and Vision
Automatic dimming rearview mirror
Applies to: vehicles with automatic dimming rearview mirror
> The interior and exterior mirrors dim automati-
cally when light shines on them, for example
from headlights on a vehicle behind you.
Z\ WARNING
— If the glass on an automatic dimming mir-
ror* breaks, electrolyte can leak out. This
liquid can irritate the skin, eyes and respira-
tory system. If there is contact with the flu-
id, flush immediately with plenty of water.
Consult a physician if necessary.
— Repeated or long-term exposure to electro-
lyte fluid can lead to irritation of the air-
ways, especially in people with asthma or
other respiratory conditions. Take deep
breaths immediately after leaving the vehi-
cle or, if this is not possible, open all of the
doors
and windows as wide as possible.
— If electrolyte fluid comes into contact with
the eyes, flush them thoroughly with plenty
of clean water for at least 15 minutes and
then seek medical attention.
— If electrolyte fluid comes into contact with
the skin, flush the affected area with clean
water for at least 15 minutes, and then
clean with soap and water and seek medical
attention. Clean affected clothing and shoes
thoroughly before wearing again.
— If the fluid was swallowed and the person is
conscious, flush the mouth with water for at
least 15 minutes. Do not induce vomiting
unless this is recommended by medical pro-
fessionals. Seek medical attention immedi-
ately.
iG) Tips
— If the light reaching the rearview mirror is
obstructed, the automatic dimming mirror*
will not function correctly.
—The automatic dimming mirrors* do not dim
when the interior lighting is turned on or re-
verse gear is selected.
|B4M-0075
Fig. 59 Roof headliner: sun visor
Sun visor
The
sun visors for the driver and front passenger
can be released from their mounts and turned to-
ward the doors (a).
They can also be moved back and forth length-
wise in this position.
Vanity mirror
The mirror light switches on when the cover over
the
vanity mirror @) opens.
Windshield wipers
Switching the windshield wipers on
(@) Note
If the glass on an automatic dimming mirror*
breaks, electrolyte can leak out. This liquid
damages plastic surfaces and paint. Clean
this liquid as quickly as possible, for example
with a wet sponge.
[RAZ-0149
Fig. 60 Lever: windshield wipers.
61
Page 64 of 302

Lights and Vision
> Move the windshield wiper lever S7 to the cor-
responding position:
@ Windshield wipers off
@ Rain sensor/intermittent mode. The wind-
shield wipers switch on once the vehicle speed
exceeds approximately 2 mph (4 km/h) and it is
raining. The higher the sensitivity of the rain sen-
sor that is set (switch © to the right), the earlier
the
windshield wipers react to moisture on the
windshield. You can deactivate the rain sensor
mode, which switches the interval mode on. In
intermittent mode, you can adjust the interval
time using the switch ©.
> Applies to: MMI: Select on the home screen:
VEHICLE > Light & Visibility > Rain sensor.
@ Slow wiping
@ Fast wiping
@ Single wipe. If you hold the lever in this posi-
tion longer, the wipers switch from slow wiping
to fast wiping.
© Clean the windshield §. The wipers wipe one
time after several seconds of driving to remove
water droplets. You can switch this function off
by moving the lever to position ©) within ten sec-
onds of the afterwipe. The afterwipe function is
reactivated the next time you switch the ignition
on.
Clean the headlights*. The headlight washer sys-
tem* operates only when the low beam head-
lights are on. If you move the lever into position
©, the headlights will be cleaned at fixed inter-
vals.
— Properly functioning windshield wiper
blades are required for a clear view and safe
driving > page 63, Cleaning/changing wip-
er blades.
ZA WARNING
— The rain sensor is only intended to assist the
driver. The driver may still be responsible for
manually switching the wipers on based on
visibility
conditions.
— The windshield must not be treated with
water-repelling windshield coating agents.
Under unfavorable conditions, such as wet-
ness, darkness, and when the sun is low,
these coatings can cause increased glare,
which increases the risk of an accident. They
can also cause wiper blade chatter.
62
@) Note
— If there is frost, make sure the windshield
wiper blades are not frozen to the wind-
shield. Switching on the windshield wipers
when the blades are frozen to the wind-
shield can damage the wiper blades.
— Prior to using a car wash, the windshield
wiper system must be switched off (lever in
position @). This prevents the wipers from
switching on unintentionally and causing
damage to the windshield wiper system.
@ Tips
— The windshield wipers switch off when the
ignition is switched off. You can activate the
windshield wipers after the ignition is
switched on again by moving the windshield
wiper lever to any position. The single wipe
function (lever in position @) also functions
when the ignition is switched off.
— Worn or dirty windshield wiper blades result
in streaking. This can affect the rain sensor
function. Check your windshield wiper
blades regularly.
—The washer fluid nozzles for the windshield
washer system are heated when the ignition
is on if the outside temperature is low.
— When stopping temporarily, such as at a
traffic light, the speed of the windshield
wipers automatically reduces by one level.
— Certain settings are automatically stored
and assigned to the active user.
 1
1 2
2 3
3 4
4 5
5 6
6 7
7 8
8 9
9 10
10 11
11 12
12 13
13 14
14 15
15 16
16 17
17 18
18 19
19 20
20 21
21 22
22 23
23 24
24 25
25 26
26 27
27 28
28 29
29 30
30 31
31 32
32 33
33 34
34 35
35 36
36 37
37 38
38 39
39 40
40 41
41 42
42 43
43 44
44 45
45 46
46 47
47 48
48 49
49 50
50 51
51 52
52 53
53 54
54 55
55 56
56 57
57 58
58 59
59 60
60 61
61 62
62 63
63 64
64 65
65 66
66 67
67 68
68 69
69 70
70 71
71 72
72 73
73 74
74 75
75 76
76 77
77 78
78 79
79 80
80 81
81 82
82 83
83 84
84 85
85 86
86 87
87 88
88 89
89 90
90 91
91 92
92 93
93 94
94 95
95 96
96 97
97 98
98 99
99 100
100 101
101 102
102 103
103 104
104 105
105 106
106 107
107 108
108 109
109 110
110 111
111 112
112 113
113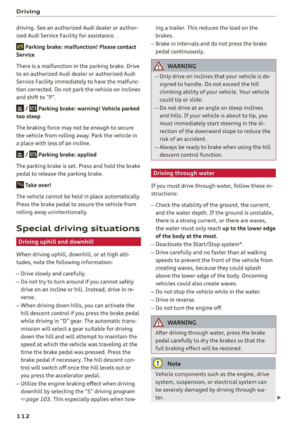 114
114 115
115 116
116 117
117 118
118 119
119 120
120 121
121 122
122 123
123 124
124 125
125 126
126 127
127 128
128 129
129 130
130 131
131 132
132 133
133 134
134 135
135 136
136 137
137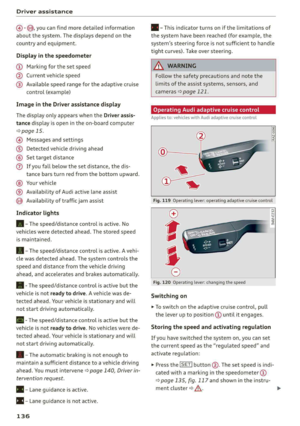 138
138 139
139 140
140 141
141 142
142 143
143 144
144 145
145 146
146 147
147 148
148 149
149 150
150 151
151 152
152 153
153 154
154 155
155 156
156 157
157 158
158 159
159 160
160 161
161 162
162 163
163 164
164 165
165 166
166 167
167 168
168 169
169 170
170 171
171 172
172 173
173 174
174 175
175 176
176 177
177 178
178 179
179 180
180 181
181 182
182 183
183 184
184 185
185 186
186 187
187 188
188 189
189 190
190 191
191 192
192 193
193 194
194 195
195 196
196 197
197 198
198 199
199 200
200 201
201 202
202 203
203 204
204 205
205 206
206 207
207 208
208 209
209 210
210 211
211 212
212 213
213 214
214 215
215 216
216 217
217 218
218 219
219 220
220 221
221 222
222 223
223 224
224 225
225 226
226 227
227 228
228 229
229 230
230 231
231 232
232 233
233 234
234 235
235 236
236 237
237 238
238 239
239 240
240 241
241 242
242 243
243 244
244 245
245 246
246 247
247 248
248 249
249 250
250 251
251 252
252 253
253 254
254 255
255 256
256 257
257 258
258 259
259 260
260 261
261 262
262 263
263 264
264 265
265 266
266 267
267 268
268 269
269 270
270 271
271 272
272 273
273 274
274 275
275 276
276 277
277 278
278 279
279 280
280 281
281 282
282 283
283 284
284 285
285 286
286 287
287 288
288 289
289 290
290 291
291 292
292 293
293 294
294 295
295 296
296 297
297 298
298 299
299 300
300 301
301