2020 AUDI A3 tow
[x] Cancel search: towPage 129 of 400

8V2012721BK
Assist systems
strongly. The message Audi pre sense A
=> fig. 120 and a warning tone will warn you
about the danger.
If there is an impending collision with vehicles,
there will also be an acute warning in the form of
sharp braking. If you do not react to the acute
warning, pre sense front can brake with increas-
ing force within the limits of the system. This re-
duces the vehicle speed in the event of a colli-
sion.
Automatic deceleration
Depending on the speed, pre sense front can de-
celerate automatically shortly before a collision:
— if there are stationary vehicles when you are
traveling at speeds up to approximately 28
mph (45 km/h)
— if there are vehicles driving or stopped ahead
when you are traveling at speeds up to approxi-
mately 155 mph (250 km/h)
Automatic braking force increase
If pre sense front determines that you are not
braking strongly enough when a collision is immi-
nent, it can increase the braking force, depending
on the situation and speed:
— if there are stationary vehicles when you are
traveling at speeds up to approximately 50
mph (85 km/h)
— if there are vehicles driving or stopped ahead
when you are traveling at speeds up to approxi-
mately 155 mph (250 km/h)
— The system can deploy incorrectly due to
system-specific limits.
— Please note that the sensor does not always
detect all objects. This increases the risk of a
collision.
— Pre sense front does not react to vehicles
traveling toward you in the same lane, to
people, groups of people, animals, objects
that are crossing the road, or objects that
are difficult to detect > A\ in General infor-
mation on page 119.
ZA\ WARNING
Pre sense front may be restricted or not avail-
able in the following example situations:
— If there are other reflective objects nearby,
such as guard rails or vehicles
— When driving into a tunnel
— In heavy fog, rain, spray, or snow
—If the radar sensor is dirty, covered in ice,
damaged, or covered
— In curves
— If the ESC was switched off.
Z\ WARNING
Pre sense front cannot overcome the laws of
physics. It is a system designed to assist and
it cannot prevent a collision in every circum-
stance. The driver must always intervene. The
driver is always responsible for braking at the
correct time. Do not let the increased safety
provided tempt you into taking risks. This
could increase your risk of a collision.
— Loose objects can be thrown around the ve-
hicle interior during sudden driving or brak-
ing maneuvers, which increases the risk of
an accident. Store objects securely while
driving.
@) Note
The sensor can be displaced by impacts or
damage to the bumper, wheel housing and
underbody. Pre sense front can be impaired by
this. Have an authorized Audi dealer or au-
thorized Audi Service Facility check their func-
tion.
(i) Tips
— You can cancel the braking with increasing
force that is initiated by the system by brak-
ing yourself, by accelerating noticeably or by
swerving.
— When driving in reverse, certain pre sense
front functions are switched off.
— System functions may not be available if the
ESC is limited or switched off, or if there is a
malfunction.
127
Page 134 of 400

Assist systems
detected and classified as critical. The display in
the mirror turns on, but is dim.
The display remains dim in the information stage
so that your view toward the front is not distur-
bed.
Warning stage
If the display in a mirror blinks brightly when you
activate a turn signal, side assist is warning you
about detected vehicles that it has classified as
critical. If this happens, check traffic by glancing
in the exterior mirrors and over your shoulder
=> A\ in General information on page 133.
Applies to: vehicles with Audi active lane assist
The display in the mirror can also blink if you
have not activated a turn signal: if you are ap-
proaching a detected lane marker line and it ap-
pears you will be leaving the lane, side assist will
warn you about detected vehicles that it has clas-
sified as critical.
iG) Tips
You can adjust the brightness on of the dis-
play on the rearview mirror > page 133.
General information
Applies to: vehicles with Audi side assist
B8U-0342|
Fig. 126 Driving situations
132
B8U-0348
Fig. 127 Rear of the vehicle: position of the sensors
Side assist functions at speeds above approxi-
mately 9 mph (15 km/h).
@ Approaching vehicles
In certain cases, a vehicle will be classified as
critical for a lane change even if it is still some-
what far away. The faster a vehicle approaches,
the sooner the display in the outside mirror will
turn on.
@ Vehicles traveling with you
Vehicles traveling with you are indicated in the
exterior mirror if they are classified as critical for
a lane change. All vehicles detected by side assist
are indicated by the time they enter your “blind
spot”,
at the latest.
@ Vehicles you are passing
If you slowly pass a vehicle that side assist has
detected (the difference in speed between the ve-
hicle and your vehicle is less than approximately
9 mph (15 km/h)), the display in the exterior mir-
ror turns on as soon as the vehicle enters your
blind spot.
The display will not turn on if you quickly pass a
vehicle that side assist has detected (the differ-
ence in speed is greater than approximately 9
mph (15 km/h)).
Functional limitations
The radar sensors are designed to detect the left
and right adjacent lanes when the road lanes are
the normal width. In some situations, the display
in the exterior mirror may turn on even though
there is no vehicle located in the area that is criti-
cal for a lane change. For example:
Page 141 of 400

8V2012721BK
Parking aid
The rearview camera is located above the rear li-
cense plate bracket. Make sure that the lens for
the parking system > fig. 135 is not covered by
deposits or any other obstructions because this
can affect the function of the parking system. For
information on cleaning, see > page 342.
The rearview camera coverage area includes ()
> fig. 134. Only this area is shown in the Info-
tainment display. Objects that are in area Q),
which is not covered, are not displayed.
Z\ WARNING
— Always read and follow the applicable warn-
ings > A\ in General information on
page 136.
— If the position and the installation angle of
the rearview camera was changed, for exam-
ple after a collision, do not continue to use
the system for safety reasons. Have it
checked by an authorized Audi dealer or au-
thorized Audi Service Facility.
— Only use the rearview camera to assist you if
it shows a good, clear picture. For example,
the image may be affected by the sun shin-
ing into the lens, dirt on the lens, or if there
is a malfunction.
— Use the rearview camera only if the luggage
compartment lid is completely closed. If the
luggage compartment lid is open the orien-
tation lines and blue surfaces are hidden.
Make sure any objects you may have mount-
ed on the luggage compartment lid do not
block the rearview camera.
— The camera lens enlarges and distorts the
field of vision. The object appears both al-
tered and inaccurate on the screen.
—Incertain situations, people or objects in
the display appear closer or farther away:
— For objects that do not touch the ground,
such as the bumper of a parked vehicle, a
trailer hitch or the rear of a truck. Do not
use the
orientation lines in this case.
—If driven from a level surface onto an in-
cline, or a downward slope.
— If driven toward protruding objects.
— If the vehicle is carrying too much load in
the rear.
CG) Note
— Always read and follow the applicable warn-
ings >@ in General information on
page 136.
— The orange-colored orientation lines in the
Infotainment display show the vehicle path
based on the steering wheel angle. The
front of the vehicle swings out more than
the rear of the vehicle. Maintain plenty of
distance so that an exterior mirror or a cor-
ner of the vehicle does not collide with any
obstacles.
Sct Remo
Applies to: vehicles with rearview camera
Switching on and off
Requirement: the vehicle speed must be under
approximately 6 mph (10 km/h).
> Press the Pv button in the center console. A
short confirmation tone sounds and the LED in
the button turns on.
Switching on automatically
The system switches on automatically when re-
verse gear is engaged while the engine is run-
ning.
Switching off automatically
The system switches off automatically when driv-
ing forward faster than 6 mph (10 km/h).
@) Tips
— The visual display* in the right section of the
display should help you detect the critical
vehicle area.
— You can change the volume of the signals
and the display > page 144.
139
Page 148 of 400

Multi Media Interface
Multi Media Interface
Traffic safety
information
Audi recommends performing certain Infotain-
ment system functions, such as entering a desti-
nation, only when the vehicle is stationary. Al-
ways be prepared to stop operating the Infotain-
ment system in the interest of your safety and
the safety of other road users.
Z\ WARNING
Only use the Infotainment system when road,
traffic, weather, and visibility conditions per-
mit and always in a way that allows you to
maintain complete control over your vehicle.
@ Tips
Certain functions are not available while driv-
ing.
Introduction
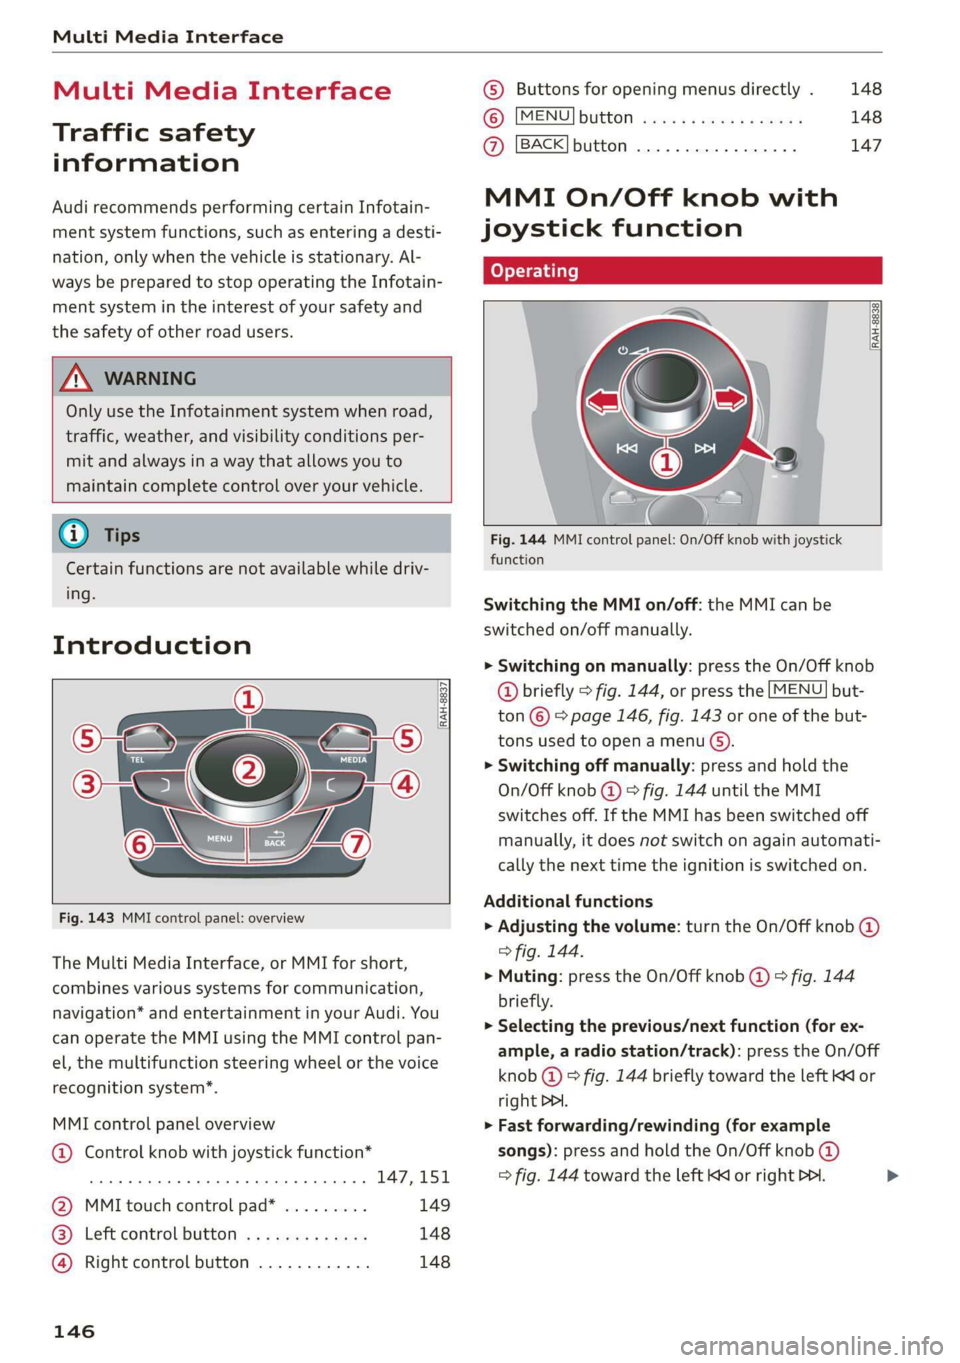
[RAH-8837
Fig. 143 MMI control panel: overview
The Multi Media Interface, or MMI for short,
combines various systems for communication,
navigation* and entertainment in your Audi. You
can operate the MMI using the MMI control pan-
el, the multifunction steering wheel or the voice
recognition system”.
MMI control panel overview
@ Control knob with joystick function*
eee teen eee 147,151
@ MMI touch control pad* ......... 149
® Left control button ............. 148
@ Right control button ............ 148
146
© Buttons for opening menus directly . 148
(6): [MENU] button suis se cas as sees 148
@ [BACK] button .... 2. 147
MMI On/Off knob with
joystick function
(ey YTelatare)
[RAH-8838,
Fig. 144 MMI control panel: On/Off knob with joystick
function
Switching the MMI on/off: the MMI can be
switched on/off manually.
> Switching on manually: press the On/Off knob
@ briefly > fig. 144, or press the [MENU] but-
ton © © page 146, fig. 143 or one of the but-
tons used to open a menu G).
> Switching off manually: press and hold the
On/Off knob @) > fig. 144 until the MMI
switches off. If the MMI has been switched off
manually, it does not switch on again automati-
cally the next time the ignition is switched on.
Additional functions
> Adjusting the volume: turn the On/Off knob @)
> fig. 144.
> Muting: press the On/Off knob @) ° fig. 144
briefly.
> Selecting the previous/next function (for ex-
ample, a radio station/track): press the On/Off
knob @ ® fig. 144 briefly toward the left KK or
right DDI.
> Fast forwarding/rewinding (for example
songs): press and hold the On/Off knob @)
=> fig. 144 toward the left Kd or right Po. >
Page 163 of 400

8V2012721BK
Voice recognition system
BAR COMMANDS
* Telephone
* Audi connect
* Navigation
* Directory
* Radio
+ Media
* Sound
* Help
+ Help Speech dialog system
* Help Telephone
* Help Audi connect
* Help Navigation
* Help Map
* Help Radio
* Help Media
TELEPHONE
+ Enter number
* Delete number / correction
+ Directory
* Call (XY)
* business / private / land line / mobile
NAVIGATION
+ Navigate to (XY)
+ Start / cancel route guidance
+ Directory
+ Last destinations
+ Navigation favorites
+ Drive home
- Enter address
+ Enter country / town / street / state
+ Exclude route / Exclude route for (XY) km /m
+ Map
* Day map / Night map
AUDI CONNECT
* Audi connect
* Travel information / Parking information
* Fuel prices
* Weather
+ Radio presets
“FM
*FM/AM/ SIRIUS XM tlle,
* Station (XY) / Frequency (XY)
* Traffic announcement on / off
* 2D driving position map / 2D north position map / 3D map / Destination map / Overview map
+ Favorites a »)
+ Call (XY) sDS
* Enter number
* Redial
* Read new text message
+ Navigate to (XY)
+ Enter address/destination
* Online destinations
* Cancel route guidance
* Map
+ Line (XY)
* Next page / previous page
* Cancel
* No, I meant (XY)
* Correction
Call list _ a.
Redial
Call mailbox we
Enter PIN / delete PIN
Telephone favorites
+ Block route for (XY) miles / Block
the next section
* Route list
* Calculate alternative routes
* Online destinations
* Special destination
Flight information
City events
Online news
Twitter
MEDIA
Jukebox s))
+ CD/DVD MEDIA
SD card 1/ SD card 2
Audi music interface / iPod / USB / Bluetooth /
Wi-Fi / Medium (XY)
* Media favorites / Artists / Albums / Genres /
Tracks / Playlists / Videos
* Folder up
* Random playback on / off
Fig. 161 Command overview
161
Page 164 of 400

Voice recognition system
Voice recognition system
General information
Applies to: vehicles with voice recognition system
You can operate many functions in the vehicle
easily using voice commands.
Using the voice recognition system optimally
> Speak clearly and distinctly at a normal volume.
Speak louder when driving faster.
> Emphasize the words in the commands evenly
and do not leave long pauses.
> Close the doors, the windows, and the sunroof*
to reduce background noise. Make sure that
passengers are not speaking when you are giv-
ing a voice command.
> Do not direct the vents toward the hands-free
microphone, which is in the roof headliner near
the front interior lights.
> Only the driver should speak to the system, be-
cause the handsfree microphone is aimed to-
ward this seating position.
ZA\ WARNING
— Direct your full attention to driving. As the
driver, you have complete responsibility for
safety in traffic. Only use the functions in
such a way that you always maintain com-
plete control over your vehicle in all traffic
situations.
— Do not use the voice recognition system in
emergencies because your voice may change
in stressful situations. The system may take
longer to dial the number or may not be
able to dial it at all. Dial the emergency
number manually.
G) Tips
There are no voice guidance* prompts when a
dialog is active.
Operating
Applies to: vehicles with voice recognition system
Requirement: the ignition and the MMI must be
switched on. A system language supported by
the voice recognition system must be set. There
162
must be no phone calls in progress and the park-
ing aid must not be active.
> Switching on: press the [2] button (2)
> page 19, fig. 13 or @) > page 20, fig. 15
briefly on the multifunction steering wheel and
say the desired command after the Beep.
> Switching off: press and hold the |] button,
‘OF:
> Press the |] button.
> Pausing: say the command Pause. To resume,
press the |%] button.
> Correcting: say the command Correction.
Input assistance
The system guides you through the input with
visual and audio feedback.
— Visual input assistance: after switching on
voice recognition, a display with a selection of
possible commands appears. This command
display can be switched on or off. Select:
MENU] button > Settings > left control button
> MMI settings > Speech dialog system.
— Audio input assistance: to have the possible
commands read, turn the voice recognition sys-
tem on and say Help.
Additional settings
See > page 235.
@) Tips
— The dialog pauses when there is an incom-
ing phone call and will continue if you ig-
nore the call. The dialog ends if you answer
the call.
— You can select an item in the list using ei-
ther the voice recognition system or the
control knob.
Command overview
information
Applies to: vehicles with voice recognition system
The following overviews describe the commands
that can be used to operate the MMI using the
voice recognition system.
Page 188 of 400

Audi connect
the price of Audi connect vehicle control
services. The cell phone network, for exam-
ple, must be available to use these services.
Applies to: vehicles with plug-in hybrid drive and Audi connect
Requirement: your mobile devices must be com-
patible.
> An authorized Audi dealer must complete a
one-time activation of Audi connect e-tron serv-
ices for your vehicle before you can register on-
line.
> Register at etron.audiusa.com
If you require assistance with your Audi connect
e-tron services, please contact an authorized
Audi dealer or authorized Audi Service Facility.
Using the myAudi app
— Install the myAudi app on your mobile device
and log in with your access information.
Services
Applies to: vehicles with plug-in hybrid drive and Audi connect
Depending on the country and the vehicle equip-
ment, the following services may be available:
Trip data
Depending on the vehicle equipment, certain
driver information system data is transmitted to
a server. An overview of your trips with the values
from the short-term memory/long-term memory
can be displayed, for example, the driving dura-
tion. The values may differ from the values dis-
played in the vehicle.
Vehicle status report
This service transfers driver information system
data to a server. Depending on the vehicle equip-
ment, certain data may be accessed, such as the
remaining range or mileage. The values may dif-
fer from the values displayed in the vehicle.
Car Finder
This service transmits the parking location to a
server when the ignition is switched off. The vehi-
cle location, your location, or the route to your
186
vehicle can be displayed. The new parking loca-
tion cannot be determined with this service if the
vehicle is moved after shutting the vehicle off
and without switching the ignition on and off
again, for example if the vehicle is towed or sto-
len.
Remote charging
Requirement: the ignition must be switched off
when changing the charging mode.
You can control and monitor the charging process
remotely with the service.
— Charging mode: immediate charging or delayed
charging (timer)
— Program the timer
— Deactivate or activate the timer
For additional information, see > page 101,
Charging the battery with the Audi charging sys-
tem.
Temperature control
Requirement: the ignition must be switched off
when starting or stopping climate control.
You can control the climate control in your vehi-
cle remotely using these services.
— Start or stop climate control
— Program the timer
— Deactivate or activate the timer
For additional information, see > page 101,
Charging the battery with the Audi charging sys-
tem.
ZA\ WARNING
— Do not ignore messages and warning or indi-
cator lights that turn on in the vehicle be-
cause of the information in the vehicle sta-
tus report. This could lead to break downs in
on the road, accidents and serious injuries.
— Only perform the climate control functions
if your vehicle was shut off correctly and the
ignition is switched off.
— Only perform charging functions on the
high-voltage battery if the vehicle is shut off
correctly, is connected to a suitable socket
and if the ignition is switched off.
Page 192 of 400

Navigation
The route displays as an overview in the map.
Route guidance is already active.
Narrowing the search area
All countries/states are selected at the factory
for the free text search.
> Select the right control button > Country/state
selection in the input field @ > page 189,
fig. 166.
> Select the country or state (@) that should be
searched using the free text search in order to
narrow the number of results and increase the
search speed. The selected entry in the coun-
try/state selection is stored, or:
> Select All countries/states.
@ Tips
— The MMI input suggestions depend on the
last navigated destinations.
— Up to 50 entries can be stored in the last
destinations list.
—
Additional information on free text searches
can be found under > page 154.
Loading previous destinations
Applies to: vehicles with navigation system
Your last destinations are automatically stored
and can be loaded directly as a destination.
Opening a menu
Requirement: a destination was already navigat-
ed to.
> Press the [NAV/MAP] button repeatedly until
the Enter destination menu is displayed
=> page 189, fig. 166.
Your last destination is listed directly in the Enter
destination menu under the home address and
identified with the symbol @) > page 189,
fig. 166.
> Select and confirm one of the last destinations
from the list.
Deleting previous destinations
> Select one of the last destinations from the list.
190
> Select: right control button > Delete destina-
tion > Delete this last destination or Delete all
last destinations.
The selected destination or all last destinations
is/are deleted and no longer displayed in the En-
ter destination menu.
Entering an address
Applies to: vehicles with navigation system
As an alternative to free text search, you can also
enter an address in stages.
> Press the [NAV/MAP] button repeatedly until
the Enter destination menu is displayed
=> page 189, fig. 166.
> Select: left control button > Enter address.
> Entering a destination using a country/state:
select and confirm Country/state. Select and
confirm a country/state directly from the list,
or search for a country/state using the input
field.
> Destination entry using the city/ZIP code: se-
lect and confirm City/ZIP code. Enter a city ora
ZIP code, or select and confirm a city in the list.
> Select and confirm additional details about the
destination such as Street, House number or
Downtown.
> Destination entry using a street intersection*:
Requirement: you must enter a street. Select
and confirm Intersection. Select and confirm a
street directly from the list, or search for a
street using the input field.
> Select and confirm Start route guidance.
Tee Maile a le eR)
destination
Applies to: vehicles with navigation system
You can quickly and easily start route guidance to
your home address using the home address func-
tion. Favorites allow easier access to frequently
used destinations.
Opening a menu
> Press the [NAV/MAP] button repeatedly until
the Enter destination menu is displayed
=> page 189, fig. 166.