2020 AUDI A3 warning
[x] Cancel search: warningPage 138 of 400
Parking aid
Parking aid
General information
Applies to: vehicles with parking system plus/rearview cam-
era/park assist
Depending on your vehicle's equipment, various
parking aids will help you when parking and ma-
neuvering.
The parking system plus assists you when park-
ing by audibly and visually indicating objects de-
tected in front of and behind the vehicle
=> page 137.
The rearview camera shows the area behind the
vehicle in the Infotainment system display. The
lines in the rearview camera image help you to
park or maneuver > page 138.
Park assist helps you to locate suitable parking
spaces when parallel or perpendicular parking,
and also helps when leaving a parallel parking
space > page 140.
Z\ WARNING
— Always look for traffic and check the area
around your vehicle by looking at it directly
as well. The parking system cannot replace
the driver's attention. The driver is always
responsible when entering or exiting a park-
ing space and during similar maneuvers.
— Please note that some surfaces, such as
clothing, are not detected by the system.
— Sensors and cameras have blind spots in
which people and objects cannot be detect-
ed. Be especially cautious of small children
and animals.
— Always pay attention to the area around the
vehicle - using the rearview mirror, too.
— The sensors can be displaced by impacts or
damage to the radiator grille, bumper,
wheel housing and the underbody. The park-
ing system may be impaired as a result.
Have an authorized Audi dealer or author-
ized Audi Service Facility check their func-
tion.
136
@) Note
— Some objects are not detected or displayed
by the system under certain circumstances:
— objects such as barrier chains, trailer draw
bars, vertical poles or fences
— objects above the sensors such as wall ex-
tensions
— objects with certain surfaces or structures
such as chain link fences or powder snow
— If you continue driving closer to a low ob-
ject, it may disappear from the sensor
range. Note that you will no Longer be
warned about this obstacle.
— Maintain enough distance from the curb to
reduce the risk of damage to the rims.
@) Tips
— The system may provide a warning even
though there are no obstacles in the cover-
age area in some situations, such as:
— certain road surfaces or when there is tall
grass
— external ultrasonic sources such as from
cleaning vehicles
—in heavy rain, snow, or thick vehicle ex-
haust
— We recommend that you practice parking in
a traffic-free location or parking lot to be-
come familiar with the system. Practice
parking in good light and weather condi-
tions.
— You can change the volume and pitch of the
signals as well as the display > page 144.
— What appears in the infotainment display is
somewhat time-delayed.
— The sensors must be kept clean and free of
snow and ice for the parking aid to operate.
Page 139 of 400
8V2012721BK
Parking aid
Parking system plus
Description
Applies to: vehicles with parking system plus/park assist
B8V-0686
RAH-8914
Fig. 131 Infotainment system: visual distance display
The parking system plus uses audio and visual
warnings to help you avoid obstacles when park-
ing.
Sensors are located in the front and rear bump-
ers. If these detect an obstacle, audible and visu-
al signals warn you.
Make sure the sensors are not covered by stick-
ers, deposits or any other obstructions as it may
impair the function of the system. For informa-
tion on cleaning, see > page 342.
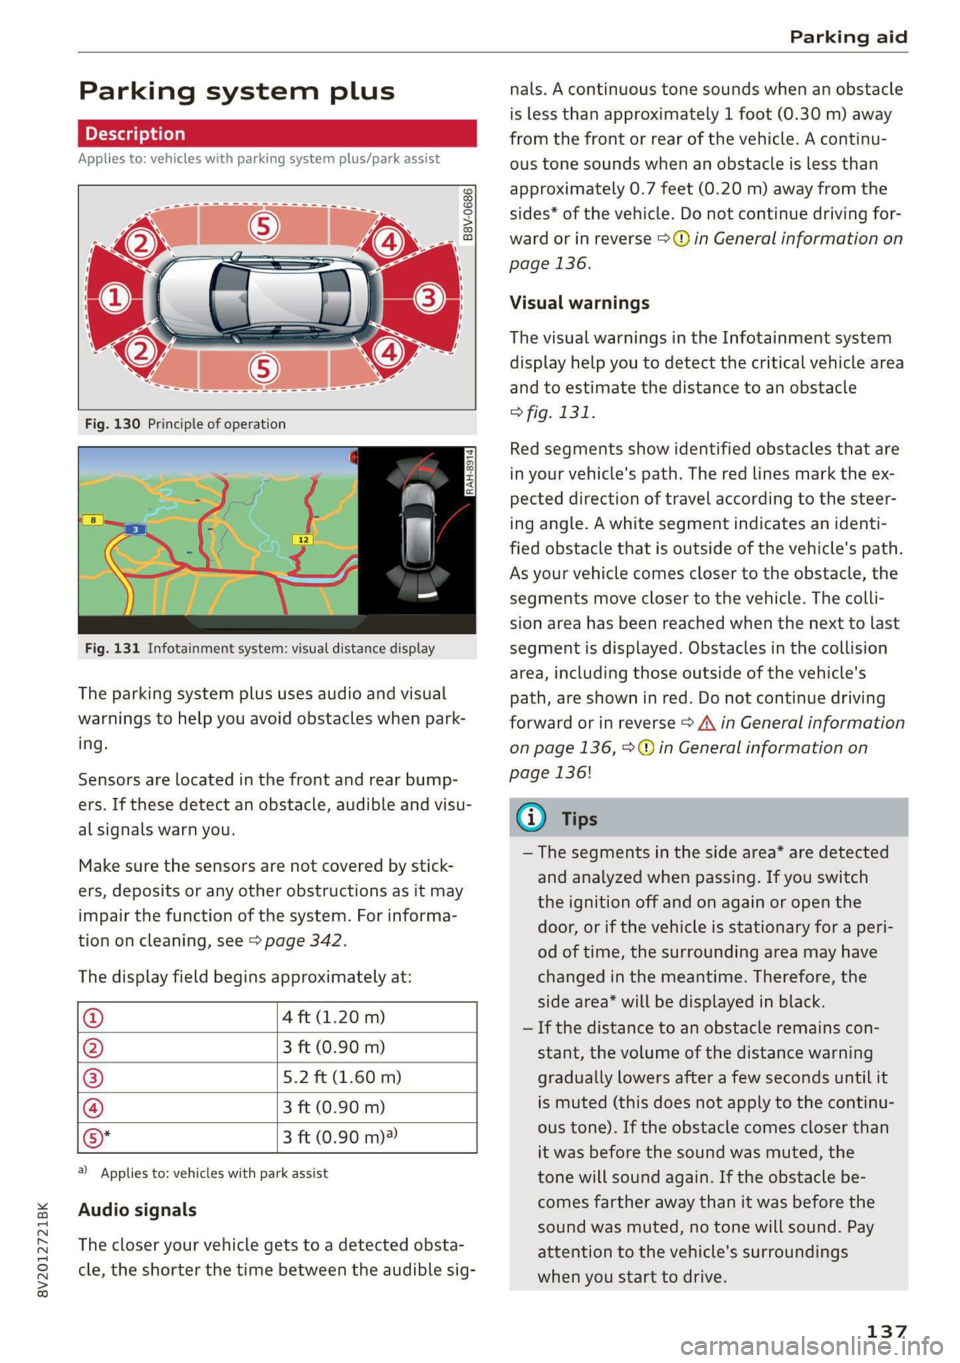
The display field begins approximately at:
@ 4 ft (1.20 m)
@ 3 ft (0.90 m)
® 5.2 ft (1.60 m)
@ 3 ft (0.90 m)
©* 3 ft (0.90 m)®
@) Applies to: vehicles with park assist
Audio signals
The closer your vehicle gets to a detected obsta-
cle, the shorter the time between the audible sig-
nals. A continuous tone sounds when an obstacle
is less than approximately 1 foot (0.30 m) away
from the front or rear of the vehicle. A continu-
ous tone sounds when an obstacle is less than
approximately 0.7 feet (0.20 m) away from the
sides* of the vehicle. Do not continue driving for-
ward or in reverse >@ in General information on
page 136.
Visual warnings
The visual warnings in the Infotainment system
display help you to detect the critical vehicle area
and to estimate the distance to an obstacle
> fig. 131.
Red segments show identified obstacles that are
in your vehicle's path. The red lines mark the ex-
pected direction of travel according to the steer-
ing angle. A white segment indicates an identi-
fied obstacle that is outside of the vehicle's path.
As your vehicle comes closer to the obstacle, the
segments move closer to the vehicle. The colli-
sion area has been reached when the next to last
segment is displayed. Obstacles in the collision
area, including those outside of the vehicle's
path, are shown in red. Do not continue driving
forward or in reverse > A\ in General information
on page 136, >@ in General information on
page 136!
G) Tips
— The segments in the side area* are detected
and analyzed when passing. If you switch
the ignition off and on again or open the
door, or if the vehicle is stationary for a peri-
od of time, the surrounding area may have
changed in the meantime. Therefore, the
side area* will be displayed in black.
— If the distance to an obstacle remains con-
stant, the volume of the distance warning
gradually lowers after a few seconds until it
is muted (this does not apply to the continu-
ous tone). If the obstacle comes closer than
it was before the sound was muted, the
tone will sound again. If the obstacle be-
comes farther away than it was before the
sound was muted, no tone will sound. Pay
attention to the vehicle's surroundings
when you start to drive.
137
Page 141 of 400
8V2012721BK
Parking aid
The rearview camera is located above the rear li-
cense plate bracket. Make sure that the lens for
the parking system > fig. 135 is not covered by
deposits or any other obstructions because this
can affect the function of the parking system. For
information on cleaning, see > page 342.
The rearview camera coverage area includes ()
> fig. 134. Only this area is shown in the Info-
tainment display. Objects that are in area Q),
which is not covered, are not displayed.
Z\ WARNING
— Always read and follow the applicable warn-
ings > A\ in General information on
page 136.
— If the position and the installation angle of
the rearview camera was changed, for exam-
ple after a collision, do not continue to use
the system for safety reasons. Have it
checked by an authorized Audi dealer or au-
thorized Audi Service Facility.
— Only use the rearview camera to assist you if
it shows a good, clear picture. For example,
the image may be affected by the sun shin-
ing into the lens, dirt on the lens, or if there
is a malfunction.
— Use the rearview camera only if the luggage
compartment lid is completely closed. If the
luggage compartment lid is open the orien-
tation lines and blue surfaces are hidden.
Make sure any objects you may have mount-
ed on the luggage compartment lid do not
block the rearview camera.
— The camera lens enlarges and distorts the
field of vision. The object appears both al-
tered and inaccurate on the screen.
—Incertain situations, people or objects in
the display appear closer or farther away:
— For objects that do not touch the ground,
such as the bumper of a parked vehicle, a
trailer hitch or the rear of a truck. Do not
use the
orientation lines in this case.
—If driven from a level surface onto an in-
cline, or a downward slope.
— If driven toward protruding objects.
— If the vehicle is carrying too much load in
the rear.
CG) Note
— Always read and follow the applicable warn-
ings >@ in General information on
page 136.
— The orange-colored orientation lines in the
Infotainment display show the vehicle path
based on the steering wheel angle. The
front of the vehicle swings out more than
the rear of the vehicle. Maintain plenty of
distance so that an exterior mirror or a cor-
ner of the vehicle does not collide with any
obstacles.
Sct Remo
Applies to: vehicles with rearview camera
Switching on and off
Requirement: the vehicle speed must be under
approximately 6 mph (10 km/h).
> Press the Pv button in the center console. A
short confirmation tone sounds and the LED in
the button turns on.
Switching on automatically
The system switches on automatically when re-
verse gear is engaged while the engine is run-
ning.
Switching off automatically
The system switches off automatically when driv-
ing forward faster than 6 mph (10 km/h).
@) Tips
— The visual display* in the right section of the
display should help you detect the critical
vehicle area.
— You can change the volume of the signals
and the display > page 144.
139
Page 143 of 400
8V2012721BK
Parking aid
system. For information on cleaning, see
=> page 342.
When parking spaces are small, the parking sys-
tem signals a continuous tone when an obstacle
is less than approximately 0.7 feet (0.20 m)
away. Do not continue driving farther.
Z\ WARNING
— Always read and follow the applicable warn-
ings > A\ in General information on
page 136.
— Please note that park assist only controls
the steering. The driver is always responsi-
ble for braking and accelerating.
— The driver must decide if the parking space
displayed is suitable for the vehicle.
— The vehicle will change position when park-
ing. Make sure you do not endanger any oth-
er drivers.
— When using park assist to drive into or out
of a parking space, the steering wheel turns
quickly on its own. Reaching into the steer-
ing wheel spokes while this is happening can
result in injury.
@) Note
— Always read and follow the applicable warn-
ings >@ in General information on
page 136.
— Park assist guides the vehicle either away
from curbs or onto them if other vehicles
are parked on the curb. Make sure that your
vehicle's tires and rims are not damaged.
Take over steering at the right time.
— Certain conditions around the parking space
may result in the vehicle not being parked
as expected.
— Objects such as pillars or posts.
— Ground covering such as gravel, snow or
Ices
@) Tips
— The Electronic Stabilization Control (ESC)
must not be switched off during the parking
process > page 94.
— Parking in tight curves with park assist is
not possible.
SY iicealiaremelilie Rela
Applies to: vehicles with park assist
B8V-0644
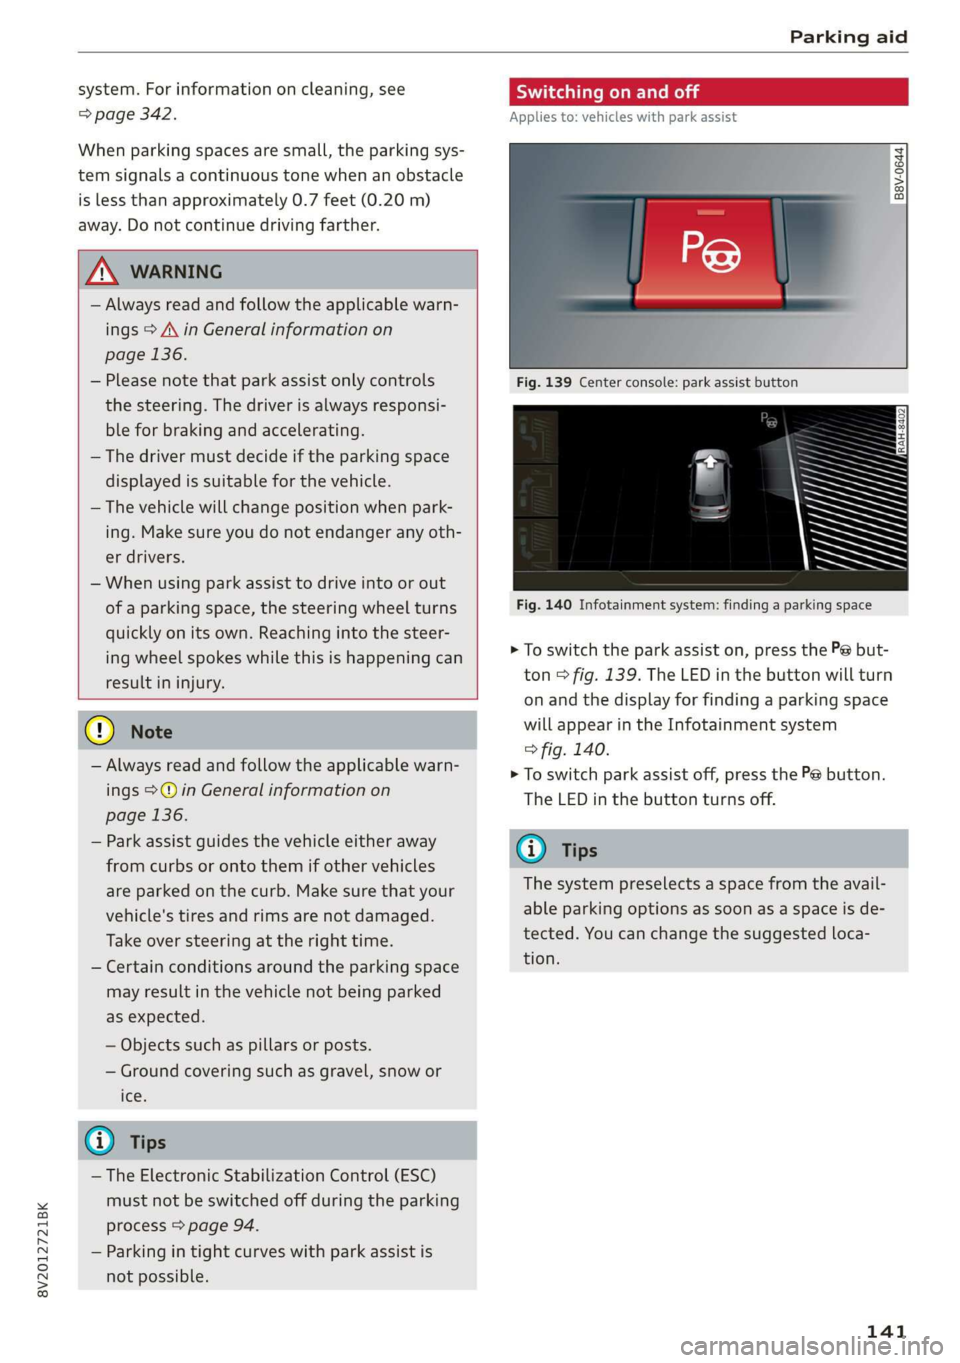
Fig. 140 Infotainment system: finding a parking space
> To switch the park assist on, press the P@ but-
ton > fig. 139. The LED in the button will turn
on and the display for finding a parking space
will appear in the Infotainment system
> fig. 140.
> To switch park assist off, press the Pe button.
The
LED in the button turns off.
@ Tips
The system preselects a space from the avail-
able parking options as soon as a space is de-
tected. You can change the suggested loca-
tion.
141
Page 145 of 400
8V2012721BK
Parking aid
> Pay attention to the path of the vehicle. When
the traffic situation allows, press the accelera-
tor pedal accordingly > A\ in Description on
page 141, >@) in Description on page 141.
> Follow the visual instructions and the warning
tones until the parking process has ended. The
arrows on the vehicle indicate the necessary di-
rection of travel.
Park assist automatically steers the vehicle into
the parking space while the driver presses the
pedals. The maximum parking speed is 4 mph
(7 km/h).
Interrupting the park assist
If the speed is too high and you take over steer-
ing, park assist switches off. To continue parking,
press the Pe button again. The park assist indica-
tor appears again in the display.
G) Tips
You can also cancel the direction of travel
specified by the system by switching between
forward and reverse gears. Based on the posi-
tion of the vehicle, the system then calculates
the additional steering and driving directions
for maneuvering.
Driving out of a parallel parking space
Applies to: vehicles with park assist
The responsibility is with the driver when leaving
a parking space.
If you parked the vehicle in a parallel parking
space, park assist can help you drive out of it.
> Start the engine.
> Press the Pe button > page 141, fig. 139.
> Wait until a message appears that requests the
direction to travel in for exiting the parking
space.
> Activate the appropriate turn signal. The mes-
sage Start automatic unparking procedure ap-
pears.
» Remove your hands from the steering wheel.
> Press the control knob to start the procedure
for exiting the parking space.
> Pay attention to the path of the vehicle. When
the traffic situation allows, press the accelera-
tor pedal accordingly > A\ in Description on
page 141, >@) in Description on page 141.
> Follow the visual instructions > page 143 and
the warning tones until the vehicle has finished
exiting the parking space.
> Drive in the direction indicated by the arrows on
the vehicle.
> The procedure has ended when additional cor-
rective movements are no longer necessary.
Take over steering.
Park assist automatically steers the vehicle out of
the parking space while the driver presses the
pedals. The maximum speed for exiting a parking
space is 3 mph (5 km/h).
Interrupting the park assist
If the speed is too high and you take over steer-
ing, park assist switches off. To continue exiting
the parking space, switch the engine off and on.
Then press the Pe button again. Otherwise, leave
the parking space without using park assist.
Messages
Applies to: vehicles with park assist
Park assist: canceled. Steering input by driv-
er. Please take over steering!
Park assist was canceled because the driver took
over steering. To continue parking, press the
button again.
ro" Park assist: time limit exceeded
& Park assist: canceled. Time limit exceeded.
Take over steering!
The parking process was not completed within
approximately six minutes of activating park as-
sist. To continue parking, press the Pe button
again.
Park assist: canceled. Speed too high. Please
take over steering!
The speed entering the parking space is too high.
Drive no faster than 4 mph (7 km/h).
Park assist: canceled. Stabilization control
(ESC) input. Please take over steering!
143
Page 148 of 400
Multi Media Interface
Multi Media Interface
Traffic safety
information
Audi recommends performing certain Infotain-
ment system functions, such as entering a desti-
nation, only when the vehicle is stationary. Al-
ways be prepared to stop operating the Infotain-
ment system in the interest of your safety and
the safety of other road users.
Z\ WARNING
Only use the Infotainment system when road,
traffic, weather, and visibility conditions per-
mit and always in a way that allows you to
maintain complete control over your vehicle.
@ Tips
Certain functions are not available while driv-
ing.
Introduction
[RAH-8837
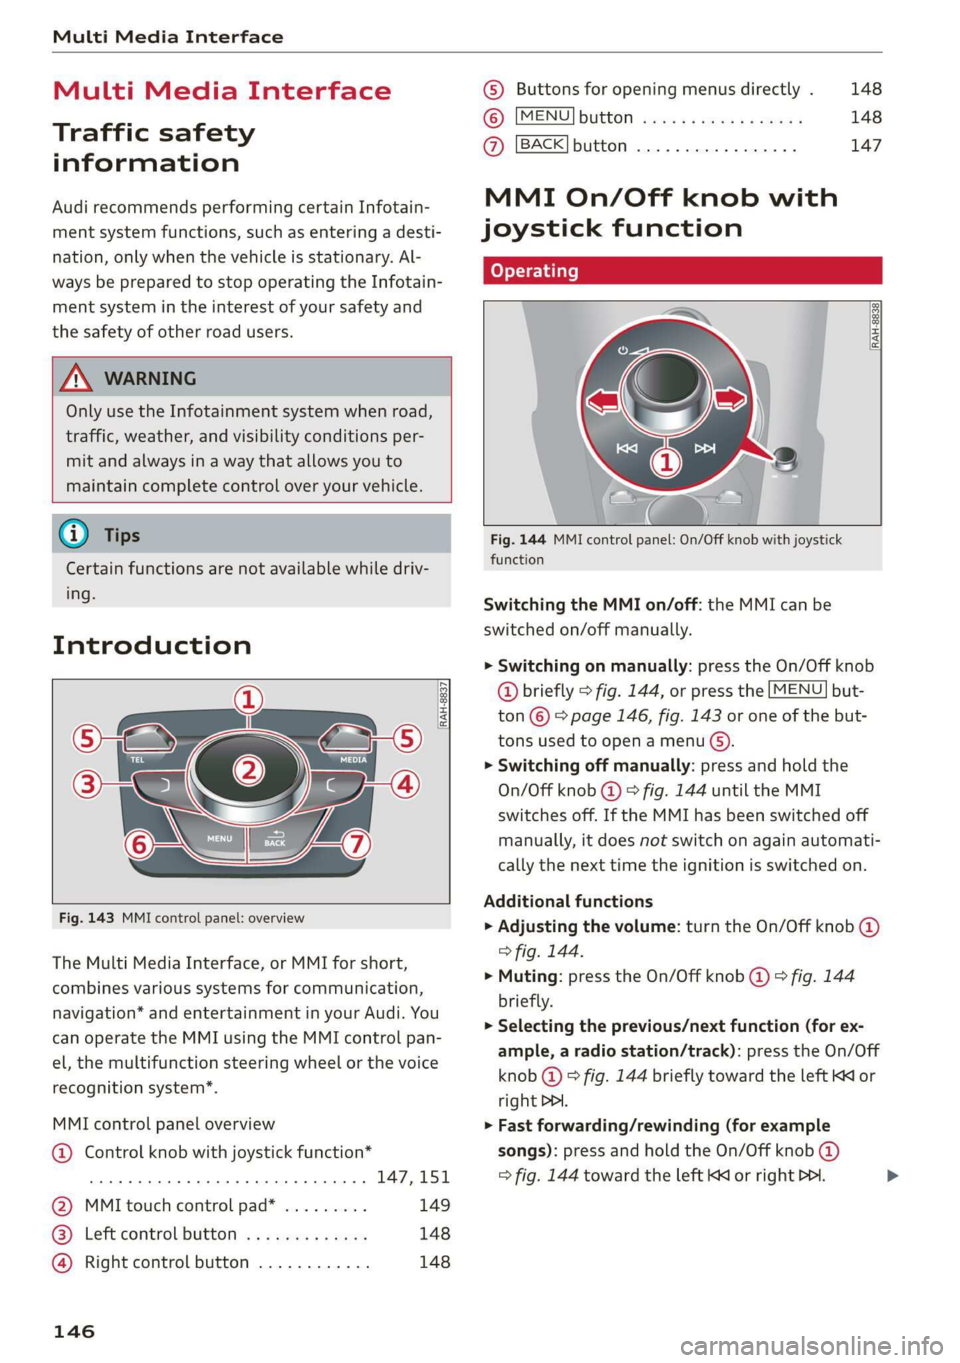
Fig. 143 MMI control panel: overview
The Multi Media Interface, or MMI for short,
combines various systems for communication,
navigation* and entertainment in your Audi. You
can operate the MMI using the MMI control pan-
el, the multifunction steering wheel or the voice
recognition system”.
MMI control panel overview
@ Control knob with joystick function*
eee teen eee 147,151
@ MMI touch control pad* ......... 149
® Left control button ............. 148
@ Right control button ............ 148
146
© Buttons for opening menus directly . 148
(6): [MENU] button suis se cas as sees 148
@ [BACK] button .... 2. 147
MMI On/Off knob with
joystick function
(ey YTelatare)
[RAH-8838,
Fig. 144 MMI control panel: On/Off knob with joystick
function
Switching the MMI on/off: the MMI can be
switched on/off manually.
> Switching on manually: press the On/Off knob
@ briefly > fig. 144, or press the [MENU] but-
ton © © page 146, fig. 143 or one of the but-
tons used to open a menu G).
> Switching off manually: press and hold the
On/Off knob @) > fig. 144 until the MMI
switches off. If the MMI has been switched off
manually, it does not switch on again automati-
cally the next time the ignition is switched on.
Additional functions
> Adjusting the volume: turn the On/Off knob @)
> fig. 144.
> Muting: press the On/Off knob @) ° fig. 144
briefly.
> Selecting the previous/next function (for ex-
ample, a radio station/track): press the On/Off
knob @ ® fig. 144 briefly toward the left KK or
right DDI.
> Fast forwarding/rewinding (for example
songs): press and hold the On/Off knob @)
=> fig. 144 toward the left Kd or right Po. >
Page 149 of 400
8V2012721BK
Multi Media Interface
ZA\ WARNING
To reduce the risk of an accident, adjust the
volume of the audio systems so that signals
outside of the vehicle, such as police and fire
sirens, can be heard easily at all times.
G) Tips
The MMI switches off automatically if the en-
gine is not running and the vehicle battery is
low.
Infotainment system
display
SY iieiemly Aol ai
The Infotainment system display automatically
extends and retracts when you switch the igni-
tion on and off.
> When it is extended, press the [@! button to
switch the Infotainment system display on or
off.
When the MMI is switched on and the display is
switched off, you can operate certain functions
using the On/Off knob with the MMI joystick
function > page 146.
@ Tips
There may be delays when switching on the
display.
MMI operation
Selecting and confirming a function
cy
= x
ce|
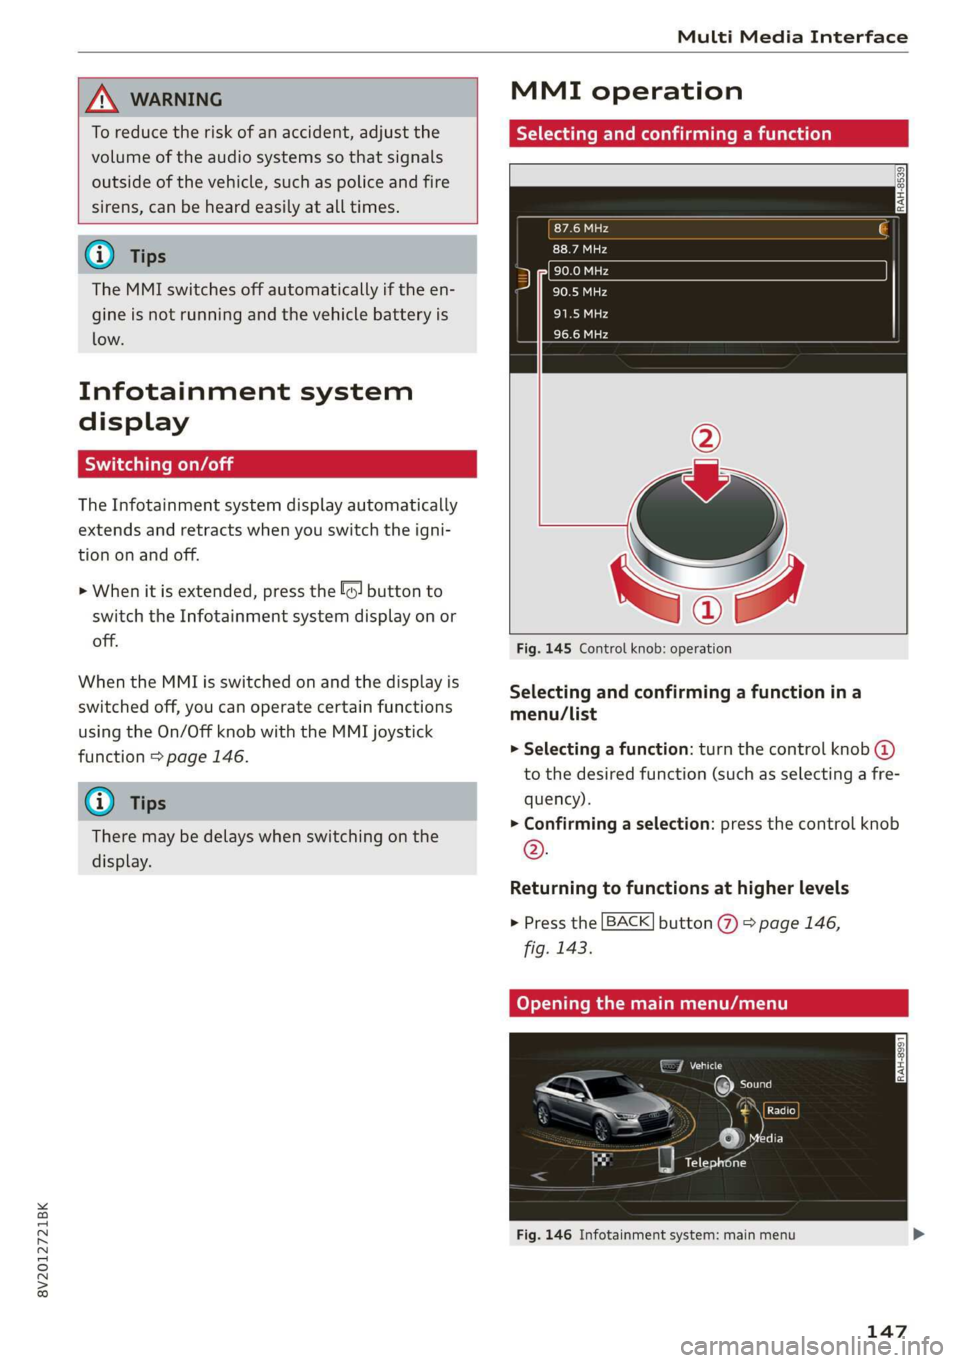
Fig. 145 Control knob: operation
Selecting and confirming a function in a
menu/list
> Selecting a function: turn the control knob @)
to the desired function (such as selecting a fre-
quency).
> Confirming a selection: press the control knob
©.
Returning to functions at higher levels
> Press the [BACK] button %) > page 146,
fig. 143.
Coy eY nema Anal)
Fig. 146 Infotainment system: main menu
147
Page 159 of 400

8V2012721BK
Multifunction steering wheel
Multifunction steering
wheel
Introduction
Applies to: vehicles with multifunction steering wheel
In the driver information system display, you can
control numerous Infotainment functions using
the multifunction steering wheel plus* > page 17
or the multifunction steering wheel* > page 20.
You can control additional Infotainment func-
tions using the MMI control panel > page 146 in
the Infotainment system display.
ZA WARNING
Direct your full attention to driving. As the
driver, you have complete responsibility for
safety in traffic. Only use the functions in such
a way that you always maintain complete con-
trol over your vehicle in all traffic situations.
Radio
Applies to: vehicles with multifunction steering wheel and ra-
dio
Requirement: radio mode must be started
= page 206 and the radio/media tab must be dis-
played.
> Press either the =lIbutton or the left control
button > page 18, depending on vehicle equip-
ment.
Depending on vehicle equipment, the following
functions
may be available in the driver informa-
tion system.
— Selecting the frequency band: select and con-
firm a frequency band.
— Selecting a station from the presets list*: se-
lect: Presets > the desired radio station.
— Selecting a station from the station list*: se-
lect and confirm a radio station.
— Selecting a station from the presets list: se-
lect: Presets > the desired radio station.
— Opening a media source: select and confirm To
media.
Additional settings
Applies to: vehicles with Audi virtual cockpit
— Select: right control button > desired entry.
Depending on the function selected, the follow-
ing additional settings may be possible:
— Show "Now Playing" screen: see > page 210.
Media
Applies to: vehicles with multifunction steering wheel and
media
Requirement: a media drive must contain audio/
video files > page 212 and the radio/media tab
must be displayed.
> Press either the [=lbutton or the left control
button > page 18, depending on vehicle equip-
ment.
Depending on vehicle equipment, the following
functions may be available in the driver informa-
tion system.
— Selecting a media source: select and confirma
source such as the “SD card”.
— Playing an audio/video file: select and confirm
a track/file.
— Pausing/resuming playback: press the right
thumbwheel @) > page 19, fig. 13. To resume
playback, press the right thumbwheel again.
Applies to: vehicles with analog instrument cluster
— Switching to radio: select and confirm a fre-
quency band (such as FM).
Applies to: vehicles with Audi virtual cockpit
— Switching to the radio: select and confirm
Switch to radio.
— Opening additional track information: select:
right
control button > Show "Now Playing"
screen. For additional information, see
=> page 222.
@) Tips
— The media drives do not play files that are
protected by DRM and that are identified
with the symbol ff.
— Please note that within a media source in
the driver information system, only playlists
that were selected through the MMI control
panel can be played = page 220.
157
>