Page 17 of 198
–12–
Exercise 4: Trolling speed maneuvering
Objective:
This exercise familiarizes you with the watercraft’s handling characteristics at trolling
speed. It teaches techniques you will use when beaching, docking, or approaching
objects.
Skills:
Starting and turning at trolling speed.
Directions:
Drill 1: Moving straight and turning at trolling speed
1. Board the watercraft, and check for people, objects and other watercraft.
2. Start the engine and go straight ahead.
3. Begin to turn, making a large figure eight about 15–21 m (50–70 ft) long. Do not apply
throttle.
Drill 2: Making full-lock turns at trolling speed
1. Turn the handlebars as far as possible in either direction. Allow the watercraft to turn
360°.
2. Practice turning both clockwise and counterclockwise to get a feel for how the water-
craft responds to handlebar movement.
F4L-T70-forPrint.book Page 12 Friday, July 13, 2018 11:00 AM
Page 18 of 198
–13–
Exercise 5: Sub-planing speed maneuvering
Objective:
This exercise shows you how to move ahead, turn in small circles, and combine the two
maneuvers to make a figure eight.
Skills:
Throttle control and slow to medium speed turning.
Directions:
Steering
Your watercraft is steered by a combination of applying throttle and turning the handle-
bars 1. When the handlebars are turned, the angle of the jet thrust nozzle 2 at the stern is
changed, which changes the direction of the watercraft.
Since the strength of the jet thrust determines the speed and direction of a turn, the
throttle must always be open when attempting a turn, except at trolling speed.
F4L-T70-forPrint.book Page 13 Friday, July 13, 2018 11:00 AM
Page 19 of 198

–14–
Exercise 5: Sub-planing speed maneuvering
Stopping
The watercraft is not equipped with a separate braking system. The watercraft slows
down by water resistance or, when operating in reverse, by the water jet. The watercraft
slows down as soon as the throttle lever is released, but will coast for a distance before
fully stopping. If you are not sure you can stop in time before hitting an obstacle, apply
throttle and turn in another direction.
From full speed, the watercraft comes to a complete stop due to water resistance in
approximately 100 m (330 ft) after the throttle lever is released or the engine is stopped,
although this distance will vary depending on many factors, including gross weight, water
surface conditions, and wind direction.
If the RiDE lever is squeezed to slow down, the stopping distance is approximately 30%
shorter than when the RiDE lever is not used. However, this distance will vary depending
on many factors, including gross weight, water surface conditions, and wind direction.
Drill 1: Moving forward and turning in large ovals
1. Gradually accelerate forward to sub-planing speed, and then make a gradual right turn
while maintaining your speed.
2. Repeat the drill, making a gradual left turn.
3. Repeat the drill, traveling forward and turning to make a complete oval.
F4L-T70-forPrint.book Page 14 Friday, July 13, 2018 11:00 AM
Page 20 of 198

–15–
Exercise 5: Sub-planing speed maneuvering
Drill 2: Turning in circles
1. Make large circles, turning to the right. Gradually decrease the size of the circles while
keeping your speed constant.
2. Repeat the drill, turning to the left.
Drill 3: Making a figure eight
1. Combine the above drills to make a large figure eight.
2. Repeat the drill, making the figure eight smaller each time.
Drill 4: Understanding how throttle affects turns
1. Gradually accelerate to sub-planing speed while traveling in a straight line. Release the
throttle lever and then turn the handlebars as far as possible to the right or left.
2. Notice that you have rapidly decreasing ability to turn the watercraft and that the water-
craft does not respond to handlebar input once the engine slows down after the throttle
lever is released.
3. Gradually re-apply throttle to see how the watercraft responds with throttle again.
Tips:
To make tight turns at these speeds you must apply more throttle while you are turning
the handlebars.
F4L-T70-forPrint.book Page 15 Friday, July 13, 2018 11:00 AM
Page 21 of 198

–16–
Exercise 6: Full acceleration and stopping
Objective:
This exercise teaches you how the watercraft stops.
Skills:
Stopping, operating at planing speed, and stopping from planing speed.
Directions:
Releasing the throttle completely produces only minimum thrust. Once the engine slows
down, the watercraft will no longer respond to handlebar input until you apply throttle again
or you reach a trolling speed - you need throttle to steer.
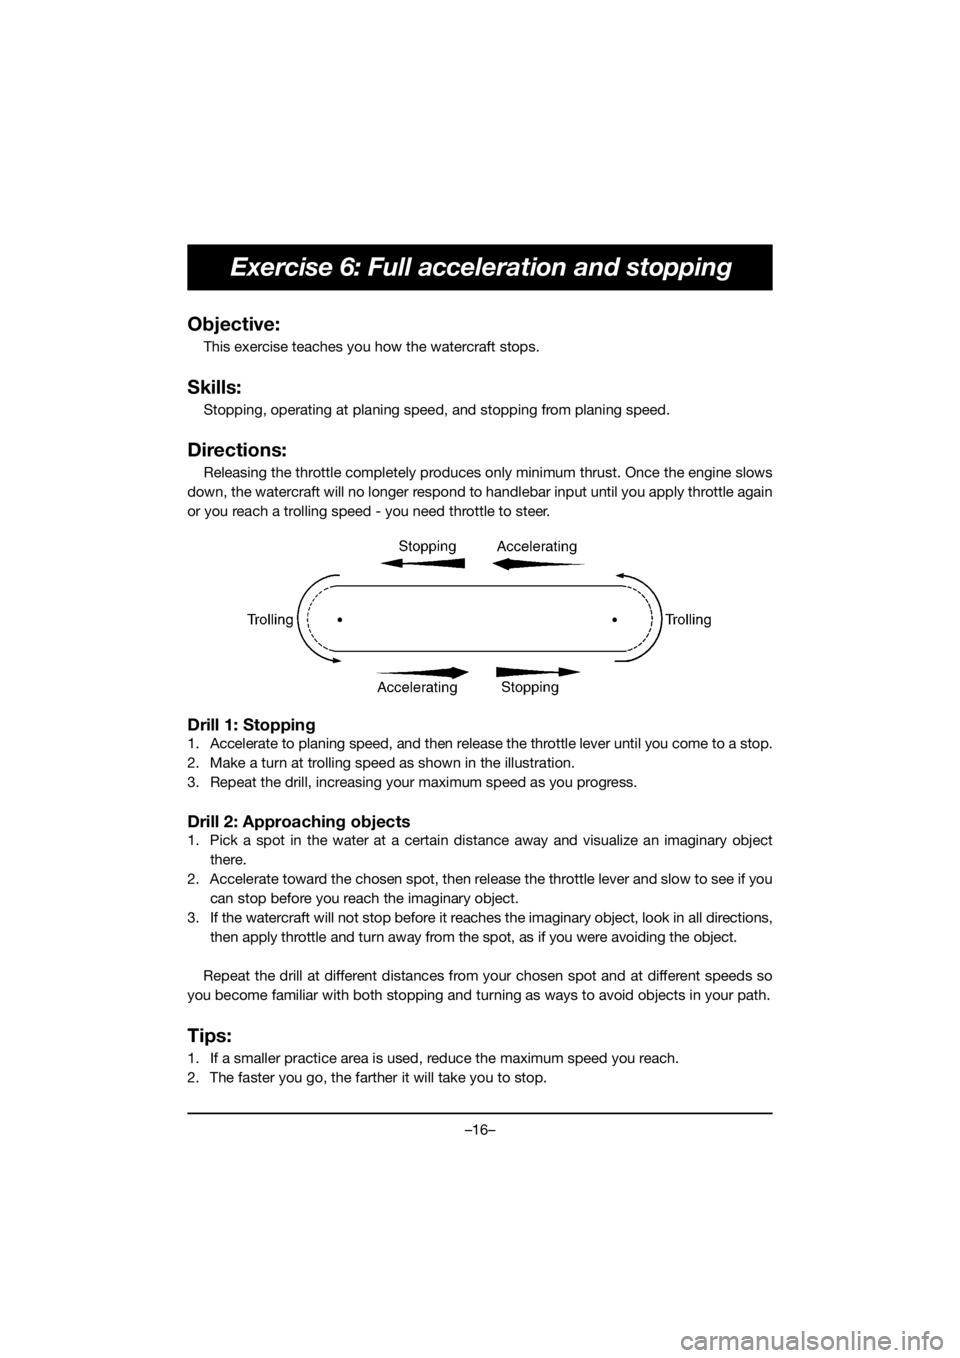
Drill 1: Stopping
1. Accelerate to planing speed, and then release the throttle lever until you come to a stop.
2. Make a turn at trolling speed as shown in the illustration.
3. Repeat the drill, increasing your maximum speed as you progress.
Drill 2: Approaching objects
1. Pick a spot in the water at a certain distance away and visualize an imaginary object
there.
2. Accelerate toward the chosen spot, then release the throttle lever and slow to see if you
can stop before you reach the imaginary object.
3. If the watercraft will not stop before it reaches the imaginary object, look in all directions,
then apply throttle and turn away from the spot, as if you were avoiding the object.
Repeat the drill at different distances from your chosen spot and at different speeds so
you become familiar with both stopping and turning as ways to avoid objects in your path.
Tips:
1. If a smaller practice area is used, reduce the maximum speed you reach.
2. The faster you go, the farther it will take you to stop.
F4L-T70-forPrint.book Page 16 Friday, July 13, 2018 11:00 AM
Page 22 of 198

–17–
Exercise 7: Planing speed operation
Objective:
This exercise teaches you how the watercraft feels and operates at higher speeds. It
also illustrates what happens when the watercraft slides or partially spins due to abrupt
high speed turning.
Skills:
Throttle control, turning, shifting weight, and sliding.
Directions:
Because of the high speeds involved, do this exercise in a very large area, in open, calm
water free of traffic or other obstacles.
Remember, you need throttle to steer.
Drill 1: Turning at planing speed
1. Accelerate to planing speed, and then make a turn.
2. Practice making ovals using right and left turns.
3. Repeat the drill, starting with gradual turns and slower speeds, and then working up as
your skill and confidence build.
You will notice how the watercraft no longer “carves” its turns as it did at sub-planing
speed.
The watercraft can only make so sharp a turn at any given planing speed.
When the handlebars are turned more than is necessary, the watercraft may start sliding
and may not turn any more sharply. This is because when the watercraft is sliding there is
less water going into the jet intake, and steering thrust is reduced because less water is
discharged from the jet thrust nozzle.
As a result, the watercraft starts to slow down and turns more gradually. Returning the
handlebars to a less extreme position allows the watercraft to resume normal turning.
F4L-T70-forPrint.book Page 17 Friday, July 13, 2018 11:00 AM
Page 23 of 198
–18–
Exercise 7: Planing speed operation
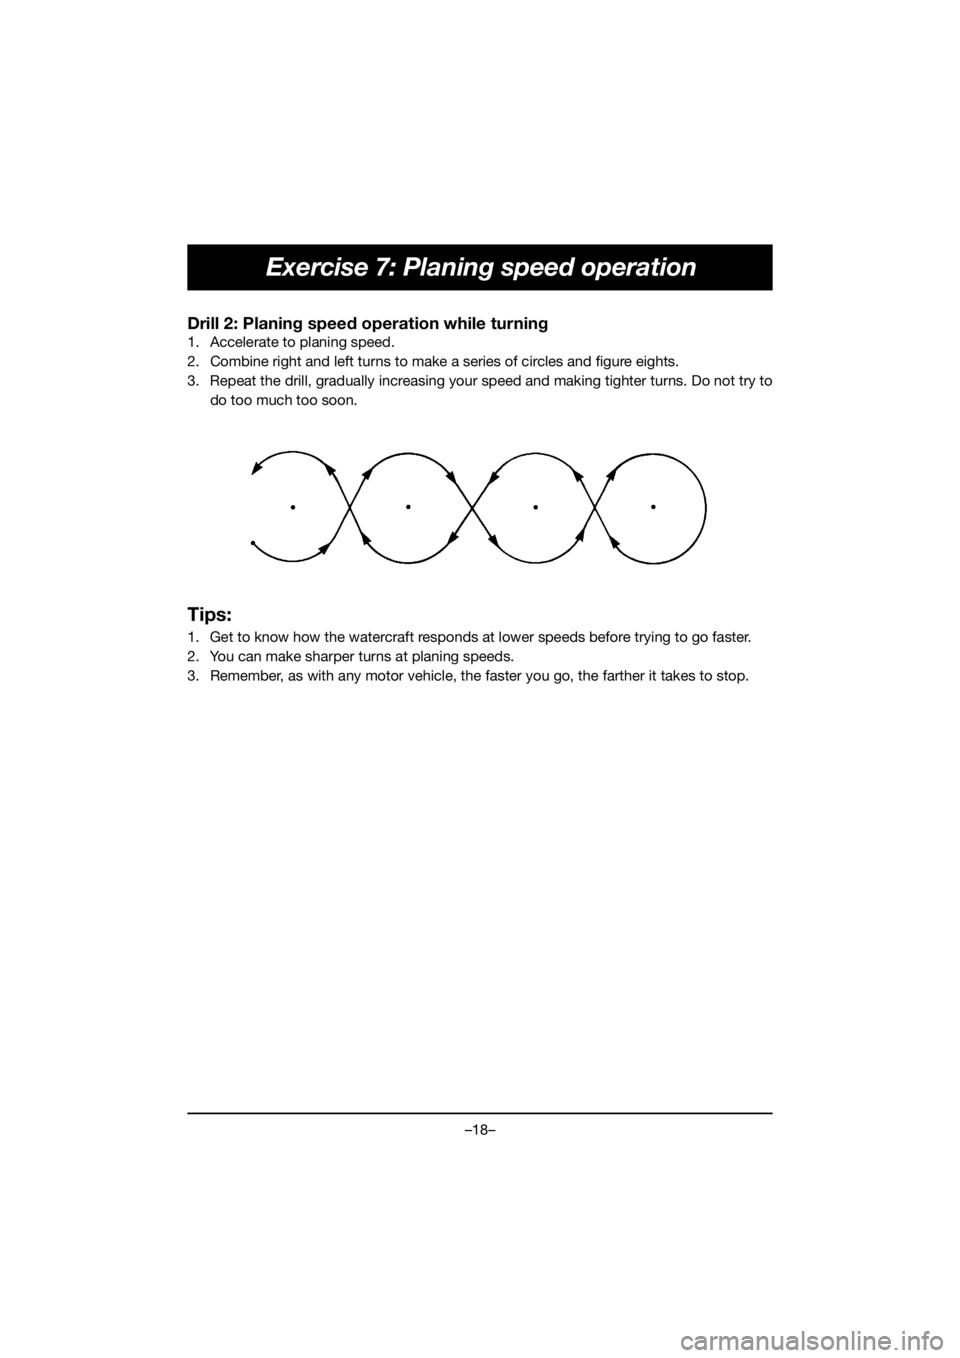
Drill 2: Planing speed operation while turning
1. Accelerate to planing speed.
2. Combine right and left turns to make a series of circles and figure eights.
3. Repeat the drill, gradually increasing your speed and making tighter turns. Do not try to
do too much too soon.
Tips:
1. Get to know how the watercraft responds at lower speeds before trying to go faster.
2. You can make sharper turns at planing speeds.
3. Remember, as with any motor vehicle, the faster you go, the farther it takes to stop.
F4L-T70-forPrint.book Page 18 Friday, July 13, 2018 11:00 AM
Page 24 of 198

–19–
Exercise 8: Crossing wakes and swells
You will not always have flat, smooth water to ride on. There will be swells, wakes from
other boats, etc. We cannot give you a drill to practice as in the earlier lessons, but we can
give you some information to help you when you encounter swells and wakes.
The best way to cross wakes and swells is with the least jolt to you and the watercraft.
Small swells are not as difficult to cross as larger swells or wakes.
Crossing a sharp wake gives more of a jolt than a broad swell.
To cross a wake or swell, change your speed and choose the angle at which you cross
the wake or swell. Usually, a slower speed and “quartering” the wake (crossing at an angle)
will reduce the jolt.
Two other things you may notice as you ride.
The first is that crossing a group of wakes or swells is not as easy or smooth as crossing
just one wake.
The second is that when you quarter the wake or swell the watercraft will try to steer
away from the wake or swell.
When crossing at a 45° angle, you may not notice this, but at a smaller angle, say 10°, it
can be very strong. Be prepared to steer and balance as necessary.
Tips:
1. Grip the handlebars firmly and keep both feet on the floor of the footwell at all times.
2. Reduce speed before crossing the wake or swell.
3. “Quarter” the wake or swell.
4. When going over wakes, raise your body off the seat slightly and absorb the shock with
your knees.
5. Do not operate the watercraft with your chin or chest right above the handlebars. It is
possible for the operator to hit his or her chest or jaw on the watercraft body or handle-
bars and be injured.
6. Do not operate in rough water.
7. Do not operate in bad weather.
F4L-T70-forPrint.book Page 19 Friday, July 13, 2018 11:00 AM