2019 VOLVO S60 TWIN ENGINE brake light
[x] Cancel search: brake lightPage 437 of 645

STARTING AND DRIVING
}}
* Option/accessory.435
Follow applicable regulations regarding per-mitted speed and weight.
Drive slowly when towing a trailer up a longand steep incline.
The maximum trailer weights given only applyto altitudes up to 1000 meters (3280 feet)above sea level. At higher altitudes, enginepower (and thus the vehicle's climbing ability)is decreased due to the reduced air density,and the maximum trailer weight must there-fore be reduced. The weight of the vehicleand trailer must be decreased by 10% foreach additional 1000 m (3280 feet) or partthereof.
Avoid driving with a trailer on inclines of morethan 12%.
Avoid overloading and other incorrect use.
The trailer's brakes must be balanced withthe vehicle's brakes to help ensure safestops (follow applicable local regulations).
CAUTION
Bumper-attached trailer hitches must notbe used on Volvos, nor should safetychains be attached to the bumper.
Trailer hitches attaching to the vehiclerear axle must not be used.
Never connect a trailer's hydraulic brakesystem directly to the vehicle brake sys-tem, nor a trailer's lighting system directlyto the vehicle lighting system. Consultyour nearest authorized Volvo retailer forcorrect installation.
When towing a trailer, the trailer's safetychains or wire must be correctly fastenedto the attachment points provided in thetrailer hitch on the vehicle. The safetychain or wire must never be fastened toor wound around the towing ball.
NOTE
The optional detachable trailer hitch may notbe available in all markets or on all models.Consult your Volvo retailer.
NOTE
Extreme weather conditions, towing a trailer,high altitude and lower fuel grade than rec-ommended are factors that can significantlyincrease the vehicle's fuel consumption.
Trailer weights
WARNING
Please adhere to the recommendations provi-ded for trailer weight. If the recommendationsare not followed, the vehicle and trailer maybe difficult to control during evasive maneu-vers and braking.
NOTE
The specified maximum trailer weights arethose permitted by Volvo. National vehicleregulations may set additional restrictions ontrailer weight and speed. The trailer hitchesmay be certified for higher towing weightsthan the vehicle is permitted to tow.
Self-leveling suspension *
The vehicle's self-leveling system attempts tokeep the vehicle at a constant level, regardless ofload (up to the maximum permitted weight).When the vehicle is stationary, the rear end of thevehicle will be slightly lowered, which is normal.
Driving in hilly terrain or hot weather
In certain conditions, there is a risk of overheat-ing when driving with a trailer. If overheating ofthe engine and drive system is detected, a warn-ing symbol will illuminate in the instrument paneland a message will appear.
Page 438 of 645

||
STARTING AND DRIVING
* Option/accessory.436
The automatic transmission selects the optimalgear for the current load and engine speed.
Steep inclines
Do not lock the automatic transmission into ahigher gear than what the engine can handle ‒ itis not always preferable to drive in high gears atlow rpm.
Parking on a hill
1. Depress the brake pedal.
2. Apply the parking brake.
3.Put the gear selector in P.
4. Release the brake pedal.
Put chocks behind the wheels when the vehicleis parked on a hill with a trailer attached.
Starting on a hill
1. Depress the brake pedal.
2.Put the gear selector in D.
3. Release the parking brake.
4. Release the brake pedal and start driving.
Related information
Trailer Stability Assist* (p. 436)
Checking trailer lights (p. 437)
Towing capacity and tongue weight (p. 618)
Overheating of engine and transmission(p. 431)
Trailer Stability Assist*
Trailer Stability Assist (TSA12) is a functiondesigned to help stabilize a vehicle that is tow-ing a trailer when the vehicle and trailer havebegun to sway. The function is part of the Elec-
tronic Stability Control system ESC13.
Reasons for swaying
A vehicle towing a trailer may begin to sway forvarious reasons. Normally this only occurs at highspeeds. However, if the trailer is overloaded orunevenly distributed, e.g. too far back, there is arisk of swaying even at low speeds.
Swaying may be caused by factors such as:
The vehicle and trailer are hit by a sudden,strong crosswind.
The vehicle and trailer are traveling on anuneven road or over a bump.
Sudden movements of the steering wheel.
Once swaying has begun, it can be difficult orimpossible to stop it. This makes the vehicle andtrailer difficult to control and there is a risk ofswerving into oncoming traffic or driving off theroad.
Trailer Stability Assist function
Trailer Stability Assist continuously monitors thevehicle's movements, particularly lateral move-
ments. If swaying is detected, the brakes areapplied individually on the front wheels, which hasa stabilizing effect on the vehicle and trailer. Thisis often enough to enable the driver to regaincontrol of the vehicle.
If the Trailer Stability Assist function's firstattempt is not adequate to stop the swayingmotion, the brakes are applied on all wheels andengine power is temporarily reduced. As theswaying motion begins to decrease and the vehi-cle and trailer have once again become stable,TSA stops regulating the brakes/engine powerand the driver regains control of the vehicle.
NOTE
Trailer Stability Assist is deactivated if thedriver selects the sport mode by deactivatingESC in the center display's menu system.
Trailer Stability Assist may not intervene if thedriver tries to compensate for the swaying motionby moving the steering wheel rapidly, becausethe system will then not be able to determine if itis the trailer or the driver causing the swaying.
12Trailer Stability Assist13Electronic Stability Control
Page 439 of 645

STARTING AND DRIVING
}}
* Option/accessory.437
When Trailer Stability Assist isactivated, the ESC symbol isdisplayed in the instrumentpanel.
Related information
Driving with a trailer (p. 434)
Electronic Stability Control (p. 261)
Checking trailer lights
When connecting a trailer, make sure that all ofthe lights on the trailer are functioning beforestarting to drive.
Trailer turn signals and brake lights
If one or more of the turn signals or brake lightson the trailer is not working, a symbol and mes-sage will be displayed in the instrument panel.The other lights on the trailer must be checkedmanually by the driver before the vehicle is driven.
SymbolMessage
Trailer turn indicator Rightturn indicator malfunction
Trailer turn indicator Leftturn indicator malfunction
Trailer brake light Malfunc-tion
If any of the trailer's turn signal lights is not work-ing, the turn signal symbol in the instrumentpanel will also flash more quickly than normal.
Trailer rear fog light
When a trailer is connected, the vehicle's rear foglight may not illuminate and rear fog light func-tionality is instead transferred to the trailer. If thisis the case, check to see if the trailer is equippedwith a rear fog light before activating the vehicle's
fog lights when driving with a trailer to helpensure safe operation.
Checking trailer lights *
Automatic check
When the trailer has been connected to the vehi-cle's electrical system, its lights can be checkedby automatically activating them. This functionhelps the driver check that the trailer's lights arefunctioning correctly before starting to drive.
In order to perform this check, the vehicle mustbe switched off.
1. When a trailer is connected to the towbar,the message Automatic Trailer LampCheck will appear in the instrument panel.
2.Acknowledge the message by pressing theO button on the right-side steering wheelkeypad.
> The light check will begin.
3. Get out of the vehicle to perform the check.
> All of the lights on the trailer will beginflashing, and then illuminate separatelyone at a time.
4. Visually check that all of the trailer's lightsare functioning correctly.
5. After a short time, all of the trailer's lights willstart flashing again.
> The light check is completed.
Page 586 of 645

||
MAINTENANCE AND SERVICE
* Option/accessory.584
FunctionAmpere
––
––
––
––
––
Headlight washers*25
Windshield washer25
––
Horn20
Alarm siren*5
Brake system control module(valves, parking brake)40
Wipers30
––
––
Parking heater*20
Brake system control module(ABS pump)40
FunctionAmpere
––
––
Fed when ignition is on:Engine control module; trans-mission components, electricalpower steering, central electri-cal module
5
Exterior vehicle sound (certainmarkets)5
Right-side headlight7.5
Right-side headlight, some
models with LEDA15
––
––
––
Airbags5
Left-side headlight7.5
Left-side headlight, some
models with LEDA15
Accelerator pedal sensor 5
FunctionAmpere
Transmission control module;gear selector control module15
Engine control module5
––
––
––
––
Engine control module; actua-tor; throttle unit; turbo-chargervalve
20
Solenoids; valve; engine cool-ing system thermostat10
Vacuum regulators; valve 7.5
Spoiler shutter control module;radiator shutter control mod-ule
5
––
Heated oxygen sensor, front;heated oxygen sensor, rear15
Oil pump solenoid; A/C mag-netic coupling; heated oxygensensor (center)
15
Page 589 of 645

MAINTENANCE AND SERVICE
}}
* Option/accessory.587
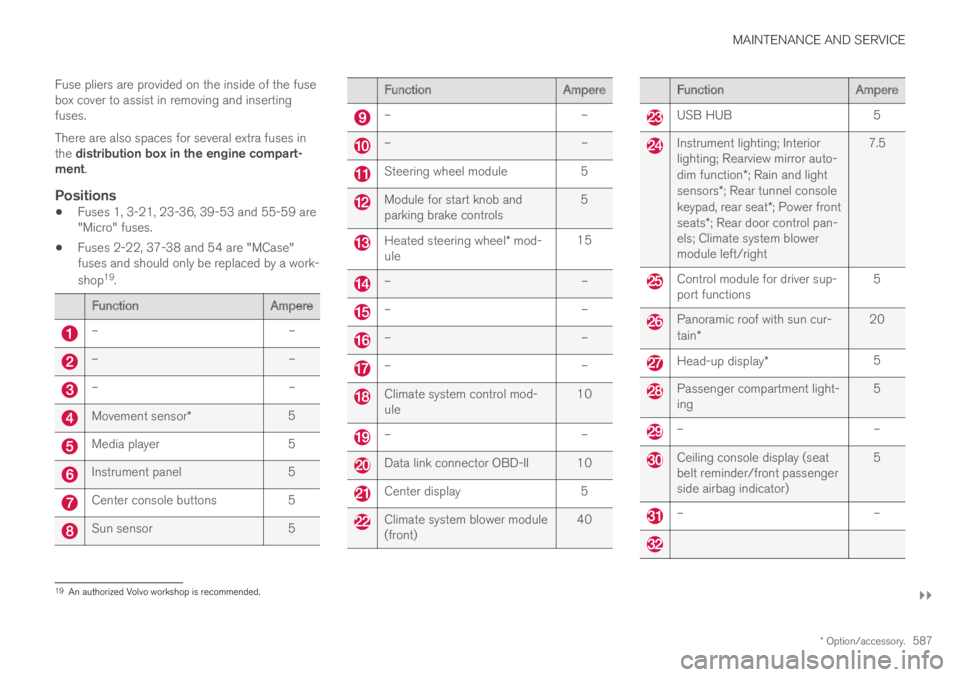
Fuse pliers are provided on the inside of the fusebox cover to assist in removing and insertingfuses.
There are also spaces for several extra fuses inthe distribution box in the engine compart-ment.
Positions
Fuses 1, 3-21, 23-36, 39-53 and 55-59 are"Micro" fuses.
Fuses 2-22, 37-38 and 54 are "MCase"fuses and should only be replaced by a work-
shop19.
FunctionAmpere
––
––
––
Movement sensor*5
Media player5
Instrument panel5
Center console buttons5
Sun sensor5
FunctionAmpere
––
––
Steering wheel module5
Module for start knob andparking brake controls5
Heated steering wheel* mod-ule15
––
––
––
––
Climate system control mod-ule10
––
Data link connector OBD-II 10
Center display5
Climate system blower module(front)40
FunctionAmpere
USB HUB5
Instrument lighting; Interiorlighting; Rearview mirror auto-dim function*; Rain and lightsensors*; Rear tunnel consolekeypad, rear seat*; Power frontseats*; Rear door control pan-els; Climate system blowermodule left/right
7.5
Control module for driver sup-port functions5
Panoramic roof with sun cur-tain*20
Head-up display*5
Passenger compartment light-ing5
––
Ceiling console display (seatbelt reminder/front passengerside airbag indicator)
5
––
19An authorized Volvo workshop is recommended.
Page 598 of 645

||
MAINTENANCE AND SERVICE
* Option/accessory.596
WARNING
Never use more than one inlay mat at atime on the driver's floor. If any other typeof floor mat is used, remove the originalmat from the driver's seat floor beforedriving. All types of mats must be securelyanchored in the attachment points in thefloor. Make sure the floor mat does notimpede the movement of the brake pedalor accelerator pedal in any way, as thiscould be a serious safety hazard.
Volvo's floor mats are specially manufac-tured for your vehicle. They must be prop-erly secured in the attachment points inthe floor to help ensure they cannot slideand become trapped under the pedals.
After vacuuming, a specially designed textilecleaning agent should be used to remove stainson floor mats. Floor mats should be cleaned withproducts recommended by Volvo retailers.
Related information
Cleaning the interior (p. 593)
Cleaning the center display (p. 593)
Cleaning fabric upholstery and ceiling liner(p. 595)
Cleaning the seat belt (p. 595)
Cleaning leather upholstery (p. 596)
Cleaning the leather steering wheel(p. 597)
Cleaning interior plastic, metal and wood sur-faces (p. 598)
Cleaning leather upholstery
Only use cleaning agents and car care productsrecommended by Volvo. Clean regularly andtreat stains immediately for best results. It isimportant to vacuum before using a cleaningagent.
Leather upholstery *
Volvo's leather upholstery is treated to protect itsoriginal appearance. Over time, sunlight, grease,dirt, etc. could break down the protective layer.This could result in scratches and cracking.
Leather upholstery is a natural product thatchanges and acquires a beautiful patina overtime. Regular cleaning and treatments arerequired to preserve the qualities and color of theleather. Volvo offers a comprehensive product,Volvo Leather Care KitWipes, for cleaning andtreating leather upholstery. When used as direc-ted, it helps preserve the leather's protective coa-ting.
For optimal results, Volvo recommends cleaningand applying protective cream one to four times ayear (or more often as needed). Volvo LeatherCare Kit 951 0251 and Volvo Leather Softener943 7429 are available for purchase at Volvoretailers.
Page 602 of 645

||
MAINTENANCE AND SERVICE
* Option/accessory.600
Wash using a sponge, car washing detergentand plenty of lukewarm water.
Clean the wiper blades with lukewarm soapsolution or car washing detergent.
Dry the vehicle using a clean, soft chamois ora squeegee. Try not to let drops of water dryin strong sunlight. This could cause waterdrying stains that may need to be polishedout.
In areas with heavy industrial emissions,more frequent washing of the vehicle's exte-rior is recommended.
Tar spots from asphalt may remain even afterwashing. Use a tar remover to remove thesespots after washing the vehicle.
WARNING
Always entrust engine washing to a workshop.If the engine is hot, there is a risk of fire.
CAUTION
Dirty headlights do not work as well. Cleanthem regularly, e.g. when refueling.
Do not use corrosive cleaners. Use water anda non-abrasive sponge.
NOTE
Exterior lighting such as headlights and tail-lights may develop temporary condensationon the inside of the lens. This is normal. Allexterior lighting is designed to resist this.Condensation is normally vented out of thelamp housing once the light has been lit forsome period of time.
CAUTION
Make sure that the panoramic roof* andsun shade are closed before washing thevehicle.
Never use abrasive polishing agents onthe panoramic roof.
Never use wax on the rubber sealsaround the panoramic roof.
CAUTION
Remember to remove dirt from the drainholes in the doors and sills after washing thevehicle.
Related information
Cleaning the exterior (p. 598)
Polishing and waxing (p. 599)
Automatic car washes (p. 601)
High-pressure washing (p. 602)
Cleaning the wiper blades (p. 602)
Cleaning exterior plastic, rubber and trimcomponents (p. 603)
Cleaning rims (p. 604)
Corrosion protection (p. 604)
Settings for automatically activating the park-ing brake (p. 402)
Page 603 of 645

MAINTENANCE AND SERVICE
601
Automatic car washes
The vehicle should be washed as soon as itbecomes dirty. This makes the vehicle easier toclean because dirt does not attach as strongly. Italso reduces the risk of scratches and keeps thevehicle looking new.
An automatic car wash is a fast and easy way tokeep your vehicle clean, but it does not reach allareas of the vehicle. For best results, Volvo rec-ommends hand washing your vehicle or supple-menting automatic car washes with a hand wash.
NOTE
Volvo recommends not washing the vehicle inan automatic car wash during the first fewmonths; the paintwork on new vehicles takessome time to fully harden.
CAUTION
Before driving the vehicle into a car wash,deactivate the Automatic Braking when Sta-tionary and Automatic Parking Brake Applica-tion functions. If the functions are not deacti-vated, the brake system will seize when thevehicle is stationary and the vehicle will not beable to roll.
CAUTION
For automatic car washes in which the vehicleis pulled forward on rolling wheels:
1.Before washing the vehicle, make surethat the automatic rain sensor is deacti-vated. If it is not deactivated and inadver-tently starts, the wiper arms could bedamaged.
2. To help prevent damage from the auto-matic car wash machinery, make surethat the door mirrors are folded in, anten-nas retracted or removed, and any auxili-ary lights secured.
3. Drive into the automatic car wash.
4. Turn off the "Automatic Braking when
Stationary" function using the buttonin the tunnel console.
5.Turn off the "Automatic Parking BrakeApplication" function in the center dis-play's Top view.
6. Turn off the engine by turning the startknob in the tunnel console clockwise.Hold the knob in position for at least2 seconds.
The vehicle is now ready for the automatic carwash.
CAUTION
The system will automatically change to Pmode if the above steps are not followed. In Pmode, the wheels are locked, which theyshould not be when the vehicle is beingwashed in a car wash.
Related information
Cleaning the exterior (p. 598)
Polishing and waxing (p. 599)
Hand washing (p. 599)
High-pressure washing (p. 602)
Cleaning the wiper blades (p. 602)
Cleaning exterior plastic, rubber and trimcomponents (p. 603)
Cleaning rims (p. 604)
Corrosion protection (p. 604)