2019 VOLVO S60 TWIN ENGINE light
[x] Cancel search: lightPage 143 of 645

DISPLAYS AND VOICE CONTROL
* Option/accessory.141
The snowflake symbol will illuminate ifthere is a risk of slippery conditions.
NOTE
People with certain types of vision problemsmay experience headaches or eye strainwhen using the head-up display.
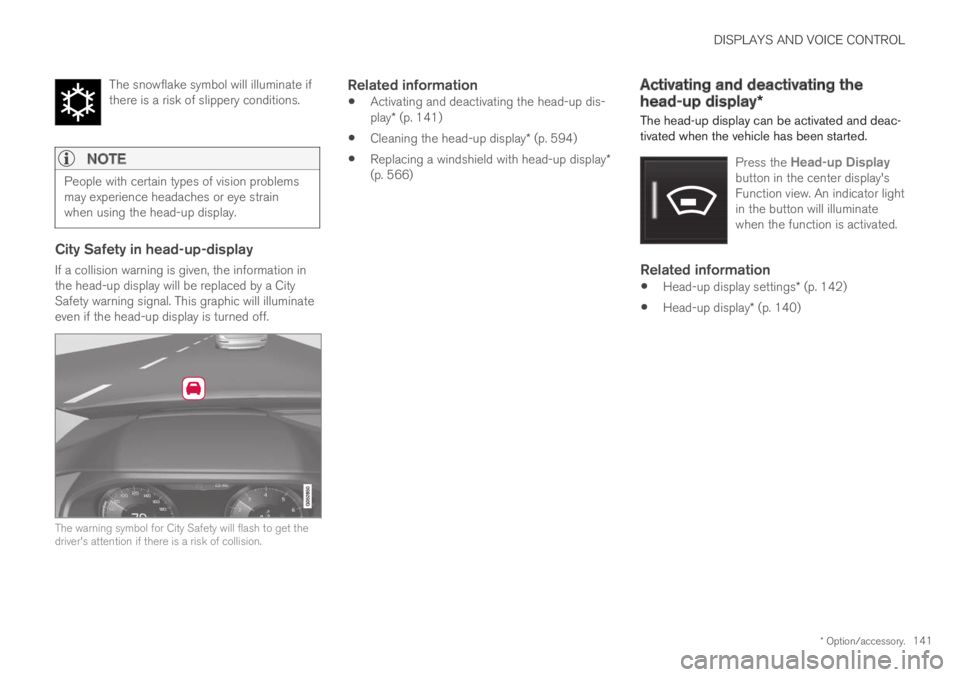
City Safety in head-up-display
If a collision warning is given, the information inthe head-up display will be replaced by a CitySafety warning signal. This graphic will illuminateeven if the head-up display is turned off.
The warning symbol for City Safety will flash to get thedriver's attention if there is a risk of collision.
Related information
Activating and deactivating the head-up dis-play* (p. 141)
Cleaning the head-up display* (p. 594)
Replacing a windshield with head-up display*(p. 566)
Activating and deactivating the
head-up display*
The head-up display can be activated and deac-tivated when the vehicle has been started.
Press the Head-up Displaybutton in the center display'sFunction view. An indicator lightin the button will illuminatewhen the function is activated.
Related information
Head-up display settings* (p. 142)
Head-up display* (p. 140)
Page 144 of 645

DISPLAYS AND VOICE CONTROL
* Option/accessory.142
Head-up display settings*
Adjusting settings for the head-up display.
Settings can be adjusted when the vehicle isstarted and a projected image is displayed on thewindshield.
Selecting display options
Select the functions to be shown in the head-updisplay.
1.Tap Settings in the center display's Topview.
2.Tap My CarDisplaysHead-UpDisplay Options.
3.Select one or more functions:
Show Navigation
Show Road Sign Information
Show Driver Support
Show Phone
This setting is stored as a personal setting in thedriver profile.
Adjusting brightness and height
position
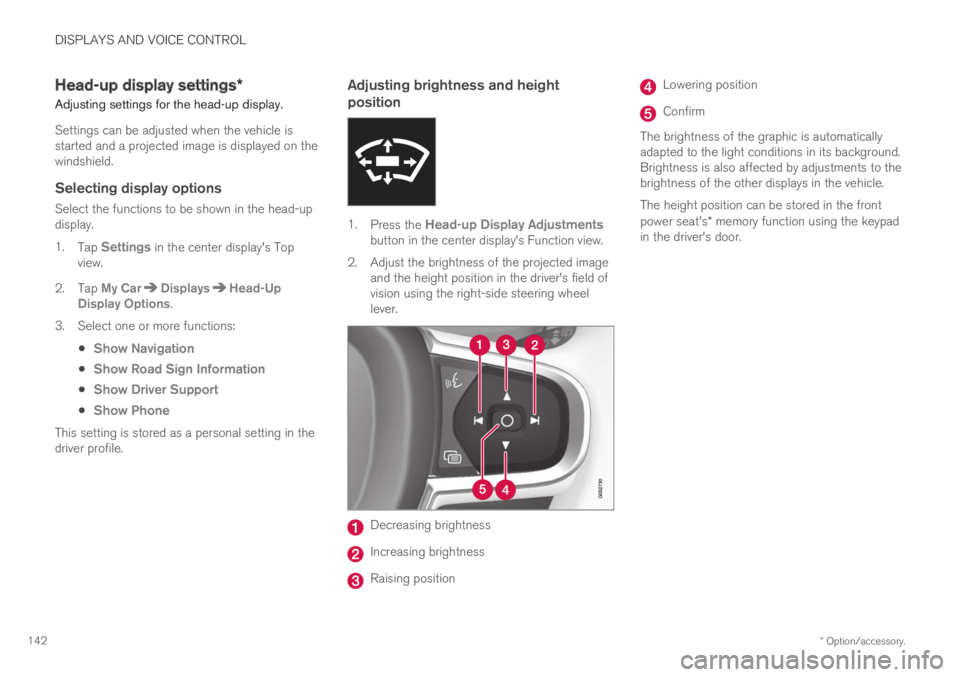
1.Press the Head-up Display Adjustmentsbutton in the center display's Function view.
2.Adjust the brightness of the projected imageand the height position in the driver's field ofvision using the right-side steering wheellever.
Decreasing brightness
Increasing brightness
Raising position
Lowering position
Confirm
The brightness of the graphic is automaticallyadapted to the light conditions in its background.Brightness is also affected by adjustments to thebrightness of the other displays in the vehicle.
The height position can be stored in the frontpower seat's* memory function using the keypadin the driver's door.
Page 152 of 645

LIGHTING
* Option/accessory.150
Lighting control and panel
The lighting panel and controls can be used toadjust both exterior and interior lighting. Thelighting ring on the left-side steering wheel levercan be used to activate and adjust the exteriorlighting. The brightness of the interior lightingcan be adjusted using the thumb wheel on thedashboard.
Exterior lighting
Lighting ring position.
When the vehicle's ignition is in mode II, thelighting ring positions have the following func-tions:
PositionMeaning
US: Daytime running lights andparking lights are off.
Canada: Daytime running lights andparking lights are on.
High beam flash can be used.
Parking lights when the vehicle isparked.
US: Daytime running lights are off.
Canada: Daytime running lights areon.
High beam flash can be used.
Low beams and parking lights.
High beams can be activated.
High beam flash can be used.
PositionMeaning
Daytime running lights and parking
lights in daylight conditions.A
Low beams and parking lights inweak daylight or dark conditions orwhen the front fog lights* and/orrear fog light are activated.
Active high beam can be activated.
High beams can be activated whenlow beams are on.
High beam flash can be used.
Active high beams on/off.
AUS models only: Daytime running lights and parking lights canbe deactivated in the center display.
NOTE
Volvo recommends use of Daytime RunningLights in the US. Its use is mandatory in Can-ada.
Volvo recommends using position whenthe vehicle is in motion.
Page 153 of 645

LIGHTING
* Option/accessory.151
WARNING
The vehicle lighting system cannot in all situa-tions determine when the daylight is too weakor not strong enough, e.g. when there is fogor rain.
The driver is always responsible for driving thevehicle with lighting that is safe for the trafficconditions and as specified by applicable traf-fic regulations.
Thumbwheel in instrument panel
Thumb wheel (to the left) for adjusting interior bright-ness.
Related information
Adjusting light functions via the center dis-play (p. 151)
Interior Lighting (p. 160)
Parking lights (p. 152)
Using turn signals (p. 156)
Using high beam (p. 154)
Low beams (p. 154)
Front fog lights/cornering illumination*(p. 157)
Rear fog light (p. 158)
Active Bending Lights* (p. 157)
Brake lights (p. 159)
Emergency brake lights (p. 159)
Hazard warning flashers (p. 159)
Adjusting light functions via thecenter display
A number of light functions can be adjusted andactivated via the center display. These includeactive high beams, home safe lighting andapproach lighting.
1.Tap Settings in the center display's Topview.
2.Tap My CarLights and Lighting.
3.Select Exterior Lights or Interior Lightingand then select the function that you wouldlike to adjust.
Related information
Lighting control and panel (p. 150)
Active high beam (p. 155)
Using home safe lighting (p. 160)
Welcome Light (p. 160)
Using turn signals (p. 156)
Changing settings in the center display's Topview (p. 130)
Function view in the center display (p. 120)
Page 154 of 645

LIGHTING
* Option/accessory.152
Adjusting the headlight pattern
The headlight pattern can be reset from right-hand to left-hand traffic, and vice versa. Thefunction adapts the light pattern from the head-lights so that they do not cause a glare toapproaching traffic.
1.Tap Settings in the center display's Topview.
2.Tap My CarLights and LightingExterior Lights.
3.Select Temporary Right Hand Traffic/Temporary Left Hand Traffic.
NOTE
Active Bending Lights are not available whenthe headlight pattern is temporarily changedfrom left-hand to right-hand traffic, or viceversa.
Related information
Changing settings in the center display's Topview (p. 130)
Function view in the center display (p. 120)
Active Bending Lights* (p. 157)
Parking lights
The parking lights can be used to help otherroad users see the vehicle if it is stopped orparked. Use the lighting ring on the steeringwheel lever to turn on the parking lights.
Lighting ring in the parking light position.
Turn the lighting ring to the position toturn on the parking lights (the license plate light-ing will also illuminate).
Canadian models: If the ignition is in the II posi-tion, the daytime running lights will illuminateinstead of the front parking lights. With the light-ing ring in this position, the parking lights willremain on regardless of what position the ignitionis in.
US models: When mode is selected, thedaytime running lights can be deactivated in thecenter display. The parking lights will also be
deactivated. In weak daylight or dark conditions,the parking lights and low beams will be illumi-nated.
In dark conditions, the rear parking lights alsoilluminate when the trunk lid is opened to alertfollowing traffic. This happens regardless of whatposition the lighting ring or ignition is in.
Related information
Lighting control and panel (p. 150)
Ignition modes (p. 395)
Page 155 of 645

LIGHTING
* Option/accessory.153
Daytime running lights
The vehicle has sensors that detect ambientlighting conditions. With the lighting ring in the
position, the daytime running lights willalways be activated when the ignition is in modeII. In weak daylight or dark conditions, the head-lights automatically switch to low beams.
Lighting ring in AUTO position.
With the steering wheel lever's lighting ring in the
position, the daytime running lights (DRL1)will illuminate when the vehicle is driven in day-light conditions. The headlights will switch auto-matically from daytime running lights to lowbeams in weak daylight or dark conditions. Theheadlights will also switch to low beams if thefront fog lights* and/or rear fog light are acti-vated.
US models: When mode is selected, thedaytime running lights can be deactivated in thecenter display. The parking lights will also bedeactivated. In weak daylight or dark conditions,the parking lights and low beams will be illumi-nated.
US models: With the lighting ring in the
or position, the daytime running lights willbe off.
Canadian models: With the lighting ring in the
or position, the daytime runninglights will be on.
NOTE
Volvo recommends use of Daytime RunningLights in the US. Its use is mandatory in Can-ada.
WARNING
The system is an energy saving aid – it cannotin all situations determine when the daylight istoo weak or not strong enough, e.g. whenthere is fog or rain.
The driver is always responsible for driving thevehicle with lighting that is safe for the trafficconditions and as specified by applicable traf-fic regulations.
Related information
Lighting control and panel (p. 150)
Ignition modes (p. 395)
Low beams (p. 154)
1Daytime Running Lights
Page 156 of 645

LIGHTING
154
Low beams
When driving with the lighting ring in the position, low beam will be automatically acti-vated in weak daylight or dark conditions, whenthe ignition is in the II position.
Lighting ring in AUTO position.
With the lighting ring in the position, thelow beams will also be automatically activated ifthe rear fog light is activated.
With the lighting ring in the position, lowbeams will always be on when the ignition is inthe II position.
Tunnel detection
The vehicle will detect if it enters a tunnel andshift from daytime running lights to low beams.
Note that the left-hand steering wheel lever must
be in position for tunnel detection to work.
Related information
Lighting control and panel (p. 150)
Ignition modes (p. 395)
Daytime running lights (p. 153)
Using high beam
High beam is operated via the left-hand steeringwheel lever. High beam is the vehicle's strongestlighting and should be used when driving in darkconditions, provided it does not blind other roadusers, to improve visibility.
Steering wheel lever with lighting ring.
High beam flash
Move the steering wheel lever slightly back-ward to the high beam flash mode. The highbeams will illuminate until the lever isreleased.
Page 157 of 645

LIGHTING
}}
155
High beams
The high beams can be activated when the
lighting ring is in mode 2 or .Activate high beams by moving the steeringwheel lever forward. Deactivate by movingthe steering wheel lever backward.
When the high beams are activated, the symbol will be illuminated in the instrument panel.
Related information
Lighting control and panel (p. 150)
Active high beam (p. 155)
Active high beam
Active high beams is a function that uses cam-era sensors in the upper edge of the windshieldto detect the headlights of approaching vehiclesor the taillights of the vehicle directly ahead.When either of these is detected, the vehicle'sheadlights will automatically switch from highbeams to low beams.
Active high beams is indicated by the symbol.
This function can be used in dark conditionswhen the vehicle's speed is approx. 20 km/h(approx. 12 mph) or higher. The function can alsodetect street lighting. When the camera sensorno longer detects an approaching vehicle or avehicle ahead, the headlights will return to highbeams after a second or two.
Activating active high beams
Active high beams can be activated and deacti-vated by turning the lighting ring on the right-side
steering wheel lever to position . The light-
ing ring will then return to . When active
high beams are activated, a white symbolwill be displayed in the instrument panel. Whenhigh beams are on, the symbol will be blue.
If active high beams are deactivated when thehigh beams are on, the headlights will automati-cally switch to low beams.
Limitations for active high beams
The camera sensor on which the function isbased has limitations.
If this symbol and the message ActiveHigh Beam Temporarilyunavailable is displayed in the instru-ment panel, switching between highand low beams must be done manually. The
symbol will go out when the message isdisplayed.
The same applies if this symbol alongwith the message Windscreensensor Sensor blocked, seeOwner's manual is displayed.
Active high beams may be temporarily unavailablein certain situations, e.g. heavy fog or rain. When
2When the low beams are on.