2019 VOLVO S60 TWIN ENGINE roof
[x] Cancel search: roofPage 218 of 645

CLIMATE CONTROL
* Option/accessory.216
Synchronize temperature
The temperature in the different climate zones ofthe vehicle can be synchronized with the tem-perature set for the driver's side.
Synchronization button on the driver's side temperaturecontrol.
1. Tap the driver's side temperature button inthe center display's climate bar to open thecontrol.
2.Tap Synchronize temperature .
>The temperature for all of the vehicle's cli-mate zones will be synchronized with theone set for the driver's side and the syn-chronization symbol will be displayed nextto the temperature button.
Synchronization is stopped with another press onSynchronize temperature or by changing thetemperature setting for a climate zone other thanthe driver's.
Related information
Climate system controls (p. 207)Activating and deactivating airconditioning
The air conditioning cools and dehumidifiesincoming air as needed.
When the air conditioning is activated, it will beswitched on and off automatically by the climatesystem as needed.
1. Tap the symbol in the center of the climatebar to open Climate view in the center dis-play.
2.Tap AC.
>The air conditioning is activated/deacti-vated and the button lights up/goes out.
NOTE
For optimum function of the air conditioning,close all side windows and the panoramicroof*.
Page 232 of 645

KEY, LOCKS AND ALARM
* Option/accessory.230
Remote key
The remote key is used to lock and unlock doorsand the trunk lid. The remote key must be in thevehicle in order to start the engine.
Remote key3 and button-less key (Key Tag)*.
The remote key is not physically used to start theignition because the vehicle is standard-equippedwith keyless start (Passive Start). The key onlyneeds to be in the front section of the passengercompartment.
For vehicles equipped with keyless locking andunlocking (Passive Entry)*, the engine can bestarted with the key anywhere in the vehicle. Asmaller, lighter and button-less key (Key Tag) isalso provided.
The remote keys can be linked to different driverprofiles to store personal settings in the vehicle.
Remote key buttons
The remote key has four buttons, one on the left sideand three on the right.
Locking - Press once to lock the doors,trunk lid and fuel filler door and arm thealarm.
Press and hold to close all windows.
Unlocking – Press once to unlock thedoors and trunk lid and disarm the alarm.
Press and hold to open all windows at thesame time. This total airing function can beused to e.g. quickly air out the vehicle in hotweather.
Trunk lid - Press to unlock and disarm thetrunk lid only. Pressing and holding will open
the trunk lid mechanically due to the preloa-ded springs.
Panic alarm - Used to attract attention inemergency situations. Press and hold thebutton for at least 3 seconds or press twicewithin 3 seconds to activate the turn signalsand horn. To deactivate, wait at least 5 sec-onds and press the button again. If no actionis taken, the panic alarm will deactivate auto-matically after 3 minutes.
WARNING
If anyone is left in the vehicle, make sure thatpower to the power windows and panoramicroof* is cut off by always taking the remotekey with you when you leave the vehicle.
3The illustration is generic - details may vary according to vehicle model.
Page 233 of 645

KEY, LOCKS AND ALARM
* Option/accessory.231
NOTE
Be aware of the risk of locking the remotekey in the vehicle.
If the remote key or key tag is left in thevehicle, it will be deactivated when thevehicle is locked and the alarm set usinganother valid key. The key will be reacti-vated when the vehicle is unlocked.
If the remote key or Red Key is left in thevehicle, it will be deactivated even if thevehicle is locked using Volvo On Call, andwill be reactivated when the vehicle isunlocked using Volvo On Call or anothervalid key.
Button-less key (Key Tag) *
The button-less key4 provided with the keylesslocking and unlocking function works in the sameway as the regular remote key for keyless start,locking and unlocking. The key is waterproof upto a depth of approx. 10 meters (30 feet) for upto 60 minutes. It does not have a detachable keyblade and its battery cannot be replaced.
Red Key - restricted remote key *
A Red Key is a key that makes it possible to setrestrictions for some of the vehicle's functions,e.g. maximum speed and maximum audio systemvolume. It helps vehicle owners ensure that the
vehicle is being operated responsibly by other dri-vers.
Interference
Electromagnetic fields or obstructing objects mayinterfere with the remote key's functions for key-less start and keyless locking and unlocking*.
NOTE
Avoid storing the remote control key nearmetal objects or electronic devices, e.g. cellphones, tablets, laptops or chargers – pref-erably no closer than 10-15 cm (4-6 in.).
If you experience interference, use the remotekey's detachable blade to unlock the vehicle andplace the remote key in the backup key reader inthe tunnel console cup holder to disarm thealarm.
NOTE
When the remote control key is placed in thecup holder, make sure that no other vehiclekeys, metal objects or electronic devices (e.g.cell phones, tablets, laptops or chargers) arefound in the cup holder. Multiple vehicle keysclose to each other in the cup holder can dis-rupt their functionality.
WARNING
California Proposition 65
Operating, servicing and maintaining a pas-senger vehicle can expose you to chemicalsincluding engine exhaust, carbon monoxide,phthalates, and lead, which are known to theState of California to cause cancer and birthdefects or other reproductive harm. To mini-mize exposure, avoid breathing exhaust, donot idle the engine except as necessary, serv-ice your vehicle in a well ventilated area andwear gloves or wash your hands frequentlywhen servicing your vehicle. For more infor-mation go to www.P65Warnings.ca.gov/passenger-vehicle.
Related information
Locking and unlocking using the remote key(p. 232)
Remote key range (p. 234)
Replacing the remote key's battery (p. 234)
Detachable key blade (p. 240)
Electronic immobilizer (p. 243)
Linking a remote key to a driver profile(p. 136)
4Also called sport key.
Page 397 of 645

STARTING AND DRIVING
* Option/accessory.395
Ignition modes
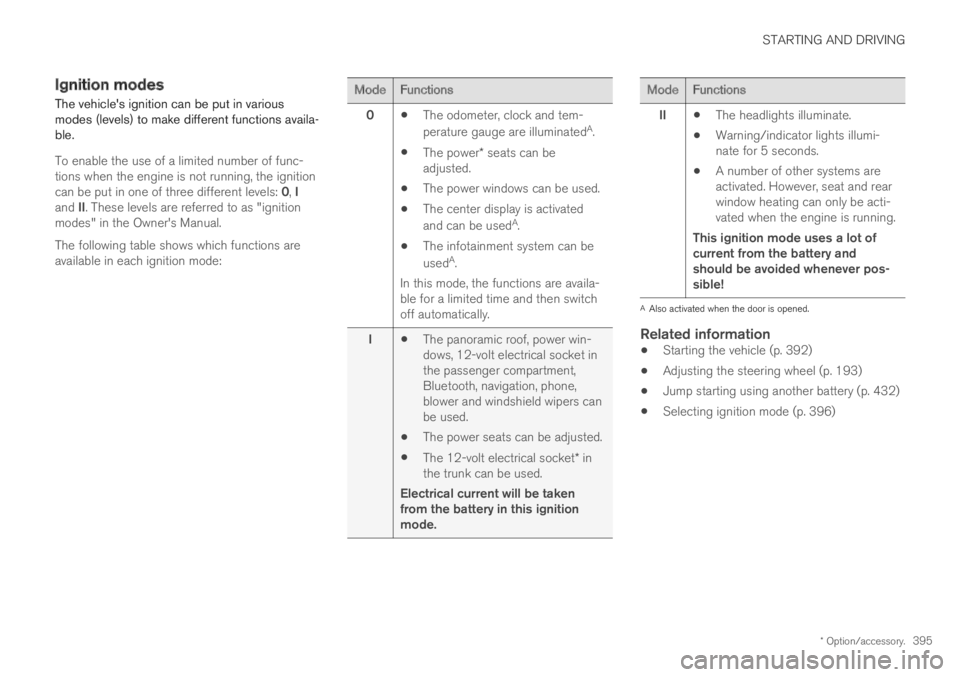
The vehicle's ignition can be put in variousmodes (levels) to make different functions availa-ble.
To enable the use of a limited number of func-tions when the engine is not running, the ignitioncan be put in one of three different levels: 0, Iand II. These levels are referred to as "ignitionmodes" in the Owner's Manual.
The following table shows which functions areavailable in each ignition mode:
ModeFunctions
0The odometer, clock and tem-
perature gauge are illuminatedA.
The power* seats can beadjusted.
The power windows can be used.
The center display is activated
and can be usedA.
The infotainment system can be
usedA.
In this mode, the functions are availa-ble for a limited time and then switchoff automatically.
IThe panoramic roof, power win-dows, 12-volt electrical socket inthe passenger compartment,Bluetooth, navigation, phone,blower and windshield wipers canbe used.
The power seats can be adjusted.
The 12-volt electrical socket* inthe trunk can be used.
Electrical current will be takenfrom the battery in this ignitionmode.
ModeFunctions
IIThe headlights illuminate.
Warning/indicator lights illumi-nate for 5 seconds.
A number of other systems areactivated. However, seat and rearwindow heating can only be acti-vated when the engine is running.
This ignition mode uses a lot ofcurrent from the battery andshould be avoided whenever pos-sible!
AAlso activated when the door is opened.
Related information
Starting the vehicle (p. 392)
Adjusting the steering wheel (p. 193)
Jump starting using another battery (p. 432)
Selecting ignition mode (p. 396)
Page 423 of 645

STARTING AND DRIVING
}}
* Option/accessory.421
Driving
Choose the Pure drive mode to help mini-mize electric power consumption.
Maintain a steady speed and a generous fol-lowing distance to traffic ahead to minimizebraking. This drive mode has the lowestpower consumption.
Balance energy requirements using theaccelerator pedal. Use the indicator on theinstrument panel to see available electricpower and avoid starting the combustionengine unnecessarily. The electric motor ismore effective than the combustion engine,especially at low speeds.
When braking is necessary, brake gentlyusing the brake pedal. This will help rechargethe hybrid battery. A regenerative function isintegrated in the brake pedal and can beaugmented by the electric motor's brakingcapacity when the gear selector is in modeB.
Higher speeds increase energy consumption- air resistance increases with speed.
Activate the Hold function in the Functionview at high speeds when traveling fartherthan is possible using the hybrid battery'scapacity.
Whenever possible, avoid using the Chargefunction to charge the hybrid battery. Charg-ing the battery using the combustion engine
increases fuel consumption and carbon diox-ide emissions.
In a cold climate, reduce heating of the wind-shield/rear window, mirrors, seats and thesteering wheel.
Maintain the correct pressure in the tires andcheck pressure regularly.
The type of tires used could affect energyconsumption - consult a retailer for advice onsuitable tires.
Remove unnecessary items from the vehicle- the heavier the load, the higher the fuelconsumption.
Roof loads increase air resistance andincrease fuel consumption. Remove roofboxes, ski racks, etc. that are not in use.
Avoid driving with the windows open.
Do not keep the vehicle still on an upwardgradient by using the accelerator pedal. Usethe brakes instead.
Related information
Drive-E ‒ purer driving pleasure (p. 27)
Energy distribution in hybrid mode using mapdata* (p. 417)
Factors affecting electric motor range(p. 421)
Hybrid gauge (p. 85)
Checking tire pressure (p. 519)
Factors affecting electric motorrange
A number of factors affect the electric motor'sdriving range. The ability to achieve a long driv-ing range varies according to the outside condi-tions and to how the vehicle is driven.
The certified value for the distance that can bedriven using the electric motor should not beconsidered an expected driving range. The actualrange is dependent on a number of factors.
Factors affecting driving range
The driver can influence some factors affectingdriving range, but not all.
The longest range is achieved under very favora-ble conditions when all factors positively influ-ence range.
Page 462 of 645

AUDIO, MEDIA AND INTERNET
* Option/accessory.460
HD Radio™ limitations
Limitations
Main channel vs. sub-channels (FM only):The main channel is the only channel thatcan receive in hybrid mode (both digital andanalog). If a frequency has sub-channels,they are broadcast in digital mode only. Themain FM channel will be displayed as, forexample, "WRIF-FM HD1". The sub-FMchannels will be displayed as"WRIF-FMHD2", "WRIF-FM HD3", etc.
Reception coverage area: Due to currentIBOC transmitter power limitations, thereception coverage area in digital mode issomewhat more limited than the station'sanalog coverage area. Be aware that, like allradio transmission technology, terrain, time ofday, vegetation and buildings can have apositive or negative effect on radio reception.
Analog to digital/digital to analog blend-ing: Analog to digital blending will occur asthe signal strength reaches a preset thresh-old in the receiver. This will be noticeable infringe areas (areas with weak reception) andis normal.
NOTE
There may be a noticeable difference insound quality when a change from analogueto digital or digital to analogue occurs, suchas:
Volume increase or decrease
Equalizer settings, i.e., Bass/ Midrange/Treble cut or boost
Time alignment (Digital program materialin extreme cases can be as much as 8seconds behind the analogue). This willnoticeable as a "stuttering" effect.
The above items are dependant on thebroadcaster's equipment settings and donot indicate a fault in the vehicle's radioreceiver or antenna systems.
Related information
HD Radio™ (p. 457)
Activating and deactivating the HD Radio™(p. 458)
HD Radio™ sub-channels (p. 459)
SiriusXM® Satellite radio*
The SiriusXM® Satellite system broadcasts fromof a number of high elevation satellites in geo-synchronous orbit.
Listening to satellite radio
The digital signals from the satellites are line-of-sight, which means that physical obstructionssuch as bridges, tunnels, etc, may temporarilyinterfere with signal reception.
Avoid any obstructions, such as metallic objectstransported on roof racks or in a ski box, or otherantennas that may impede signals from the
SiriusXM® satellites.
Selecting SiriusXM ®
Satellite radio
mode
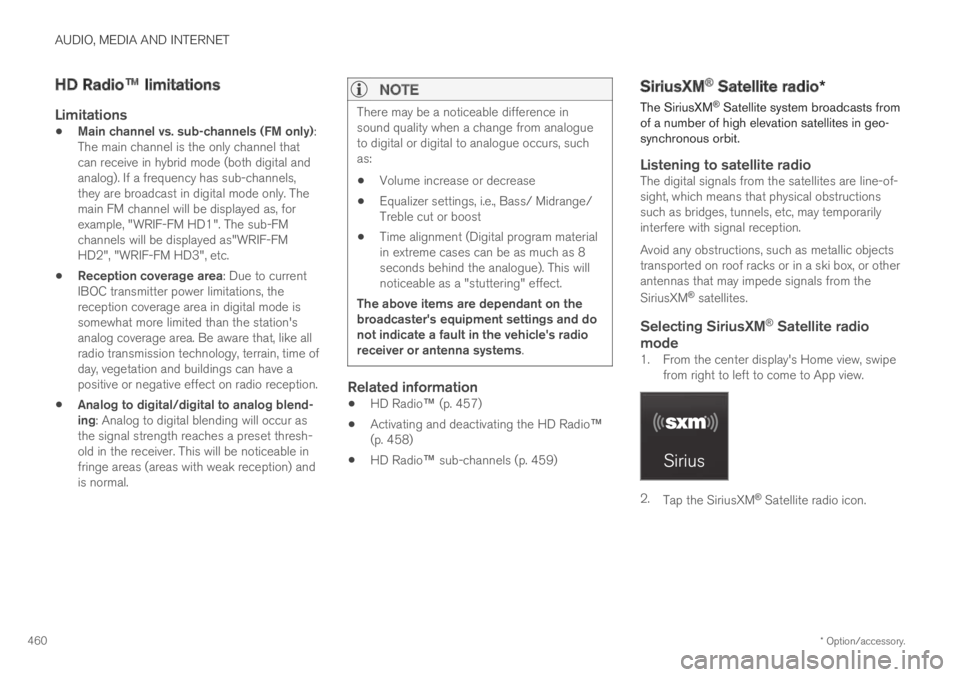
1. From the center display's Home view, swipefrom right to left to come to App view.
2.Tap the SiriusXM® Satellite radio icon.
Page 554 of 645

||
LOADING, STORAGE AND PASSENGER COMPARTMENT
* Option/accessory.552
Extra cargo space
The rear seat backrests can be folded down toincrease cargo compartment space and simplifyloading*. If the rear seat backrests are foldeddown, make sure that no objects loaded into thevehicle prevent the WHIPS system for the frontseats from functioning correctly.
The ski hatch* in the rear seat can be foldeddown to carry skis or other long, thin objects.
Related information
Load anchoring eyelets (p. 553)
Folding down the rear seat backrests*(p. 189)
Rear seat ski hatch* (p. 554)
Roof loads and load carriers (p. 552)
Leveling control* and suspension (p. 418)
Weights (p. 617)
Roof loads and load carriers
Volvo-developed load carriers are recommendedfor carrying loads on the roof of the vehicle.
Volvo load carriers are specially designed to helpprevent damage to your vehicle and help ensuremaximum safety while driving. Volvo load carriersare available from authorized Volvo retailers.
Carefully follow the installation instructions provi-ded with the load carriers.
Distribute the load evenly throughout theload carriers. Place heavier cargo at the bot-tom of the load.
Check periodically to ensure that the loadcarriers and load are properly secured.Secure the load firmly using tie straps orsimilar.
If the load is longer than the vehicle, such asa canoe or kayak, attach the towing eyelet inits front outlet and secure the tie straps in it.
The vehicle's wind resistance and fuel con-sumption increase with the size of the load.
Drive smoothly. Avoid rapid acceleration, hardbraking and fast cornering.
WARNING
The vehicle's center of gravity and drivingcharacteristics are altered by roof loads.
Follow the vehicle's specifications regardingweights and maximum permitted load.
Related information
Loading recommendations (p. 551)
Weights (p. 617)
Page 589 of 645

MAINTENANCE AND SERVICE
}}
* Option/accessory.587
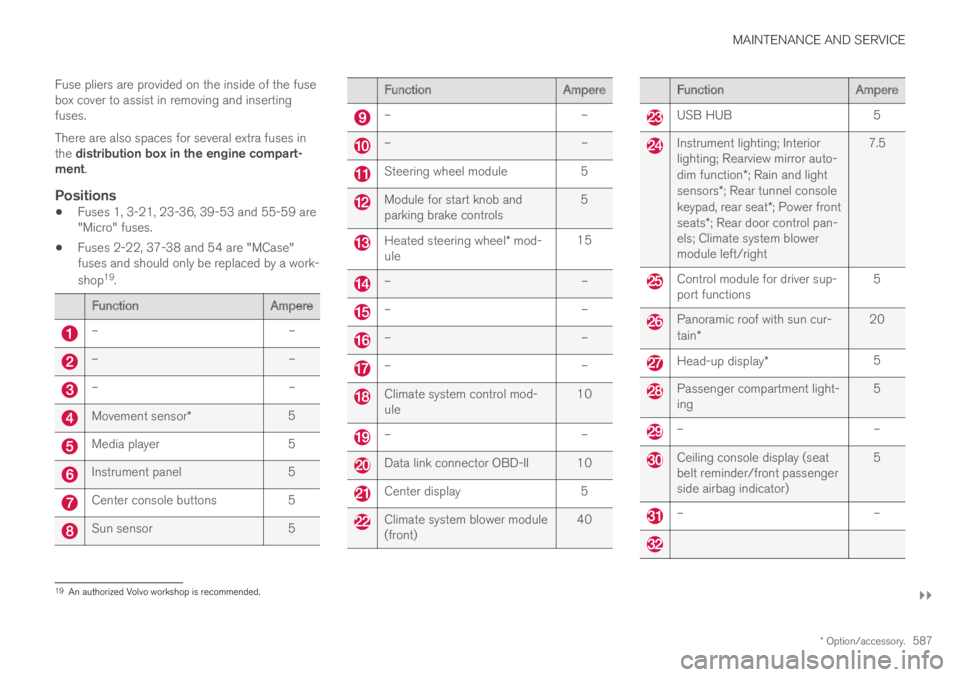
Fuse pliers are provided on the inside of the fusebox cover to assist in removing and insertingfuses.
There are also spaces for several extra fuses inthe distribution box in the engine compart-ment.
Positions
Fuses 1, 3-21, 23-36, 39-53 and 55-59 are"Micro" fuses.
Fuses 2-22, 37-38 and 54 are "MCase"fuses and should only be replaced by a work-
shop19.
FunctionAmpere
––
––
––
Movement sensor*5
Media player5
Instrument panel5
Center console buttons5
Sun sensor5
FunctionAmpere
––
––
Steering wheel module5
Module for start knob andparking brake controls5
Heated steering wheel* mod-ule15
––
––
––
––
Climate system control mod-ule10
––
Data link connector OBD-II 10
Center display5
Climate system blower module(front)40
FunctionAmpere
USB HUB5
Instrument lighting; Interiorlighting; Rearview mirror auto-dim function*; Rain and lightsensors*; Rear tunnel consolekeypad, rear seat*; Power frontseats*; Rear door control pan-els; Climate system blowermodule left/right
7.5
Control module for driver sup-port functions5
Panoramic roof with sun cur-tain*20
Head-up display*5
Passenger compartment light-ing5
––
Ceiling console display (seatbelt reminder/front passengerside airbag indicator)
5
––
19An authorized Volvo workshop is recommended.