Page 589 of 645

MAINTENANCE AND SERVICE
}}
* Option/accessory.587
Fuse pliers are provided on the inside of the fusebox cover to assist in removing and insertingfuses.
There are also spaces for several extra fuses inthe distribution box in the engine compart-ment.
Positions
Fuses 1, 3-21, 23-36, 39-53 and 55-59 are"Micro" fuses.
Fuses 2-22, 37-38 and 54 are "MCase"fuses and should only be replaced by a work-
shop19.
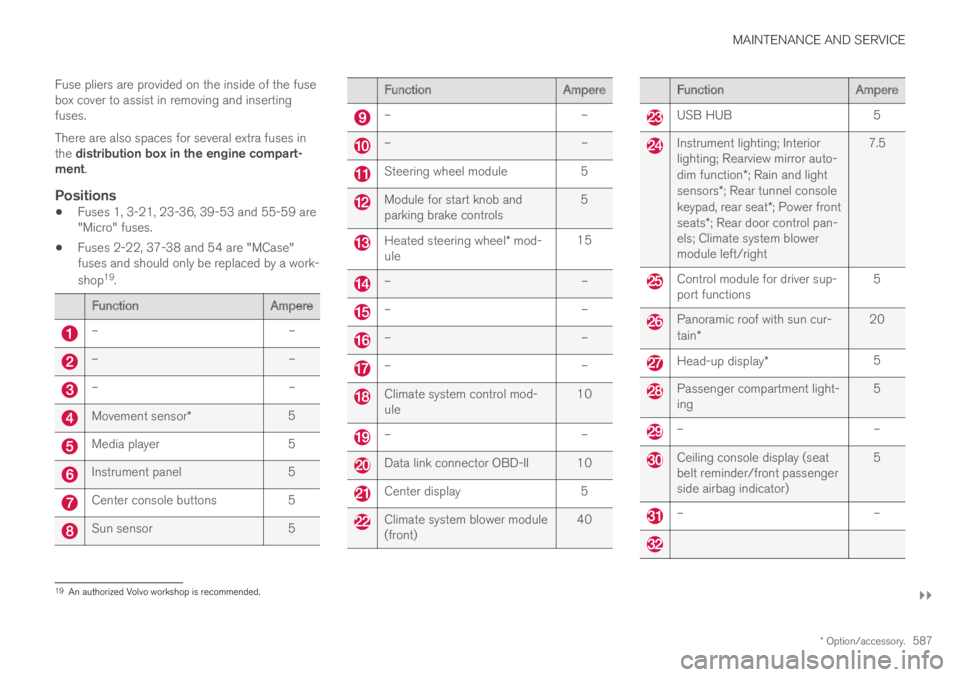
FunctionAmpere
––
––
––
Movement sensor*5
Media player5
Instrument panel5
Center console buttons5
Sun sensor5
FunctionAmpere
––
––
Steering wheel module5
Module for start knob andparking brake controls5
Heated steering wheel* mod-ule15
––
––
––
––
Climate system control mod-ule10
––
Data link connector OBD-II 10
Center display5
Climate system blower module(front)40
FunctionAmpere
USB HUB5
Instrument lighting; Interiorlighting; Rearview mirror auto-dim function*; Rain and lightsensors*; Rear tunnel consolekeypad, rear seat*; Power frontseats*; Rear door control pan-els; Climate system blowermodule left/right
7.5
Control module for driver sup-port functions5
Panoramic roof with sun cur-tain*20
Head-up display*5
Passenger compartment light-ing5
––
Ceiling console display (seatbelt reminder/front passengerside airbag indicator)
5
––
19An authorized Volvo workshop is recommended.
Page 590 of 645
||
MAINTENANCE AND SERVICE
* Option/accessory.588
FunctionAmpere
––
Fuses in the trunk/cargo com-partment10
Control module for Internet-connected vehicle; Controlmodule for Volvo On Call
5
–20
–
Infotainment control module(amplifier)40
––
Multi-band antenna module 5
Front seat massage function*5
––
––
Fuel pump control module 15
Relay windings for distributionbox in engine compartment;Relay windings for transmis-sion oil pump
5
––
FunctionAmpere
Driver's seat heating15
Front passenger's seat heat-ing15
Coolant pump7.5
––
Power driver's seat*20
Active chassis control module*20
––
Sensus control module10
––
––
Power front passenger seat*20
––
TV* (certain markets only)5
Primary fuse for fuses 52, 53,57 and 5815
Related information
Fuses and fuseboxes (p. 580)
Replacing fuses (p. 580)
Page 592 of 645
||
MAINTENANCE AND SERVICE
590
The fuse box is located on the right-hand side.
Fuse pliers are provided on the inside of the fusebox cover to assist in removing and insertingfuses.
There are also spaces for several extra fuses inthe distribution box in the engine compart-ment.
Page 593 of 645

MAINTENANCE AND SERVICE
}}
* Option/accessory.591
Positions
Fuses 13-17 and 21-36 are "Micro" fuses.
Fuses 1-12, 18-20 and 37 are "MCase"fuses and should only be replaced by a work-
shop20.
FunctionAmpere
––
––
Pneumatic suspension* com-pressor40
Lock motor for rear seat back-rest, right side15
––
Lock motor for rear seat back-rest, left side15
Power front passenger seat*
Door module right side, rear
20
Power trunk release*25
Power front passenger seat*
Door module right side, front
20
FunctionAmpere
Towbar* control module40
Seat belt tensioner module(right side)40
Internal relay windings5
––
Foot movement detectionmodule for opening the powertrunk release*
5
USB hub/accessory port –
––
Towbar* control module25
Accessory module40
Power driver seat*20
Seat belt tensioner module(left side)40
Park Assist Camera*5
––
––
FunctionAmpere
––
Control module for airbagsand seat belt tensioners5
––
Heated rear seat (left side)*15
––
Blind Spot Information(BLIS)*; Exterior reverse signalcontrol module
5
––
Modules for seat belt tension-ers5
Emissions system actuator(gasoline, certain engine vari-ants)
5
––
All Wheel Drive (AWD) controlmodule*15
20An authorized Volvo workshop is recommended.
Page 602 of 645

||
MAINTENANCE AND SERVICE
* Option/accessory.600
Wash using a sponge, car washing detergentand plenty of lukewarm water.
Clean the wiper blades with lukewarm soapsolution or car washing detergent.
Dry the vehicle using a clean, soft chamois ora squeegee. Try not to let drops of water dryin strong sunlight. This could cause waterdrying stains that may need to be polishedout.
In areas with heavy industrial emissions,more frequent washing of the vehicle's exte-rior is recommended.
Tar spots from asphalt may remain even afterwashing. Use a tar remover to remove thesespots after washing the vehicle.
WARNING
Always entrust engine washing to a workshop.If the engine is hot, there is a risk of fire.
CAUTION
Dirty headlights do not work as well. Cleanthem regularly, e.g. when refueling.
Do not use corrosive cleaners. Use water anda non-abrasive sponge.
NOTE
Exterior lighting such as headlights and tail-lights may develop temporary condensationon the inside of the lens. This is normal. Allexterior lighting is designed to resist this.Condensation is normally vented out of thelamp housing once the light has been lit forsome period of time.
CAUTION
Make sure that the panoramic roof* andsun shade are closed before washing thevehicle.
Never use abrasive polishing agents onthe panoramic roof.
Never use wax on the rubber sealsaround the panoramic roof.
CAUTION
Remember to remove dirt from the drainholes in the doors and sills after washing thevehicle.
Related information
Cleaning the exterior (p. 598)
Polishing and waxing (p. 599)
Automatic car washes (p. 601)
High-pressure washing (p. 602)
Cleaning the wiper blades (p. 602)
Cleaning exterior plastic, rubber and trimcomponents (p. 603)
Cleaning rims (p. 604)
Corrosion protection (p. 604)
Settings for automatically activating the park-ing brake (p. 402)
Page 603 of 645

MAINTENANCE AND SERVICE
601
Automatic car washes
The vehicle should be washed as soon as itbecomes dirty. This makes the vehicle easier toclean because dirt does not attach as strongly. Italso reduces the risk of scratches and keeps thevehicle looking new.
An automatic car wash is a fast and easy way tokeep your vehicle clean, but it does not reach allareas of the vehicle. For best results, Volvo rec-ommends hand washing your vehicle or supple-menting automatic car washes with a hand wash.
NOTE
Volvo recommends not washing the vehicle inan automatic car wash during the first fewmonths; the paintwork on new vehicles takessome time to fully harden.
CAUTION
Before driving the vehicle into a car wash,deactivate the Automatic Braking when Sta-tionary and Automatic Parking Brake Applica-tion functions. If the functions are not deacti-vated, the brake system will seize when thevehicle is stationary and the vehicle will not beable to roll.
CAUTION
For automatic car washes in which the vehicleis pulled forward on rolling wheels:
1.Before washing the vehicle, make surethat the automatic rain sensor is deacti-vated. If it is not deactivated and inadver-tently starts, the wiper arms could bedamaged.
2. To help prevent damage from the auto-matic car wash machinery, make surethat the door mirrors are folded in, anten-nas retracted or removed, and any auxili-ary lights secured.
3. Drive into the automatic car wash.
4. Turn off the "Automatic Braking when
Stationary" function using the buttonin the tunnel console.
5.Turn off the "Automatic Parking BrakeApplication" function in the center dis-play's Top view.
6. Turn off the engine by turning the startknob in the tunnel console clockwise.Hold the knob in position for at least2 seconds.
The vehicle is now ready for the automatic carwash.
CAUTION
The system will automatically change to Pmode if the above steps are not followed. In Pmode, the wheels are locked, which theyshould not be when the vehicle is beingwashed in a car wash.
Related information
Cleaning the exterior (p. 598)
Polishing and waxing (p. 599)
Hand washing (p. 599)
High-pressure washing (p. 602)
Cleaning the wiper blades (p. 602)
Cleaning exterior plastic, rubber and trimcomponents (p. 603)
Cleaning rims (p. 604)
Corrosion protection (p. 604)
Page 616 of 645
||
SPECIFICATIONS
614
Engine oil. This label contains the recom-mended engine oil specifications.
Decal A/C. Refrigerant R134a.
NOTE
The decals shown in the Owner's Manual donot claim to be exact reproductions of thosefound in the vehicle. The purpose is to showapproximately how they look and about wherethey are located on the vehicle. The informa-tion that applies for your vehicle in particularis found on the decal on the vehicle.
Related information
Air conditioning specifications (p. 622)
Page 620 of 645
SPECIFICATIONS
* Option/accessory.618
Towing capacity and tongue weightTowing capacity and tongue weight are shownin the tables below.
CategoryUSA
(lbs)
Canada
(kg)
Max. trailer weightsWithout brakes:1650750
With brakes:2000900
Max. tongue weight20090
CAUTION
The maximum trailer weights listed areonly applicable for altitudes up to 3280 ft(1,000 m) above sea level. With increas-ing altitude the engine power and there-fore the car's climbing ability are impairedbecause of the reduced air density, sothe maximum trailer weight has to bereduced accordingly. The weight of thecar and trailer must be reduced by 10%for every further 3280 ft (1,000 m) (orpart thereof).
Related information
Type designations (p. 612)
Weights (p. 617)
Driving with a trailer (p. 434)
Trailer Stability Assist* (p. 436)