2019 NISSAN ROGUE SPORT ESP
[x] Cancel search: ESPPage 167 of 500
LOCKING WITH POWER DOOR LOCK
SWITCH
Operating the power door lock switch
(located on the driver’s and front passen-
ger’s doors) will lock or unlock all the
doors.
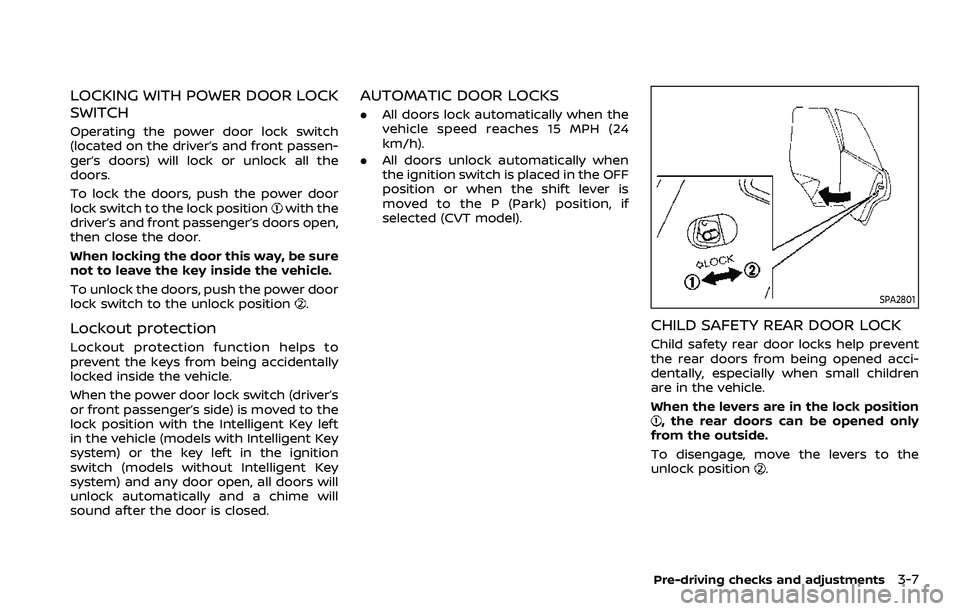
To lock the doors, push the power door
lock switch to the lock position
with the
driver’s and front passenger’s doors open,
then close the door.
When locking the door this way, be sure
not to leave the key inside the vehicle.
To unlock the doors, push the power door
lock switch to the unlock position
.
Lockout protection
Lockout protection function helps to
prevent the keys from being accidentally
locked inside the vehicle.
When the power door lock switch (driver’s
or front passenger’s side) is moved to the
lock position with the Intelligent Key left
in the vehicle (models with Intelligent Key
system) or the key left in the ignition
switch (models without Intelligent Key
system) and any door open, all doors will
unlock automatically and a chime will
sound after the door is closed.
AUTOMATIC DOOR LOCKS
. All doors lock automatically when the
vehicle speed reaches 15 MPH (24
km/h).
. All doors unlock automatically when
the ignition switch is placed in the OFF
position or when the shift lever is
moved to the P (Park) position, if
selected (CVT model).
SPA2801
CHILD SAFETY REAR DOOR LOCK
Child safety rear door locks help prevent
the rear doors from being opened acci-
dentally, especially when small children
are in the vehicle.
When the levers are in the lock position
, the rear doors can be opened only
from the outside.
To disengage, move the levers to the
unlock position
.
Pre-driving checks and adjustments3-7
Page 175 of 500
Welcome light and farewell light
function
When you lock or unlock the doors or the
liftgate, the daytime running lights, park-
ing lights and the tail lights will illuminate
for a period of time. The welcome light
and farewell light function can be dis-
abled. For information about disabling
the welcome light and farewell light
function, see “Vehicle Settings” (P.2-23).
Locking doors
1. Move the shift lever to the P (Park)position (Continuously Variable Trans-
mission (CVT) models), or the shift
lever in the N (Neutral) position (Man-
ual Transmission (MT) models), place
the ignition switch in the OFF position
and make sure you carry the Intelli-
gent Key with you.
2. Close all doors.
3. Push any door handle request switch while carrying the Intelligent Key with
you.
4. All doors and the liftgate will lock.
5. The hazard indicator lights flash twice and the outside buzzer sounds twice.
NOTE:
. Request switches for all doors and
the liftgate can be deactivated when
the I-Key Door Lock setting is turned off in the Vehicle Settings of the
vehicle information display. For ad-
ditional information, see “Vehicle
Settings” (P.2-23).
. Doors lock with the door handle
request switch while the ignition
switch is not in the LOCK position.
. Doors do not lock by pushing the
door handle request switch while
any door is open. However, doors
lock with the mechanical key even if
any door is open.
. Doors do not lock with the door
handle request switch with the In-
telligent Key inside the vehicle and a
beep sounds to warn you. However,
when an Intelligent Key is inside the
vehicle, doors can be locked with
another Intelligent Key.
CAUTION
.After locking the doors using the
request switch, make sure that
the doors have been securely
locked by operating the door
handles or the liftgate opener
switch.
. When locking the doors using the
request switch, make sure to
have the Intelligent Key in your possession before operating the
request switch to prevent the
Intelligent Key from being left in
the vehicle.
. The request switch is operational
only when the Intelligent Key has
been detected by the Intelligent
Key system.
Unlocking doors
1. Push the door handle request switchor the liftgate request switchwhile carrying the Intelligent Key with
you.
2. The hazard indicator flashes once and outside chime sounds once. The cor-
responding door or the liftgate will
unlock.
3. Push the request switch again within 1 minute.
4. The hazard indicator flashes once and outside chime sounds once again. All
the doors and the liftgate will unlock.
All doors will be locked automatically
unless one of the following operations is
performed within 1 minute after pushing
the request switch while the doors are
locked.
. Opening any door.
Pre-driving checks and adjustments3-15
Page 177 of 500
TROUBLESHOOTING GUIDE
Verify the location of all Intelligent Keys that are programmed for the vehicle. If another Intelligent Key is in range or inside the vehicle,
the vehicle system may respond differently than expected.
SymptomPossible causeAction to take
When stopping the engine
(CVT model) The Shift to Park warning appears on
the display and the inside warning chime
sounds continuously. The shift lever is not in the P (Park)
position.
Move the shift lever to the P (Park)
position.
When opening the driver’s
door to get out of the vehicle The Door/liftgate open warning appears
on the display. The ignition switch is in the ON
position.Place the ignition switch in the OFF
position.
When closing the door after
getting out of the vehicle The No Key Detected warning appears
on the display, the outside chime sounds
three times and the inside warning
chime sounds for approximately three
seconds.
The ignition switch is in the ON
position.
Place the ignition switch in the OFF
position.
The red Shift to Park warning appears
on the display and the inside side chime
sounds continuously. (CVT model) The ignition switch is in the ON
position and the shift lever is not in
the P (Park) position.Move the shift lever to the P (Park)
position and place the ignition switch
in the OFF position.
The Rear Door Alert is activated mes-
sage appears on the display, the horn
sounds three times twice, or a Check
Back Seat for all articles warning ap-
pears on the display. The Rear Door Alert is activated.
Check the back seat for all articles,
clear the Rear Door Alert warning
message by using the steering
switches.
When closing the door with
the inside lock knob turned
to LOCK The outside chime sounds for approxi-
mately three seconds and all the doors
unlock.
The Intelligent Key is inside the
vehicle.
Carry the Intelligent Key with you.
When pushing the door han-
dle request switch or the
LOCK button on the Intelli-
gent Key to lock the door The outside chime sounds for approxi-
mately three seconds.
The Intelligent Key is inside the
vehicle.
Carry the Intelligent Key with you.
Pre-driving checks and adjustments3-17
Page 204 of 500
4-10Monitor, heater, air conditioner, audio and phone systems
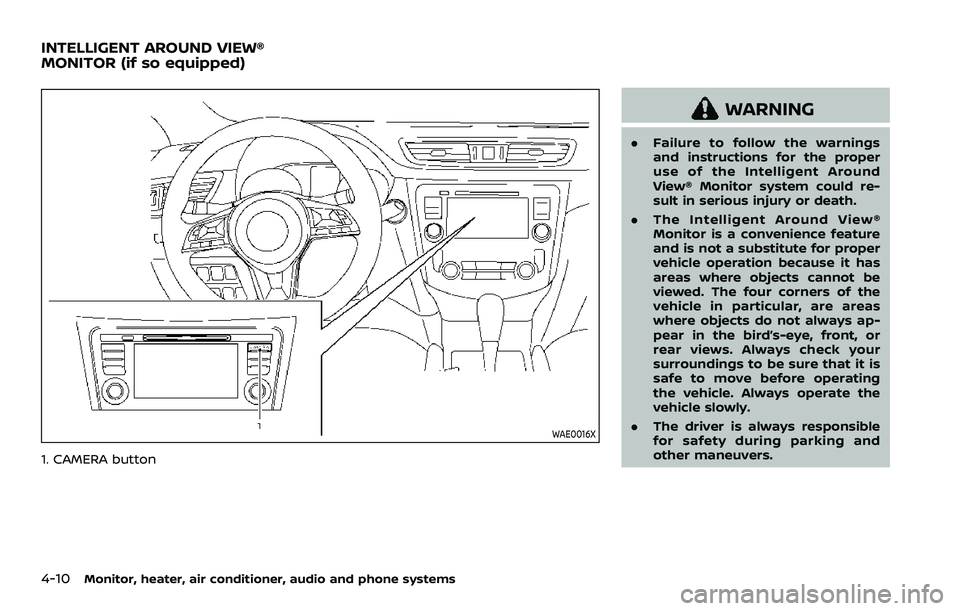
WAE0016X
1. CAMERA button
WARNING
.Failure to follow the warnings
and instructions for the proper
use of the Intelligent Around
View® Monitor system could re-
sult in serious injury or death.
. The Intelligent Around View®
Monitor is a convenience feature
and is not a substitute for proper
vehicle operation because it has
areas where objects cannot be
viewed. The four corners of the
vehicle in particular, are areas
where objects do not always ap-
pear in the bird’s-eye, front, or
rear views. Always check your
surroundings to be sure that it is
safe to move before operating
the vehicle. Always operate the
vehicle slowly.
. The driver is always responsible
for safety during parking and
other maneuvers.
INTELLIGENT AROUND VIEW®
MONITOR (if so equipped)
Page 225 of 500
.When the DUAL indicator light is notilluminated, pushing the DUAL but-
ton (the indicator light will turn on)
allows the user to independently
change the driver and passenger
side temperatures with the corre-
sponding temperature control dial.
.To cancel the separate tempera-ture setting, push the DUAL button
(the indicator light will turn off) and
the driver’s side temperature
setting will be applied to both the
driver and passenger sides.
The temperature of the passenger
compartment will be maintained
automatically. Air flow distribution
and fan speed are also controlled
automatically.
A visible mist may be seen coming
from the ventilators in hot and humid
conditions as the air is cooled rapidly.
This does not indicate a malfunction.
Dehumidified defrosting/defogging:
1. Push the front defroster
button
(The indicator light on the front
defroster
button will illuminate).
2. Turn the temperature control dial to set the desired temperature.
. To quickly remove frost from the out-
side surface of the windshield, set the
temperature and the fan speed to the maximum levels.
. After the windshield is cleared, push
the AUTO button (the AUTO indicator
light will turn on).
. When the front defroster
button is
pushed, the air conditioner will turn on
when the outside air temperature is
above approximately 36°F (2°C) to
defog the windshield. The air recircu-
lation mode will automatically turn off.
The outside air circulation mode will
be selected to improve the defogging
performance.
Do not set the temperature too low when
the front defroster mode is on (the
indicator light is illuminated), because
doing so may fog up the windshield.
Manual operation
The manual mode can be used to control
the heater and air conditioner to your
desired settings.
Fan speed control:
Push the fan speed control button (
side orside) to manually control the
fan speed.
Push the AUTO button to change the fan
speed to the automatic mode.
Air flow control:
Push the MODE button to select the
desired mode:
— Air flows mainly from the center and
side ventilators.
— Air flows mainly from the center andside ventilators and foot outlets.
— Air flows mainly from the foot outletand partly from the defroster.
— Air flows mainly from the frontdefroster outlets and foot outlets.
Temperature control:
Turn the temperature control dial to set
the desired temperature.
.When the DUAL indicator light is not
illuminated, pushing the DUAL button
(the indicator light will turn on) allows
the user to independently change the
driver and passenger side tempera-
tures with the corresponding tem-
perature control dial.
Also turning the passenger’s side
temperature control dial changes only
the front passenger’s side tempera-
ture. (The DUAL indicator light will
illuminate and DUAL will appear on
the display.)
. To cancel the separate temperature
setting, push the DUAL button (the
indicator light will turn off) and the
driver’s side temperature setting will
be applied to both the driver and
passenger sides.
Monitor, heater, air conditioner, audio and phone systems4-31
Page 233 of 500
away from the exhaust system
components.
. Do not stop or park the vehicle
over flammable materials such as
dry grass, wastepaper or rags.
They may ignite and cause a fire.
CAUTION
.Do not use leaded gasoline. De-
posits from leaded gasoline will
seriously reduce the three-way
catalyst’s ability to help reduce
exhaust pollutants.
. Keep your engine tuned up. Mal-
functions in the ignition, fuel in-
jection, or electrical systems can
cause overrich fuel flow into the
three-way catalyst, causing it to
overheat. Do not keep driving if
the engine misfires, or if notice-
able loss of performance or other
unusual operating conditions are
detected. Have the vehicle in-
spected. It is recommended you
visit a NISSAN dealer for this
service.
. Avoid driving with an extremely
low fuel level. Running out of fuel
could cause the engine to misfire, damaging the three-way catalyst.
. Do not race the engine while
warming it up.
. Do not push or tow your vehicle
to start the engine.
TIRE PRESSURE MONITORING SYS-
TEM (TPMS)
Each tire, including the spare (if provided),
should be checked monthly when cold
and inflated to the inflation pressure
recommended by the vehicle manufac-
turer on the vehicle placard or tire infla-
tion pressure label. (If your vehicle has
tires of a different size than the size
indicated on the vehicle placard or tire
inflation pressure label, you should deter-
mine the proper tire inflation pressure for
those tires.)
As an added safety feature, your vehicle
has been equipped with a Tire Pressure
Monitoring System (TPMS) that illumi-
nates a low tire pressure telltale when
one or more of your tires is significantly
under-inflated. Accordingly, when the low
tire pressure telltale illuminates, you
should stop and check your tires as soon
as possible, and inflate them to the
proper pressure. Driving on a significantly
under-inflated tire causes the tire to
overheat and can lead to tire failure. Under-inflation also reduces fuel effi-
ciency and tire tread life, and may affect
the vehicle’s handling and stopping abil-
ity.
Please note that the TPMS is not a
substitute for proper tire maintenance,
and it is the driver’s responsibility to
maintain correct tire pressure, even if
under-inflation has not reached the level
to trigger illumination of the TPMS low
tire pressure telltale.
Your vehicle has also been equipped with
a TPMS malfunction indicator to indicate
when the system is not operating prop-
erly. The TPMS malfunction indicator is
combined with the low tire pressure tell-
tale. When the system detects a malfunc-
tion, the telltale will flash for
approximately one minute and then re-
main continuously illuminated. This se-
quence will continue upon subsequent
vehicle start-ups as long as the malfunc-
tion exists. When the malfunction indica-
tor is illuminated, the system may not be
able to detect or signal low tire pressure
as intended. TPMS malfunctions may
occur for a variety of reasons, including
the installation of replacement or alter-
nate tires or wheels on the vehicle that
prevent the TPMS from functioning prop-
erly. Always check the TPMS malfunction
telltale after replacing one or more tires
Starting and driving5-5
Page 237 of 500
maneuvers, particularly at high speeds. As
with other vehicles of this type, failure to
operate this vehicle correctly may result
in loss of control or vehicle rollover. Seat
belts help reduce the risk of injury in
collisions and rollovers. In a rollover crash,
an unbelted or improperly belted person
is significantly more likely to be injured or
killed than a person properly wearing a
seat belt.
Be sure to read “Driving safety precau-
tions” (P.5-10).
OFF-ROAD RECOVERY
If the right side or left side wheels leave
the road surface, maintain control of the
vehicle by following the procedure below.
Please note that this procedure is only a
general guide. The vehicle must be driven
as appropriate based on the conditions of
the vehicle, road and traffic.
1. Remain calm and do not overreact.
2. Do not apply the brakes.
3. Maintain a firm grip on the steeringwheel with both hands and try to hold
a straight course.
4. When appropriate, slowly release the accelerator pedal to gradually slow
the vehicle.
5. If there is nothing in the way, steer the vehicle to follow the road while the vehicle speed is reduced. Do not
attempt to drive the vehicle back onto
the road surface until vehicle speed is
reduced.
6. When it is safe to do so, gradually turn the steering wheel until both tires
return to the road surface. When all
tires are on the road surface, steer the
vehicle to stay in the appropriate
driving lane.
.If you decide that it is not safe to
return the vehicle to the road sur-
face based on vehicle, road or
traffic conditions, gradually slow
the vehicle to a stop in a safe place
off the road.
RAPID AIR PRESSURE LOSS
Rapid air pressure loss or a “blow-out” can
occur if the tire is punctured or is
damaged due to hitting a curb or pothole.
Rapid air pressure loss can also be caused
by driving on under-inflated tires.
Rapid air pressure loss can affect the
handling and stability of the vehicle,
especially at highway speeds.
Help prevent rapid air pressure loss by
maintaining the correct air pressure and
visually inspect the tires for wear and
damage. See “Wheels and tires” (P.8-29) of
this manual.
If a tire rapidly loses air pressure or “blows-out” while driving, maintain con-
trol of the vehicle by following the proce-
dure below. Please note that this
procedure is only a general guide. The
vehicle must be driven as appropriate
based on the conditions of the vehicle,
road and traffic.
WARNING
The following actions can increase
the chance of losing control of the
vehicle if there is a sudden loss of tire
air pressure. Losing control of the
vehicle may cause a collision and
result in personal injury.
.
The vehicle generally moves or
pulls in the direction of the flat
tire.
. Do not rapidly apply the brakes.
. Do not rapidly release the accel-
erator pedal.
. Do not rapidly turn the steering
wheel.
1. Remain calm and do not overreact.
2. Maintain a firm grip on the steering wheel with both hands and try to hold
a straight course.
Starting and driving5-9
Page 246 of 500
5-18Starting and driving
1. Apply the parking brake.
2.Continuously Variable Transmission
(CVT) model:
Move the shift lever to the P (Park) or N
(Neutral) position. (P is recommended.)
The starter is designed so that it does
not operate unless the shift lever is in
either of the above positions.
Manual Transmission (MT) model:
Move the shift lever to the N (Neutral)
position, and depress the clutch pedal
to the floor while starting the engine.
3. Crank the engine with your foot off
the accelerator pedal by turning the
ignition switch to START. Release the
switch when the engine starts. If the
engine starts, but fails to run, repeat
the above procedure.
.If the engine is very hard to start in
extremely cold weather or when
restarting, depress the accelerator
pedal a little (approximately 1/3 to
the floor) and hold it and then
crank the engine. Release the ac-
celerator pedal when the engine
starts.
.If the engine is very hard to startbecause it is flooded, depress the
accelerator pedal all the way to the
floor and hold it. Crank the engine
for 5 - 6 seconds. After cranking the engine, release the accelerator
pedal. Crank the engine
with your
foot off the accelerator pedal by
turning the ignition switch to
START. Release the ignition switch
when the engine starts. If the
engine starts, but fails to run, re-
peat the above procedure.
CAUTION
Do not operate the starter for more
than 15 seconds at a time. If the
engine does not start, turn the igni-
tion switch off and wait 10 seconds
before cranking again, otherwise the
starter could be damaged.
Do not turn the ignition switch to the
START position unless the engine
and starter have stopped moving.
Attempting to start the engine while
the engine or starter is moving may
cause damage.
4. Warm-up
Allow the engine to idle for at least 30
seconds after starting. Do not race the
engine while warming it up. Drive at
moderate speed for a short distance
first, especially in cold weather. In cold
weather, keep the engine running for a minimum of 2 - 3 minutes before
shutting it off. Starting and stopping
the engine over a short period of time
may make the vehicle more difficult to
start.
5. To stop the engine, shift the shift lever to the P (Park) position (CVT model) or
N (Neutral) position (MT model) and
turn the ignition switch to the OFF
position.
NOTE:
Care should be taken to avoid situations
that can lead to potential battery dis-
charge and potential no-start condi-
tions such as:
1. Installation or extended use of elec-
tronic accessories that consume
battery power when the engine is
not running (Phone chargers, GPS,
DVD players, etc.)
2. Vehicle is not driven regularly and/
or only driven short distances.
In these cases, the battery may need to
be charged to maintain battery health.
STARTING THE ENGINE (model
without Intelligent Key system)