2019 NISSAN ROGUE SPORT navigation
[x] Cancel search: navigationPage 3 of 500
safety features to all occupants
of the vehicle.
. ALWAYS review this Owner’s Man-
ual for important safety informa-
tion.
On-pavement and off-road
driving
This vehicle will handle and maneuver
differently from an ordinary passenger
car because it has a higher center of
gravity. As with other vehicles with
features of this type, failure to operate
this vehicle correctly may result in loss
of control or an accident. Be sure to
read “Avoiding collision and rollover”
and “Driving safety precautions” in the
“5. Starting and driving” section of this
manual.
MODIFICATION OF YOUR VEHI-
CLE
This vehicle should not be modified.
Modification could affect its perfor-
mance, safety or durability, and may
even violate governmental regula-
tions. In addition, damage or perfor-
mance problems resulting from
modification may not be covered un-
der NISSAN warranties.
WARNING
Installing an aftermarket On-Board
Diagnostic (OBD) plug-in device that
uses the port during normal driving,
for example remote insurance com-
pany monitoring, remote vehicle di-
agnostics, telematics or engine
reprogramming, may cause interfer-
ence or damage to vehicle systems.
We do not recommend or endorse
the use of any aftermarket OBD
plug-in devices, unless specifically
approved by NISSAN. The vehicle
warranty may not cover damage
caused by any aftermarket plug-in
device.
WHEN READING THE MANUAL
This manual includes information for all
features and equipment available on
this model. Features and equipment in
your vehicle may vary depending on
model, trim level, options selected, or-
der, date of production, region or avail-
ability. Therefore, you may find
information about features or equip-
ment that are not included or installed
on your vehicle.
All information, specifications and illustra-
tions in this manual are those in effect at
the time of printing. NISSAN reserves the
right to change specifications, perfor-
mance, design or component suppliers
without notice and without obligation.
From time to time, NISSAN may update
or revise this manual to provide Owners
with the most accurate information cur-
rently available. Please carefully read and
retain with this manual all revision up-
dates sent to you by NISSAN to ensure
you have access to accurate and up-to-
date information regarding your vehicle.
Current versions of vehicle Owner’s Man-
uals and any updates can also be found in
the Owner section of the NISSAN website
at https://owners.nissanusa.com/now-
ners/navigation/manualsGuide. If you
have questions concerning any informa-
tion in your Owner’s Manual, contact
Page 16 of 500
0-8Illustrated table of contents
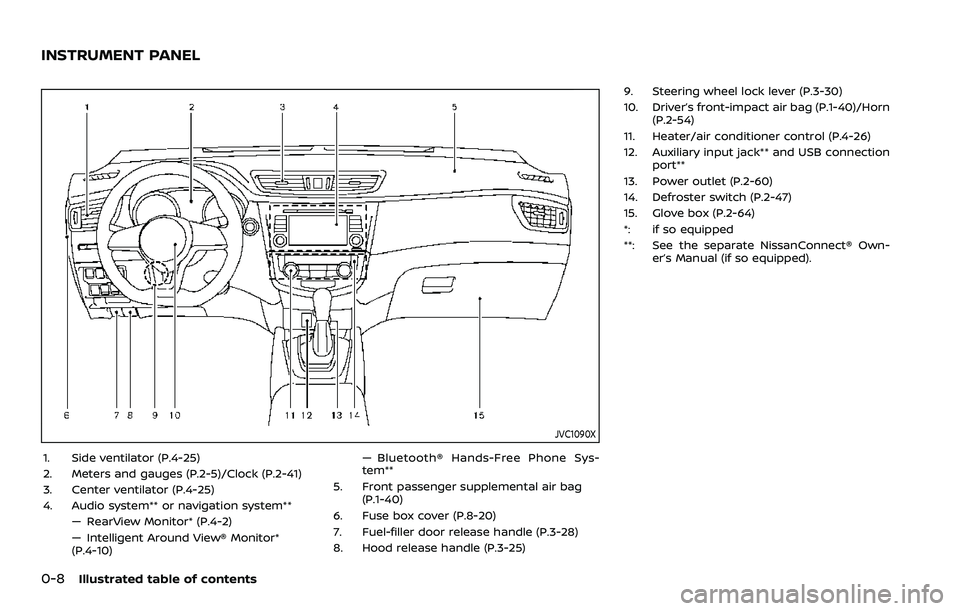
JVC1090X
1. Side ventilator (P.4-25)
2. Meters and gauges (P.2-5)/Clock (P.2-41)
3. Center ventilator (P.4-25)
4. Audio system** or navigation system**— RearView Monitor* (P.4-2)
— Intelligent Around View® Monitor*
(P.4-10) — Bluetooth® Hands-Free Phone Sys-
tem**
5. Front passenger supplemental air bag (P.1-40)
6. Fuse box cover (P.8-20)
7. Fuel-filler door release handle (P.3-28)
8. Hood release handle (P.3-25) 9. Steering wheel lock lever (P.3-30)
10. Driver’s front-impact air bag (P.1-40)/Horn
(P.2-54)
11. Heater/air conditioner control (P.4-26)
12. Auxiliary input jack** and USB connection port**
13. Power outlet (P.2-60)
14. Defroster switch (P.2-47)
15. Glove box (P.2-64)
*: if so equipped
**: See the separate NissanConnect® Own- er’s Manual (if so equipped).
INSTRUMENT PANEL
Page 84 of 500
2-4Instruments and controls
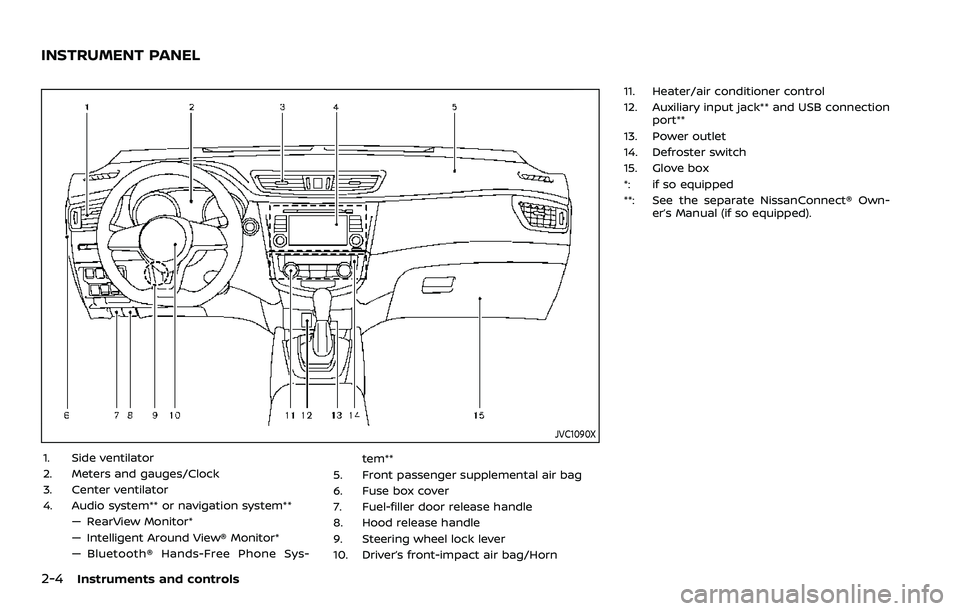
JVC1090X
1. Side ventilator
2. Meters and gauges/Clock
3. Center ventilator
4. Audio system** or navigation system**— RearView Monitor*
— Intelligent Around View® Monitor*
— Bluetooth® Hands-Free Phone Sys- tem**
5. Front passenger supplemental air bag
6. Fuse box cover
7. Fuel-filler door release handle
8. Hood release handle
9. Steering wheel lock lever
10. Driver’s front-impact air bag/Horn 11. Heater/air conditioner control
12. Auxiliary input jack** and USB connection
port**
13. Power outlet
14. Defroster switch
15. Glove box
*: if so equipped
**: See the separate NissanConnect® Own- er’s Manual (if so equipped).
INSTRUMENT PANEL
Page 99 of 500
.Rear Automatic Braking (RAB)
. Rear Sonar System (RSS)
For additional information, refer to the
“Starting and driving” section of this
manual.
NISSAN Intelligent Key® door buz-
zer (if so equipped)
The Intelligent Key door buzzer sounds if
any one of the following improper opera-
tions is found.
. The Intelligent Key is left inside the
vehicle when locking the doors.
. The Intelligent Key is left outside the
vehicle when operating the vehicle.
When the buzzer sounds, be sure to
check both the vehicle and the Intelligent
Key. For additional information, refer to
“Intelligent Key system” (P.3-11).
Brake pad wear warning
The disc brake pads have audible wear
warnings. When a brake pad requires
replacement, it will make a high pitched
scraping sound when the vehicle is in
motion. This scraping sound will first
occur only when the brake pedal is
depressed. After more wear of the brake
pad, the sound will always be heard even
if the brake pedal is not depressed. Have
the brakes checked as soon as possible if
the warning sound is heard.
Parking brake reminder chime
The parking brake reminder chime will
sound if the vehicle is driven at more than
4 MPH (7 km/h) (models not equipped
with electronic parking brake) or 2 MPH (4
km/h) (models equipped with electronic
parking brake) with the parking brake
applied. Stop the vehicle and release the
parking brake.
Seat belt warning chime
The seat belt warning chime will sound
for about 6 seconds unless the driver’s
seat belt is securely fastened.
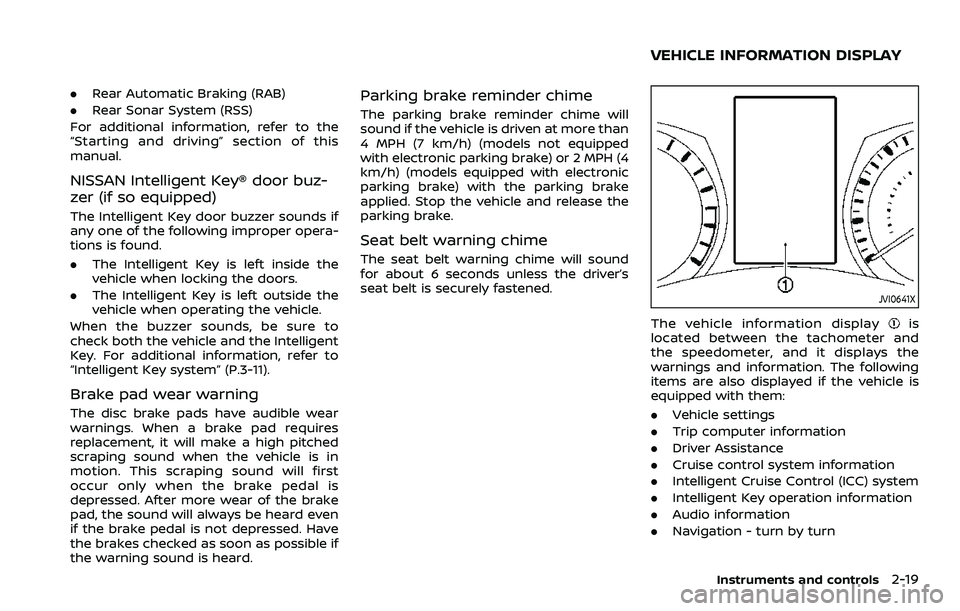
JVI0641X
The vehicle information displayis
located between the tachometer and
the speedometer, and it displays the
warnings and information. The following
items are also displayed if the vehicle is
equipped with them:
. Vehicle settings
. Trip computer information
. Driver Assistance
. Cruise control system information
. Intelligent Cruise Control (ICC) system
. Intelligent Key operation information
. Audio information
. Navigation - turn by turn
Instruments and controls2-19
VEHICLE INFORMATION DISPLAY
Page 100 of 500
2-20Instruments and controls
.Indicators and warnings
. Tire pressure information
. Chassis Control
. Other information
JVI1566X
HOW TO USE THE VEHICLE INFOR-
MATION DISPLAY
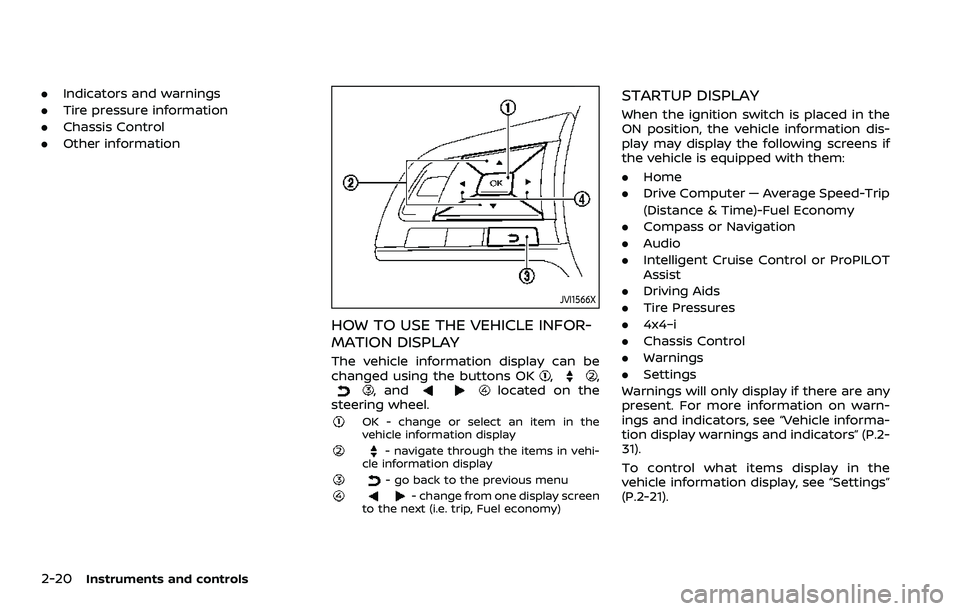
The vehicle information display can be
changed using the buttons OK,,, andlocated on the
steering wheel.
OK - change or select an item in the
vehicle information display
- navigate through the items in vehi-
cle information display
- go back to the previous menu- change from one display screen
to the next (i.e. trip, Fuel economy)
STARTUP DISPLAY
When the ignition switch is placed in the
ON position, the vehicle information dis-
play may display the following screens if
the vehicle is equipped with them:
. Home
. Drive Computer — Average Speed-Trip
(Distance & Time)-Fuel Economy
. Compass or Navigation
. Audio
. Intelligent Cruise Control or ProPILOT
Assist
. Driving Aids
. Tire Pressures
. 4x4–i
. Chassis Control
. Warnings
. Settings
Warnings will only display if there are any
present. For more information on warn-
ings and indicators, see “Vehicle informa-
tion display warnings and indicators” (P.2-
31).
To control what items display in the
vehicle information display, see “Settings”
(P.2-21).
Page 105 of 500
Remote start (if so equipped):
The “Remote start” feature allows user to
turn the remote engine start on or off.
When turned on, the engine can be
restarted remotely. For additional infor-
mation, refer to “Remote engine start”
(P.3-23).
Maintenance
The maintenance mode allows you to set
alerts for the reminding of maintenance
intervals. To change an item:
Select “Maintenance” using the
switchand press OK.
Oil and Filter:
This indicator appears when the custo-
mer set distance comes for changing the
engine oil and filter. You can set or reset
the distance for checking or replacing
these items. For scheduled maintenance
items and intervals, refer to the “9. Main-
tenance and schedules” section.
Tire:
This indicator appears when the custo-
mer set distance comes for replacing
tires. You can set or reset the distance
for replacing tires.
WARNING
The tire replacement indicator is not
a substitute for regular tire checks,
including tire pressure checks. See
“Changing wheels and tires” (P.8-37).
Many factors including tire inflation,
alignment, driving habits and road
conditions affect tire wear and when
tires should be replaced. Setting the
tire replacement indicator for a cer-
tain driving distance does not mean
your tires will last that long. Use the
tire replacement indicator as a guide
only and always perform regular tire
checks. Failure to perform regular
tire checks, including tire pressure
checks could result in tire failure.
Serious vehicle damage could occur
and may lead to a collision, which
could result in serious personal in-
jury or death.
Other:
This indicator appears when the custo-
mer set distance comes for checking or
replacing maintenance items other than
the engine oil, oil filter and tires. Other
maintenance items can include such
things as air filter or tire rotation. You
can set or reset the distance for checking or replacing the items.
Alarm (if so equipped)
This setting allows the customer to set
alarms.
Select “Alarm” using the
buttonand
press OK button.
Timer Alert (if so equipped):
This setting allows the customer to set an
alert to notify the driver that the set time
has been reached.
1. Use the
buttonto select “Timer
Alert”.
2. Press the OK button
.
3. To change the timer amount, use the
buttonand the OK buttonto
save the selected time amount.
Navigation (if so equipped):
This setting allows the customer to en-
able/disable the alert for navigation in the
vehicle information display.
1. Use the
buttonto select “Navi-
gation”.
2. Press the OK button
to turn ON/OFF
the alert.
Phone (if so equipped):
This setting allows the customer to en-
able/disable the alert for an incoming call
in the vehicle information display.
Instruments and controls2-25
Page 120 of 500
2-40Instruments and controls
.All
— Reset all items of “Average Speed”,
“Elapsed time and trip odometer”
and “Fuel economy.”
Once the “Elapsed time and trip odometer
1” is displayed, you can use
buttons
to switch between the “Elapsed time and
trip odometer 1” and “Elapsed time and
trip odometer 2.”
4-5. Fuel economy/ECO pedal
guide
Current fuel consumption:
The current fuel consumption mode
shows the current fuel consumption.
Average fuel consumption:
The average fuel consumption 1 mode
shows the average fuel consumption
since the last reset. The average fuel
consumption 2 mode shows the average
fuel consumption since the time the
ignition switch was placed in the ON
position. The average fuel consumption
2 is automatically reset each time the
ignition is placed in the OFF position.
Resetting is done by pushing the OK
button. When the OKbutton is pushed,
the following menu items are displayed.
. Cancel — Return to the previous screen with-
out resetting.
. Fuel Economy
— Reset the fuel economy.
. All
— Reset all items of “Average Speed”,
“Elapsed time and trip odometer”
and “Fuel economy”.
Once the “Fuel economy 1” is displayed,
you can use
buttons to switch
between the “Fuel economy 1” and “Fuel
economy 2”.
The display is updated every 30 seconds.
For about the first 1/3 mile (500 m) after a
reset, the display shows “——”.
6. Audio
The audio mode shows the status of
audio information.
7. Navigation (if so equipped)
When the route guidance is set in the
navigation system, this item shows the
navigation route information.
8. Compass (if so equipped)
This display indicates the heading direc-
tion of the vehicle.
9. Intelligent 4x4 torque distribution
display (if so equipped)
When the Intelligent 4x4 torque distribu-
tion display is selected, you can view the
distribution ratio of the transmission
torque to the front and rear wheels
during driving.
10. Chassis control
When Intelligent Trace Control, Intelligent
Engine Brake (Continuously Variable
Transmission (CVT) models) or Active Ride
Control system is operated, it shows the
operating condition. It also shows oper-
ating condition of Hill Start Assist. The
operating condition of the automatic
brake hold system (if so equipped) is also
shown. See “Intelligent Trace Control”
(P.5-149), “Intelligent Engine Brake (Con-
tinuously Variable Transmission (CVT)
models)” (P.5-150), “Active Ride Control”
(P.5-151), “Hill Start Assist system” (P.5-152)
or “Automatic brake hold” (P.5-29) for
more details.
11. Tire Pressures
The tire pressure mode shows the pres-
sure of all four tires while the vehicle is
driven.
When the Tire Pressure Low — Add Air
warning appears, the display can be
switched to the tire pressure mode by
Page 168 of 500
3-8Pre-driving checks and adjustments
It is possible to lock/unlock all doors
(including the liftgate), and activate the
panic alarm by using the key fob from
outside the vehicle.
Before locking the doors, make sure the
key is not left in the vehicle.
The key fob can operate at a distance of
approximately 33 ft (10 m) from the
vehicle. (The effective distance depends
upon the conditions around the vehicle.)
As many as 4 key fobs can be used with
one vehicle. For information concerning
the purchase and use of additional key
fobs, contact a NISSAN dealer.
The key fob will not function:
.When the key fob is not within the
operational range.
. When the doors are open or not
closed securely.
. When the key is in the ignition switch.
. When the battery is discharged.
WARNING
The remote keyless entry key fob
transmits radio waves when the
buttons are pushed. The FAA advises
that the radio waves may affect
aircraft navigation and communica-
tion systems. Do not operate the key fob while on an airplane. Make sure
the buttons are not operated unin-
tentionally when the unit is stored
during a flight.
CAUTION
The following conditions or occur-
rences will damage the key fob.
.
Do not allow the key fob to
become wet.
. Do not drop the key fob.
. Do not strike the key fob sharply
against another object.
. If the outside temperature is be-
low 14°F (-10°C) degrees, the bat-
tery of key fob may not function
properly.
. Do not place the key fob for an
extended period in an area where
temperatures exceed 140°F
(60°C).
If a key fob is lost or stolen, NISSAN
recommends erasing the ID code of
that key fob. This will prevent the key
fob from unauthorized use to unlock
the vehicle. For information regard-
ing the erasing procedure, it is re-
commended that you visit a NISSAN dealer.
For information regarding the replace-
ment of a battery, see “Key fob battery
replacement” (P.8-21).
REMOTE KEYLESS ENTRY SYSTEM
(if so equipped)