2019 NISSAN ROGUE SPORT alarm
[x] Cancel search: alarmPage 101 of 500
SETTINGS
The setting mode allows you to change
the information displayed in the vehicle
information display:
.Driver Assistance
. Clock
. Meter Settings
. Vehicle Settings
. Maintenance
. Alarm (if so equipped)
. Tire Pressures
. Unit
. Language
. Factory Reset
Driver Assistance
To change the status, warnings or turn on
or off any of the systems/warnings dis-
played in the “Driver Assistance” menu,
use the
buttonsto select and the
OKto change a menu item:
. Driving Aids
. Parking Aids (if so equipped)
. Chassis Control (if so equipped)
. Power Steering (if so equipped)
Driving Aids:
To change the status, warnings or turn on
or off any of the systems/warnings dis-
played in the “Driving Aids” menu, use the
buttonsto select and the OKto
change a menu item:
. Steering Assist (if so equipped)
Allows user to turn the Steering Assist
ON/OFF.
. Emergency Brake
— Front
Allows user to turn the Automatic
Emergency Braking (AEB) system
ON/OFF
— Rear (if so equipped) Allows user to turn the Rear Auto-
matic Braking (RAB) system ON/
OFF.
. Lane (if so equipped)
— Warning (LDW)
Allows user to turn the Lane De-
parture Warning (LDW) system ON/
OFF.
— Prevention (LDP) Allows user to turn the Intelligent
Lane Intervention (I-LI) system ON/
OFF.
. Blind Spot
— Warning (BSW)
Allows user to turn the Blind Spot
Warning (BSW) system ON/OFF.
For additional information, see “ProPILOT
assist” (P.5-86), “Automatic Emergency
Braking (AEB)” (P.5-115), “Automatic Emer-
gency Braking (AEB) with pedestrian de- tection system” (P.5-122), “Rear Automatic
Braking (RAB)” (P.5-132), “Lane Departure
Warning (LDW)” (P.5-35), “Intelligent Lane
Intervention (I-LI)” (P.5-107), and “Blind
Spot Warning (BSW)” (P.5-46).
Parking Aids (if so equipped):
To change the status or turn on or off any
of the systems displayed in the “Parking
Aids” menu, use the
buttonsto
select and the OKto change a menu
item:
. Moving Object (if so equipped)
Press the OK
to turn the Moving
Object Detection (MOD) ON/OFF.
. Cross Traffic
Press the OK
to turn the Rear Cross
Traffic Alert (RCTA) ON/OFF.
. Rear Sensor (if so equipped)
Allows user to turn the rear sensor
ON/OFF.
. Display (if so equipped)
Allows user to turn the Rear Sonar
System (RSS) display ON/OFF.
. Volume (if so equipped)
Allows user to select sensor volume
(High, Med. or Low).
. Range (if so equipped)
Allows user to select the sensor range
(Far, Mid. or Near).
For additional information, see “Moving
Instruments and controls2-21
Page 105 of 500
Remote start (if so equipped):
The “Remote start” feature allows user to
turn the remote engine start on or off.
When turned on, the engine can be
restarted remotely. For additional infor-
mation, refer to “Remote engine start”
(P.3-23).
Maintenance
The maintenance mode allows you to set
alerts for the reminding of maintenance
intervals. To change an item:
Select “Maintenance” using the
switchand press OK.
Oil and Filter:
This indicator appears when the custo-
mer set distance comes for changing the
engine oil and filter. You can set or reset
the distance for checking or replacing
these items. For scheduled maintenance
items and intervals, refer to the “9. Main-
tenance and schedules” section.
Tire:
This indicator appears when the custo-
mer set distance comes for replacing
tires. You can set or reset the distance
for replacing tires.
WARNING
The tire replacement indicator is not
a substitute for regular tire checks,
including tire pressure checks. See
“Changing wheels and tires” (P.8-37).
Many factors including tire inflation,
alignment, driving habits and road
conditions affect tire wear and when
tires should be replaced. Setting the
tire replacement indicator for a cer-
tain driving distance does not mean
your tires will last that long. Use the
tire replacement indicator as a guide
only and always perform regular tire
checks. Failure to perform regular
tire checks, including tire pressure
checks could result in tire failure.
Serious vehicle damage could occur
and may lead to a collision, which
could result in serious personal in-
jury or death.
Other:
This indicator appears when the custo-
mer set distance comes for checking or
replacing maintenance items other than
the engine oil, oil filter and tires. Other
maintenance items can include such
things as air filter or tire rotation. You
can set or reset the distance for checking or replacing the items.
Alarm (if so equipped)
This setting allows the customer to set
alarms.
Select “Alarm” using the
buttonand
press OK button.
Timer Alert (if so equipped):
This setting allows the customer to set an
alert to notify the driver that the set time
has been reached.
1. Use the
buttonto select “Timer
Alert”.
2. Press the OK button
.
3. To change the timer amount, use the
buttonand the OK buttonto
save the selected time amount.
Navigation (if so equipped):
This setting allows the customer to en-
able/disable the alert for navigation in the
vehicle information display.
1. Use the
buttonto select “Navi-
gation”.
2. Press the OK button
to turn ON/OFF
the alert.
Phone (if so equipped):
This setting allows the customer to en-
able/disable the alert for an incoming call
in the vehicle information display.
Instruments and controls2-25
Page 122 of 500
2-42Instruments and controls
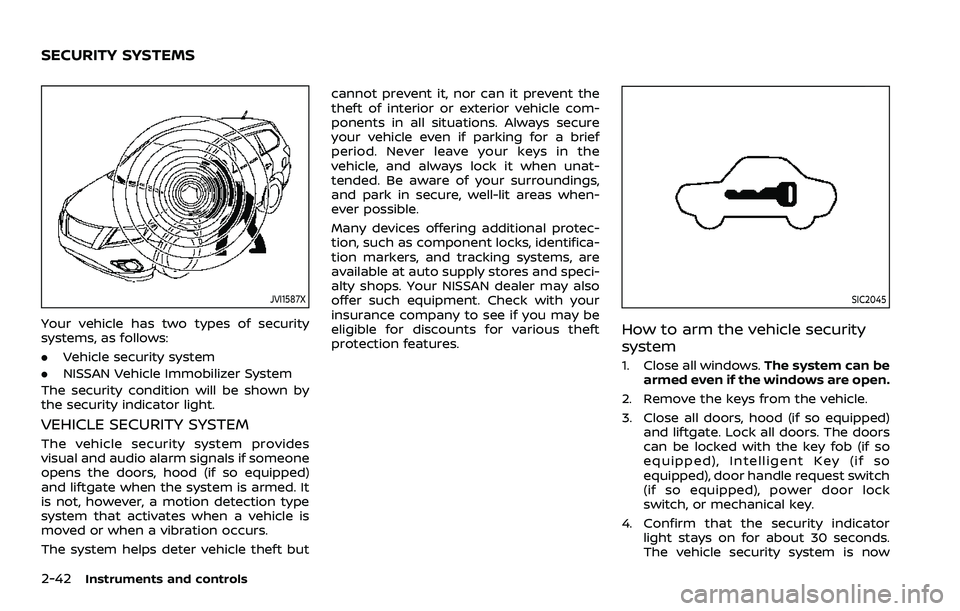
JVI1587X
Your vehicle has two types of security
systems, as follows:
.Vehicle security system
. NISSAN Vehicle Immobilizer System
The security condition will be shown by
the security indicator light.
VEHICLE SECURITY SYSTEM
The vehicle security system provides
visual and audio alarm signals if someone
opens the doors, hood (if so equipped)
and liftgate when the system is armed. It
is not, however, a motion detection type
system that activates when a vehicle is
moved or when a vibration occurs.
The system helps deter vehicle theft but cannot prevent it, nor can it prevent the
theft of interior or exterior vehicle com-
ponents in all situations. Always secure
your vehicle even if parking for a brief
period. Never leave your keys in the
vehicle, and always lock it when unat-
tended. Be aware of your surroundings,
and park in secure, well-lit areas when-
ever possible.
Many devices offering additional protec-
tion, such as component locks, identifica-
tion markers, and tracking systems, are
available at auto supply stores and speci-
alty shops. Your NISSAN dealer may also
offer such equipment. Check with your
insurance company to see if you may be
eligible for discounts for various theft
protection features.
SIC2045
How to arm the vehicle security
system
1. Close all windows.
The system can be
armed even if the windows are open.
2. Remove the keys from the vehicle.
3. Close all doors, hood (if so equipped) and liftgate. Lock all doors. The doors
can be locked with the key fob (if so
equipped), Intelligent Key (if so
equipped), door handle request switch
(if so equipped), power door lock
switch, or mechanical key.
4. Confirm that the security indicator light stays on for about 30 seconds.
The vehicle security system is now
SECURITY SYSTEMS
Page 123 of 500
pre-armed. The vehicle security sys-
tem will automatically shift into the
armed phase. The security light begins
to flash once every three seconds. If
during the pre-armed phase one of
the following occurs, the system will
not arm:
.Any door is unlocked with the keyfob (if so equipped), the Intelligent
Key (if so equipped), mechanical
key, or door request switch.
.Ignition switch is placed in the ONposition.
Even when the driver and/or passen-
gers are in the vehicle, the system will
activate with all the doors, hood (if so
equipped) and liftgate locked with the
ignition switch placed in the LOCK posi-
tion. When placing the ignition switch in
the ON position, the system will be
released.
Vehicle security system activation
The vehicle security system will give the
following alarm:
. The headlights blink and the horn
sounds intermittently.
. The alarm automatically turns off
after approximately 50 seconds. How-
ever, the alarm reactivates if the
vehicle is tampered with again. The alarm is activated by:
.
opening any doors, the hood (if so
equipped) or liftgate without using the
key or Intelligent Key (even if the door
is unlocked by releasing the door
inside lock knob).
How to stop an activated alarm
The alarm stops only by unlocking a door
or the liftgate with the mechanical key,
pressing the UNLOCK
button on the
key fob (if so equipped) or the Intelligent
Key (if so equipped), or pushing the
request switch (if so equipped) on the
driver’s or passenger’s door in range of
the door handle.
NISSAN VEHICLE IMMOBILIZER SYS-
TEM
The NISSAN Vehicle Immobilizer System
will not allow the engine to start without
the use of the registered key.
If the engine fails to start using the
registered key, it may be due to inter-
ference caused by another registered key,
an automated toll road device or auto-
mated payment device on the key ring.
Restart the engine using the following
procedures:
1. Leave the ignition switch in the ON
position for approximately 5 seconds. 2. Place the ignition switch in the OFF or
LOCK position and wait approximately
10 seconds.
3. Repeat step 1 and 2 again.
4. Restart the engine while holding the device (which may have caused the
interference) separate from the regis-
tered key.
If this procedure allows the engine to
start, NISSAN recommends placing the
registered key on a separate key ring
to avoid interference from other de-
vices.
Statement related to section 15 of FCC
rules for NISSAN Vehicle Immobilizer
System (CONT ASSY-BCM. ANT ASSY-
IMMOBILISER)
FCC Notice:
For USA:
This device complies with Part 15 of the
FCC Rules. Operation is subject to the
following two conditions: (1) This device
may not cause harmful interference,
and (2) this device must accept any
interference received, including inter-
ference that may cause undesired op-
eration.
Note: Changes or modifications not
expressly approved by the party re-
sponsible for compliance could void
the user’s authority to operate the
Instruments and controls2-43
Page 168 of 500
3-8Pre-driving checks and adjustments
It is possible to lock/unlock all doors
(including the liftgate), and activate the
panic alarm by using the key fob from
outside the vehicle.
Before locking the doors, make sure the
key is not left in the vehicle.
The key fob can operate at a distance of
approximately 33 ft (10 m) from the
vehicle. (The effective distance depends
upon the conditions around the vehicle.)
As many as 4 key fobs can be used with
one vehicle. For information concerning
the purchase and use of additional key
fobs, contact a NISSAN dealer.
The key fob will not function:
.When the key fob is not within the
operational range.
. When the doors are open or not
closed securely.
. When the key is in the ignition switch.
. When the battery is discharged.
WARNING
The remote keyless entry key fob
transmits radio waves when the
buttons are pushed. The FAA advises
that the radio waves may affect
aircraft navigation and communica-
tion systems. Do not operate the key fob while on an airplane. Make sure
the buttons are not operated unin-
tentionally when the unit is stored
during a flight.
CAUTION
The following conditions or occur-
rences will damage the key fob.
.
Do not allow the key fob to
become wet.
. Do not drop the key fob.
. Do not strike the key fob sharply
against another object.
. If the outside temperature is be-
low 14°F (-10°C) degrees, the bat-
tery of key fob may not function
properly.
. Do not place the key fob for an
extended period in an area where
temperatures exceed 140°F
(60°C).
If a key fob is lost or stolen, NISSAN
recommends erasing the ID code of
that key fob. This will prevent the key
fob from unauthorized use to unlock
the vehicle. For information regard-
ing the erasing procedure, it is re-
commended that you visit a NISSAN dealer.
For information regarding the replace-
ment of a battery, see “Key fob battery
replacement” (P.8-21).
REMOTE KEYLESS ENTRY SYSTEM
(if so equipped)
Page 169 of 500
JVP0308X
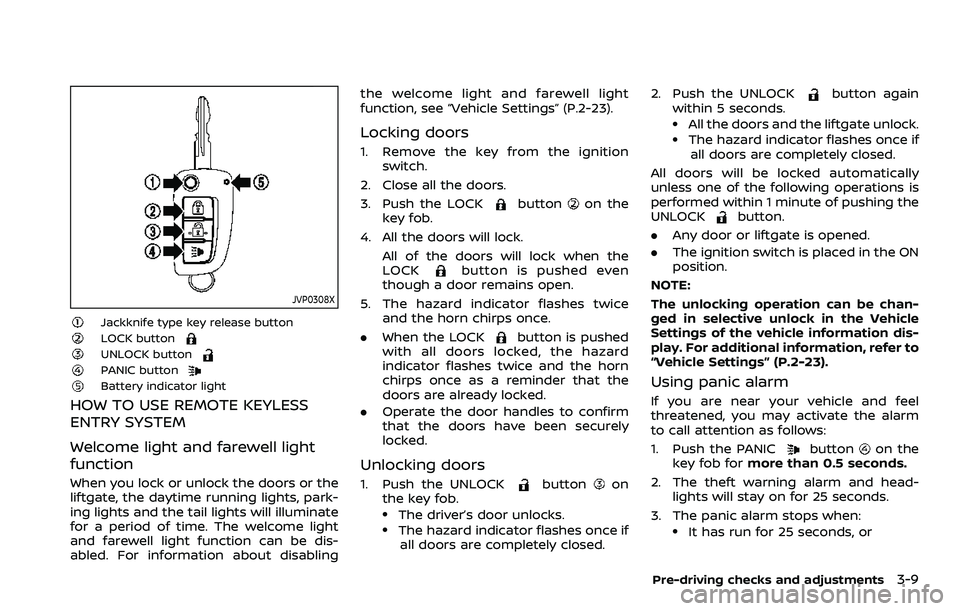
Jackknife type key release buttonLOCK buttonUNLOCK buttonPANIC buttonBattery indicator light
HOW TO USE REMOTE KEYLESS
ENTRY SYSTEM
Welcome light and farewell light
function
When you lock or unlock the doors or the
liftgate, the daytime running lights, park-
ing lights and the tail lights will illuminate
for a period of time. The welcome light
and farewell light function can be dis-
abled. For information about disablingthe welcome light and farewell light
function, see “Vehicle Settings” (P.2-23).
Locking doors
1. Remove the key from the ignition
switch.
2. Close all the doors.
3. Push the LOCK
buttonon the
key fob.
4. All the doors will lock. All of the doors will lock when the
LOCK
button is pushed even
though a door remains open.
5. The hazard indicator flashes twice and the horn chirps once.
. When the LOCK
button is pushed
with all doors locked, the hazard
indicator flashes twice and the horn
chirps once as a reminder that the
doors are already locked.
. Operate the door handles to confirm
that the doors have been securely
locked.
Unlocking doors
1. Push the UNLOCKbuttonon
the key fob.
.The driver’s door unlocks..The hazard indicator flashes once if
all doors are completely closed. 2. Push the UNLOCK
button again
within 5 seconds.
.All the doors and the liftgate unlock..The hazard indicator flashes once if all doors are completely closed.
All doors will be locked automatically
unless one of the following operations is
performed within 1 minute of pushing the
UNLOCK
button.
. Any door or liftgate is opened.
. The ignition switch is placed in the ON
position.
NOTE:
The unlocking operation can be chan-
ged in selective unlock in the Vehicle
Settings of the vehicle information dis-
play. For additional information, refer to
“Vehicle Settings” (P.2-23).
Using panic alarm
If you are near your vehicle and feel
threatened, you may activate the alarm
to call attention as follows:
1. Push the PANIC
buttonon the
key fob for more than 0.5 seconds.
2. The theft warning alarm and head- lights will stay on for 25 seconds.
3. The panic alarm stops when:
.It has run for 25 seconds, or
Pre-driving checks and adjustments3-9
Page 179 of 500
HOW TO USE REMOTE KEYLESS
ENTRY FUNCTION
WARNING
.Radio waves could adversely af-
fect electric medical equipment.
Those who use a pacemaker
should contact the electric med-
ical equipment manufacturer for
the possible influences before
use.
. The Intelligent Key transmits
radio waves when the buttons
are pushed. The FAA advises that
the radio waves may affect air-
craft navigation and communica-
tion systems. Do not operate the
Intelligent Key while on an air-
plane. Make sure the buttons are
not operated unintentionally
when the unit is stored during a
flight.
CAUTION
.Do not allow the Intelligent Key,
which contains electrical compo-
nents, to come into contact with
water or salt water. This could affect the system function.
. Do not drop the Intelligent Key.
. Do not strike the Intelligent Key
sharply against another object.
. Do not change or modify the
Intelligent Key.
. Wetting may damage the Intelli-
gent Key. If the Intelligent Key
gets wet, immediately wipe until
it is completely dry.
. If the outside temperature is be-
low 14°F (-10°C) degrees, the bat-
tery of the Intelligent Key may not
function properly.
. Do not place the Intelligent Key
for an extended period in an area
where temperatures exceed
140°F (60°C).
. Do not attach the Intelligent Key
with a key holder that contains a
magnet.
. Do not place the Intelligent Key
near equipment that produces a
magnetic field, such as a TV,
audio equipment, personal com-
puters or cellular phone.
The remote keyless entry function can
operate all door locks using the remote
keyless entry function of the Intelligent Key. The remote keyless entry function
can operate at a distance of approxi-
mately 33 ft (10 m) from the vehicle. (The
operating distance depends upon the
conditions around the vehicle.)
The remote keyless entry function will not
operate:
.
When the Intelligent Key is not within
the operational range.
. When the doors are open or not
closed securely.
. When the Intelligent Key battery is
discharged.
The remote keyless entry function can
also operate the vehicle alarm.
Pre-driving checks and adjustments3-19
Page 181 of 500
Using panic alarm
If you are near your vehicle and feel
threatened, you may activate the alarm
to call attention as follows:
1. Push the PANIC
buttonon the
Intelligent Key for more than 0.5
seconds.
2. The theft warning alarm and head- lights will stay on for 25 seconds.
3. The panic alarm stops when:
.It has run for 25 seconds, or.Any of the buttons on the Intelligent Key is pushed. (Note: the PANIC
button must be pushed for more
than 0.5 seconds.)
Remote engine start (if so
equipped)
The remote engine startbuttonis
on the Intelligent Key if the vehicle has
remote engine start function. This func-
tion allows the engine to start from
outside the vehicle. See “Remote engine
start” (P.3-23).
Setting hazard indicator and horn
mode
This vehicle is set in hazard indicator and
horn mode when you first receive the
vehicle.
In hazard indicator and horn mode, when
the LOCK
buttonis pushed, the
hazard indicator flashes twice and the
horn chirps once. When the UNLOCK
buttonis pushed, the hazard indicator
flashes once.
If horns are not necessary, the system
can be switched to the hazard indicator
mode.
In hazard indicator mode, when the LOCK
button is pushed, the hazard indica-
tor flashes twice. When the UNLOCK
button is pushed, neither the hazard
indicator nor the horn operates.
Pre-driving checks and adjustments3-21