2019 NISSAN ROGUE SPORT ESP
[x] Cancel search: ESPPage 247 of 500
1. Apply the parking brake.
2.Continuously Variable Transmission
(CVT) model:
Move the shift lever to the P (Park) or N
(Neutral) position. (P is recommended.)
The starter is designed not to operate
unless the shift lever is in either of the
above positions.
Manual Transmission (MT) model:
Move the shift lever to the N (Neutral)
position. Depress the clutch pedal fully
to the floor.
The starter is designed not to operate
unless the clutch pedal is fully de-
pressed.
The Intelligent Key must be carried
when operating the ignition switch.
3. Push the ignition switch to the ON position. Depress the brake pedal (CVT
models) or the clutch pedal (MT mod-
els) and push the ignition switch to
start the engine.
To start the engine immediately, push
and release the ignition switch while
depressing the brake pedal (CVT mod-
els) or the clutch pedal (MT models)
with the ignition switch in any posi-
tion.
.If the engine is very hard to start in
extremely cold weather or when restarting, depress the accelerator
pedal a little (approximately 1/3 to
the floor) and while holding, crank
the engine. Release the accelerator
pedal when the engine starts.
.If the engine is very hard to start
because it is flooded, depress the
accelerator pedal all the way to the
floor and hold it. Push the ignition
switch to the ON position to start
cranking the engine. After 5 or 6
seconds, stop cranking by pushing
the ignition switch to OFF. After
cranking the engine, release the
accelerator pedal. Crank the engine
with your foot off the accelerator
pedal by depressing the brake
pedal and pushing the push-button
ignition switch to start the engine.
If the engine starts, but fails to run,
repeat the above procedure.
CAUTION
Do not operate the starter for more
than 15 seconds at a time. If the
engine does not start, push the
ignition switch to OFF and wait 10
seconds before cranking again,
otherwise the starter could be da-
maged. 4.
Warm-up
Allow the engine to idle for at least 30
seconds after starting. Do not race the
engine while warming it up. Drive at
moderate speed for a short distance
first, especially in cold weather. In cold
weather, keep the engine running for
a minimum of 2 - 3 minutes before
shutting it off. Starting and stopping
the engine over a short period of time
may make the vehicle more difficult to
start.
When racing the engine up to 4,000
rpm or more under no load condition,
the engine will enter the fuel cut
mode.
5. To stop the engine, move the shift lever to the P (Park) position (CVT
models) or move the shift lever to
the N (Neutral) position (MT models),
and push the ignition switch to the
OFF position.
NOTE:
Care should be taken to avoid situations
that can lead to potential battery dis-
charge and potential no-start condi-
tions such as:
1. Installation or extended use of elec-
tronic accessories that consume
battery power when the engine is
not running (Phone chargers, GPS,
DVD players, etc.)
Starting and driving5-19
STARTING THE ENGINE (model
with Intelligent Key system)
Page 251 of 500
M4 (4th), M3 (3rd) and M2 (2nd) :
Use these positions for hill climbing or
engine braking on downhill grades.
M1 (1st):
Use this position when climbing steep
hills slowly or driving slowly through deep
snow, sand or mud, or for maximum
engine braking on steep downhill grades.
.Remember not to drive at high speeds
for extended periods of time in lower
than M7 range. This reduces fuel
economy.
. In the manual shift mode, the trans-
mission may not shift to the se-
lected range. This helps maintain
driving performance and reduces
the chance of vehicle damage or
loss of control.
. In the manual shift mode, the trans-
mission automatically shifts down
to 1st gear before the vehicle comes
to a stop. When accelerating again, it
is necessary to shift up to the
desired range.
. When the CVT fluid temperature is
extremely low, the manual shift mode
may not work and automatically shift
as a drive mode. This is not a mal-
function. In this case, return the shift
lever to the D (Drive) position and drive
for a while and then shift to the manual shift mode.
. When the CVT fluid temperature is
high, the shift range may upshift at a
lower engine speed than usual. This is
not a malfunction.Accelerator downshift — In D posi-
tion —
For passing or hill climbing, fully depress
the accelerator pedal to the floor. This
shifts the transmission down into a lower
gear, depending on the vehicle speed.
High fluid temperature protection
mode
This transmission has a high fluid tem-
perature protection mode. If the fluid
temperature becomes too high (for ex-
ample, when climbing steep grades in
high temperature with heavy loads), en-
gine power and, under some conditions,
vehicle speed will be decreased automa-
tically to reduce the chance of transmis-
sion damage. Vehicle speed can be
controlled with the accelerator pedal,
but the engine and vehicle speed may
be limited.
Fail-safe
If the vehicle is driven under extreme
conditions, such as excessive wheel
spinning and subsequent hard braking,
the fail-safe system may be activated.
The MIL may illuminate to indicate the
fail-safe mode is activated. (See “Mal-
function Indicator Light (MIL)” (P.2-17).)
This will occur even if all electrical
circuits are functioning properly. In this
case, place the ignition switch in the
OFF position and wait for 10 seconds.
Then turn the switch back to the ON
position. The vehicle should return to its
normal operating condition. If it does
not return to its normal operating con-
dition, have the transmission checked
and repaired, if necessary. It is recom-
mended you visit a NISSAN dealer for
this service.
WARNING
When the high fluid temperature
protection mode or fail-safe opera-
tion occurs, vehicle speed may be
gradually reduced. The reduced
speed may be lower than other
traffic, which could increase the
chance of a collision. Be especially
careful when driving. If necessary,
pull to the side of the road at a safe
Starting and driving5-23
Page 253 of 500
4. Insert the mechanical key and pushdown the shift lock release.
5. Push the shift lever button and move the shift lever to the N (Neutral)
position while holding down the shift
lock release.
Place the ignition switch in the ON posi-
tion. The vehicle may be moved to the
desired location.
Replace the removed shift lock release
cover after the operation.
If the shift lever cannot be moved out of
the P (Park) position, have the CVT system
checked as soon as possible. It is recom-
mended you visit a NISSAN dealer for this
service.
WARNING
If the shift lever cannot be moved
from the P (Park) position while the
engine is running and the brake
pedal is depressed, the stop lights
may not work. Malfunctioning stop
lights could cause an accident injur-
ing yourself and others.
MANUAL TRANSMISSION (MT)
WARNING
. Do not downshift abruptly on
slippery roads. This may cause a
loss of control.
. Do not over-rev the engine when
shifting to a lower gear. This may
cause a loss of control or engine
damage.
. When the high fluid temperature
protection mode or fail-safe op-
eration occurs, vehicle speed may
be gradually reduced. The re-
duced speed may be lower than
other traffic, which could increase
the chance of a collision. Be
especially careful when driving. If
necessary, pull to the side of the
road at a safe place and allow the
transmission to return to normal
operation, or have it repaired if
necessary.
CAUTION
.Do not rest your foot on the
clutch pedal while driving. This
may damage the clutch.
. Fully depress the clutch pedal
before shifting to help prevent
transmission damage.
. Stop your vehicle completely be-
fore shifting into R (Reverse).
. When the vehicle is stopped for a
period of time, for example at a
stop light, shift to N (Neutral) and
release the clutch pedal with the
foot brake applied.
Starting and driving5-25
Page 263 of 500
WARNING
Failure to follow the warnings and
instructions for proper use of the
LDW system could result in serious
injury or death.
.This system is only a warning
device to inform the driver of a
potential unintended lane depar-
ture. It will not steer the vehicle or
prevent loss of control. It is the
driver’s responsibility to stay
alert, drive safely, keep the vehi-
cle in the traveling lane, and be in
control of the vehicle at all times.
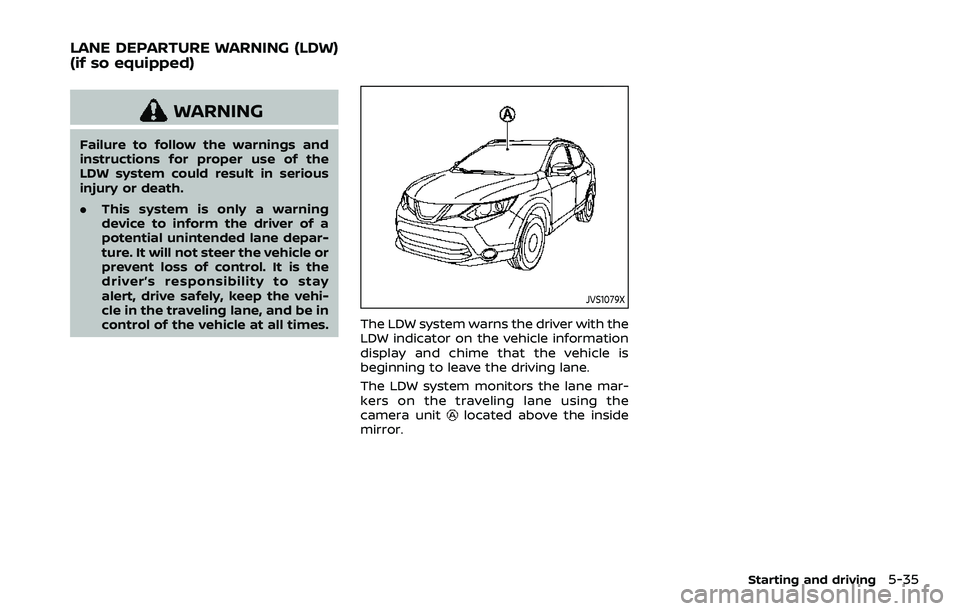
JVS1079X
The LDW system warns the driver with the
LDW indicator on the vehicle information
display and chime that the vehicle is
beginning to leave the driving lane.
The LDW system monitors the lane mar-
kers on the traveling lane using the
camera unit
located above the inside
mirror.
Starting and driving5-35
LANE DEPARTURE WARNING (LDW)
(if so equipped)
Page 268 of 500
5-40Starting and driving
.Do not strike or damage the areas
around the camera unit. Do not touch
the camera lens or remove the screw
located on the camera unit. If the
camera unit is damaged due to an
accident, it is recommended that you
visit a NISSAN dealer.
WARNING
Failure to follow the warnings and
instructions for proper use of the I-LI
system could result in serious injury
or death.
.The I-LI system will not steer the
vehicle or prevent loss of control.
It is the driver’s responsibility to
stay alert, drive safely, keep the
vehicle in the traveling lane, and
be in control of the vehicle at all
times.
. The I-LI system is primarily in-
tended for use on well-developed
freeways or highways. It may not
detect the lane markers in certain
road, weather, or driving condi-
tions.
JVS1079X
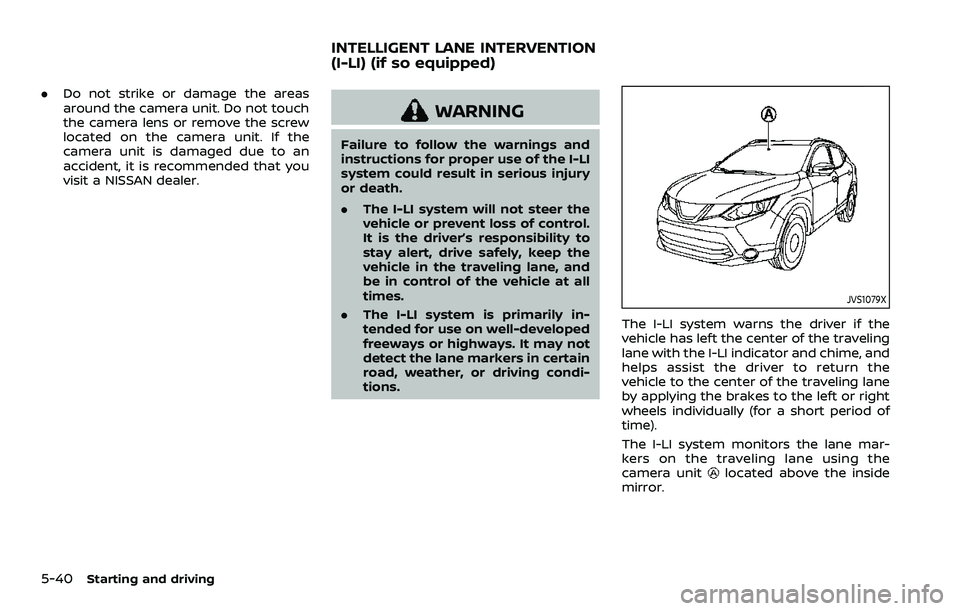
The I-LI system warns the driver if the
vehicle has left the center of the traveling
lane with the I-LI indicator and chime, and
helps assist the driver to return the
vehicle to the center of the traveling lane
by applying the brakes to the left or right
wheels individually (for a short period of
time).
The I-LI system monitors the lane mar-
kers on the traveling lane using the
camera unit
located above the inside
mirror.
INTELLIGENT LANE INTERVENTION
(I-LI) (if so equipped)
Page 283 of 500
SYSTEM MALFUNCTION
When the BSW system malfunctions, it will
be turned off automatically and the
system malfunction warning message will
appear in the vehicle information display.
NOTE:
If the BSW system stops working, the
RCTA system will also stop working.
Action to take:
Stop the vehicle in a safe location, turn
the engine off and restart the engine. If
the message continues to appear, have
the BSW system checked. It is recom-
mended that you visit a NISSAN dealer for
this service.
JVS0649X
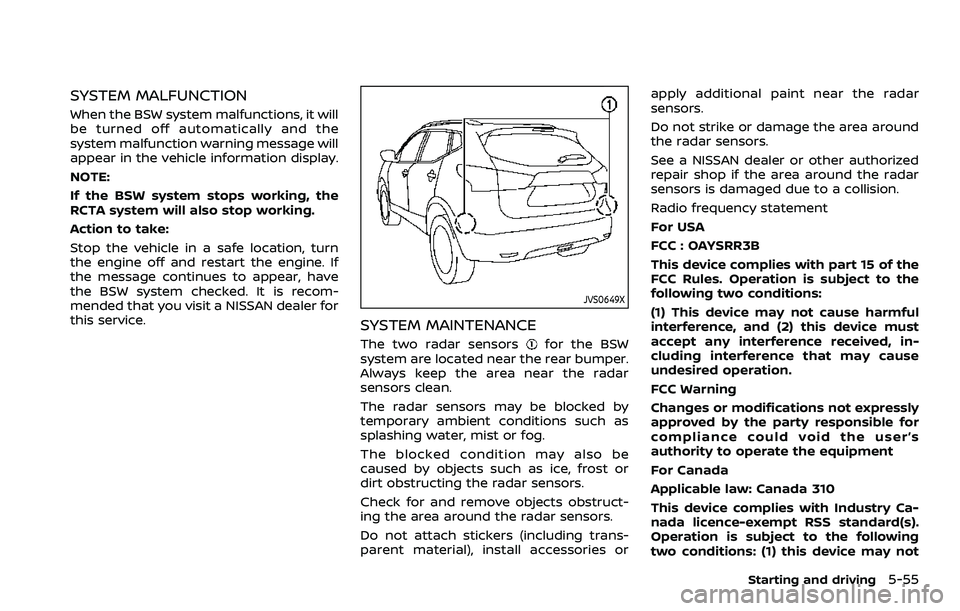
SYSTEM MAINTENANCE
The two radar sensorsfor the BSW
system are located near the rear bumper.
Always keep the area near the radar
sensors clean.
The radar sensors may be blocked by
temporary ambient conditions such as
splashing water, mist or fog.
The blocked condition may also be
caused by objects such as ice, frost or
dirt obstructing the radar sensors.
Check for and remove objects obstruct-
ing the area around the radar sensors.
Do not attach stickers (including trans-
parent material), install accessories or apply additional paint near the radar
sensors.
Do not strike or damage the area around
the radar sensors.
See a NISSAN dealer or other authorized
repair shop if the area around the radar
sensors is damaged due to a collision.
Radio frequency statement
For USA
FCC : OAYSRR3B
This device complies with part 15 of the
FCC Rules. Operation is subject to the
following two conditions:
(1) This device may not cause harmful
interference, and (2) this device must
accept any interference received, in-
cluding interference that may cause
undesired operation.
FCC Warning
Changes or modifications not expressly
approved by the party responsible for
compliance could void the user’s
authority to operate the equipment
For Canada
Applicable law: Canada 310
This device complies with Industry Ca-
nada licence-exempt RSS standard(s).
Operation is subject to the following
two conditions: (1) this device may not
Starting and driving5-55
Page 292 of 500
5-64Starting and driving
apply additional paint near the radar
sensors.
Do not strike or damage the area around
the radar sensors. It is recommended that
you visit a NISSAN dealer if the area
around the radar sensors is damaged
due to a collision.
Radio frequency statement
For USA
FCC : OAYSRR3B
This device complies with part 15 of the
FCC Rules. Operation is subject to the
following two conditions:
(1) This device may not cause harmful
interference, and (2) this device must
accept any interference received, in-
cluding interference that may cause
undesired operation.
FCC Warning
Changes or modifications not expressly
approved by the party responsible for
compliance could void the user’s
authority to operate the equipment
For Canada
Applicable law: Canada 310
This device complies with Industry Ca-
nada licence-exempt RSS standard(s).
Operation is subject to the following
two conditions: (1) this device may not
cause interference, and (2) this devicemust accept any interference, including
interference that may cause undesired
operation of the device.
Frequency bands: 24.05 – 24.25GHz
Output power: less than 20 milliwatts
JVS1005X
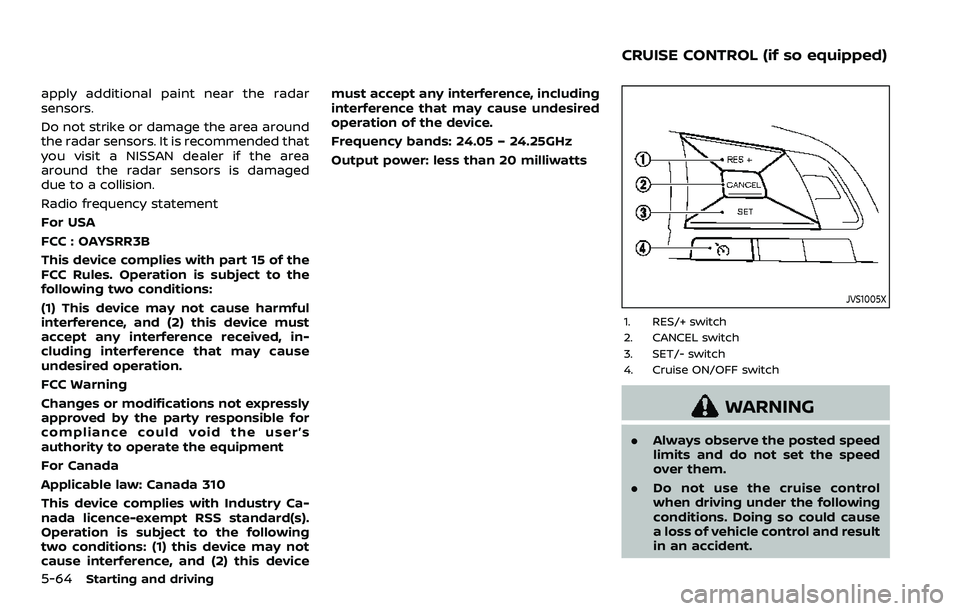
1. RES/+ switch
2. CANCEL switch
3. SET/- switch
4. Cruise ON/OFF switch
WARNING
.
Always observe the posted speed
limits and do not set the speed
over them.
. Do not use the cruise control
when driving under the following
conditions. Doing so could cause
a loss of vehicle control and result
in an accident.
CRUISE CONTROL (if so equipped)
Page 294 of 500
5-66Starting and driving
.Quickly push and release the SET/-
switch. This will reduce the vehicle
speed by about 1 MPH (1.6 km/h).
Resetting to faster speed:
Use any one of the following methods to
reset to a faster speed.
. Depress the accelerator pedal. When
the vehicle reaches the desired speed,
push and release the SET/- switch.
. Push and hold the RES/+switch. When
the vehicle reaches the desired speed,
release the RES/+ switch.
. Quickly push and release the RES/+
switch. This will increase the vehicle
speed by about 1 MPH (1.6 km/h).
Resuming at preset speed:
Push and release the RES/+ switch.
The vehicle will resume the last set
cruising speed when the vehicle speed is
over 25 MPH (40 km/h).
Cancelling cruising speed
Use any one of the following methods to
cancel the set speed.
. Push the CANCEL switch.
. Tap the foot brake pedal.
. Push the Cruise ON/OFF switch. The
CRUISE indicator will turn off.
WARNING
Failure to follow the warnings and
instructions for proper use of the ICC
system could result in serious injury
or death.
.ICC is not a collision avoidance or
warning device. For highway use
only and it is not intended for
congested areas or city driving.
Failure to apply the brakes could
result in an accident.
. The ICC system is only an aid to
assist the driver. It is the driver’s
responsibility to stay alert, drive
safely, and be in control of the
vehicle at all times.
. Always observe posted speed
limits and do not set the speed
over them.
. Always drive carefully and atten-
tively when using either cruise
control mode. Read and under-
stand the Owner’s Manual thor-
oughly before using the cruise
control. To avoid serious injury
or death, do not rely on the
system to prevent accidents or
to control the vehicle’s speed in
emergency situations. Do not use cruise control except in appropri-
ate road and traffic conditions.
. In the conventional (fixed speed)
cruise control mode, a warning
chime will not sound to warn you
if you are too close to the vehicle
ahead. Pay special attention to
the distance between your vehi-
cle and the vehicle ahead of you
or a collision could occur.
NOTE:
For vehicles equipped with ProPILOT
assist, refer to “ProPILOT assist” (P.5-
86).
The ICC system maintains a selected
distance from the vehicle in front of you
within the speed range of 0 to 90 MPH (0
to 144 km/h) up to the set speed.
The set speed can be selected by the
driver between 20 to 90 MPH (32 to 144
km/h).
The vehicle travels at a set speed when
the road ahead is clear.
The ICC system can be set to one of two
cruise control modes.
. Vehicle-to-vehicle distance control
mode:
For maintaining a selected distance
between your vehicle and the vehicle
INTELLIGENT CRUISE CONTROL
(ICC) (models without ProPILOT
assist) (if so equipped)