Page 275 of 536
CAUTION
Do not leave the vehicle with the
push-button ignition switch in ACC or
ON positions when the engine is not
running for an extended period. This
can discharge the battery.
EMERGENCY ENGINE SHUT OFF
To shut off the engine in an emergency
situation while driving, perform the fol-
lowing procedure:
.Rapidly push the push-button ignition
switch 3 consecutive times in less
than 1.5 seconds, or
. Push and hold the push-button igni-
tion switch for more than 2 seconds.
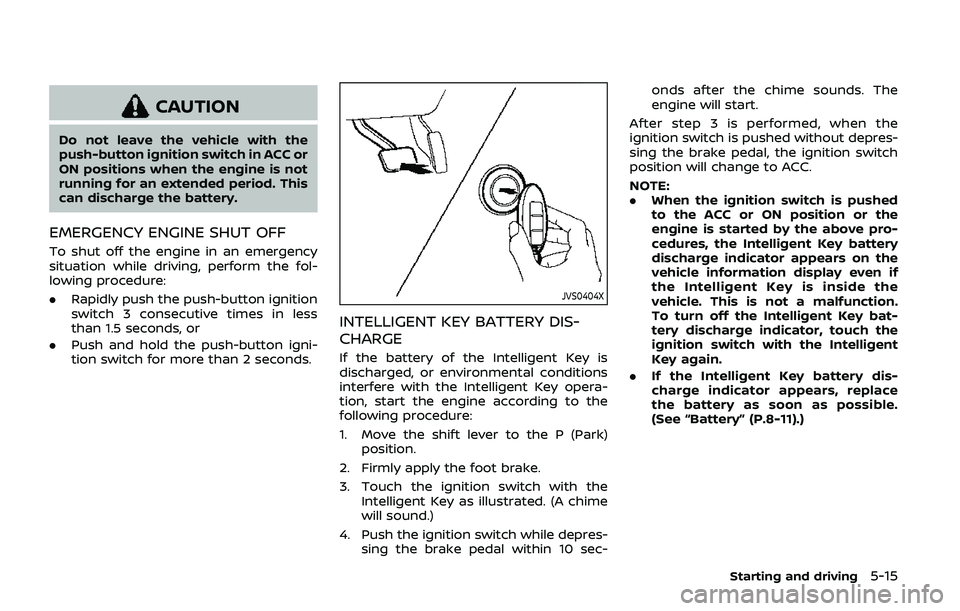
JVS0404X
INTELLIGENT KEY BATTERY DIS-
CHARGE
If the battery of the Intelligent Key is
discharged, or environmental conditions
interfere with the Intelligent Key opera-
tion, start the engine according to the
following procedure:
1. Move the shift lever to the P (Park)
position.
2. Firmly apply the foot brake.
3. Touch the ignition switch with the Intelligent Key as illustrated. (A chime
will sound.)
4. Push the ignition switch while depres- sing the brake pedal within 10 sec- onds after the chime sounds. The
engine will start.
After step 3 is performed, when the
ignition switch is pushed without depres-
sing the brake pedal, the ignition switch
position will change to ACC.
NOTE:
. When the ignition switch is pushed
to the ACC or ON position or the
engine is started by the above pro-
cedures, the Intelligent Key battery
discharge indicator appears on the
vehicle information display even if
the Intelligent Key is inside the
vehicle. This is not a malfunction.
To turn off the Intelligent Key bat-
tery discharge indicator, touch the
ignition switch with the Intelligent
Key again.
. If the Intelligent Key battery dis-
charge indicator appears, replace
the battery as soon as possible.
(See “Battery” (P.8-11).)
Starting and driving5-15
Page 280 of 536
5-20Starting and driving
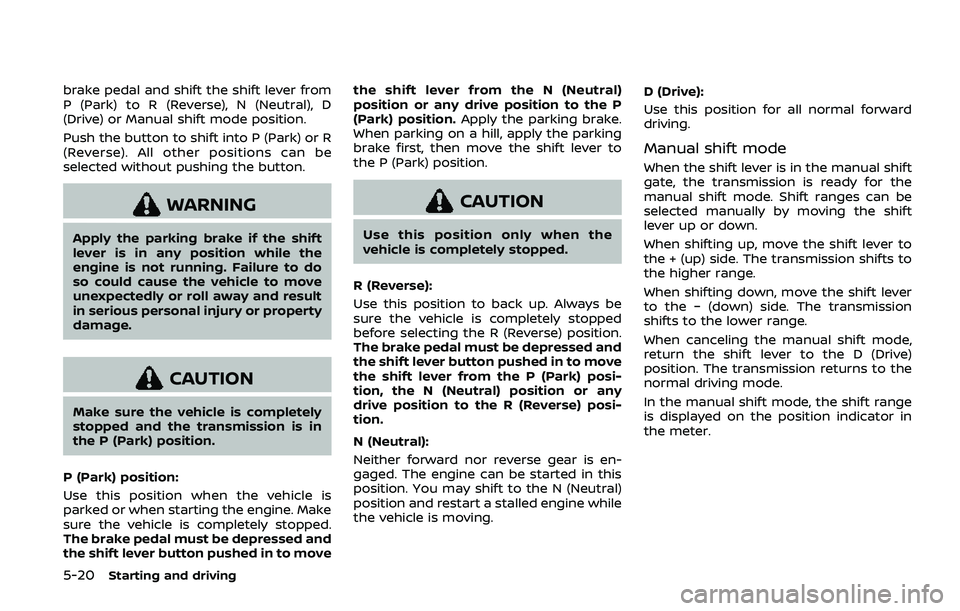
brake pedal and shift the shift lever from
P (Park) to R (Reverse), N (Neutral), D
(Drive) or Manual shift mode position.
Push the button to shift into P (Park) or R
(Reverse). All other positions can be
selected without pushing the button.
WARNING
Apply the parking brake if the shift
lever is in any position while the
engine is not running. Failure to do
so could cause the vehicle to move
unexpectedly or roll away and result
in serious personal injury or property
damage.
CAUTION
Make sure the vehicle is completely
stopped and the transmission is in
the P (Park) position.
P (Park) position:
Use this position when the vehicle is
parked or when starting the engine. Make
sure the vehicle is completely stopped.
The brake pedal must be depressed and
the shift lever button pushed in to move the shift lever from the N (Neutral)
position or any drive position to the P
(Park) position.
Apply the parking brake.
When parking on a hill, apply the parking
brake first, then move the shift lever to
the P (Park) position.
CAUTION
Use this position only when the
vehicle is completely stopped.
R (Reverse):
Use this position to back up. Always be
sure the vehicle is completely stopped
before selecting the R (Reverse) position.
The brake pedal must be depressed and
the shift lever button pushed in to move
the shift lever from the P (Park) posi-
tion, the N (Neutral) position or any
drive position to the R (Reverse) posi-
tion.
N (Neutral):
Neither forward nor reverse gear is en-
gaged. The engine can be started in this
position. You may shift to the N (Neutral)
position and restart a stalled engine while
the vehicle is moving. D (Drive):
Use this position for all normal forward
driving.
Manual shift mode
When the shift lever is in the manual shift
gate, the transmission is ready for the
manual shift mode. Shift ranges can be
selected manually by moving the shift
lever up or down.
When shifting up, move the shift lever to
the + (up) side. The transmission shifts to
the higher range.
When shifting down, move the shift lever
to the − (down) side. The transmission
shifts to the lower range.
When canceling the manual shift mode,
return the shift lever to the D (Drive)
position. The transmission returns to the
normal driving mode.
In the manual shift mode, the shift range
is displayed on the position indicator in
the meter.
Page 281 of 536
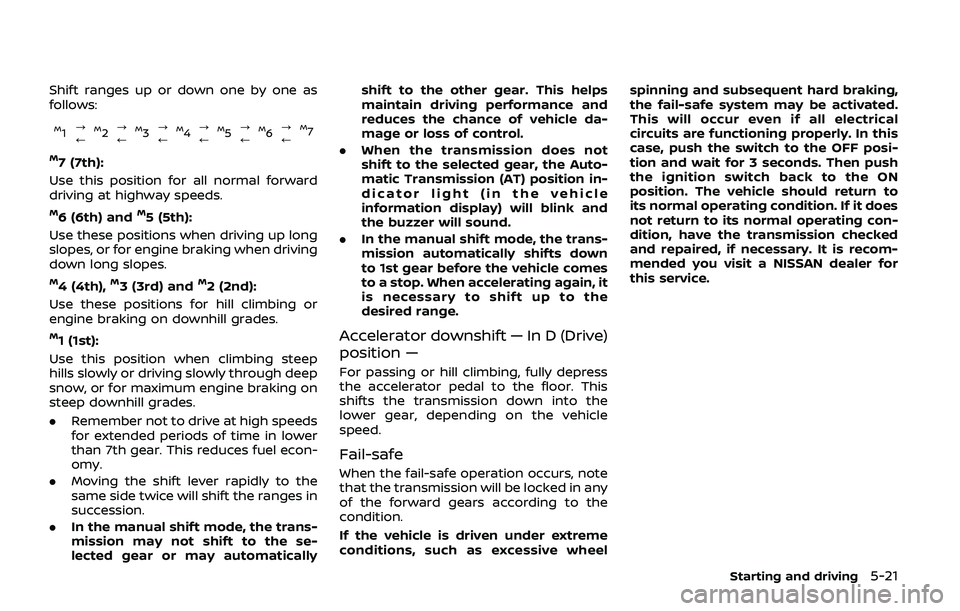
Shift ranges up or down one by one as
follows:
M1?
/M2 ?
/M3 ?
/M4 ?
/M5?
/M6 ?
/M7
M7 (7th):
Use this position for all normal forward
driving at highway speeds.
M6 (6th) andM5 (5th):
Use these positions when driving up long
slopes, or for engine braking when driving
down long slopes.
M4 (4th),M3 (3rd) andM2 (2nd):
Use these positions for hill climbing or
engine braking on downhill grades.
M1 (1st):
Use this position when climbing steep
hills slowly or driving slowly through deep
snow, or for maximum engine braking on
steep downhill grades.
. Remember not to drive at high speeds
for extended periods of time in lower
than 7th gear. This reduces fuel econ-
omy.
. Moving the shift lever rapidly to the
same side twice will shift the ranges in
succession.
. In the manual shift mode, the trans-
mission may not shift to the se-
lected gear or may automatically shift to the other gear. This helps
maintain driving performance and
reduces the chance of vehicle da-
mage or loss of control.
. When the transmission does not
shift to the selected gear, the Auto-
matic Transmission (AT) position in-
dicator light (in the vehicle
information display) will blink and
the buzzer will sound.
. In the manual shift mode, the trans-
mission automatically shifts down
to 1st gear before the vehicle comes
to a stop. When accelerating again, it
is necessary to shift up to the
desired range.Accelerator downshift — In D (Drive)
position —
For passing or hill climbing, fully depress
the accelerator pedal to the floor. This
shifts the transmission down into the
lower gear, depending on the vehicle
speed.
Fail-safe
When the fail-safe operation occurs, note
that the transmission will be locked in any
of the forward gears according to the
condition.
If the vehicle is driven under extreme
conditions, such as excessive wheel spinning and subsequent hard braking,
the fail-safe system may be activated.
This will occur even if all electrical
circuits are functioning properly. In this
case, push the switch to the OFF posi-
tion and wait for 3 seconds. Then push
the ignition switch back to the ON
position. The vehicle should return to
its normal operating condition. If it does
not return to its normal operating con-
dition, have the transmission checked
and repaired, if necessary. It is recom-
mended you visit a NISSAN dealer for
this service.
Starting and driving5-21
Page 286 of 536
5-26Starting and driving
JVS1130X
Warning systems switchWarning systems ON indicator lightCenter multi-function control panel
TURNING THE LDW SYSTEM ON/OFF
The warning systems switchis used to
turn on and off the LDW system when it is
activated on the center display using the
center multi-function control panel
. See
“How to enable/disable the LDW system”
(P.5-27). When the warning systems
switch
is turned off, the warning
systems ON indicator lighton the
switch is off.
The warning systems switch
will turn
on and off the LDW and BSW (if so
equipped) systems at the same time.
Page 288 of 536
5-28Starting and driving
JVS1095X
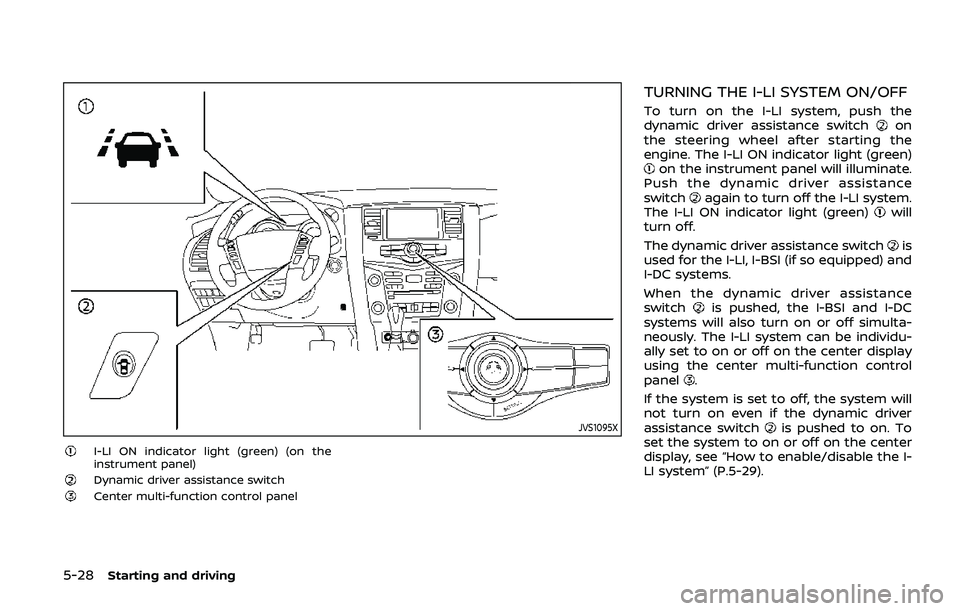
I-LI ON indicator light (green) (on the
instrument panel)
Dynamic driver assistance switchCenter multi-function control panel
TURNING THE I-LI SYSTEM ON/OFF
To turn on the I-LI system, push the
dynamic driver assistance switchon
the steering wheel after starting the
engine. The I-LI ON indicator light (green)
on the instrument panel will illuminate.
Push the dynamic driver assistance
switch
again to turn off the I-LI system.
The I-LI ON indicator light (green)will
turn off.
The dynamic driver assistance switch
is
used for the I-LI, I-BSI (if so equipped) and
I-DC systems.
When the dynamic driver assistance
switch
is pushed, the I-BSI and I-DC
systems will also turn on or off simulta-
neously. The I-LI system can be individu-
ally set to on or off on the center display
using the center multi-function control
panel
.
If the system is set to off, the system will
not turn on even if the dynamic driver
assistance switch
is pushed to on. To
set the system to on or off on the center
display, see “How to enable/disable the I-
LI system” (P.5-29).
Page 296 of 536
5-36Starting and driving
JVS1130X
Warning systems switchWarning systems ON indicator lightCenter multi-function control panel
TURNING THE BSW SYSTEM ON/OFF
The warning systems switchis used to
turn on and off the BSW system when it is
activated on the center display using the
center multi-function control panel
. See
“How to enable/disable the BSW system”
(P.5-36). When the warning systems
switch
is turned off, the warning
systems ON indicator lighton the
switch is off.
The warning systems switch
will turn
on and off the LDW and BSW systems at
the same time.
HOW TO ENABLE/DISABLE THE BSW
SYSTEM
The BSW system can be turned off
permanently using the center display.
Page 307 of 536
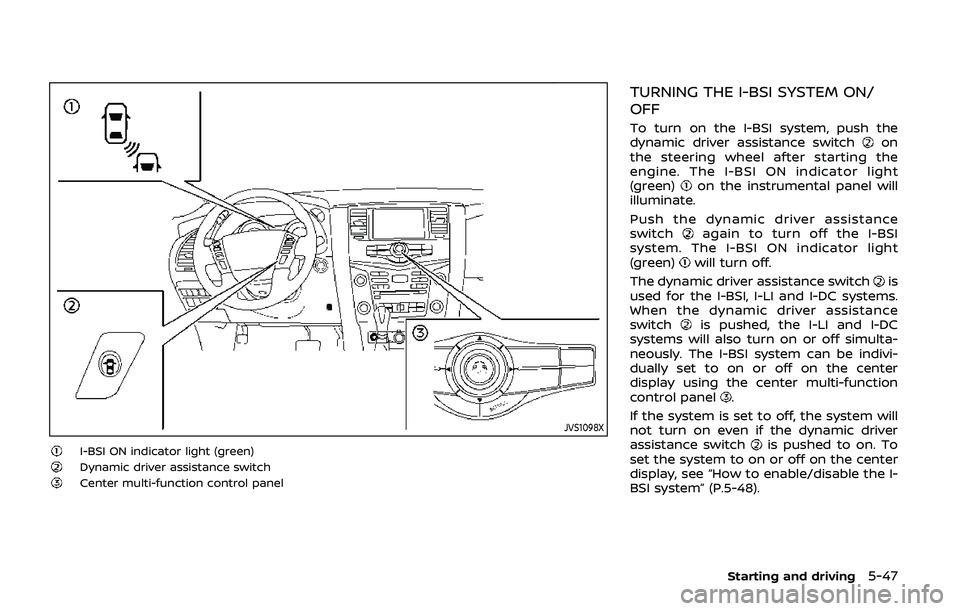
JVS1098X
I-BSI ON indicator light (green)Dynamic driver assistance switchCenter multi-function control panel
TURNING THE I-BSI SYSTEM ON/
OFF
To turn on the I-BSI system, push the
dynamic driver assistance switchon
the steering wheel after starting the
engine. The I-BSI ON indicator light
(green)
on the instrumental panel will
illuminate.
Push the dynamic driver assistance
switch
again to turn off the I-BSI
system. The I-BSI ON indicator light
(green)
will turn off.
The dynamic driver assistance switch
is
used for the I-BSI, I-LI and I-DC systems.
When the dynamic driver assistance
switch
is pushed, the I-LI and I-DC
systems will also turn on or off simulta-
neously. The I-BSI system can be indivi-
dually set to on or off on the center
display using the center multi-function
control panel
.
If the system is set to off, the system will
not turn on even if the dynamic driver
assistance switch
is pushed to on. To
set the system to on or off on the center
display, see “How to enable/disable the I-
BSI system” (P.5-48).
Starting and driving5-47
Page 319 of 536
JVS1099X
Side indicator lightI-BI system indicatorI-BI system key (on the center display)Center multi-function control panel
JVS0173X
I-BI SYSTEM OPERATION
When the shift lever is in the R (Reverse)
position and the vehicle speed is less than
approximately 5 MPH (8 km/h), the I-BI
system operates.
If the radar detects a vehicle approaching
from the side or the sonar detects close
stationary objects behind the vehicle, the
system gives visual and audible warnings.
If the driver does not apply the brakes, the
system automatically applies the brake
for a moment when the vehicle is moving
backwards. After the automatic brake
application, the driver must depress the
brake pedal to maintain brake pressure. If
the driver’s foot is on the accelerator
Starting and driving5-59