2019 MERCEDES-BENZ SPRINTER window
[x] Cancel search: windowPage 26 of 354

Symbols
..................................................... 4At
agl ance ................................................. 6
Cockpit ........................................................ 6
Instrument clus ter ....................................... 7
Overhead control panel ............................. 10
Door control panel .................................... .14
Emergencies and breakdowns ................... 16Genera
l notes.......................................... 18
Environmental pr otection .......................... 18
Mercedes-Benz Genuine Parts ...................18
Information about attachments, add-
on equipment, ins tallations and con‐
ve rsions .................................................... .19
Operating Instructions ...............................20
Service and vehicle operation ...................20
Operating saf ety ........................................ 21
Declarations of conformity ........................ 22
Diagno stics connection ............................ .22
No tes on changes tothe engine output ..... 23
Qualified specialist workshop .................... 23
Ve hicle registration ................................... 23
Cor rect use of theve hicle .........................23
Multi Purpose Vehicle ................................ 24
Information on problems with your
ve hicle .......................................................24
Re porting saf ety defects ............................ 24
Limited Warranty ...................................... .24
QR codes forre scue card .......................... 24
Data storage ..............................................25
Copyright .................................................. .27Occupant saf
ety...................................... 28
Re stra int sy stem ........................................28
Seat belts .................................................. 30
Airbags ...................................................... 32
Children in theve hicle ...............................34
No tes on pets in theve hicle ......................40 Opening and closing
...............................41
SmartK ey................................................... 41
Doo rs........................................................ 44
Sliding door ............................................... 45
Electrical sliding door ................................ 46
Re ar-end doors .......................................... 50
Pa rtition sliding door .................................. 51
Electrical step ............................................ 52
Side window ..............................................53
Anti-theft pr otection ..................................55 Seats and
stowage .................................. 59
Co rrect driver's seat position .................... 59
Seats ......................................................... 59
Ad justing thesteering wheel ..................... 71
St ow age areas .......................................... .72
Bottle holder .............................................. 74
Cup holder ................................................ .74
Ashtr ayand cigar ette lighter ...................... 74
Soc kets ...................................................... 75
Wi relessly charging the mobile phone
and coupling with theex terior antenna ..... 77
Ins talling or removing thefloor mats ......... 78 Light and vision
....................................... 79
Ex terior lighting ......................................... 79
Ad justing the interior lighting .................... 82
Changing bulbs .......................................... 83
Wi ndshield wipe rs..................................... 88
Mir rors ...................................................... 90
Using sun visors ........................................ 92 Climate control
....................................... 93
Overview of climate control sy stems ......... 93
Operating climate control sy stems ............ 95
Operating air vents .................................... 98
Au xilia ryheating ........................................99
Operating cargo compartment ventila‐
tion .......................................................... 102 Driving and pa
rking .............................. 103
Driving .................................................... .103
Battery main switch ................................. 11 4
Au tomatic transmission ........................... 11 5
All-wheel drive .......................................... 11 8
DSR (Downhill Speed Regulation) ............ 12 0
Electronic le vel control ............................ 121
Re fueling ................................................ .125
Pa rking .................................................... 13 2
Driving and driving sa fety sy stems ..........1 36
Wo rkmode ............................................. .156
Tr ailer operation ...................................... 157 Instrument Display and on-board
compu
ter............................................... 16 3
Overview of Instrument Display ............... 16 3
Overview of the buttons on thesteer‐
ing wheel .................................................1 64
Operating the on-board computer ........... 16 4
Overview of the displa yson the multi‐
function display ....................................... 16 5
Setting the instrument lighting ................1 662
Contents
Page 38 of 354

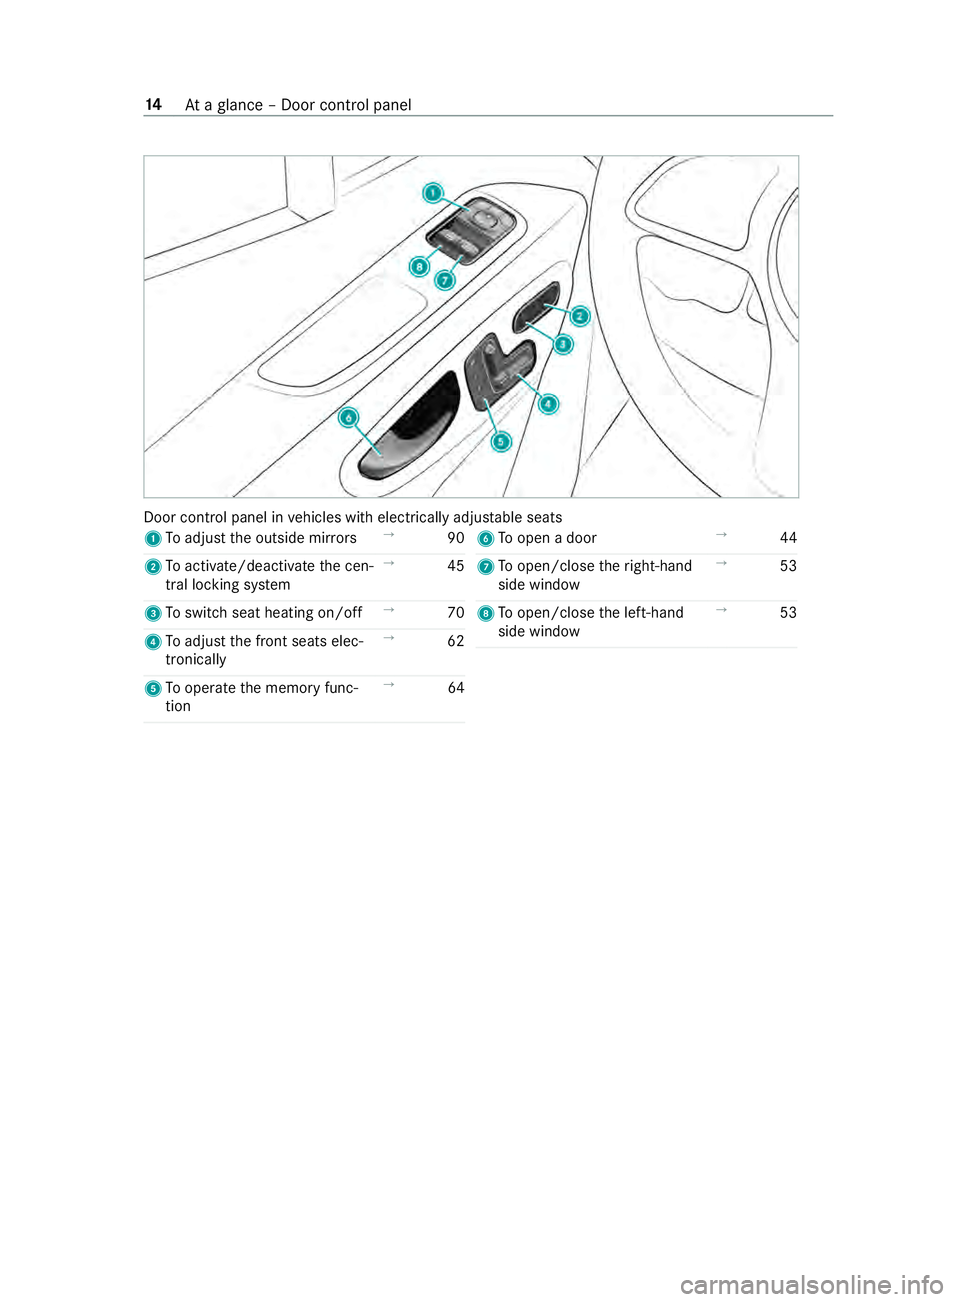
Door control panel in
vehicles with electrically adjus table seats
1 Toadjust the outside mir rors →
90
2 Toactivate/deactivate the cen‐
tral locking sy stem →
45
3 Toswitch seat heating on/off →
70
4 Toadjust the front seats elec‐
tronically →
62
5 Tooperate the memory func‐
tion →
64 6
Toopen a door →
44
7 Toopen/close theright-hand
side window →
53
8 Toopen/close the left-hand
side window →
53 14
Ataglance – Door control panel
Page 39 of 354

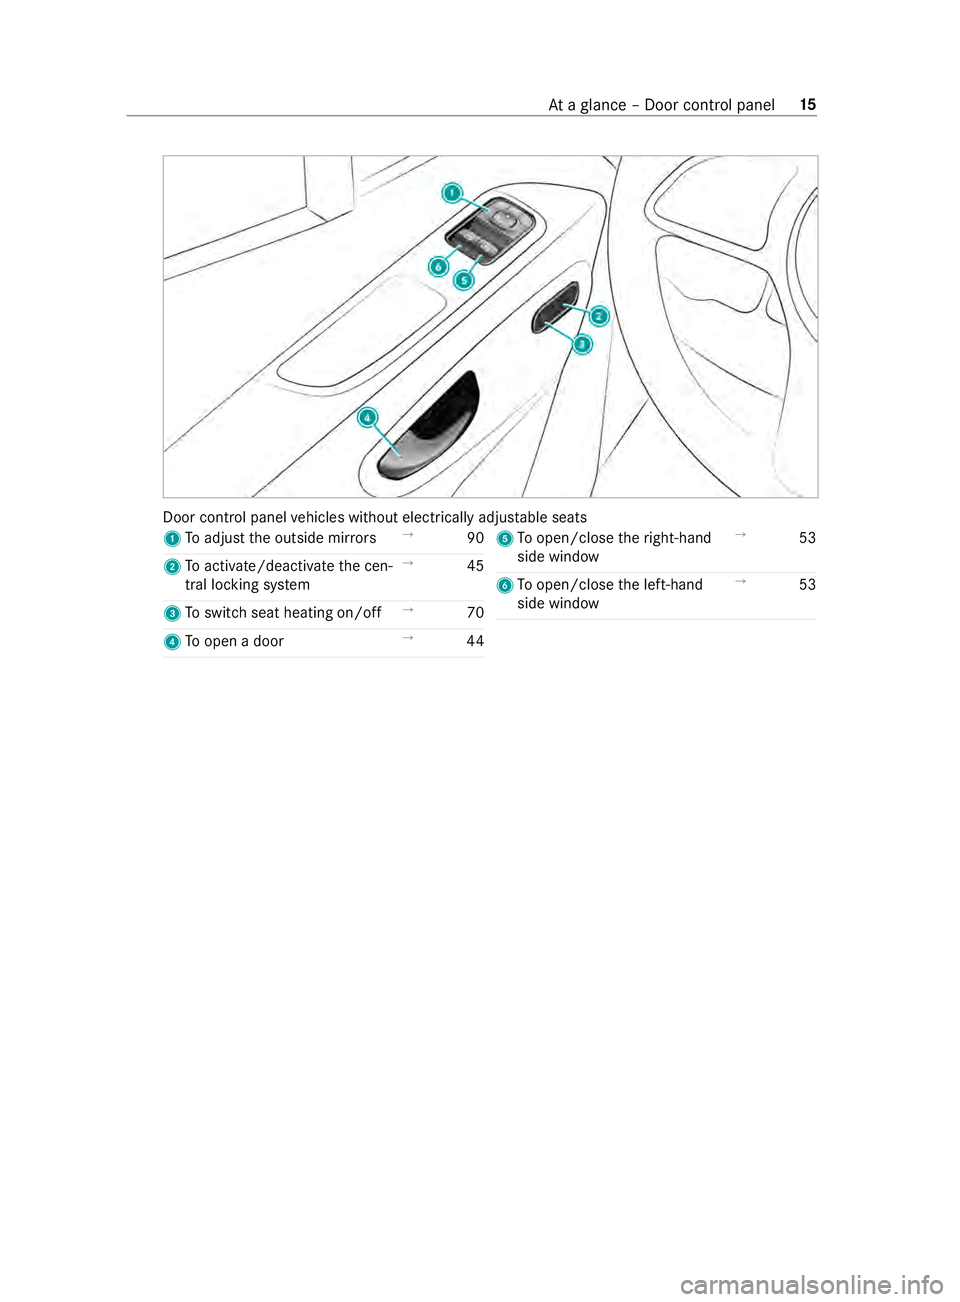
Door control panel
vehicles without electrically adjus table seats
1 Toadjust the outside mir rors →
90
2 Toactivate/deactivate the cen‐
tral locking sy stem →
45
3 Toswitch seat heating on/off →
70
4 Toopen a door →
44 5
Toopen/close theright-hand
side window →
53
6 Toopen/close the left-hand
side window →
53 At
aglance – Door control panel 15
Page 53 of 354

#
Have there stra int sy stem checked and
re paired immediately at a qualified spe‐
cialist workshop. Fu
nction of there stra int sy stem in an acci‐
dent How
there stra int sy stem works is de term ined by
th e se verity of the impact de tected and the type
of accident anticipated:
R Frontal impact
R Rear impact
R Side impact
R Rollover
The activation thre sholds forth e components of
th ere stra int sy stem are de term ined based on the
ev aluation of the sensor values measured at vari‐
ous points in theve hicle. This process is pre-
em ptive in nature. The triggering/deployment of
th e components of there stra int sy stem must
ta ke place in good time at thest art of the colli‐
sion.
Fa ctors whi chcan only be seen and measured
af te r a collision has occur red do not play a deci‐
sive role in the deployment of an airbag. Nordo
th ey prov ide an indication of airbag deployment.
The vehicle may be deformed significantly with‐
out an airbag being deplo yed. This is the case if
only parts which are relatively easily deformed
are af fected and thera te ofvehicle deceleration
is not high. Con versely, an airbag may be
deplo yedev en though theve hicle suf fers only
minor deformation. If very rigid vehicle parts such
as longitudinal members are hit, forex ample, this
may result in suf ficiently high le vels of vehicle
deceleration.
The components of there stra int sy stem can
be activated or deplo yed independently of
each other: Component De
tected deploy‐
ment situation
Emer gency Tensioning
Devices Fr
ontal impact, rear
impact, side impact 1)
,
ro llo ver
Driver's airbag, front
passenger front air‐
bag Fr
ontal impact Component De
tected deploy‐
ment situation
Side airbag Side impact
Wi ndow cur tain airbag Side impact, rollo ver,
frontal impact 1)
Only if theve hicle is equipped with a side air‐
bag or window cur tain airbag. &
WARNING Risk of bu rns from hot air bag
components
The air bag parts are hot af ter an air bag has
been depl oyed. #
Do not touch the air bag parts. #
Have a deplo yed air bag replaced at a
qu alified specialist workshop as soon as
possible. Fo
ryo ur saf ety and that of your passengers, it is
re commended that you ha vetheve hicle towe dto
a qu alified specialist workshop af ter an accident.
Ta ke this into account, particular lyif an Emer‐
ge ncy Tensioning Device is trig gered or an airbag
deplo yed.
If th e Emer gency Tensioning Devices are trig‐
ge red or an airbag is deplo yed, you will hear a
bang, and a small amount of powder may also be
re leased:
R The bang will not general lyaffect your hear‐
ing.
R Ingeneral, the powder released is not hazard‐
ous tohealth but may cause short-term
breathing dif ficulties topersons suf fering
from as thma or other pulmonary conditions.
Pr ov ided it is safe todo so, lea vetheve hicle
immediately or open the window in order to
pr eve nt brea thing dif ficulties.
Airbags and pyrotech nic Emergency Tensioning
Devices contain pe rchlorate material, which may
re qu ire special handling or environmental pr otec‐
tion measures. National guidelines rega rding
wa ste disposal must be obser ved. In California,
see http://www.dtsc.ca.gov/HazardousWas te/
Pe rchlorate/index.cfm. Occupant saf
ety29
Page 56 of 354

Re
leasing seat belts #
Press there lease button in the seat belt
buckle and guide the seat belt back with the
seat belt tongue. Fu
nction of the seat belt warning sy stem for
driver and co-driver The
00E9 seat belt warning lamp in the Instru‐
ment Display reminds youth at all vehicle occu‐
pants must fastentheir seat belts cor rectl y.
The 00E9 seat belt warning lamp lights up for six
seconds everytime af ter switching on the igni‐
tion.
A wa rning tone may also sound.
Af terth e engine is star ted, the seat belt warning
goes out as soon as the driver's and the front-
passenger seat belts are fastened.
While driving the seat belt warning lights up in
th efo llowing cases:
R ifth eve hicle's speed is higher than 15 mph
(25 km/h) and the driver's or front-passenger
seat belt is not fastened
R ifth e driver or co-driver unfas tenth eir seat
belt during the journey Airbags
Overview of airbags
1
Driver's airbag
2 Window cur tain airbag
3 front-passenger front airbag
4 Side airbag
An airbag's ins tallation location is identified by
th e label AIRB AG.
When activated, an airbag can increase pr otec‐
tion forth ere spective vehicle occupant. Pot
ential pr otection of each airbag: Airba
gP otential pr otection for
…
Driver's airbag,
front-passenger
front airbag: Head and
chest
Wi ndow cur tain
airbag Head
Side airbag Chest and pelvis Pr
otection bythe airbags Depending on
the accident situation, an airbag
may supplement the pr otection of fere dby a cor‐
re ctly fastened seat belt. &
WARNING Risk of inju ryor death due to
incor rect seat position
If yo u deviate from the cor rect seat position,
th e airbag cann otper form its intended pro‐
te ctive function and deployment may even
cause fur ther injuries.
In order toavo idrisks, each vehicle occupant
must alw ays make sure of thefo llowing:
R Fasten seat belts cor rectly. Pregnant
wo men must take particular care to
ensure that the lap belt ne ver lies across
th e abdomen.
R Adopt the cor rect seat position and keep
as faraw ay as possible from the airbags.
R Obser vethefo llowing information. #
Always make sure that there are no
objects between the airbag and vehicle
occupant. To
avo idtherisks resulting from the deployment
of an airbag, each vehicle occupant must obser ve
th efo llowing information in particular:
R Before starting your journe y,adjust your seat
cor rectl y;the driver's seat and front
passenger seat should be mo ved as far back
as possible.
When doing so, alw ays obser vethe informa‐
tion on the cor rect driver's seat position
(/ page 59).
R Only hold thesteering wheel bythesteering
wheel rim. This allows the airbag tobe fully
deplo yed. 32
Occupant saf ety
Page 57 of 354

R
Always lean against the seat backrest when
th eve hicle is in motion. Do not lean forw ards
or against the door or side windo w.You may
ot herwise be in the deployment area of the
airbags.
R Alwayske ep your feet on thefloor. Do not put
yo ur feet on the cockpit, forex ample. Your
fe et may otherwise be in the deployment area
of the airbag.
R Ifch ildren are tr aveling in theve hicle, obser ve
th e additional no tes (/ page 34).
R Alwaysstow and secure objects cor rectl y.
Objects in theve hicle interior may pr event an air‐
bag from functioning cor rectly. Each vehicle
occupant must alw ays make sure of thefo llowing
in particular:
R There are no people, animals or objects
between theve hicle occupants and an airbag.
R There are no objects between the seat, door
and door pillar (B-pillar).
R There are no hard objects, e.g. coat hangers,
hanging on the grab handles or coat hooks.
R There are no accessory parts, such as mobile
navigation devices, mobile phones or cup
holders, attached totheve hicle within the
deployment area of an airbag, e.g. on the
cockpit, on the door, on the side window or
on the side wall trim.
In addition, no connecting cables, tensioning
st ra ps or retai ning stra ps must be routed or
attached totheve hicle within the deployment
area of an airbag. Alw ays comply with the
accesso rymanufacturer's ins tallation instruc‐
tions and, in particular, the no tes on suitable
places for ins tallation.
R There are no heavy, sharp-edged or fragile
objects in the poc kets of your clo thing. Store
such objects in a suitable place. Limited pr
otection from airbags &
WARNING Risk of inju rydue tomodifica‐
tions tothe airbag co ver
If yo u modify the co ver of an airbag or af fix
objects such as sticke rs to it,the airbag may
no longer function cor rectly. #
Never modify the co ver of an airbag and
do not af fix objects toit. The ins
tallation location of an airbag is identified
by the AIRB AGsymbol (/ page 32). &
WARNING Risk of inju ryor death due to
th e use of unsuitable seat co vers
Un suitable seat co vers can obstruct or pre‐
ve nt the deployment of the airbags integrated
into the seats.
Consequentl y,the airbags cann otprotect
ve hicle occupants as they are designed todo. #
Only use seat co vers that ha vebeen
appr ovedfo ryo ur vehicle bythe sales
or ga nization named on the inside front
co ver. &
WARNING Risk of inju rydue tomalfunc‐
tions of the sensors in the door paneling
Sensors tocontrol the airbags are located in
th e doors. Modifications or worknot per‐
fo rm ed cor rectly tothe doors or door panel‐
ing, as well as damaged doors, can lead to
th e function of the sensors being impaired.
The airbags might therefore not function
proper lyany more.
Consequent ly,th e airbags cann otprotect
ve hicle occupants as they are designed todo. #
Never modify the doors or parts of the
doors. #
Always ha vewo rkon the doors or door
paneling car ried out at a qualified spe‐
cialist workshop. &
WARNING Risk of inju rydue todeplo yed
airbag
A deplo yed airbag no longer has a pr otective
function and cann otprotect as intended in
th eev ent of an accident. #
Have theve hicle towe dto aqu alified
specialist workshop in order tohave the
deplo yed airbag replaced. Ha
ve deplo yed airbags replaced immediately. Occupant saf
ety33
Page 77 of 354

#
Fold bars 1into thestep's housing. #
Slide thestep into its housing.
% When securing
thestep forth efirs t time, you
must puncture a foil with the spring cotters. #
On bo thsides, insert spring cotters 1
th ro ugh the housing's holes and into thestep
as far as they will go.
The step has been secured in its housing. Side window
Opening and closing
the side windo ws &
WARNING Risk of entrapment when
opening a side window
When opening a side windo w,parts of the
body could be dr awn in or become trapped
between the side window and window frame. #
When opening, make sure that nobody
is touching the side windo w. #
If someone is trapped, release the but‐
to n immedia tely or pull it in order to
close the side window again. &
WARNING Risk of becoming trapped
when closing a side window
When closing a side windo w,body parts could
be trapped in the closing area in the process. #
When closing, make sure that no body
parts are in the closing area. #
If someone is trapped, release the but‐
to n immedia tely or press the button in
order toreopen the side windo w. &
WARNING Risk of becoming trapped
when children opera tethe side windo ws
Children could become trapped if they oper‐
ate the side windo ws, particularly when unat‐
te nded. #
Activate thech ild saf ety lock forthe
re ar side wind ows. #
When leaving theve hicle, alw aysta ke
th e SmartK eywith you and lock the
ve hicle. #
Never lea vechildren unat tended in the
ve hicle. 1
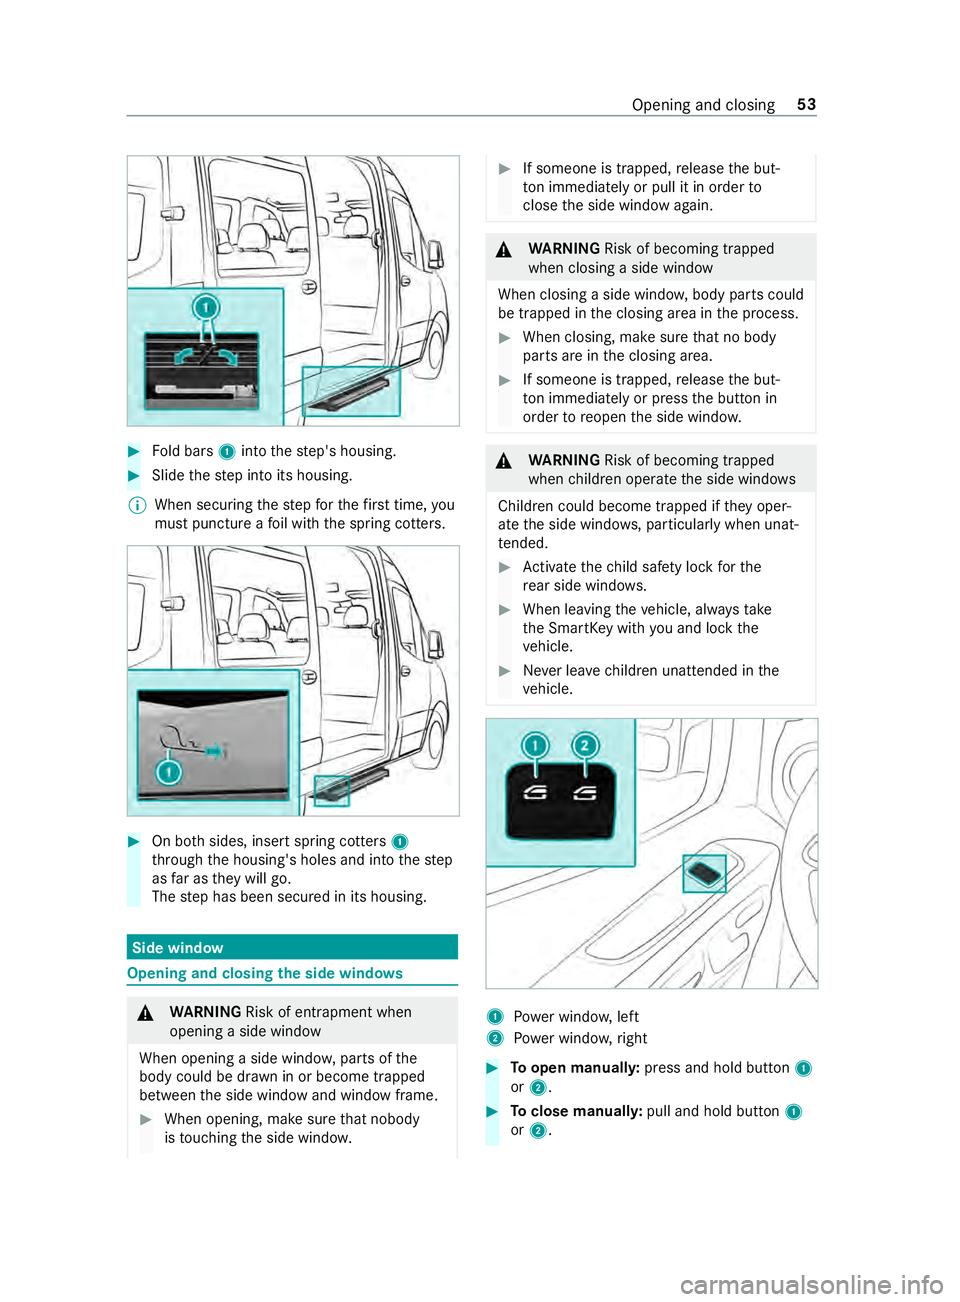
Powe r windo w,left
2 Powe r windo w,right #
Toopen manuall y:press and hold button 1
or 2. #
Toclose manuall y:pull and hold button 1
or 2. Opening and closing
53
Page 78 of 354

The windo
wsinthe front doors can also be oper‐
ated automaticall y. #
Toopen comple tely: briefly press button 1
or 2 beyond the point of resis tance.
Au tomatic operation will start. #
Toclose comple tely: briefly pull button 1
or 2 beyond the point of resis tance.
Au tomatic operation will start. #
Tointer rupt automatic operation: briefly
press or pull button 1or2 again.
% If an object bloc
ksa side wind owduring the
automatic closing process, the side window
will open again automaticall y.The automatic
re ve rsing function is only an aid and is not a
substitute foryo ur attentiveness.
% If automatic operation of
the side windo ws
does not work,th ere is no anti-entra pment
function.
Au tomatic reve rsing function of the side win‐
do ws
If an object bloc ksa side wind owduring the clos‐
ing process, the side window will open again
automaticall y.The automatic reve rsing function is
only an aid and is not a substitute foryo ur atten‐
tiveness. #
During the closing process, make sure that no
body parts are in the closing area. &
WARNING Risk of becoming trapped
despite there being reve rse pr otection on
th e side window
The reve rse function does not react:
R Tosoft, light and thin objects, e.g. fingers
R Over the last 00CFin (4 mm) of the closing
path
R During resetting
R When the side window is closed again
manually immediately af ter automatic
re ve rsing
This means that there ve rse function cann ot
pr eve nt someone from becoming trapped in
th ese situations. #
During the closing process, make sure
th at no body parts are in the closing
area. #
If someone becomes trapped, press the
0062 button toopen the side window
again. Ve
ntilating theve hicle before starting a jour‐
ney (co nvenience opening) &
WARNING Risk of entrapment when
opening a side window
When opening a side windo w,parts of the
body could be dr awn in or become trapped
between the side window and window frame. #
When opening, make sure that nobody
is touching the side windo w. #
Release the button immediately if some‐
body becomes trapped. Yo
u can ventilate theve hicle before youstart
driving.
To do this, theke y is used tocar ryout thefo llow‐
ing functions simultaneously:
R unlock theve hicle
R open the side windo ws
The "con venience opening" function can only be
ope rated using thekey. Thekey must be in close
pr ox imity tothe driver's or front-passen ger door. #
Press and hold the0036 button on thekey.
The following functions are per form ed:
R theve hicle is unloc ked
R the side windo wsare opened #
Tointer rupt convenience opening: release
th e0036 button. Closing side windo
wsfrom the outside (con‐
ve nience closing) &
WARNING Risk of entrapment caused by
inadver tent con venience closing
When the con venience closing feature is
operating, parts of the body could become
trapped in the closing area of the side win‐
do ws. #
Obser vethe comple teclosing proce‐
du re when using con venience closing. #
When closing, make su rethat no body
parts are in the closing area. #
Press and hold the0037 button on thekey.
The following functions are per form ed:
R The vehicle is loc ked
R The side windo wsare closed 54
Opening and closing