2019 MERCEDES-BENZ SLC brake
[x] Cancel search: brakePage 267 of 306
Transporting the vehicle
Vehicles with automatic transmission
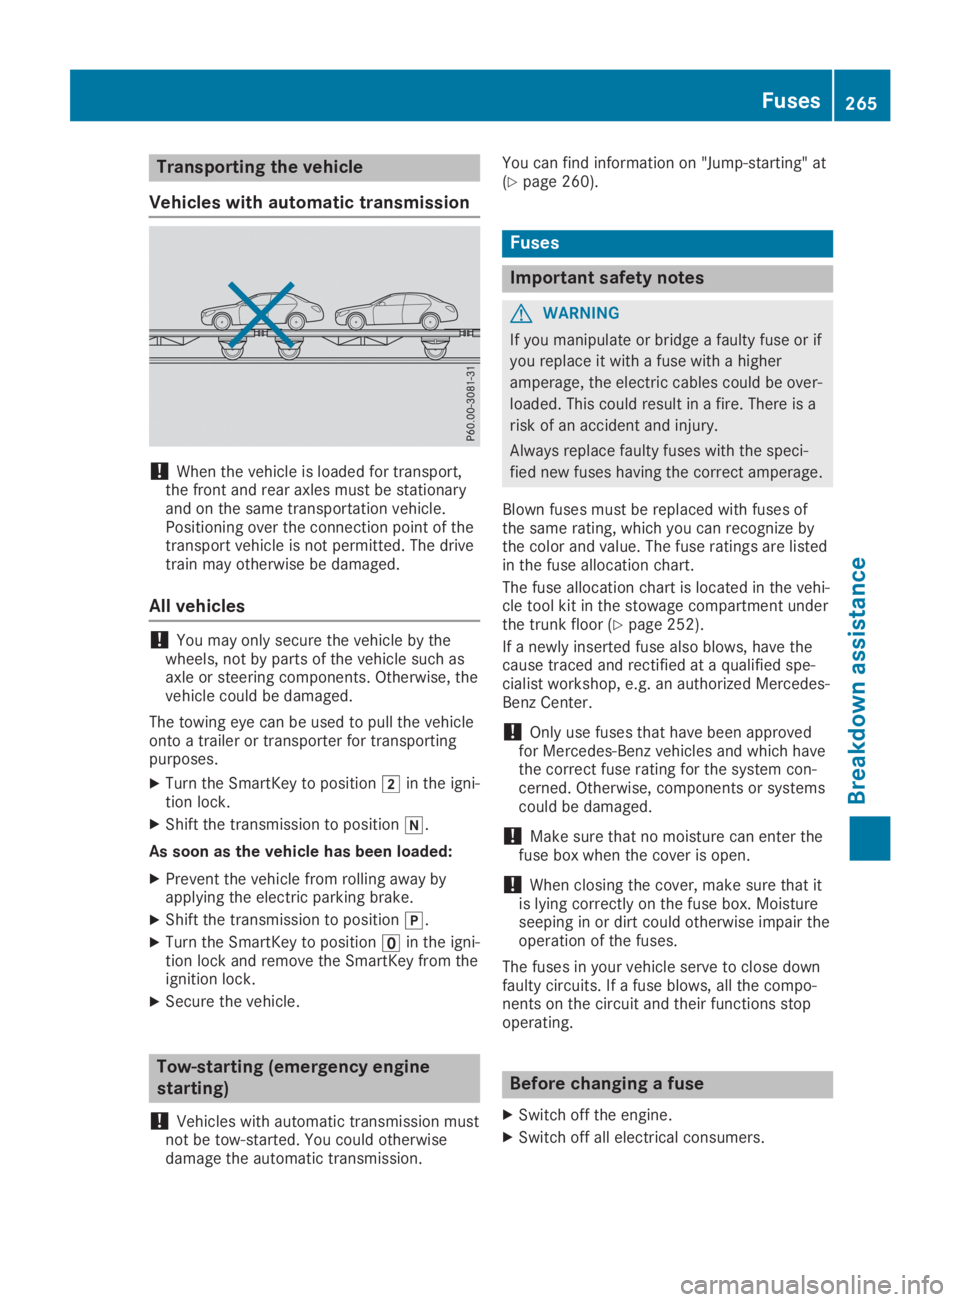
!When the vehicle is loaded for transport,the front and rear axles must be stationaryand on the same transportation vehicle.Positioning over the connection point of thetransport vehicle is not permitted. The drivetrain may otherwise be damaged.
All vehicles
!You may only secure the vehicle by thewheels, not by parts of the vehicle such asaxle or steering components. Otherwise, thevehicle could be damaged.
The towing eye can be used to pull the vehicleonto a trailer or transporter for transportingpurposes.
XTurn the SmartKey to position�Hin the igni-tion lock.
XShift the transmission to position�\\.
As soon as the vehicle has been loaded:
XPrevent the vehicle from rolling away byapplying the electric parking brake.
XShift the transmission to position�].
XTurn the SmartKey to position�
Page 269 of 306
Important safety notes
GWARNING
If you install wheels and tires with incorrect
dimensions, the service brake or wheel sus-
pension components may be damaged.
There is a risk of an accident.
Always replace wheels and tires with ones
that comply with the specifications of the
original part.
When replacing wheels, pay attention to the:
RDesignation
RModel
When replacing tires, pay attention to the:
RDesignation
RManufacturer
RModel
GWARNING
A flat tire will severely affect the driving
characteristics as well as the steering and
braking of the vehicle. There is a risk of an
accident.
Tires without run-flat characteristics:
RDo not drive on with a flat tire.
RChange the flat tire immediately with an
emergency spare wheel or spare wheel.
Alternatively, consult a qualified specialist
workshop.
Tires with run-flat characteristics:
RObserve the information and warning
notes on MOExtended tires (run-flat tires).
Accessories that are not approved for yourvehicle by Mercedes-Benz or are not beingused correctly can impair the operating safety.
Before purchasing and using non-approvedaccessories, visit a qualified specialist work-shop and ask about:
Rsuitability
Rlegal stipulations
Rfactory recommendations
Further information regarding wheels and tirescan be found under "Wheel/tire combinations"(Ypage 292).
You can ask for information regarding permit-ted wheel/tire combinations at an authorizedMercedes-Benz Center.
Information on tire pressure can be found:
Ron the Tire and Loading Information placardon the B-pillar on the driver's side(Ypage 279)
Rin the tire pressure table in the fuel filler flap(Ypage 133)
Rin the "Tire pressure" section
Operation
Information on driving
Check the tire pressure when the vehicle isheavily laden and adjust prior to a trip.
While driving, pay attention to vibrations,noises and unusual handling characteristics,e.g. pulling to one side. This may indicate thatthe wheels or tires are damaged. If you sus-pect that a tire is defective, reduce your speedimmediately. Stop the vehicle as soon as pos-sible to check the wheels and tires for dam-age. Hidden tire damage could also be causingthe unusual handling characteristics. If youfind no signs of damage, have the tires andwheels checked at a qualified specialist work-shop.
When parking your vehicle, make sure that thetires do not get deformed by the curb or otherobstacles. If they cannot be avoided, driveover obstacles such as curbs slowly and at anobtuse angle. Otherwise, you may damage thewheels or tires.
Regular checking of wheels and tires
GWARNING
Damaged tires can cause tire inflation pres-
sure loss. As a result, you could lose control
of your vehicle. There is a risk of accident.
Check the tires regularly for signs of dam-
age and replace any damaged tires immedi-
ately.
Operation267
Wheels and ti res
Z
Page 281 of 306
CountryRadio type approval number
IC: 2546A-MC34MA4
Loading the vehicle
Instruction labels for tires and loads
GWARNING
Overloaded tires can overheat, causing a
blowout. Overloaded tires can also impair
the steering and driving characteristics and
lead to brake failure. There is a risk of acci-
dent.
Observe the load rating of the tires. The load
rating must be at least half of the GAWR of
your vehicle. Never overload the tires by
exceeding the maximum load.
Two instruction labels on your vehicle showthe maximum possible load.
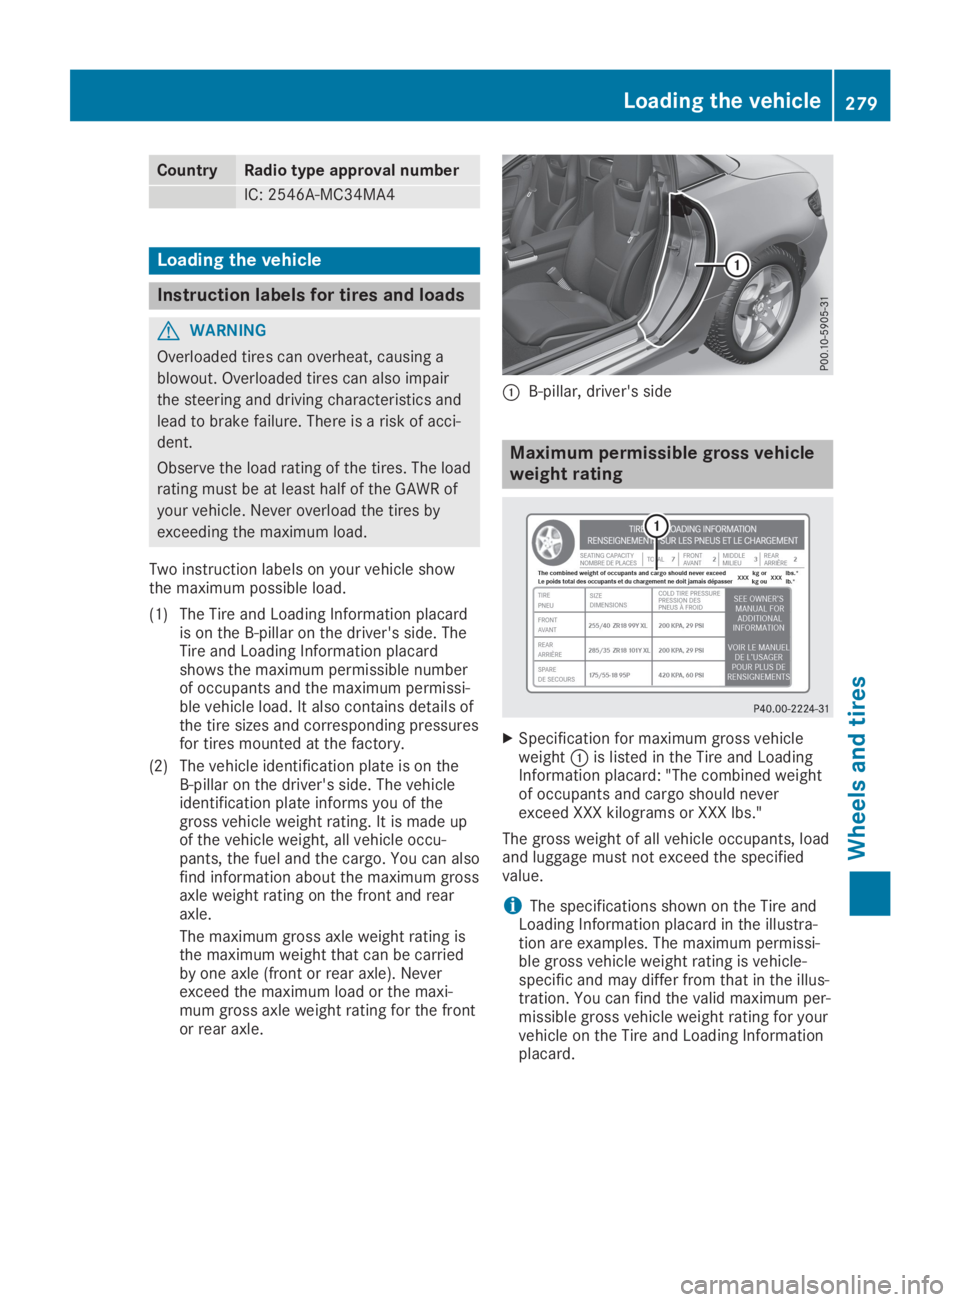
(1) The Tire and Loading Information placardis on the B-pillar on the driver's side. TheTire and Loading Information placardshows the maximum permissible numberof occupants and the maximum permissi-ble vehicle load. It also contains details ofthe tire sizes and corresponding pressuresfor tires mounted at the factory.
(2) The vehicle identification plate is on theB-pillar on the driver's side. The vehicleidentification plate informs you of thegross vehicle weight rating. It is made upof the vehicle weight, all vehicle occu-pants, the fuel and the cargo. You can alsofind information about the maximum grossaxle weight rating on the front and rearaxle.
The maximum gross axle weight rating isthe maximum weight that can be carriedby one axle (front or rear axle). Neverexceed the maximum load or the maxi-mum gross axle weight rating for the frontor rear axle.
�CB-pillar, driver's side
Maximum permissible gross vehicle
weight rating
XSpecification for maximum gross vehicleweight�Cis listed in the Tire and LoadingInformation placard: "The combined weightof occupants and cargo should neverexceed XXX kilograms or XXX lbs."
The gross weight of all vehicle occupants, loadand luggage must not exceed the specifiedvalue.
iThe specifications shown on the Tire andLoading Information placard in the illustra-tion are examples. The maximum permissi-ble gross vehicle weight rating is vehicle-specific and may differ from that in the illus-tration. You can find the valid maximum per-missible gross vehicle weight rating for yourvehicle on the Tire and Loading Informationplacard.
Loading the vehicle279
Wheels and tires
Z
Page 290 of 306
Tread
The part of the tire that comes into contactwith the road.
Bead
The tire bead ensures that the tire sitssecurely on the wheel. There are several steelwires in the bead to prevent the tire from com-ing loose from the wheel rim.
Sidewall
The part of the tire between the tread and thebead.
Weight of optional extras
The combined weight of those optional extrasthat weigh more than the replaced standardparts and more than 2.3 kg (5 lbs). Theseoptional extras, such as high-performancebrakes, level control, a roof rack or a high-per-formance battery, are not included in the curbweight and the weight of the accessories.
TIN (Tire Identification Number)
This is a unique identifier which can be usedby a tire manufacturer to identify tires, forexample for a product recall, and thus identifythe purchasers. The TIN is made up of themanufacturer's identity code, tire size, tiretype code and the manufacturing date.
Load bearing index
The load bearing index (also load index) is acode that contains the maximum load bearingcapacity of a tire.
Traction
Traction is the result of friction between thetires and the road surface.
Treadwear indicators
Narrow bars (tread wear bars) that are distrib-uted over the tire tread. If the tire tread is levelwith the bars, the wear limit of�
Page 291 of 306
Clean the contact surfaces of the wheel andthe brake disc thoroughly every time a wheelis rotated. Check the tire pressure and, if nec-essary, restart the tire pressure loss warningsystem or the tire pressure monitor.
Direction of rotation
Tires with a specified direction of rotation haveadditional benefits, e.g. if there is a risk ofhydroplaning. These advantages can only begained if the tires are installed correspondingto the direction of rotation.
An arrow on the sidewall of the tire indicatesits correct direction of rotation.
Storing wheels
Store wheels that are not being used in a cool,dry and preferably dark place. Protect the tiresfrom oil, grease, gasoline and diesel.
Mounting a wheel
Preparing the vehicle
XStop the vehicle on solid, non-slippery andlevel ground.
XApply the electric parking brake manually.
XBring the front wheels into the straight-ahead position.
XShift the transmission to position�].
XSwitch off the engine.
XVehicles without KEYLESS-GO:removethe SmartKey from the ignition lock.
XVehicles with KEYLESS-GO:open the driv-er's door.The vehicle electronics now have status0.This is the same as the SmartKey havingbeen removed.
XVehicles with KEYLESS-GO:remove theStart/Stop button from the ignition lock(Ypage 118).
XIf included in the vehicle equipment, removethe tire-change tool kit from the vehicle.
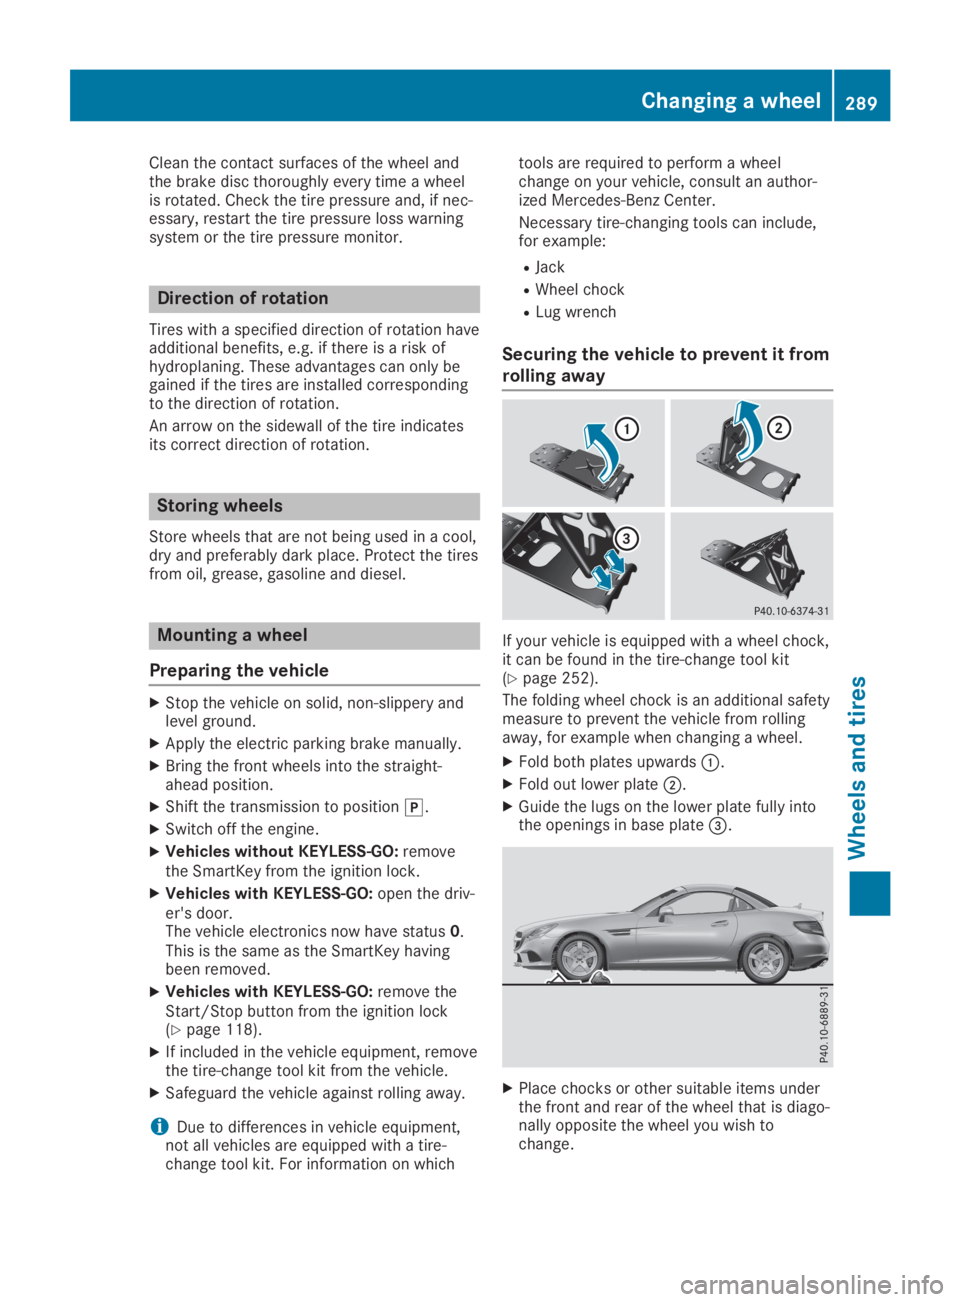
XSafeguard the vehicle against rolling away.
iDue to differences in vehicle equipment,not all vehicles are equipped with a tire-change tool kit. For information on which
tools are required to perform a wheelchange on your vehicle, consult an author-ized Mercedes-Benz Center.
Necessary tire-changing tools can include,for example:
RJack
RWheel chock
RLug wrench
Securing the vehicle to prevent it from
rolling away
If your vehicle is equipped with a wheel chock,it can be found in the tire-change tool kit(Ypage 252).
The folding wheel chock is an additional safetymeasure to prevent the vehicle from rollingaway, for example when changing a wheel.
XFold both plates upwards�C.
XFold out lower plate�D.
XGuide the lugs on the lower plate fully intothe openings in base plate�
Page 292 of 306
Raising the vehicle
GWARNING
If you do not position the jack correctly at
the appropriate jacking point of the vehicle,
the jack could tip over with the vehicle
raised. There is a risk of injury.
Only position the jack at the appropriate
jacking point of the vehicle. The base of the
jack must be positioned vertically, directly
under the jacking point of the vehicle.
!Only position the jack at the appropriatejacking point of the vehicle. Otherwise, youcould damage the vehicle.
Observe the following when raising the vehi-cle:
RTo raise the vehicle, only use the vehicle-specific jack that has been tested andapproved by Mercedes-Benz. If used incor-rectly, the jack could tip over with the vehi-cle raised.
RThe jack is designed only to raise and holdthe vehicle for a short time while a wheelis being changed. It must not be used forperforming maintenance work under thevehicle.
RAvoid changing the wheel on uphill anddownhill slopes.
RBefore raising the vehicle, secure it fromrolling away by applying the parking brakeand inserting wheel chocks. Do not disen-gage the parking brake while the vehicle israised.
RThe jack must be placed on a firm, flat andnon-slip surface. On a loose surface, a large,flat, load-bearing underlay must be used. Ona slippery surface, a non-slip underlay mustbe used, e.g. rubber mats.
RDo not use wooden blocks or similar objectsas a jack underlay. Otherwise, the jack willnot be able to achieve its load-bearing capa-city due to the restricted height.
RMake sure that the distance between theunderside of the tires and the ground doesnot exceed 1.2 in (3 cm).
RNever place your hands and feet under theraised vehicle.
RDo not lie under the vehicle.
RDo not start the engine when the vehicle israised.
RDo not open or close a door or the trunk lidwhen the vehicle is raised.
RMake sure that no persons are present inthe vehicle when the vehicle is raised.
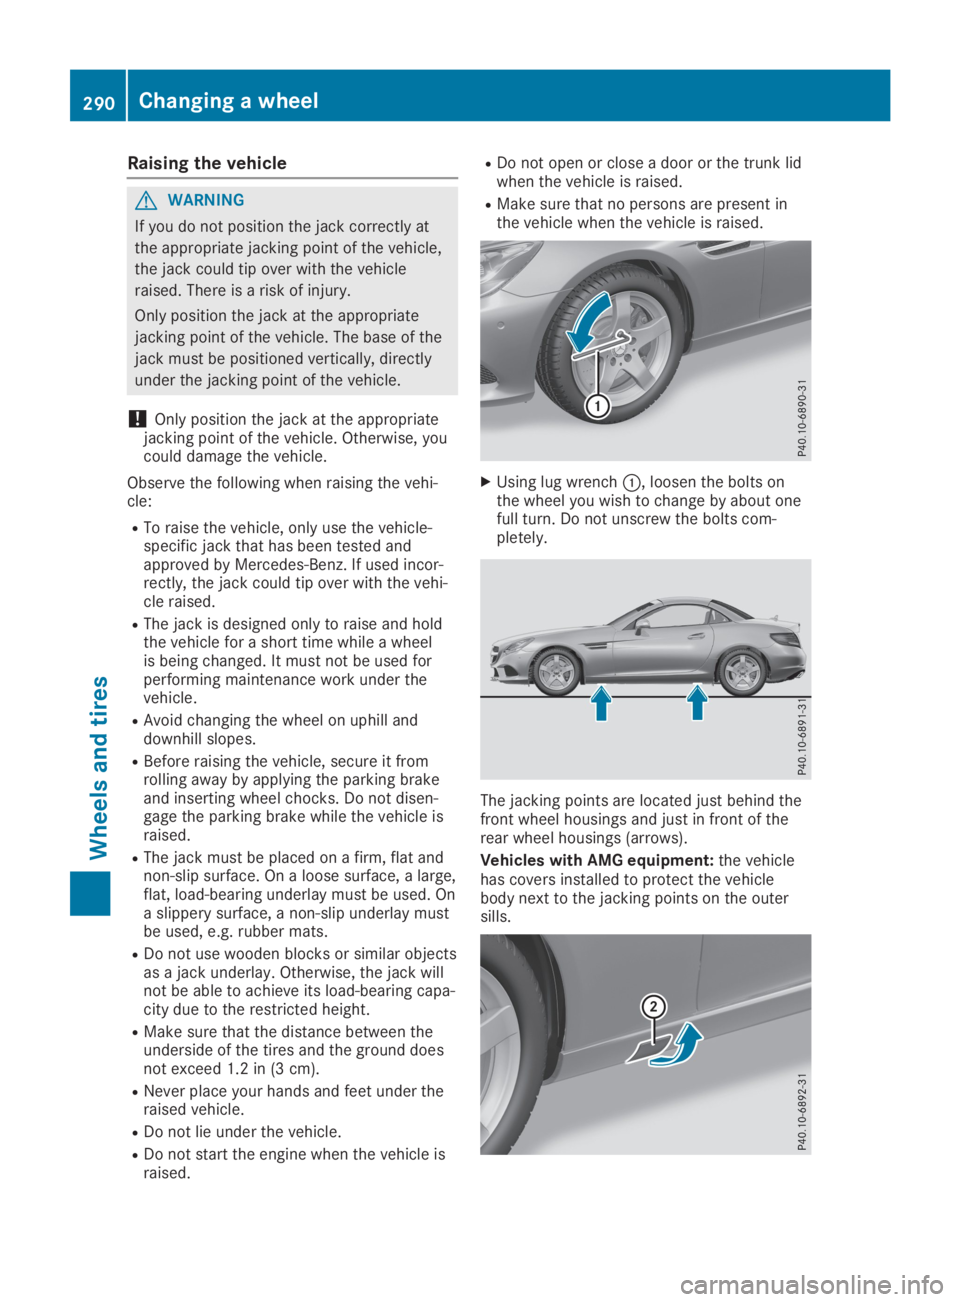
XUsing lug wrench�C, loosen the bolts onthe wheel you wish to change by about onefull turn. Do not unscrew the bolts com-pletely.
The jacking points are located just behind thefront wheel housings and just in front of therear wheel housings (arrows).
Vehicles with AMG equipment:the vehiclehas covers installed to protect the vehiclebody next to the jacking points on the outersills.
290Changing a wheel
Wheels and tires
Page 303 of 306
The table shows which engine oils have beenapproved for your vehicle.
ModelMB-Freigabe orMB-Approval
All models229.5
iMB approval is indicated on the oil con-tainers.
Filling capacities
The following values refer to an oil changeincluding the oil filter.
ModelCapacity
SLC 3006.7 US qt (6.3l)
Mercedes-AMGSLC 436.9 US qt (6.5l)
Additives
!Do not use any additives in the engine oil.This could damage the engine.
Brake fluid
GWARNING
The brake fluid constantly absorbs moisture
from the air. This lowers the boiling point of
the brake fluid. If the boiling point of the
brake fluid is too low, vapor pockets may
form in the brake system when the brakes
are applied hard. This would impair braking
efficiency. There is a risk of an accident.
You should have the brake fluid renewed at
the specified intervals.
When handling brake fluid, observe the impor-tant safety notes on service products(Ypage 298).
The brake fluid change intervals can be foundin the Maintenance Booklet.
Only use brake fluid approved by Mercedes-Benz in accordance with MB-Freigabe or MB-Approval 331.0.
Information about approved brake fluid can beobtained at any qualified specialist workshop
or on the Internet athttp://bevo.mercedes-benz.com.
iHave the brake fluid regularly replaced at aqualified specialist workshop and thereplacement confirmed in the MaintenanceBooklet.
Coolant
Important safety notes
GWARNING
If antifreeze comes into contact with hot
components in the engine compartment, it
may ignite. There is a risk of fire and injury.
Let the engine cool down before you add
antifreeze. Make sure that antifreeze is not
spilled next to the filler neck. Thoroughly
clean the antifreeze from components
before starting the engine.
!Only add coolant that has been premixedwith the desired antifreeze protection. Youcould otherwise damage the engine.
You can find additional notes on the coolantin the following places:
Rin the Mercedes-Benz Specifications forService Products, MB BeVo 310.1
-on the Internet athttp://bevo.mercedes-benz.com
-on the Mercedes-Benz BeVo app
Ra qualified specialized workshop
!Always use a suitable coolant mixture,even in countries where high temperaturesprevail.
Otherwise, the engine cooling system is notsufficiently protected from corrosion andoverheating.
iHave the coolant regularly replaced at aqualified specialist workshop and thereplacement confirmed in the MaintenanceBooklet.
Comply with the important safety notes forservice products when handling coolant(Ypage 298).
Service products and filling capacities301
Technical data
Z