2019 MERCEDES-BENZ SL CLASS sensor
[x] Cancel search: sensorPage 301 of 330

Overinflated tires may:
Rincrease the braking distance
Radversely affect handling
Rwear excessively and/or unevenly
Rhave an adverse effect on ride comfort
Rbe more susceptible to damage
Maximum tire pressures
�CExample: maximum permissible tire pres-sure
Never exceed the maximum permissible tireinflation pressure. Always observe the recom-mended tire pressure for your vehicle whenadjusting the tire pressure (Ypage 296).
iThe actual values for tires are vehicle-spe-cific and may deviate from the values in theillustration.
Checking the tire pressures
Important safety notes
The tire pressure monitor does not warn youof:
Rincorrectly set tire pressure
Rsudden loss of tire pressure, e.g. from a for-eign object that has penetrated the tire
Observe the notes on tire pressure(Ypage 296).
Information on air pressure for the tires onyour vehicle can be found:
Ron the vehicle's Tire and Loading Informa-tion placard on the B-pillar
Ron the tire pressure table in the fuel fillerflap
Rin the "Tire pressure" section
Checking tire pressures manually
To determine and set the correct tire pressure,proceed as follows:
XRemove the valve cap of the tire that is tobe checked.
XPress the tire pressure gauge securely ontothe valve.
XRead the tire pressure and compare it to therecommended value on the Tire and LoadingInformation placard or the tire pressuretable (Ypage 296).
XIf the tire pressure is too low, increase thetire pressure to the recommended value.
XIf the tire pressure is too high, release air.To do so, press down the metal pin in thevalve, using the tip of a pen for example.Then check the tire pressure again using thetire pressure checker.
XScrew the valve cap onto the valve.
XRepeat these steps for the other tires.
Tire pressure monitor
General notes
If a tire pressure monitor is installed, the vehi-cle's wheels have sensors that monitor the tirepressures in all four tires. The tire pressuremonitor warns you if the pressure drops in oneor more of the tires. The tire pressure monitoronly functions if the corresponding sensorsare installed in all wheels.
Information on tire pressures is displayed inthe multifunction display. After a few minutesof driving, the current tire pressure of each tireis shown in theServ.Serv.menu of the multifunc-tion display.
Example: current tire pressure display
For information on the message display, referto the "Checking the tire pressure electroni-cally" section (Ypage 301).
Tire pressure299
Wheels and tires
Z
Page 303 of 330

stantly, the tire pressure monitor is malfunc-tioning.
In addition to the warning lamp, a messageappears in the multifunction display. Observethe information on display messages(Ypage 227).
It may take up to ten minutes for a malfunc-tion of the tire pressure monitor to be indica-ted. A malfunction will be indicated by the tirepressure warning lamp flashing for approx-imately one minute and then remaining lit.When the malfunction has been rectified, thetire pressure warning lamp goes out after afew minutes of driving.
The tire pressure values indicated by the on-board computer may differ from those meas-ured at a gas station with a pressure gage. Thetire pressures shown by the on-board com-puter refer to those measured at sea level. Athigh altitudes, the tire pressure values indica-ted by a pressure gage are higher than thoseshown by the on-board computer. In this case,do not reduce the tire pressures.
The operation of the tire pressure monitor canbe affected by interference from radio trans-mitting equipment (e.g. radio headphones,two-way radios) that may be being operated inor near the vehicle.
Checking the tire pressure electroni-
cally
XMake sure that the SmartKey is in position�H(Ypage 126) in the ignition lock.
XPress the�Yor�ebutton on the steer-ing wheel to select theServ.Serv.menu.
XPress the�cor�dbutton to selectTire PressureTire Pressure.
XPress�v.The current tire pressure of each tire isshown in the multifunction display.
If the vehicle has been parked for over20 minutes, theTire pressure will beTire pressure will bedisplayed after driving a few minutesdisplayed after driving a few minutesmessage appears.
After a teach-in process, the tire pressuremonitor automatically detects new wheels ornew sensors. As long as a clear allocation ofthe tire pressure value to the individual wheelsis not possible, theTire Pressure MonitorTire Pressure MonitorActiveActivedisplay message is shown instead ofthe tire pressure display. The tire pressuresare already being monitored.
Tire pressure monitor warning mes-
sages
The tire pressure monitor detects a pressureloss in one or more tires:
RIf the tire pressure monitor detects a pres-sure loss in one or more tires, a warningmessage is shown in the multifunction dis-play. The yellow tire pressure warning lampthen lights up.
RIf thePlease Correct Tire PressurePlease Correct Tire Pressuremessage appears in the multifunction dis-play, the tire pressure in at least one tire istoo low. The tire pressure must be correctedwhen the opportunity arises.
RIf theCheck TiresCheck Tiresmessage appears in themultifunction display, the tire pressure in atleast one tire has dropped significantly. Thetires must be checked.
RIf theWarning Tire MalfunctionWarning Tire Malfunctionmes-sage appears in the multifunction display,the tire pressure in at least one tire hasdropped suddenly. The tires must bechecked.
Observe the instructions and safety notes inthe display messages in the "Tires" section(Ypage 227).
If the wheel positions on the vehicle are rota-ted, the tire pressures may be displayed forthe wrong positions for a short time. This isrectified after a few minutes of driving, and thetire pressures are displayed for the correctpositions.
Restarting the tire pressure monitor
When you restart the tire pressure monitor, allexisting warning messages are deleted and thewarning lamps go out. The monitor uses thecurrently set tire pressures as the referencevalues for monitoring. In most cases, the tirepressure monitor will automatically detect thenew reference values after you have changedthe tire pressure. However, you can also setreference values manually as described here.The tire pressure monitor then monitors thenew tire pressure values.
XSet the tire pressure to the value recom-mended for the corresponding driving situa-tion on the Tire and Loading Informationplacard on the driver's side B-pillar(Ypage 296).
Tire pressure301
Wheels and tires
Z
Page 320 of 330

tor cannot function reliably. Only restart thetire pressure monitor when the defectivewheel has been replaced with a new wheel.
All mounted wheels must be equipped withfunctioning sensors for the tire pressure moni-tor.
Wheel and tire combinations
You can ask for information regarding permit-ted wheel/tire combinations at an authorizedMercedes-Benz Center.
!For safety reasons, Mercedes-Benz recom-mends that you only use tires and wheelswhich have been approved by Mercedes-Benz specifically for your vehicle.
These tires have been specially adapted foruse with the control systems, such as ABS
or ESP®, and are marked as follows:
RMO = Mercedes-Benz Original
RMOE = Mercedes-Benz Original Extended(tires featuring run-flat characteristics)
RMO1 = Mercedes-Benz Original (only cer-tain AMG tires)
Mercedes-Benz Original Extended tires mayonly be used on wheels that have been spe-cifically approved by Mercedes-Benz.
Only use tires, wheels or accessories testedand approved by Mercedes-Benz. Certaincharacteristics, e.g. handling, vehicle noiseemissions or fuel consumption, may other-wise be adversely affected. In addition,when driving with a load, tire dimension var-iations could cause the tires to come intocontact with the bodywork and axle compo-nents. This could result in damage to thetires or the vehicle.
Mercedes-Benz accepts no liability for dam-age resulting from the use of tires, wheelsor accessories other than those tested andapproved.
Information on tires, wheels and approvedcombinations can be obtained from anyqualified specialist workshop.
!Retreaded tires are neither tested nor rec-ommended by Mercedes-Benz, since previ-ous damage cannot always be detected onretreaded tires. As a result, Mercedes-Benzcannot guarantee vehicle safety if retreadedtires are mounted. Do not mount used tires
if you have no information about their previ-ous usage.
The recommended pressures for various oper-ating conditions can be found:
Ron the Tire and Loading Information placardon the B-pillar on the driver's side
Rin the tire pressure table on the fuel fillerflap
Observe the notes on recommended tire pres-sures under various operating conditions(Ypage 296).
Check tire pressures regularly, and only whenthe tires are cold. Comply with the mainte-nance recommendations of the tire manufac-turer in the vehicle document wallet.
Notes on the vehicle equipment – alwaysequip the vehicle:
Rwith tires of the same size on a given axle(left and right)
Rwith the same type of tires at a given time(summer tires, winter tires, MOExtendedtires)
Exception: it is permissible to mount a dif-ferent type or make in the event of a flattire. Observe the "MOExtended tires (tireswith run-flat characteristics)" section(Ypage 278).
Vehicles equipped with MOExtended tires arenot equipped with a TIREFIT kit at the factory.It is therefore recommended that you addition-ally equip your vehicle with a TIREFIT kit if youmount tires that do not feature run-flat charac-teristics, e.g. winter tires. A TIREFIT kit may beobtained from a qualified specialist workshop.
318Wheel and tire combinations
Wheels and tires
Page 321 of 330

Information regarding technical data
iThe data stated here specifically refers toa vehicle with standard equipment. Consultan authorized Mercedes-Benz Center for thedata for all vehicle variants and trim levels.
Vehicle electronics
Tampering with the engine electron-
ics
!Have the engine electronics and associ-ated parts, such as control units, sensors,actuating components or electric cablesserviced only at a qualified specialist work-shop. Vehicle components may otherwisewear more quickly and the vehicle's operat-ing permit may be invalidated.
Installing two-way radios and mobile
phones (RF transmitters)
GWARNING
The electromagnetic radiation from two-way
radios can interfere with the vehicle elec-
tronics if two-way radios are manipulated or
retrofitted incorrectly. This could jeopardize
the operating safety of the vehicle. There is
a risk of an accident.
You should have all work on electrical and
electronic components carried out at a
qualified specialist workshop.
GWARNING
If you incorrectly operate two-way radios in
the vehicle, the electromagnetic radiation
may interfere with the vehicle electronics,
for example if:
Rthe two-way radio is not connected to an
exterior antenna
Rthe exterior antenna is not correctly
mounted or is not low-reflection
This could jeopardize the operating safety of
the vehicle. There is a risk of an accident.
Have the low-reflection exterior antenna
installed at a qualified specialist workshop.
Always connect two-way radios to the low-
reflection exterior antenna when operating
in the vehicle.
!The operating permit may be invalidated ifthe instructions for installation and use oftwo-way radios are not observed.
In particular, the following requirementsmust be complied with:
Ronly approved wavebands may be used
Robserve the maximum permissible outputin these wavebands
Ronly approved antenna positions may beused
Excessive levels of electromagnetic radiationmay cause damage to your health and thehealth of others. Using an exterior antennatakes into account current scientific discus-sions relating to the possible health hazardsthat may result from electromagnetic fields.
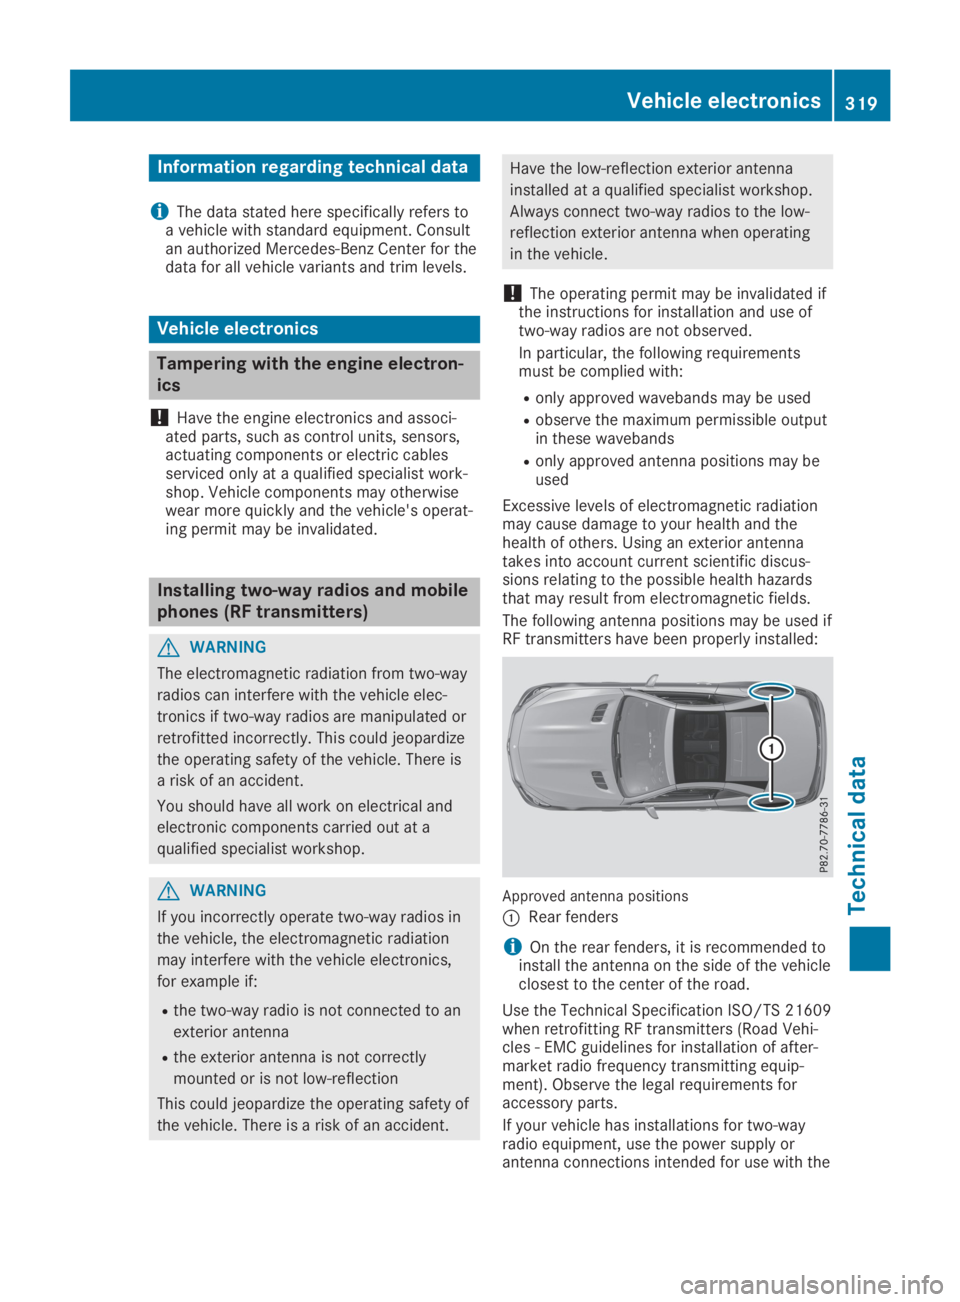
The following antenna positions may be used ifRF transmitters have been properly installed:
Approved antenna positions
�CRear fenders
iOn the rear fenders, it is recommended toinstall the antenna on the side of the vehicleclosest to the center of the road.
Use the Technical Specification ISO/TS 21609when retrofitting RF transmitters (Road Vehi-cles - EMC guidelines for installation of after-market radio frequency transmitting equip-ment). Observe the legal requirements foraccessory parts.
If your vehicle has installations for two-wayradio equipment, use the power supply orantenna connections intended for use with the
Vehicle electronics319
Technical data
Z
Page 327 of 330

The coolant is a mixture of water and anti-freeze/corrosion inhibitor. It is responsible forthe following:
Ranti-corrosion protection
Rantifreeze protection
Rraising the boiling point
If the coolant has antifreeze protection downto -35 ‡ (-37 †), the boiling point of the cool-ant during operation is approximately 266 ‡(130 †).
The antifreeze/corrosion inhibitor concentra-tion in the engine cooling system should:
Rbe at least 50%. This will protect the enginecooling system against freezing down toapproximately -35 ‡ (-37 †).
Rnot exceed 55% (antifreeze protection downto -49 ‡ [-45 †]). Otherwise, heat will notbe dissipated as effectively.
If the vehicle has lost coolant, add equalamounts of water and antifreeze/corrosioninhibitor.
Mercedes-Benz recommends an antifreeze/corrosion inhibitor concentrate in accordancewith MB Specifications for Service Products310.1.
iWhen the vehicle is first delivered, it is fil-led with a coolant mixture that ensures ade-quate antifreeze and anti-corrosion protec-tion.
iThe coolant is checked with every mainte-nance interval at a qualified specialist work-shop.
Filling capacities
Missing values were not available at time ofgoing to print.
ModelCapacity
SL 450Approx. 10.8 US qt(10.2l)
SL 550Approx. 12.5 US qt(11.8l)
Mercedes‑AMGSL 63
Mercedes‑AMGSL 65Approx. 10.5 US qt(10l)
Windshield washer system
Important safety notes
GWARNING
Windshield washer concentrate is highly
flammable. If windshield washer concentrate
gets onto hot components of the engine or
the exhaust system, it can ignite. There is a
risk of fire and injury.
Make sure that windshield washer concen-
trate is not spilled in the vicinity of the filler
neck.
!Only use washer fluid which is suitable forlamp lenses, e.g. MB SummerFit or MB Win-terFit. Unsuitable washer fluid may damagethe lamp lenses of the headlamps.
!Only MB SummerFit and MB WinterFitwasher fluid should be mixed together. Thespray nozzles may otherwise becomeblocked.
Do not use distilled or de-ionized water. Other-wise, the level sensor may give a false reading.
When handling washer fluid, observe theimportant safety notes on service products(Ypage 321).
At temperatures above freezing:
XFill the washer fluid reservoir with a mixtureof water and windshield washer fluid, e.g.MB SummerFit.
XAdd 1 part MB SummerFit to 100 partswater.
At temperatures below freezing:
XFill the washer fluid reservoir with a mixtureof water and washer fluid, e.g. MB WinterFit.
For the correct mixing ratio refer to theinformation on the antifreeze reservoir.
iAdd windshield washer fluid, e.g. MB Sum-merFit or MB WinterFit, to the washer fluidall year round.
Service products and filling capacities325
Technical data
Z