Page 403 of 578

#Followthe instructions inthe serviceinterval displayregardingthe oilchange.
*NOTEDamagecausedbyaddingtoomuch engine oil
Too much engine oil can damagethe engineorthe catalytic converter.
#Haveexcess engine oilremoved at aqualified specialistworkshop.
#Turncap1counter-clockwise andremoveit.
#Add engine oil.
#Replace cap1and turn it clockwise asfaras it will go.
#Checkthe oil level again (→page 399).
Checking coolant level
&WARNINGRisk of burns from hot com‐ponent parts inthe engine compartment
Certain components inthe engine compart‐ment can beveryhot, e.g.the engine,theradiator and parts oftheexhaust system.
#Allowthe enginetocool down and onlytouch component parts described inthefollowing.
&WARNINGRisk of scalding from hotcoolant
The engine cooling system is pressurized,particularly whenthe engine iswarm. Ifyouopenthe cap,you could be scaldedbyhotcoolant spraying out.
#Letthe engine cool down before open‐ingthe cap.
#When openingthe cap,wear protectivegloves and safetyglasses.
#Openthe cap slowlytorelease pres‐sure.
Maintenance and care401
Page 404 of 578

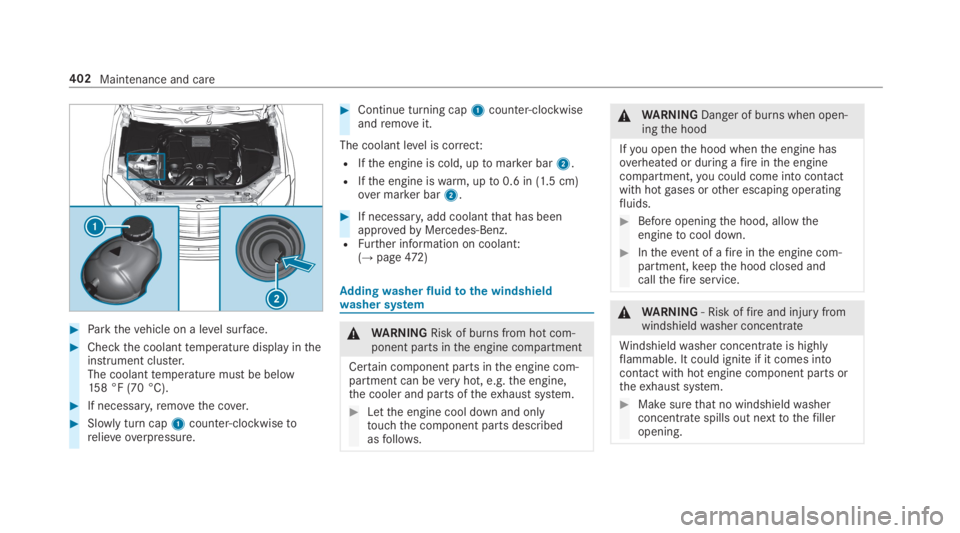
#Parkthevehicle on a level surface.
#Checkthe coolanttemperature display intheinstrument cluster.The coolanttemperature must be below158 °F (70 °C).
#If necessary,removethe cover.
#Slowly turn cap1counter-clockwisetorelieve overpressure.
#Continue turning cap1counter-clockwiseandremoveit.
The coolant level is correct:
RIfthe engine is cold, uptomarker bar2.
RIfthe engine iswarm, upto0.6 in (1.5 cm)over marker bar2.
#If necessary,add coolantthat has beenapprovedbyMercedes-Benz.RFurther information on coolant:(→page472)
Addingwasherfluidtothe windshieldwasher system
&WARNINGRisk of burns from hot com‐ponent parts inthe engine compartment
Certain component parts inthe engine com‐partment can beveryhot, e.g.the engine,the cooler and parts oftheexhaust system.
#Letthe engine cool down and onlytouchthe component parts describedasfollows.
&WARNINGDanger of burns when open‐ingthe hood
Ifyou openthe hood whenthe engine hasoverheated or during afireinthe enginecompartment,you could come into contactwith hotgases orother escaping operatingfluids.
#Before openingthe hood, allowtheenginetocool down.
#Intheevent of afireinthe engine com‐partment,keepthe hood closed andcallthefireservice.
&WARNING‑ Risk offireand injury fromwindshieldwasher concentrate
Windshieldwasher concentrate is highlyflammable. It could ignite if it comes intocontact withhot engine component parts ortheexhaust system.
#Make surethat no windshieldwasherconcentrate spills out nexttothefilleropening.
402Maintenance and care
Page 431 of 578
#Press and hold button1for at leastfiveseconds.Thevehicle is adjustedtothe height ofthelast active drive program. Indicator lamp2goes out.
#Drivethevehicle offthe transporter.
4MATICvehicles
#Make surethatthe front andrear axles cometorestonthe same transportationvehicle.
*NOTEDamagetothe drivetrain duetoincorrect positioning
#Do not positionthevehicle abovetheconnection point ofthe transportvehi‐cle.
Towingeyestoragelocation
Towingeye1is located withthevehicletool kitunderthe trunkfloor.
Installingthetowingeye
#Pressthe mark on cover1inwards andremove.
#Screwinthetowingeyeclockwise asfar as itwill go and tighten.
%Make surethat cover1engages inthebumper whenyouremovethetowingeye.
Breakdown assistance429
Page 460 of 578

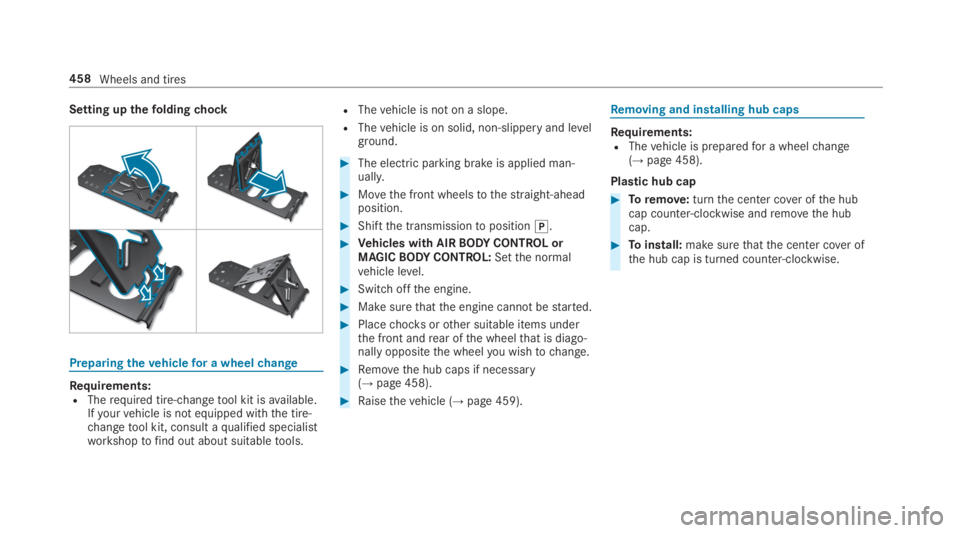
Setting upthefoldingchock
Preparingthevehiclefor a wheelchange
Requirements:RTherequired tire-changetool kit isavailable.Ifyourvehicle is not equipped withthe tire-changetool kit, consult aqualified specialistworkshoptofind out about suitabletools.
RThevehicle is not on a slope.
RThevehicle is on solid, non-slippery and levelground.
#The electric parking brake is applied man‐ually.
#Movethe front wheelstothestraight-aheadposition.
#Shiftthe transmissiontoposition�].
#Vehicles with AIRBODYCONTROL orMAGICBODYCONTROL:Setthe normalvehicle level.
#Switchoffthe engine.
#Make surethatthe engine cannotbestarted.
#Placechocksorother suitable items underthe front andrear ofthe wheelthat is diago‐nally oppositethe wheelyou wishtochange.
#Removethe hub caps if necessary(→page 458).
#Raisethevehicle (→page 459).
Removing and installing hub caps
Requirements:RThevehicle is preparedfor a wheelchange(→page 458).
Plastic hub cap
#Toremove:turnthe center cover ofthe hubcap counter-clockwise andremovethe hubcap.
#Toinstall:make surethatthe center cover ofthe hub cap is turned counter-clockwise.
458Wheels and tires
Page 461 of 578

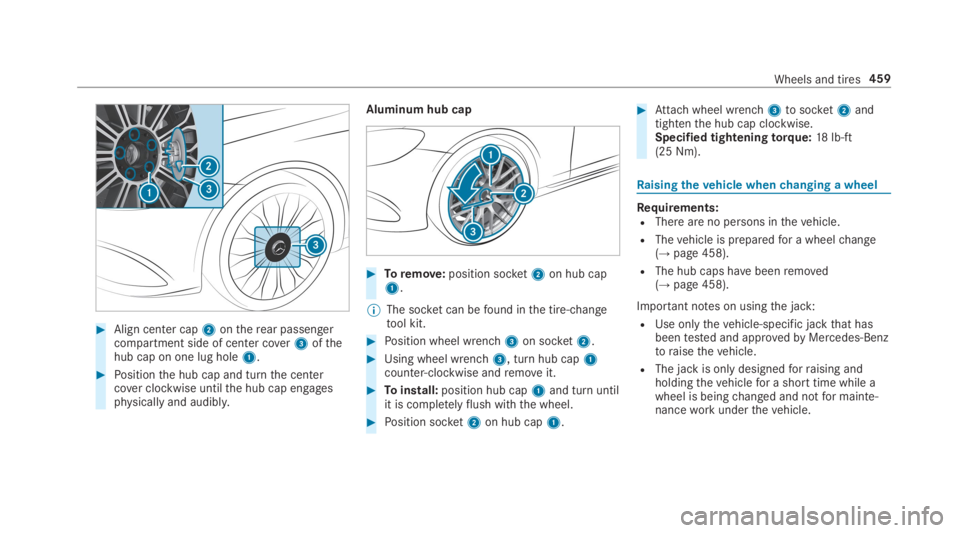
#Align center cap2ontherear passengercompartment side of center cover3ofthehub cap on one lug hole1.
#Positionthe hub cap and turnthe centercover clockwise untilthe hub cap engagesphysically and audibly.
Aluminum hub cap
#Toremove:position socket2on hub cap1.
%The socket can befound inthe tire-changetool kit.
#Position wheel wrench3on socket2.
#Using wheel wrench3, turn hub cap1counter-clockwise andremoveit.
#Toinstall:position hub cap1and turn untilit is completelyflush withthe wheel.
#Position socket2on hub cap1.
#Attachwheel wrench3tosocket2andtightenthe hub cap clockwise.Specified tighteningtorque:18lb-ft(25 Nm).
Raisingthevehicle whenchanging a wheel
Requirements:RThere are no persons inthevehicle.
RThevehicle is preparedfor a wheelchange(→page 458).
RThe hub caps havebeenremoved(→page 458).
Important notes on usingthe jack:
RUse onlythevehicle-specific jackthat hasbeentested and approvedbyMercedes-Benztoraisethevehicle.
RThe jack is only designedforraising andholdingthevehiclefor a short time while awheel is beingchanged and notfor mainte‐nanceworkunderthevehicle.
Wheels and tires459
Page 463 of 578

*NOTEVehicle damage fromthe jack
Ifyou do not positionthe jack correctly atthe appropriate jack support point ofthevehicle,the jack could tipover withthevehi‐cleraised.
#The jack is designedexclusivelyforjacking upthevehicle atthe jack sup‐port points.
#Taketheratchet wrench out ofthe tire-changetool kit and place it onthe hexagonnut ofthe jack sothatthe letters "AUF" arevisible.
#Position jack2at jack support point1.
#Turnratchet wrench3clockwise until jack2sits completelyon jack support point1andthe base ofthe jack liesevenly ontheground.
#Continuetoturnratchet wrench3untilthetire israised a maximum of1.2 in (3 cm) offthe ground.
#Loosen andremovethe wheel (→page 461).
Removing a wheel
Requirements:RThevehicle israised (→page 459).
Mercedes-AMGvehicles:observethe notes inthe Supplement. Otherwise,you may notrecog‐nize dangers.
Whenchanging a wheel,avoid applying anyforcetothe brake discs, sincethis could impairthelevel of comfortwhen braking.
*NOTEDamagetothreading from dirt onwheel bolts
#Do not place wheel bolts in sand or ona dirty surface.
#Unscrewthe uppermost wheel bolt com‐pletely.
Wheelsand tires461
Page 465 of 578

#Pressthe wheelfirmlyagainstthewheel hub when screwing onthefirstwheel bolt.
#Tightenthe wheel boltsevenly in a diagonalpattern inthe order indicated untiltheyarefinger-tight.
#Unscrewthe alignment bolt.
#Tightenthe last wheel bolt until it isfinger-tight.
#Lowerthevehicle (→page 463).
Loweringthevehicle after a wheelchange
Requirements:RThe new wheel has been installed(→page 462).
#Placetheratchet ontothe hexagon nut ofthejack sothatthe letters "AB" are visible.
#Tolower thevehicle:turntheratchet ofthejack counter-clockwise.
#Tightenthe wheel boltsevenly in a diagonalpattern inthe order indicated (1to5).Specified tighteningtorque:111lb-ft(150 Nm).
&WARNINGRisk of injurythrough incor‐rect tighteningtorque
The wheelscould come loose ifthe wheelbolts or wheel nuts are not tightenedtotheprescribed tighteningtorque.
#Makesurethe wheel bolts or wheelnuts are tightenedtothe prescribedtighteningtorque.
#Ifyou are not sure, do not movethevehicle. Consult aqualified specialistworkshop and havethe tighteningtor‐quechecked immediately.
#Checkthe tire pressure ofthe newly moun‐ted wheel and adjust accordingly.
#Vehicles with a tire pressure monitoringsystem:Restartthe tire pressure monitoringsystem (→page441).
Makesuretoobservethefollowing furtherrela‐ted subject:
RNotes on tire pressure (→page 435)
Wheels and tires463