2019 MERCEDES-BENZ GLS SUV automatic transmission
[x] Cancel search: automatic transmissionPage 25 of 398
Towing away
Important safety guidelines ........... 346
Installing the towing eye ................ 347
Notes for 4MATIC vehicles ............ 349
Removing the towing eye ............... 347
Transporting the vehicle ................ 348
With both axles on the ground ....... 347
Towing eye ......................................... 335
Traffic reports
see also Digital Operator's Man-
ual .................................................. 287
Traffic Sign Assist
Activating/deactivating the warn-ing function .................................... 238
Display message ............................ 264
Function/note s............................. 206
Important safety notes .................. 206
Instrument cluster display ............. 206
Trailer coupling
see Towing a trailer
Trailer loads and drawbar nose-
weights ............................................... 226
Trailer towing
Active Blind Spot Assist ................. 212
Active Lane Keeping Assist ............ 215
Blind Spot Assist ............................ 208
Permissible trailer loads and
drawbar noseweights ..................... 226
Transfer case ..................................... 155
Transmission
see Automatic transmission
Transmission position display ......... 149
Transporting the vehicle .................. 348
Traveling uphill
Brow of hill ..................................... 170
Driving downhill ............................. 170
Maximum gradient-climbing capa-
bility ............................................... 170
Trim pieces (cleaning instruc-
tions) .................................................. 332
Trip computer (on-board com-
puter) .................................................. 233
Trip odometer
Calling up ....................................... 233
Resetting (on-board computer) ...... 234
Trunk
see Tailgate Turn signals
Display message ............................ 257
Replacing bulbs (front) ................... 122
Switching on/of f........................... 116
Two-way radio
Frequencies ................................... 382
Installation ..................................... 382
Transmission output (maximum) .... 382
TWR (Tongue Weight Rating) (defi-
nition) ................................................. 372
Type identification plate
see Vehicle identification plate U
Unlocking Emergency unlocking ....................... 84
From inside the vehicle (central
unlocking button) ............................. 83
Upshift indicator (on-board com-
puter, Mercedes-AMG vehicles) ....... 242
USB devices
Connecting to the Media Inter-
face ............................................... 294 V
Vanity mirror (in the sun visor) ........ 305
Vehicle
Correct use ...................................... 31
Data acquisition ............................... 32
Display message ............................ 270
Equipment ....................................... 28
Individual settings .......................... 240
Limited Warranty ............................. 32
Loading .......................................... 362
Locking (in an emergency) ............... 84
Locking (SmartKey) .......................... 77
Lowering ........................................ 377
Maintenance .................................... 29
Operating safety .............................. 30
Parking .......................................... 158
Parking for a long period ................ 160
Pulling away ................................... 143
Raising ........................................... 374
REACH Regulation ........................... 31
Reporting problems ......................... 32
Securing from rolling away ............ 374 Index
23
Page 62 of 398
a child restraint system on a rear seat. Children
are generally better protected there.
If a child younger than twelve years old and
under 5 ft (1.50 m) in height is traveling in the
vehicle:
R always secure the child in a child restraint
system suitable for Mercedes-Benz vehicles.
The child restraint system must be appropri-
ate to the age, weight and size of the child.
R be sure to observe the instructions and safety
notes in this section in addition to the child
restraint system manufacturer's installation
instructions.
R always observe the instructions and safety
notes on the "Occupant classification system (OCS)". (Y page 51) G
WARNING
If you leave children unsupervised in the vehi- cle, they could set it in motion by, for example:
R release the parking brake.
R shift the automatic transmission out of the
parking position P.
R start the engine.
In addition, they may operate vehicle equip-
ment and become trapped. There is a risk of
an accident and injury.
When leaving the vehicle, always take the
SmartKey with you and lock the vehicle. Never
leave children unsupervised in the vehicle. G
WARNING
If persons, particularly children are subjected to prolonged exposure to extreme heat or
cold, there is a risk of injury, possibly even
fatal. Never leave children unattended in the
vehicle. G
WARNING
If the child restraint system is subjected to
direct sunlight, parts may get very hot. Chil-
dren may burn themselves on these parts,
particularly on the metal parts of the child
restraint system. There is a risk of injury.
If you leave the vehicle, taking the child with
you, always ensure that the child restraint
system is not exposed to direct sunlight. Pro- tect it with a blanket, for example. If the child
restraint system has been exposed to direct
sunlight, let it cool down before securing the
child in it. Never leave children unattended in the vehicle.
Always ensure that all vehicle occupants have
their seat belts fastened correctly and are sitting properly. Particular attention must be paid to
children.
Observe the safety notes on the seat belt
(Y page 46) and the notes on correct use of seat
belts (Y page 47).
A booster seat may be necessary to achieve
proper seat belt positioning for children over
40 lbs (18 kg) until they reach a height where a
three-point seat belt can be properly fastened
without a booster seat. Special seatbelt retractor
G
WARNING
If the seat belt is released while driving, the
child restraint system will no longer be
secured properly. The special seat belt retrac- tor is disabled and the inertia real draws in a
portion of the seat belt. The seat belt cannot
be immediately refastened. There is an
increased risk of injury, possibly even fatal.
Stop the vehicle immediately, paying atten-
tion to road and traffic conditions. Reactivate
the special seat belt retractor and secure the
child restraint system properly.
All seat belts in the vehicle, except the driver's
seat belt, are equipped with a special seat belt
retractor. When activated, the special seat belt
retractor ensures that the seat belt cannot
slacken once the child seat is secured.
Installing a child restraint system:
X Make sure you observe the child restraint
system manufacturer's installation instruc-
tions.
X Pull the seat belt smoothly from the belt out-
let.
X Engage seat belt tongue in belt buckle. 60
Children in the vehicleSafety
Page 66 of 398
Child restraint system on the front-
passenger seat
General notes Accident statistics show that children secured
in the rear seats are safer than children secured
in the front-passenger seat. For this reason,
Mercedes-Benz strongly advises that you install the child restraint system on a rear seat.
If it is absolutely necessary to install a child
restraint system on the front-passenger seat,
always observe the instructions and safety
notes on the "Occupant Classification System
(OCS)" (Y page 51).
You can thus avoid the risks that could arise as a result of:
R an incorrectly categorized person in the front-
passenger seat
R deactivating the front passenger front air bag
unintentionally
R the unsuitable positioning of the child
restraint system, e.g. too close to the dash-
board
Rearward-facing child restraint system If circumstances require you to secure a child in
a rearward-facing child restraint system on the
front-passenger seat, always make sure that the
front passenger front air bag is deactivated.
Only if the PASSENGER AIR BAG OFF indicator
lamp is lit continuously (Y page 45), is the front
passenger front air bag deactivated.
Always observe the child restraint system man- ufacturer's installation and operating instruc-
tions.
Forward-facing child restraint system If it is absolutely necessary to install a forward-
facing child restraint system on the front-
passenger seat, always move the front-
passenger seat as far back as possible. The
entire base of the child restraint system must
always rest on the seat cushion of the front-
passenger seat. The backrest of the child
restraint system must lie as flat as possible
against the backrest of the front-passenger
seat. The child restraint system must not touch the roof or be subjected to a load by the head
restraint. Adjust the angle of the seat backrest
and the head restraint position accordingly.
Always make sure that the shoulder belt strap is correctly routed from the vehicle belt outlet to
the shoulder belt guide on the child restraint
system. The shoulder belt strap must be routed forward and down from the vehicle belt outlet. If
necessary, adjust the vehicle belt outlet and the
front-passenger seat accordingly.
Always observe the child restraint system man- ufacturer's installation and operating instruc-
tions. Child-proof locks
Important safety notes G
WARNING
If children are traveling in the vehicle, they
could:
R open doors, thus endangering other people
or road users
R exit the vehicle and be caught by oncoming
traffic
R operate vehicle equipment and become
trapped
There is a risk of an accident and injury.
Always activate the child-proof locks and
override feature if children are traveling in the vehicle. When leaving the vehicle, always take
the key with you and lock the vehicle. Never
leave children unattended in the vehicle.
Override feature for:
R the rear doors (Y page 65)
R the rear side windows (Y page 65) G
WARNING
If you leave children unsupervised in the vehi- cle, they could set it in motion by, for example:
R release the parking brake.
R shift the automatic transmission out of the
parking position P.
R start the engine.
In addition, they may operate vehicle equip-
ment and become trapped. There is a risk of
an accident and injury. 64
Children in the vehicleSafety
Page 71 of 398
passenger protection measures (PRE-SAFE
®
)
are activated simultaneously (Y page 58).
Situation-dependent braking assis-
tance General information
i Observe the "Important safety notes" sec-
tion (Y page 66).
With the help of the radar sensor system, Active
Brake Assist can detect obstacles that are in the path of your vehicle for an extended period of
time.
If Active Brake Assist detects a risk of collision
with the vehicle in front, it calculates the brake
pressure necessary to avoid a collision. If you
apply the brakes forcefully, situation-dependent
braking assistance adapts to the situation and
automatically increases the brake pressure to a degree appropriate to the traffic situation.
Situation-dependent braking assistance pro-
vides braking assistance in hazardous situations at speeds above 4 mph (7 km/h). It uses radar
sensor technology to assess the traffic situa-
tion.
Situation-dependent braking assistance is capa-
ble of reacting to moving objects that have
already been detected as such at least once
over the period of observation, up to vehicle
speeds of around 155 mph (250 km/ h).
Situation-dependent braking assistance reacts
to stationary obstacles up to a speed of approx-
imately 44 mph (70 km/h).
If situation-dependent braking assistance
demands particularly high brake pressure, pre-
ventative passenger protection measures (PRE-
SAFE ®
) are triggered simultaneously
(Y page 58).
X Keep the brake pedal depressed until the
emergency braking situation is over.
ABS prevents the wheels from locking.
The brakes will work normally again if: R you release the brake pedal
R there is no longer any danger of a collision
R no obstacle is detected in front of your vehi-
cle.
Situation-dependent braking assistance is then
deactivated. Important safety notes
i Observe the "Important safety notes" sec-
tion for driving safety systems (Y page 66). G
WARNING
Adaptive Brake Assist cannot always clearly
identify objects and complex traffic situa-
tions.
In such cases, Adaptive Brake Assist might:
R intervene unnecessarily
R not intervene
There is a risk of an accident.
Always pay careful attention to the traffic sit- uation and be ready to brake. Terminate the
intervention in a non-critical driving situation. G
WARNING
Adaptive Brake Assist does not react:
R to people or animals
R to oncoming vehicles
R to crossing traffic
R when cornering
As a result, Adaptive Brake Assist may not
intervene in all critical conditions. There is a
risk of an accident.
Always pay careful attention to the traffic sit- uation and be ready to brake.
Due to the nature of the system, complex but
non-critical driving conditions may also cause
Active Brake Assist to intervene.
Even if Active Brake Assist is not available due to a malfunction in the radar sensor system, the
brake system is still available with full brake
boosting effect and BAS. ESP
®
(Electronic Stability Program)
General notes i
Observe the "Important safety notes" sec-
tion (Y page 66).
ESP ®
monitors driving stability and traction, i.e.
power transmission between the tires and the
road surface. Driving safety systems
69Safety Z
Page 79 of 398
SmartKey
Important safety notes
G
WARNING
If children are left unsupervised in the vehicle, they could:
R open the doors, thus endangering other
people or road users.
R get out and disrupt traffic.
R operate the vehicle's equipment.
Additionally, children could set the vehicle in
motion if, for example, they:
R release the parking brake.
R shifting the automatic transmission out of
park position P
R Start the engine.
There is a risk of an accident and injury.
When leaving the vehicle, always take the
SmartKey with you and lock the vehicle. Never
leave children or animals unattended in the
vehicle. Always keep the SmartKey out of
reach of children. G
WARNING
If you attach heavy or large objects to the
SmartKey, the SmartKey could be uninten-
tionally turned in the ignition lock. This could
cause the engine to be switched off. There is a risk of an accident.
Do not attach any heavy or large objects to the
SmartKey. Remove any bulky key rings before
inserting the SmartKey into the ignition lock.
! Keep the SmartKey away from strong mag-
netic fields. Otherwise, the remote control
function could be affected.
Strong magnetic fields can occur in the vicin- ity of powerful electrical installations.
Do not keep the SmartKey: R with electronic devices, e.g. a mobile phone
or another SmartKey.
R with metallic objects, e.g. coins or metal foil.
R inside metallic objects, e.g. a metal case.
This can affect the functionality of the Smart- Key. Do not keep the KEYLESS-GO or KEYLESS-GO
Start function key in the temperature-controlled
cup holder. Otherwise, the KEYLESS-GO or KEY- LESS-GO Start function key will not be detected.
Vehicles with KEYLESS-GO start function: do
not keep the SmartKey in the cargo compart-
ment. Otherwise, the SmartKey may not be
detected, e.g. when starting the engine using
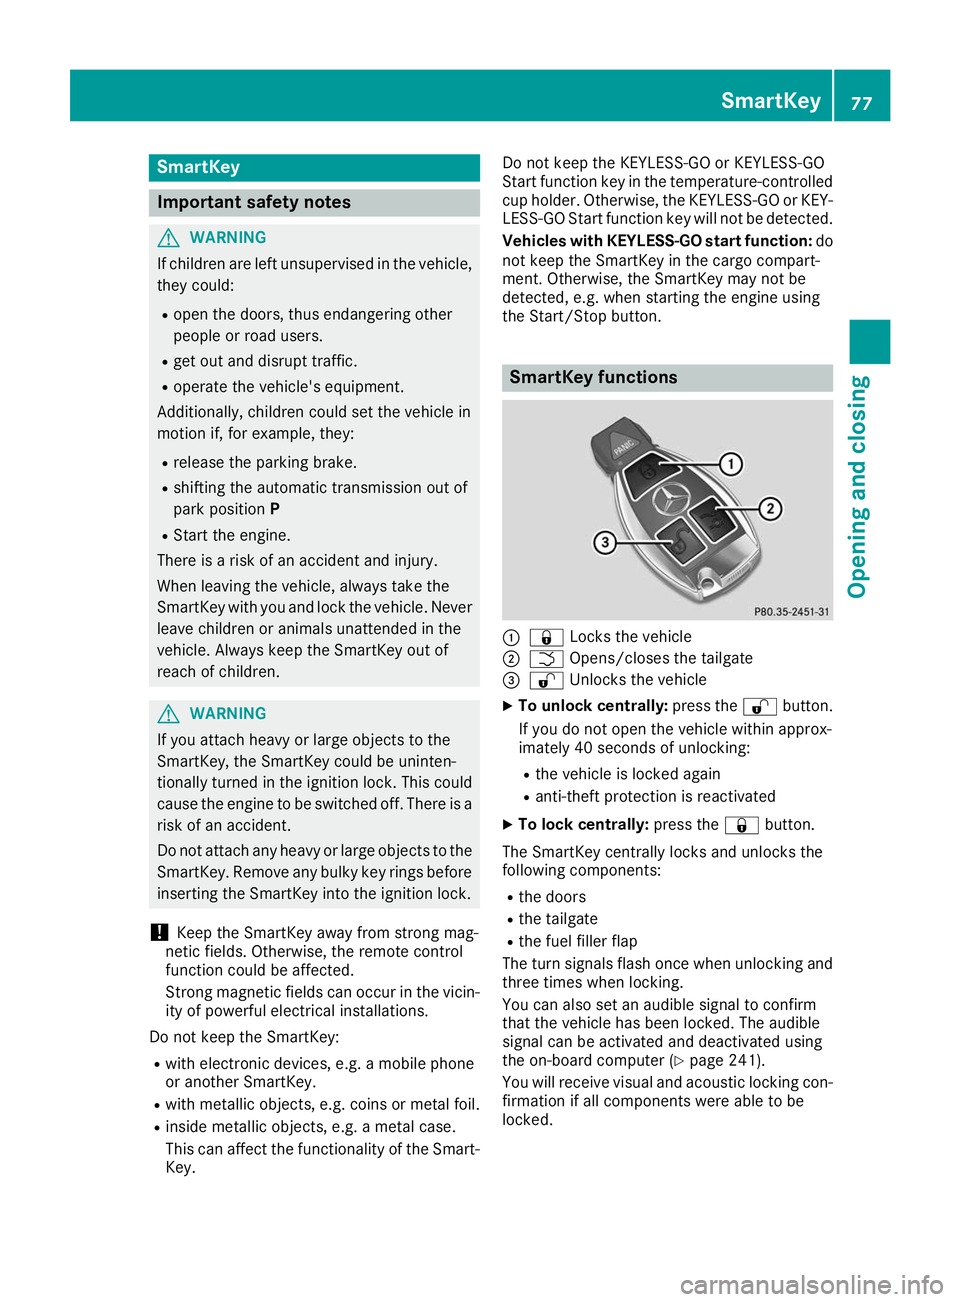
the Start/Stop button. SmartKey functions
0043
0037 Locks the vehicle
0044 0054 Opens/closes the tailgate
0087 0036 Unlocks the vehicle
X To unlock centrally: press the0036button.
If you do not open the vehicle within approx-
imately 40 seconds of unlocking:
R the vehicle is locked again
R anti-theft protection is reactivated
X To lock centrally: press the0037button.
The SmartKey centrally locks and unlocks the
following components:
R the doors
R the tailgate
R the fuel filler flap
The turn signals flash once when unlocking and three times when locking.
You can also set an audible signal to confirm
that the vehicle has been locked. The audible
signal can be activated and deactivated using
the on-board computer (Y page 241).
You will receive visual and acoustic locking con-
firmation if all components were able to be
locked. SmartKey
77Opening and closing Z
Page 85 of 398

Doors
Important safety notes
G
WARNING
If children are left unsupervised in the vehicle, they could:
R open the doors, thus endangering other
people or road users.
R get out and disrupt traffic.
R operate the vehicle's equipment.
Additionally, children could set the vehicle in
motion if, for example, they:
R release the parking brake.
R shifting the automatic transmission out of
park position P
R Start the engine.
There is a risk of an accident and injury.
When leaving the vehicle, always take the
SmartKey with you and lock the vehicle. Never
leave children or animals unattended in the
vehicle. Always keep the SmartKey out of
reach of children. Unlocking and opening doors from
the inside
You can open a door from inside the vehicle
even if it has been locked. You can only open the rear doors from inside the vehicle if they are not
secured by the child-proof locks (Y page 65).
If the vehicle has previously been locked from
the outside, opening a door from the inside will
trigger the anti-theft alarm system. Switch off
the alarm (Y page 75). X
Front door: pull door handle 0044.
If the door is locked, locking knob 0043pops up.
The door is unlocked and can be opened.
X Rear door: pull door handle 0044.
If the door is locked, locking knob 0043pops up
and the door unlocks.
X Pull door handle 0044again.
The door can be opened. Centrally locking and unlocking the
vehicle from the inside
You can centrally lock or unlock the vehicle from the inside. The buttons are located on both frontdoors. X
To unlock: press button 0043.
X To lock: press button 0044.
If the front-passenger door is closed, the vehi-
cle locks.
Meanwhile, the fuel filler flap will not be locked
or unlocked.
You cannot unlock the vehicle centrally from the
inside if the vehicle has been locked from the
outside.
You can open a front door from inside the vehi-
cle even if it has been locked.
If a locked door is opened from the inside, the
previous unlock status of the vehicle will be
taken into consideration if:
R the vehicle was locked using the locking but-
ton for the central locking, or
R if the vehicle was locked automatically
The vehicle will be fully unlocked if it had previ-
ously been fully unlocked. If only the driver's
door had been previously unlocked, only the
door which has been opened from the inside is
unlocked. Doors
83Opening and closing Z
Page 114 of 398

Automatic anti-glare mirrors
G
WARNING
Electrolyte may escape if the glass in an auto- matic anti-glare mirror breaks. The electrolyte
is harmful and causes irritation. It must not
come into contact with your skin, eyes, res-
piratory organs or clothing or be swallowed.
There is a risk of injury.
If you come into contact with the electrolyte,
observe the following:
R Rinse off the electrolyte from your skin
immediately with water.
R Immediately rinse the electrolyte out of
your eyes thoroughly with clean water.
R If the electrolyte is swallowed, immediately
rinse your mouth out thoroughly. Do not
induce vomiting.
R If electrolyte comes into contact with your
skin or hair or is swallowed, seek medical
attention immediately.
R Immediately change out of clothing which
has come into contact with electrolyte.
R If an allergic reaction occurs, seek medical
attention immediately.
The rear-view mirror and the exterior mirror on
the driver's side automatically go into anti-glare
mode if the following conditions are met simul-
taneously:
R the ignition is switched on and
R incident light from headlamps strikes the sen-
sor in the rear-view mirror
The mirrors do not go into anti-glare mode if
reverse gear is engaged or if the interior lighting
is switched on. Parking position for the exterior mir-
ror on the front-passenger side
Setting and storing the parking position You can position the front-passenger side exte-
rior mirror in such a way that you can see the
rear wheel on that side as soon as you engage
reverse gear. You can store this position. Using reverse gear
0043
Button for the driver's side exterior mirror
0044 Button for the front-passenger side exterior
mirror
0087 Switch
0085 Memory button M
X Bring the vehicle to a standstill.
X Turn the SmartKey to position 0048in the igni-
tion lock (Y page 140).
X Press button 0044.
X Engage reverse gear.
The exterior mirror on the front-passenger
side moves to the default setting parking posi-
tion.
X Use button 0087to adjust the exterior mirror to
a position that allows you to see the rear
wheel and the curb.
The parking position is stored.
i If you shift the transmission to another posi-
tion, the exterior mirror on the front-
passenger side returns to the driving position.
Using the memory button You can store the parking position of the exte-
rior mirror on the front-passenger side using
memory button
M0085. The reverse gear must not
be engaged during the process.
X Turn the SmartKey to position 0048in the igni-
tion lock (Y page 140).
X Press button 0044.
X Use button 0087to adjust the exterior mirror to
a position that allows you to see the rear
wheel and the curb. 112
MirrorsSeats
, steering wheel and mirrors
Page 142 of 398
!
Do not warm up the engine while stationary.
Pull away immediately. Avoid high engine
speeds and full throttle until the engine has
reached its operating temperature.
In vehicles with automatic transmission,
engage positions P and R only when the vehi-
cle is stationary.
Where possible, avoid spinning the drive
wheels when pulling away on slippery roads.
You could otherwise damage the drive train.
! Mercedes-AMG vehicles:
at low engine oil
temperatures below 68 ‡ (+20 †), the max-
imum engine speed is restricted in order to
protect the engine. To protect the engine and
maintain smooth engine operation, avoid driv-
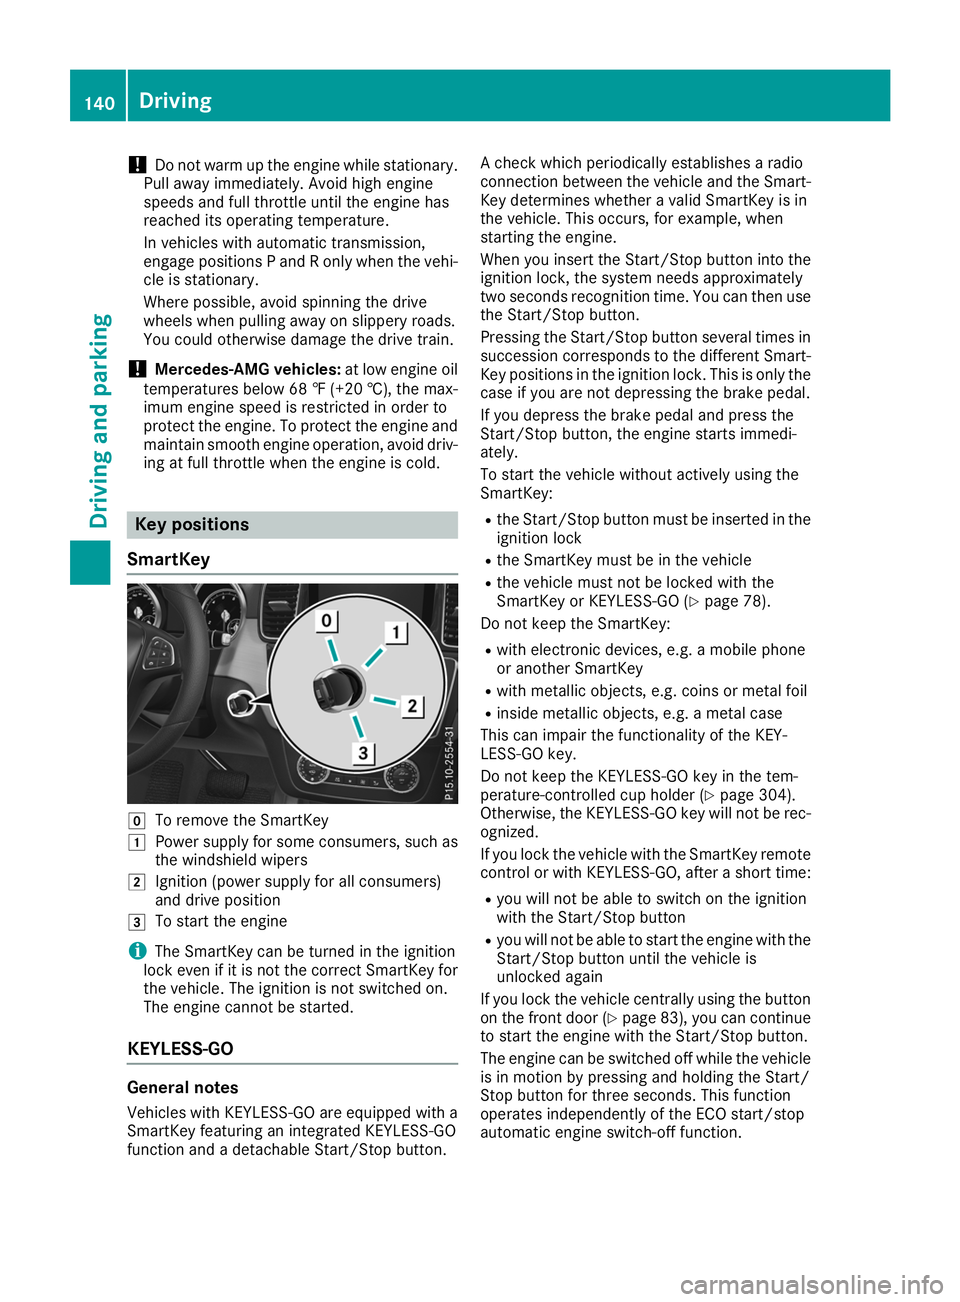
ing at full throttle when the engine is cold. Key positions
SmartKey 005A
To remove the SmartKey
0047 Power supply for some consumers, such as
the windshield wipers
0048 Ignition (power supply for all consumers)
and drive position
0049 To start the engine
i The SmartKey can be turned in the ignition
lock even if it is not the correct SmartKey for
the vehicle. The ignition is not switched on.
The engine cannot be started.
KEYLESS-GO General notes
Vehicles with KEYLESS-GO are equipped with a
SmartKey featuring an integrated KEYLESS-GO
function and a detachable Start/Stop button. A check which periodically establishes a radio
connection between the vehicle and the Smart-
Key determines whether a valid SmartKey is in
the vehicle. This occurs, for example, when
starting the engine.
When you insert the Start/Stop button into the ignition lock, the system needs approximately
two seconds recognition time. You can then usethe Start/Stop button.
Pressing the Start/Stop button several times in
succession corresponds to the different Smart-
Key positions in the ignition lock. This is only the
case if you are not depressing the brake pedal.
If you depress the brake pedal and press the
Start/Stop button, the engine starts immedi-
ately.
To start the vehicle without actively using the
SmartKey:
R the Start/Stop button must be inserted in the
ignition lock
R the SmartKey must be in the vehicle
R the vehicle must not be locked with the
SmartKey or KEYLESS-GO (Y page 78).
Do not keep the SmartKey:
R with electronic devices, e.g. a mobile phone
or another SmartKey
R with metallic objects, e.g. coins or metal foil
R inside metallic objects, e.g. a metal case
This can impair the functionality of the KEY-
LESS-GO key.
Do not keep the KEYLESS-GO key in the tem-
perature-controlled cup holder (Y page 304).
Otherwise, the KEYLESS-GO key will not be rec-
ognized.
If you lock the vehicle with the SmartKey remote
control or with KEYLESS-GO, after a short time:
R you will not be able to switch on the ignition
with the Start/Stop button
R you will not be able to start the engine with the
Start/Stop button until the vehicle is
unlocked again
If you lock the vehicle centrally using the button
on the front door (Y page 83), you can continue
to start the engine with the Start/Stop button.
The engine can be switched off while the vehicle
is in motion by pressing and holding the Start/
Stop button for three seconds. This function
operates independently of the ECO start/stop
automatic engine switch-off function. 140
DrivingDriving and parking