2019 MERCEDES-BENZ GLS SUV service indicator
[x] Cancel search: service indicatorPage 4 of 398

Index
....................................................... 4Digital Operator's Manual
..................26
Introduction .......................................... .26
Operation ............................................... 26 Introduction
......................................... 27
Protecting the environment ...................27
Genuine Mercedes-Benz parts .............. .27
Operator's Manual ................................. 28
Service and vehicle operation ................28
Operating safety .................................... 30
QR code for rescue card ........................ 32
Data stored in the vehicle ......................32
Information on copyright ....................... 35 At a glance
........................................... 36
Cockpit .................................................. 36
Instrument cluster .................................37
Multifunction steering wheel ................. 38
Center console ...................................... 39
Overhead control panel .........................42
Door control panel ................................. 43 Safety
................................................... 44
Panic alarm ............................................ 44
Occupant safety .................................... 44
Children in the vehicle ........................... 59
Pets in the vehicle ................................. 65
Driving safety systems ........................... 66
Protection against theft ........................ .75Opening and closing
...........................77
SmartKey ............................................... 77
Doors ..................................................... 83
Cargo compartment ...............................84
Side windows ......................................... 88
Sliding sunroof ....................................... 92 Seats, steering wheel and mirrors
....97
Correct driver's seat position ................ 97
Seats ..................................................... 97
Steering wheel ..................................... 108
Mirrors ................................................. 110 Memory function ................................. 113 Lights and windshield wipers
..........115
Exterior lighting ................................... 115
Interior lighting .................................... 119
Replacing bulbs (vehicles with LED
headlamps) .......................................... 120
Replacing bulbs (vehicles with halo-
gen headlamps) ................................... 120
Windshield wipers ................................ 122 Climate control
................................. 125
Overview of climate control systems ... 125
Operating the climate control sys-
tems .................................................... 131
Setting the air vents ............................ 136 Driving and parking
..........................139
Notes on breaking-in a new vehicle ..... 139
Driving ................................................. 139
DYNAMIC SELECT controller ............... 147
Automatic transmission ....................... 148
Refueling ............................................. 155
Parking ................................................ 158
Driving tips .......................................... 161
Driving systems ................................... 170
Towing a trailer .................................... 221
Bicycle rack ......................................... 227
Notes on towing vehicles ..................... 229 On-board computer and displays
....230
Important safety notes ........................ 230
Displays and operation ........................ 230
Menus and submenus ......................... 233
Display messages ................................ 245
Warning and indicator lamps in the
instrument cluster ............................... 274 Multimedia system
...........................287
General notes ...................................... 287
Important safety notes ........................ 287
Function restrictions ............................ 287
Operating system ................................ 288 2
Contents
Page 7 of 398

ADS (Adaptive Damping System)
Function/notes ............................ .185
Air bags
Deployment ..................................... 56
Display message ............................ 255
Front air bag (driver, front
passenger) ....................................... 50
Important safety notes .................... 49
Introduction ..................................... 49
Knee bag .......................................... 50
Occupant Classification System
(OCS) ............................................... 51
PASSENGER AIR BAG indicator
lamps ............................................... 45
Side impact air bag .......................... 51
Window curtain air bag .................... 51
AIR FLOW .......................................... .132
Air vents
Glove box ....................................... 136
Important safety notes .................. 136
Rear ............................................... 137
Setting .......................................... .136
Setting the center air vents ........... 136
Setting the side air vents .............. .136
Air-conditioning system
see Climate control
AIRMATIC package
ADS (Adaptive Damping System) ... 185
Function/notes ............................ .185
Alarm
ATA (Anti-Theft Alarm system) ......... 75
Switching off (ATA) .......................... 75
Switching the function on/off
(ATA) ................................................ 75
Alarm system
see ATA (Anti-Theft Alarm system)
AMG
Adaptive sport suspension sys-
tem ................................................ 188
AMG menu (on-board computer) ..... 242
Anti-lock braking system
see ABS (Anti-lock Braking System)
Anti-skid chains
see Snow chains
Anti-theft alarm system
see ATA (Anti-Theft Alarm system)
Approach/departure angle .............. 169
Ashtray ............................................... 306 Assistance display (on-board com-
puter)
................................................. .238
Assistance menu (on-board com-
puter) ................................................. .238
ASSYST PLUS
Displaying a service message ....... .325
Hiding a service message .............. 325
Resetting the service interval dis-
play ................................................ 325
Service message ............................ 325
Special service requirements ......... 325
ATA (Anti-Theft Alarm system)
Activating/deactivating ................... 75
Function .......................................... .75
Switching off the alarm .................... 75
ATTENTION ASSIST
Activating/deactivating ................. 239
Display message ............................ 261
Function/note s............................. 204
Audio menu (on-board computer) .... 236
Authorized Mercedes-Benz Center
see Qualified specialist workshop
Authorized workshop
see Qualified specialist workshop
AUTO lights
Display message ............................ 257
see Lights
Automatic car wash (care) ............... 326
Automatic engine start (ECO start/
stop function) .................................... 145
Automatic engine switch-off (ECO
start/stop function) .......................... 144
Automatic headlamp mode .............. 115
Automatic transmission
Accelerator pedal position ............. 150
Changing gear ............................... 150
DIRECT SELECT lever ..................... 148
Display message ............................ 270
Drive program ................................ 151
Drive program display .................... 149
Driving tips .................................... 150
DYNAMIC SELECT controlle r......... 147
Emergency running mode .............. 155
Engaging drive position .................. 149
Engaging neutral ............................ 149
Engaging park position automati-
cally ............................................... 148 Index
5
Page 24 of 398
Display message ............................ 268
Distribution of the vehicle occu-
pants (definition) ............................ 372
DOT (Department of Transporta-
tion) (definition) ............................. 370
DOT, Tire Identification Number
(TIN) ............................................... 370
GAWR (Gross Axle Weight Rating)
(definition) .................................... .371
GTW (Gross Trailer Weight) (defi-
nition) ............................................ 371
GVW (Gross Vehicle Weight) (def-
inition) .......................................... .371
GVWR (Gross Vehicle Weight Rat-
ing) (definition) .............................. 371
Important safety notes .................. 352
Increased vehicle weight due to
optional equipment (definition) ...... 371
Information on driving .................... 352
Kilopascal (kPa) (definition) ........... 371
Labeling (overview )........................ 367
Load bearing index (definition) ...... 372
Load index ..................................... 369
Load index (definition) ................... 371
M+S tire s....................................... 354
Maximum load on a tire (defini-
tion) ............................................... 371
Maximum loaded vehicle weight
(definition) ..................................... 371
Maximum permissible tire pres-
sure (definition) ............................. 371
Maximum tire load ......................... 369
Maximum tire load (definition) ....... 371
MOExtended tire s.......................... 353
Optional equipment weight (defi-
nition) ............................................ 372
PSI (pounds per square inch) (def-
inition) ........................................... 372
Replacing ....................................... 372
Service life ..................................... 353
Sidewall (definition) ....................... 372
Snow chains .................................. 354
Speed rating (definition) ................ 371
Storing ........................................... 373
Structure and characteristics
(definition) ..................................... 370
Summer tires in winter .................. 354
Temperature .................................. 366 TIN (Tire Identification Number)
(definition) ..................................... 372
Tire bead (definition) ...................... 372
Tire pressure (definition) ................ 372
Tire pressures (recommended) ...... 371
Tire size (data) ............................... 377
Tire size designation, load-bearing
capacity, speed rating .................... 367
Tire tread ....................................... 353
Tire tread (definition) ..................... 372
Total load limit (definition) ............. 372
Traction ......................................... 366
Traction (definition) ....................... 372
Tread wear ..................................... 366
TWR (permissible trailer drawbar
noseweight) (definition) ................. 372
Uniform Tire Quality Grading
Standards ...................................... 366
Uniform Tire Quality Grading
Standards (definition) .................... 370
Wear indicator (definition) ............. 372
Wheel and tire combination ........... 377
Wheel rim (definition) .................... 371
see Flat tire
Tool
see Vehicle tool kit
Top Tether ............................................ 63
Tow-starting
Emergency engine starting ............ 349
Important safety notes .................. 346
Towing
Permitted towing methods ............ 347
Towing a trailer
Axle load, permissibl e.................... 392
Cleaning the trailer tow hitch ......... 331
Coupling up a traile r...................... 224
Decoupling a trailer ....................... 226
Driving tip s.................................... 222
Important safety notes .................. 221
Installing the ball coupling ............. 223
Lights display message .................. 257
Mounting dimensions .................... 392
Parking Assist PARKTRONIC .......... 189
Power supply ................................. 227
Pulling away with a traile r.............. 143
Removing the ball coupling ............ 226
Trailer load s................................... 392 22
Index
Page 311 of 398
Problems with the 115 V power socket
Problem
Possible causes/consequences and
0050
0050Solutions The warning lamp on the
115 V power socket is
not lit. The on-board voltage is too low because the battery is too weak.
X Start the engine.
or X Charge the battery (Y page 342).
If the indicator lamp still does not light up: X Visit a qualified specialist workshop. The temperature of the DC/AC converter is temporarily too high.
X Remove the electronic device connector from the 115 V socket.
X Let the DC/AC converter cool down.
If the indicator lamp still does not light up after cooling down the
converter:
X Visit a qualified specialist workshop. You have connected an electronic device that has a constant nominal
power of less than 150 watts, but has a very high switch-on current.
This device will not work. If you connect such a device, the 115 V
power socket will not supply it with power.
X Connect a suitable electronic device. mbrace
General notes The mbrace system is only available in the USA.
A license agreement must be in place in order to
activate the mbrace service. Make sure that
your system is activated and operational. To
register, press the 00D9Info call button. If any of
the steps mentioned are not carried out, the
system may not be activated.
If you have questions about the activation, con- tact one of the following telephone hotlines:
Mercedes-Benz Customer Assistance Center at
1-800 FOR-MERCEDES (1-800-367-6372) or
1-866-990-9007
Shortly after successfully registering with the
mbrace service, a user ID and password will be
sent to you by mail. You can use this password
to log onto the mbrace area under "Owners
Online" at http://www.mbusa.com. The system is available if:
R it has been activated and is operational
R the corresponding mobile phone network is
available for transmitting data to the Cus-
tomer Center
R a service subscription is available
Determining the location of the vehicle on a map
is only possible if:
R GPS reception is available
R the vehicle position can be forwarded to the
Customer Assistance Center
The mbrace system To adjust the volume during a call, proceed as
follows:
X Press the 0081or0082 button on the multi-
function steering wheel.
or X Use the multimedia system volume control. Features
309Stowage and features Z
Page 312 of 398
The system offers various services, e.g.:
R Automatic and manual emergency call
R Roadside Assistance call
R Info call
You can find information and a description of all
available features under "Owners Online" at
http://www.mbusa.com.
System self-test After you have switched on the ignition, the sys-
tem carries out a self-diagnosis.
A malfunction in the system has been detected
if one of the following occurs:
R The indicator lamp in the SOS button does not
come on during the system self-test.
R The indicator lamp in the 0052Roadside
Assistance call button does not light up dur-
ing self-diagnosis of the system.
R The indicator lamp in the 00D9Info call button
does not light up during the system self-diag-
nosis.
R The indicator lamp in one or more of the fol-
lowing buttons continues to light up red after
the system self-diagnosis:
- SOS button
- 0052 Roadside Assistance call button
- 00D9 Info call button
R The Inoperative
Inoperative or theService Not Service Not
Activated
Activated message appears in the multi-
function display after the system self-diagno- sis.
If a malfunction is indicated as outlined above,
the system may not operate as expected. In the
event of an emergency, help will have to be
summoned by other means.
Have the system checked at the nearest author- ized Mercedes-Benz Center or call the following
telephone assistance services:
Mercedes-Benz Customer Assistance Center at
1-800-FOR-MERCedes (1-800-367-6372) or
1-866-990-9007. Emergency call Important safety notes
G
WARNING
It can be dangerous to remain in the vehicle,
even if you have pressed the SOS button in an emergency if:
R you see smoke inside or outside of the vehi-
cle, e.g. if there is a fire after an accident
R the vehicle is on a dangerous section of
road
R the vehicle is not visible or cannot easily be
seen by other road users, particularly whendark or in poor visibility conditions
There is a risk of an accident and injury.
Leave the vehicle immediately in this or simi-
lar situations as soon as it is safe to do so.
Move to a safe location along with other vehi-
cle occupants. In such situations, secure the
vehicle in accordance with national regula-
tions, e. g. with a warning triangle.
General notes
Observe the notes on system activation
(Y page 309).
The emergency call is triggered automatically if
an air bag is deployed or an Emergency Ten-
sioning Device is triggered. You cannot end an
automatically triggered emergency call yourself.
An emergency call can also be initiated man-
ually.
As soon as the emergency call has been initi-
ated, the indicator lamp in the SOS button
flashes. The Connecting Call Connecting Call message
appears in the multifunction display.
The audio output is muted.
Once the connection has been made, the Call Call
Connected
Connected message appears in the multifunc-
tion display.
All important information on the emergency is
transmitted, for example:
R Current location of the vehicle (as determined
by the GPS system)
R Vehicle identification number
R Information on the severity of the accident
Shortly after the emergency call has been initi-
ated, a voice connection is automatically estab- 310
FeaturesStowage and features
Page 313 of 398
lished between the Customer Assistance Center
and the vehicle occupants.
R If the vehicle occupants respond, the
Mercedes-Benz Customer Assistance Center
attempts to get more information on the
emergency.
R If there is no response from the vehicle occu-
pants, an ambulance is immediately sent to
the vehicle.
R If the relevant mobile phone network is not
available, no emergency call can be initiated.
The indicator lamp in the SOS button flashes
continuously.
No voice connection can be established to the
Mercedes-Benz Customer Assistance Center.
The Call Call Failed
Failed message appears on the mul-
tifunction display and must be confirmed.
In this case, summon assistance by other
means.
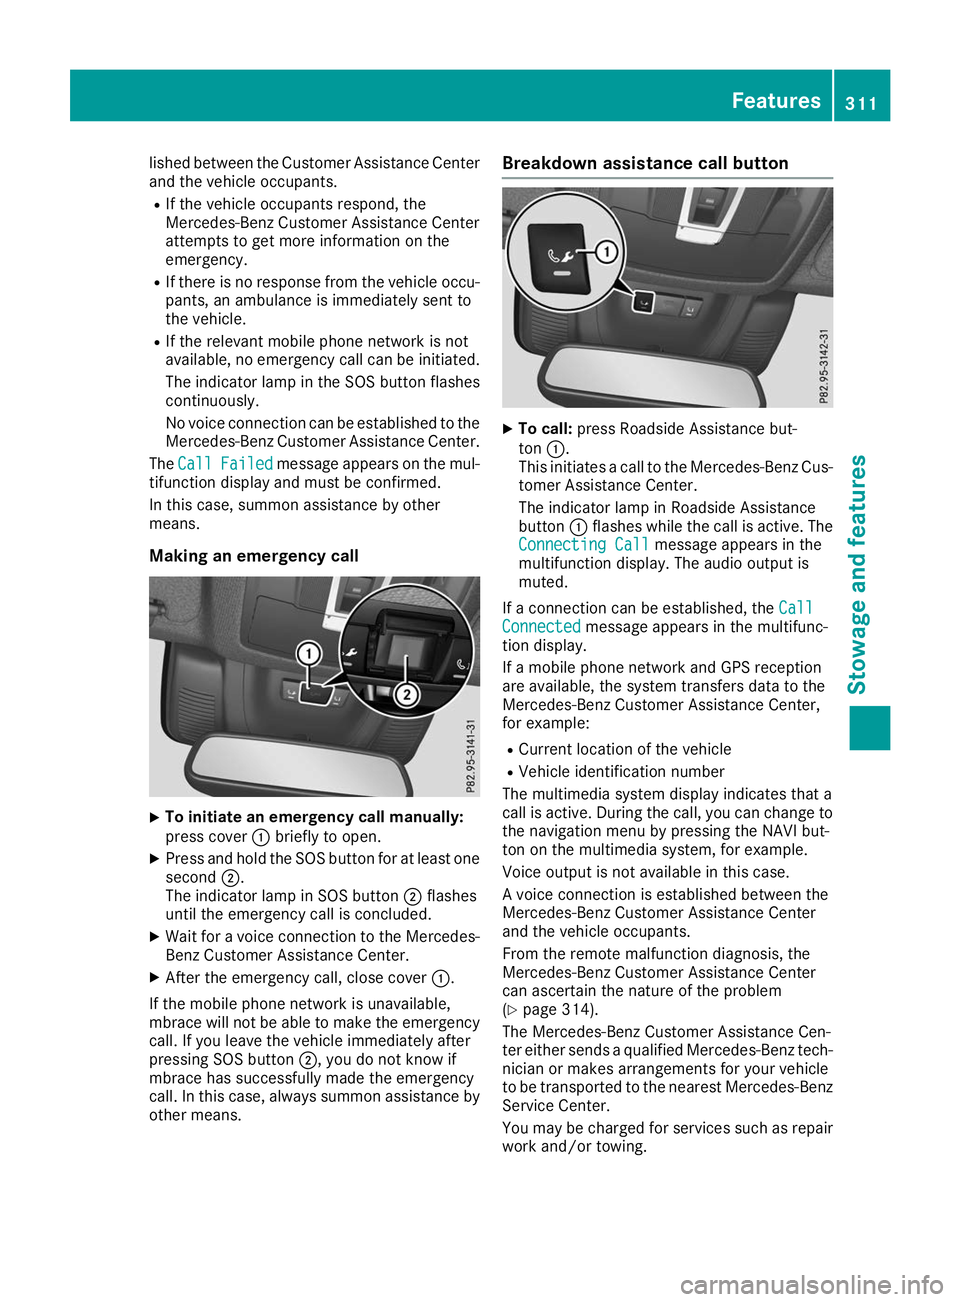
Making an emergency call X
To initiate an emergency call manually:
press cover 0043briefly to open.
X Press and hold the SOS button for at least one
second 0044.
The indicator lamp in SOS button 0044flashes
until the emergency call is concluded.
X Wait for a voice connection to the Mercedes-
Benz Customer Assistance Center.
X After the emergency call, close cover 0043.
If the mobile phone network is unavailable,
mbrace will not be able to make the emergency
call. If you leave the vehicle immediately after
pressing SOS button 0044, you do not know if
mbrace has successfully made the emergency
call. In this case, always summon assistance by other means. Breakdown assistance call button
X
To call: press Roadside Assistance but-
ton 0043.
This initiates a call to the Mercedes-Benz Cus-
tomer Assistance Center.
The indicator lamp in Roadside Assistance
button 0043flashes while the call is active. The
Connecting Call Connecting Call message appears in the
multifunction display. The audio output is
muted.
If a connection can be established, the Call Call
Connected Connected message appears in the multifunc-
tion display.
If a mobile phone network and GPS reception
are available, the system transfers data to the
Mercedes-Benz Customer Assistance Center,
for example:
R Current location of the vehicle
R Vehicle identification number
The multimedia system display indicates that a
call is active. During the call, you can change to
the navigation menu by pressing the NAVI but-
ton on the multimedia system, for example.
Voice output is not available in this case.
A voice connection is established between the
Mercedes-Benz Customer Assistance Center
and the vehicle occupants.
From the remote malfunction diagnosis, the
Mercedes-Benz Customer Assistance Center
can ascertain the nature of the problem
(Y page 314).
The Mercedes-Benz Customer Assistance Cen-
ter either sends a qualified Mercedes-Benz tech-
nician or makes arrangements for your vehicle
to be transported to the nearest Mercedes-Benz
Service Center.
You may be charged for services such as repair work and/or towing. Features
311Stowage and features Z
Page 314 of 398
You can find more information in the separate
mbrace manual.
The system has not been able to initiate a Road-
side Assistance call, if:
R the 0052 indicator lamp for the Roadside
Assistance call button is flashing continu-
ously.
R no voice connection to the Mercedes-Benz
Customer Assistance Center was estab-
lished.
This can occur if the relevant mobile phone net-
work is not available, for example.
The Call Failed Call Failed message appears in the mul-
tifunction display.
X To end a call: press the0076button on the
multifunction steering wheel.
or X Press the corresponding multimedia system
button for ending a phone call.
Info call button X
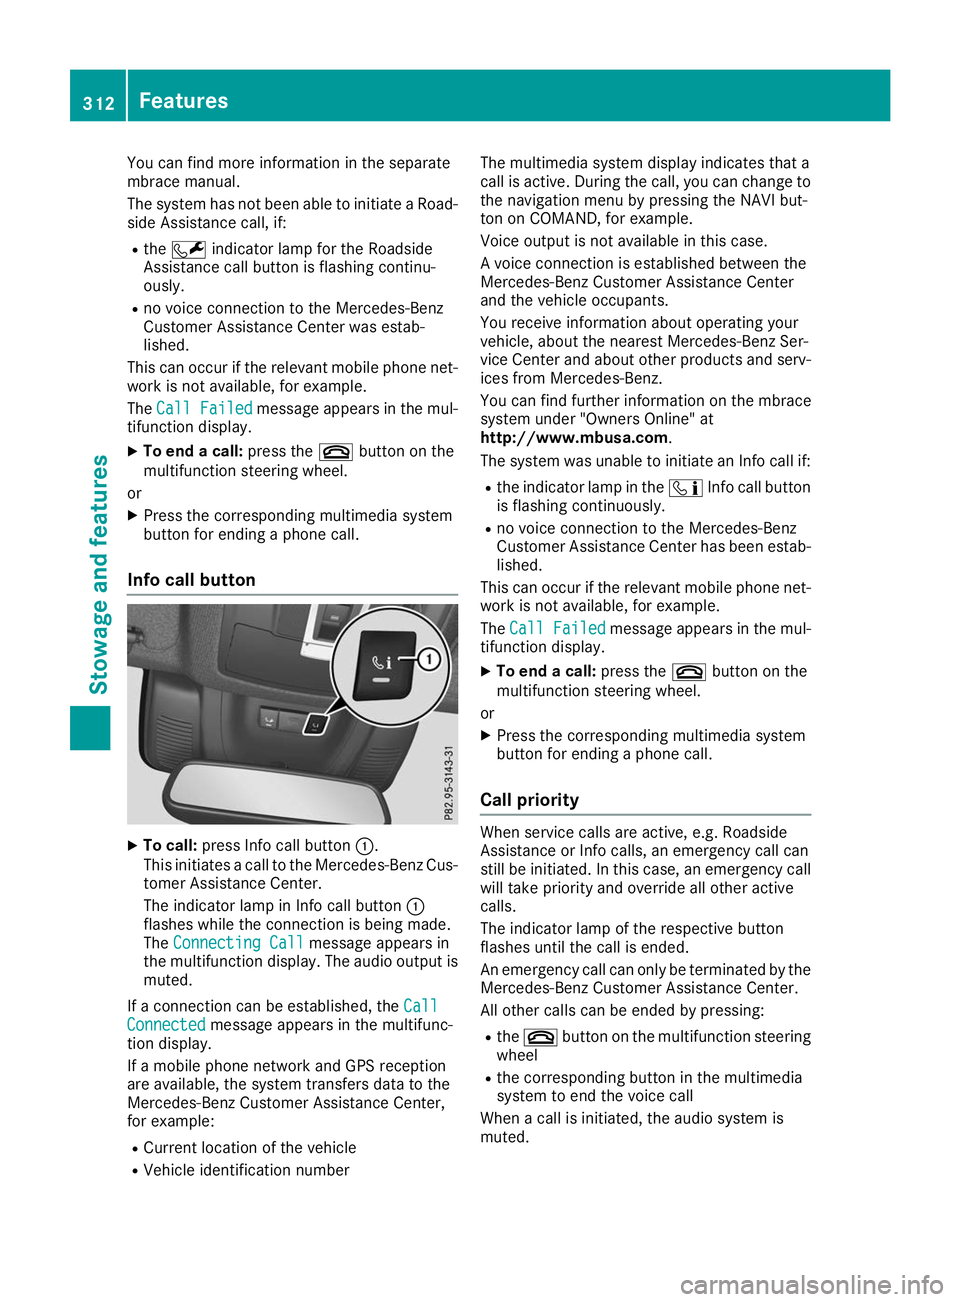
To call: press Info call button 0043.
This initiates a call to the Mercedes-Benz Cus-
tomer Assistance Center.
The indicator lamp in Info call button 0043
flashes while the connection is being made.
The Connecting Call
Connecting Call message appears in
the multifunction display. The audio output is muted.
If a connection can be established, the Call Call
Connected
Connected message appears in the multifunc-
tion display.
If a mobile phone network and GPS reception
are available, the system transfers data to the
Mercedes-Benz Customer Assistance Center,
for example:
R Current location of the vehicle
R Vehicle identification number The multimedia system display indicates that a
call is active. During the call, you can change to
the navigation menu by pressing the NAVI but-
ton on COMAND, for example.
Voice output is not available in this case.
A voice connection is established between the
Mercedes-Benz Customer Assistance Center
and the vehicle occupants.
You receive information about operating your
vehicle, about the nearest Mercedes-Benz Ser-
vice Center and about other products and serv- ices from Mercedes-Benz.
You can find further information on the mbrace
system under "Owners Online" at
http://www.mbusa.com.
The system was unable to initiate an Info call if:
R the indicator lamp in the 00D9Info call button
is flashing continuously.
R no voice connection to the Mercedes-Benz
Customer Assistance Center has been estab-
lished.
This can occur if the relevant mobile phone net-
work is not available, for example.
The Call Failed
Call Failed message appears in the mul-
tifunction display.
X To end a call: press the0076button on the
multifunction steering wheel.
or X Press the corresponding multimedia system
button for ending a phone call.
Call priority When service calls are active, e.g. Roadside
Assistance or Info calls, an emergency call can
still be initiated. In this case, an emergency call
will take priority and override all other active
calls.
The indicator lamp of the respective button
flashes until the call is ended.
An emergency call can only be terminated by the
Mercedes-Benz Customer Assistance Center.
All other calls can be ended by pressing:
R the 0076 button on the multifunction steering
wheel
R the corresponding button in the multimedia
system to end the voice call
When a call is initiated, the audio system is
muted. 312
FeaturesStowage and features
Page 344 of 398
occupants from suffering acid burns should the
battery be damaged in the event of an accident.
In order for the battery to achieve the maximum possible service life, it must always be suffi-
ciently charged.
Like other batteries, the vehicle battery may
discharge over time if you do not use the vehicle. In this case, have the battery disconnected at a
qualified specialist workshop. However, you can also charge the battery with a charger recom-
mended by Mercedes-Benz. Contact a qualified
specialist workshop for further information.
Have the battery charge state checked more
frequently if you use the vehicle mainly for short trips or if you leave it standing idle for a lengthyperiod. Consult a qualified specialist workshop
if you wish to leave your vehicle parked for a long
period of time.
Remove the SmartKey if you park the vehicle
and do not require any electrical consumers.
The vehicle will then use very little energy, thus
conserving battery power.
If the power supply has been interrupted, e.g. if
you reconnect the battery, you will have to:
R set the clock (see the Digital Operator's Man-
ual)
On vehicles with a multimedia system and
navigation system, the clock is set automati-
cally.
R reset the function for automatically folding
the exterior mirrors in/out by folding the mir-
rors out once(Y page 111) Charging the 12 V battery
G
WARNING
During charging and jump-starting, explosive
gases can escape from the battery. There is a risk of an explosion.
Particularly avoid fire, open flames, creating
sparks and smoking. Ensure there is sufficient
ventilation while charging and jump-starting.
Do not lean over a battery. G
WARNING
Battery acid is caustic. There is a risk of injury. Avoid contact with skin, eyes or clothing. Do
not inhale any battery gases. Do not lean over
the battery. Keep children away from batter- ies. Wash away battery acid immediately with
plenty of clean water and seek medical atten-tion. G
WARNING
A discharged battery can freeze at tempera-
tures below freezing point. When jump-start-
ing the vehicle or charging the battery, gases can escape from the battery. There is a risk of
an explosion.
Allow the frozen battery to thaw out before
charging it or jump-starting.
! Only use battery chargers with a maximum
charging voltage of 14.8 V.
! Only charge the battery using the jump-
starting connection point.
The jump-starting connection point is in the
engine compartment (Y page 343).
X Open the hood.
X Connect the battery charger to the positive
terminal and ground point in the same order
as when connecting the donor battery in the
jump-starting procedure (Y page 343).
Keep away from fire and open flames. Do not
lean over a battery. Never charge the battery if it is still installed in the vehicle, unless you use a
battery charger which has been tested and
approved by Mercedes-Benz. A battery charger
unit specially adapted for Mercedes-Benz vehi-
cles and tested and approved by Mercedes-
Benz is available as an accessory. It permits the
charging of the battery in its installed position.
Contact an authorized Mercedes-Benz Center
for further information and availability. Read the battery charger's operating instructions before
charging the battery.
If, at low temperatures, the indicator lamps/
warning lamps in the instrument cluster do not
light up, it is highly likely that the discharged
battery has frozen. In this case you may neither
jump-start the vehicle nor charge the battery.
The service life of a thawed-out battery may be
shorter. The starting characteristics can be
impaired, particularly at low temperatures. Have
the thawed-out battery checked at a qualified
specialist workshop. 342
Battery (vehicle)Breakdown assistance