2019 MERCEDES-BENZ GLS SUV lock
[x] Cancel search: lockPage 161 of 398
Electric parking brake
General notes G
WARNING
If you leave children unsupervised in the vehi- cle, they could set it in motion by, for example:
R release the parking brake.
R shift the automatic transmission out of the
parking position P.
R start the engine.
In addition, they may operate vehicle equip-
ment and become trapped. There is a risk of
an accident and injury.
When leaving the vehicle, always take the
SmartKey with you and lock the vehicle. Never
leave children unsupervised in the vehicle.
The function of the electric parking brake is
dependent on the on-board voltage. If the on-
board voltage is low or there is a malfunction in
the system, it may not be possible to apply the
released parking brake.
X If this is the case, only park the vehicle on
level ground and secure it to prevent it rolling
away.
X Shift the automatic transmission to position
005D.
It may not be possible to release an applied
parking brake if the on-board voltage is low or
there is a malfunction in the system. Contact a
qualified specialist workshop.
i The electric parking brake performs a func-
tion test at regular intervals while the engine
is switched off. The sounds that can be heard while this is occurring are normal. Applying or releasing manually X
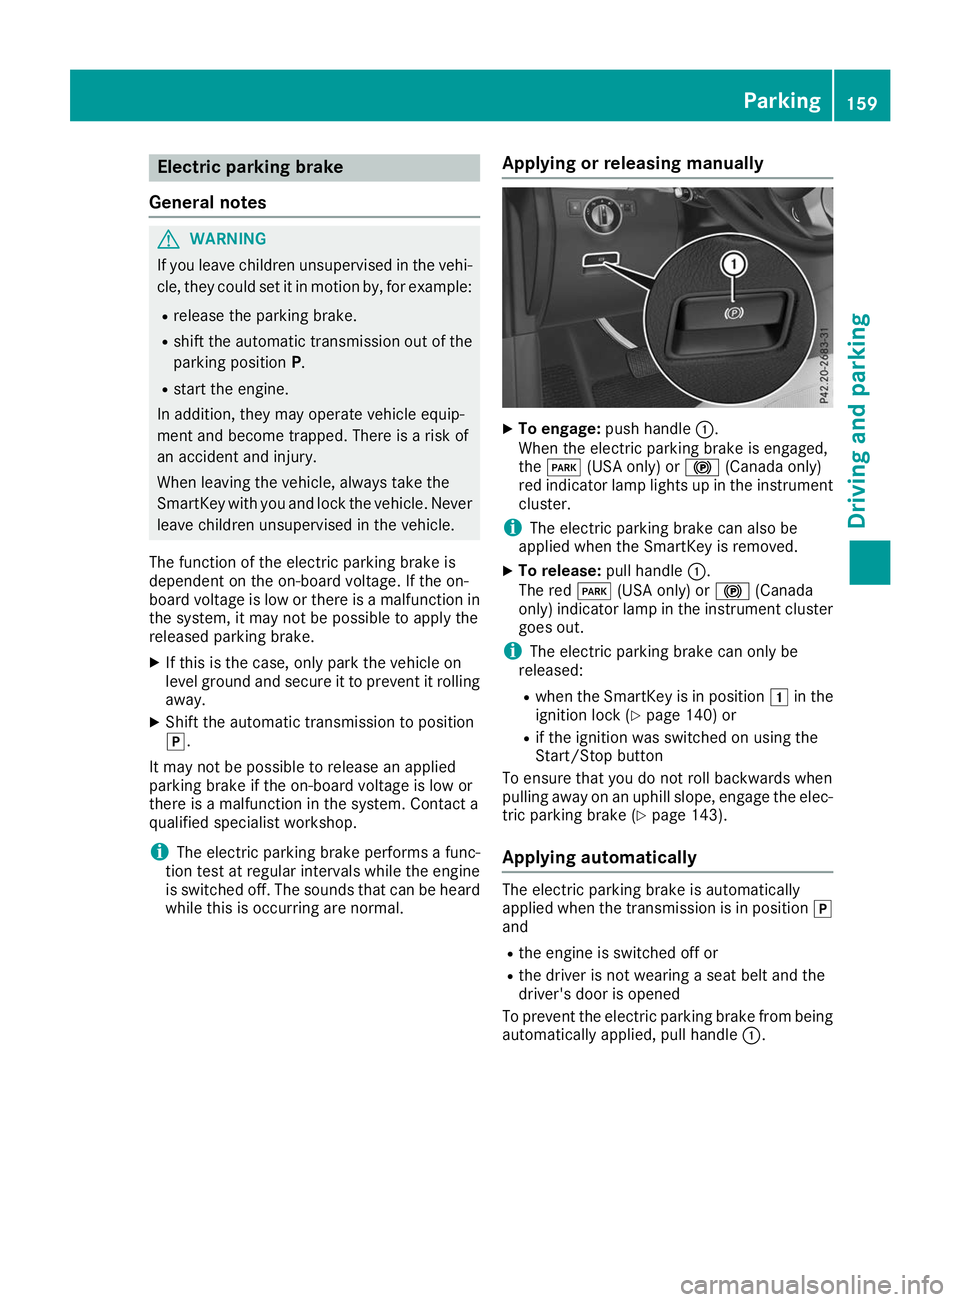
To engage: push handle 0043.
When the electric parking brake is engaged,
the 0049 (USA only) or 0024(Canada only)
red indicator lamp lights up in the instrument
cluster.
i The electric parking brake can also be
applied when the SmartKey is removed.
X To release: pull handle0043.
The red 0049(USA only) or 0024(Canada
only) indicator lamp in the instrument cluster goes out.
i The electric parking brake can only be
released:
R when the SmartKey is in position 0047in the
ignition lock (Y page 140) or
R if the ignition was switched on using the
Start/Stop button
To ensure that you do not roll backwards when
pulling away on an uphill slope, engage the elec-
tric parking brake (Y page 143).
Applying automatically The electric parking brake is automatically
applied when the transmission is in position 005D
and
R the engine is switched off or
R the driver is not wearing a seat belt and the
driver's door is opened
To prevent the electric parking brake from being automatically applied, pull handle 0043. Parking
159Driving and parking Z
Page 167 of 398
You can obtain further information about this
from your authorized Mercedes-Benz Center.
New and replaced brake pads and discs only
reach their optimum braking effect after several
hundred kilometers of driving. Compensate for
this by applying greater force to the brake pedal. Keep this in mind, and adapt your driving and
braking accordingly during this break-in period.
Excessive heavy braking results in correspond-
ingly high brake wear. Observe the 0026brake
wear warning lamp in the instrument cluster and
note any brake status messages in the multi-
function display. Especially for high perform-
ance driving, it is important to maintain and have the brake system checked regularly. Driving on wet roads
Hydroplaning If water has accumulated to a certain depth on
the road surface, there is a danger of hydro-
planing occurring, even if:
R you drive at low speeds
R the tires have adequate tread depth
For this reason, in the event of heavy rain or in
conditions in which hydroplaning may occur,
you must drive in the following manner:
R lower your speed
R avoid ruts
R avoid sudden steering movements
R brake carefully
Driving on flooded roads !
Do not drive through flooded areas. Check
the depth of any water before driving through
it. Drive slowly through standing water. Oth-
erwise, water could enter the vehicle interior
or engine compartment. It can then damage
the engine's or automatic transmission's
electronic components. It can also be sucked
in by the engine's air intake connection and
cause engine damage.
i Vehicles with the AIRMATIC Package:
select the raised vehicle level before driving
through a body of water. Off-road fording !
Under no circumstances should you accel-
erate before entering the water. The bow
wave could cause water to enter and damage
the engine and other assemblies.
! Do not open any of the vehicle's doors while
fording. Otherwise, water could get into the
vehicle interior and damage the vehicle's
electronics and interior equipment.
R Establish how deep the water is and the char-
acteristics of the body of water before ford-
ing.
R Select the highest possible vehicle level.
R Shift to a lower gear using the left-hand steer-
ing wheel paddle shifter.
R Avoid high engine speeds.
R Enter and exit the water at a flat place and at
a steady walking pace.
R Drive slowly and at an even speed through the
water.
R Ensure that a bow wave does not form as you
drive.
R Do not stop and do not switch off the engine.
Water offers a high degree of resistance, and the ground is slippery and in some cases
unstable. Therefore, it is difficult and danger-
ous to pull away in the water.
R Clean any mud from the tire tread after ford-
ing.
R Apply the brakes to dry them after fording.
Always observe the maximum fording depth val- ues (Y page 390). Winter driving
G
WARNING
If you shift down on a slippery road surface in an attempt to increase the engine's braking
effect, the drive wheels could lose their grip.
There is an increased danger of skidding and
accidents.
Do not shift down for additional engine brak-
ing on a slippery road surface. G
DANGER
If the exhaust pipe is blocked or adequate
ventilation is not possible, poisonous gases Driving tips
165Driving and parking
Z
Page 169 of 398
twigs can gather between the underbody and
the underbody paneling. If these materials
come in contact with hot parts of the exhaust
system, they can catch fire.
In such situations, have the vehicle checked
and repaired immediately at a qualified spe-
cialist workshop. If on continuing your jour-
ney you notice that driving safety is impaired, pull over and stop the vehicle immediately,
paying attention to road and traffic condi-
tions. In such cases, consult a qualified spe-
cialist workshop.
When driving off-road, substances such as sand,
mud and water or water mixed with oil may get
into the brakes. This could result in a reduced
braking effect or in total brake failure and also in increased wear and tear. The braking charac-
teristics change depending on the material
entering the brakes. Clean the brakes after driv-
ing off-road. If you detect a reduced braking
effect or grinding noises, have the brake system
checked in a qualified specialist workshop as
soon as possible. Adapt your driving style to the different braking characteristics.
Driving off-road increases the likelihood of dam-age to the vehicle, which, in turn, can lead to
failure of the mechanical assembly or systems.
Adapt your driving style to suit the terrain con-
ditions. Drive carefully. Have damage to the
vehicle rectified immediately at a qualified spe-
cialist workshop.
Do not shift into transmission position 005Cwhen
driving off-road. You could lose control of the
vehicle if you attempt to brake the vehicle using
the service brake. If the gradient is too steep for your vehicle, drive back down in reverse gear.
General notes H
Environmental note
Protection of the environment is of primary
importance. Treat nature with respect.
Observe all prohibiting signs.
Read this section carefully before driving your
vehicle off-road. Practice by driving over more
gentle off-road terrain first.
Familiarize yourself with the characteristics of
your vehicle and the gear shift operation before driving through difficult terrain. The following driving systems are specially
adapted to off-road driving:
R The Off-road drive program (vehicles without
Off-Road Engineering package)
(Y page 216)
R Off-road andOff-road Plus drive programs
(vehicles with Off-Road Engineering package) (Y page 217)
R LOW RANGE off-road gear (vehicles with the
Off-Road Engineering package)
(Y page 218)
R Differential lock (vehicles with the Off-Road
Engineering package) (Y page 218)
R Off-road ABS (Y page 67)
R Off-road 4ETS (Y page 70)
R Off-road ESP ®
(Y page 71)
R AIRMATIC package (vehicle level)
(Y page 185)
R DSR (Downhill Speed Regulation)
(Y page 215)
Observe the following notes:
R Stop the vehicle before starting to drive along
an off-road route. If necessary, select the off-
road program (Y page 217) or shift to the
LOW RANGE off-road gear (Y page 218).
R Select a vehicle level that is suitable for the
terrain. To avoid damaging the vehicle, make
sure there is always sufficient ground clear-
ance.
R Check that items of luggage and loads are
stowed safely and are well secured
(Y page 300).
R Always keep the engine running and in gear
when driving on a downhill gradient. Activate
DSR (Y page 215).
R Always keep the engine running and in gear
when driving down an incline.
R Adapt your speed to the terrain. The rougher,
steeper or more ruts on the terrain, the slower
your speed should be.
R Do not jump with the vehicle as this will inter-
rupt the vehicle's propulsion.
R Drive with extreme care on unfamiliar off-road
routes where visibility is poor. For safety rea- sons, get out of the vehicle first and survey
the off-road route.
R Look out for obstacles, such as rocks, holes,
tree stumps and furrows. Driving
tips
167Driving an d parking Z
Page 172 of 398
could slip sideways, tip and rollover. There is a
risk of an accident.
Always drive on a steep incline in the line of
fall (straight up or down) and do not turn the
vehicle.
R Observe the rules on off-road driving.
R Do not drive at an angle on slopes, inclines or
gradients, but instead follow the direct line of
fall.
R When driving down an incline, make use of the
engine's braking effect. Observe the engine
speed; do not overrev the engine.
R Select the Offroaddrive program (vehicles
without Off-road Engineering Package)
(Y page 216).
R Select the Offroaddrive program (vehicles
with Off-road Engineering Package)
(Y page 217).
R Before driving on extreme uphill and downhill
gradients, select the LOW RANGE offroad
gear (vehicles with Off-road Engineering
Package) (Y page 218).
R Drive slowly.
R Avoid high engine speeds. Drive at appropri-
ate engine speeds (maximum 3,000 rpm).
R Use the left-hand steering wheel paddle
shifter to shift into a lower gear in good time
on long and steep downhill gradients.
R Check the brakes after prolonged off-road
driving.
Hill start assist will aid you when pulling away on
a hill. For further information about hill start
assist, see (Y page 143).
Do not shift into transmission position 005Cwhen
driving off-road. You could lose control of the
vehicle if you attempt to brake the vehicle using
the service brake. If the gradient is too steep for
your vehicle, drive back down in reverse gear.
Always observe the approach/departure angle
values (Y page 391).
Maximum gradient-climbing capability Always observe the maximum gradient climbing
ability values (Y page 392). Hilltops When driving up an uphill gradient, slightly
reduce pressure on the accelerator immediately
before reaching the brow of the hill. Make use of the vehicle's own impetus to travel over the
brow.
This style of driving prevents:
R the vehicle from lifting off the ground on the
brow of a hill
R the vehicle from traveling too quickly down
the other side
Driving downhill R
Drive slowly.
R Do not drive at an angle down steep inclines.
Steer into the line of fall and drive with the
front wheels aligned straight. Otherwise, the
vehicle could slip sideways, tip and rollover.
R Shift to a lower gear using the left-hand pad-
dle shifter before tackling steep downhill gra-
dients.
R Activate DSR. If this is not sufficient, brake
gently. When doing so, make sure that the
vehicle is facing in the direction of the line of
fall.
R Check that the brakes are working normally
after a long downhill stretch.
i The special off-road ABS setting enables a
precise, brief and repeated locking of the
front wheels. This causes them to dig into
loose earth. Be aware that the front wheels
easily skid across the ground surface if com-
pletely braked and therefore lose their ability
to steer. Driving systems
Intelligent Drive
Mercedes-Benz Intelligent Drive stands for inno- vative driver assistance and safety systems
which enhance comfort and support the driver in
critical situations. With these intelligent co-ordi- nated systems Mercedes-Benz has set a mile-
stone on the path towards autonomous driving.
Mercedes-Benz Intelligent Drive embraces all
elements of active and passive safety in one well thought out system – for the safety of the vehi-
cle occupants and that of other road users. 170
Driving systemsDriving and parking
Page 182 of 398
R
the distance to the vehicle in front is too short
and thus the lane markings cannot be detec-
ted
R the lane markings change quickly, e.g. lanes
branch off, cross one another or merge
R the road is narrow and winding
R there are highly variable shade conditions on
the roadway
The system is switched to passive and no longer assists you by performing steering interventions
if:
R you actively change lane
R you switch on the turn signal
R you take your hands off the steering wheel or
do not steer for a prolonged period of time
i Once you have finished changing lanes,
Active Steering Assist automatically reacti-
vates.
Active Steering Assist cannot provide assis-
tance:
R on very sharp corners
R when towing a trailer
R when a loss of tire pressure or a defective tire
has been detected and displayed
Observe the important safety notes on Active
Distance Assist DISTRONIC (Y page 173).
The steering interventions are carried out with a limited steering moment. The system requires
the driver to keep his hands on the steering
wheel and to steer himself.
If you do not steer yourself or if you take your
hands off the steering wheel for a prolonged
period of time, the system will first alert you with
a visual warning. A steering wheel symbol
appears in the multifunction display. If you have
still not started to steer and have not taken hold of the steering wheel after five seconds at the
latest, a warning tone also sounds to remind you
to take control of the vehicle. Active Steering
Assist is then switched to passive. Active Dis-
tance Assist DISTRONIC remains active.
Activating Active Steering Assist X Select the Active Distance Assist DISTRONIC
with Active Steering Assist function using the
on-board computer (Y page 238).
The Active
Active Steering Steering Assist
AssistOn
Onmessage
appears on the multifunction display. Active
Steering Assist is activated. Information in the multifunction display
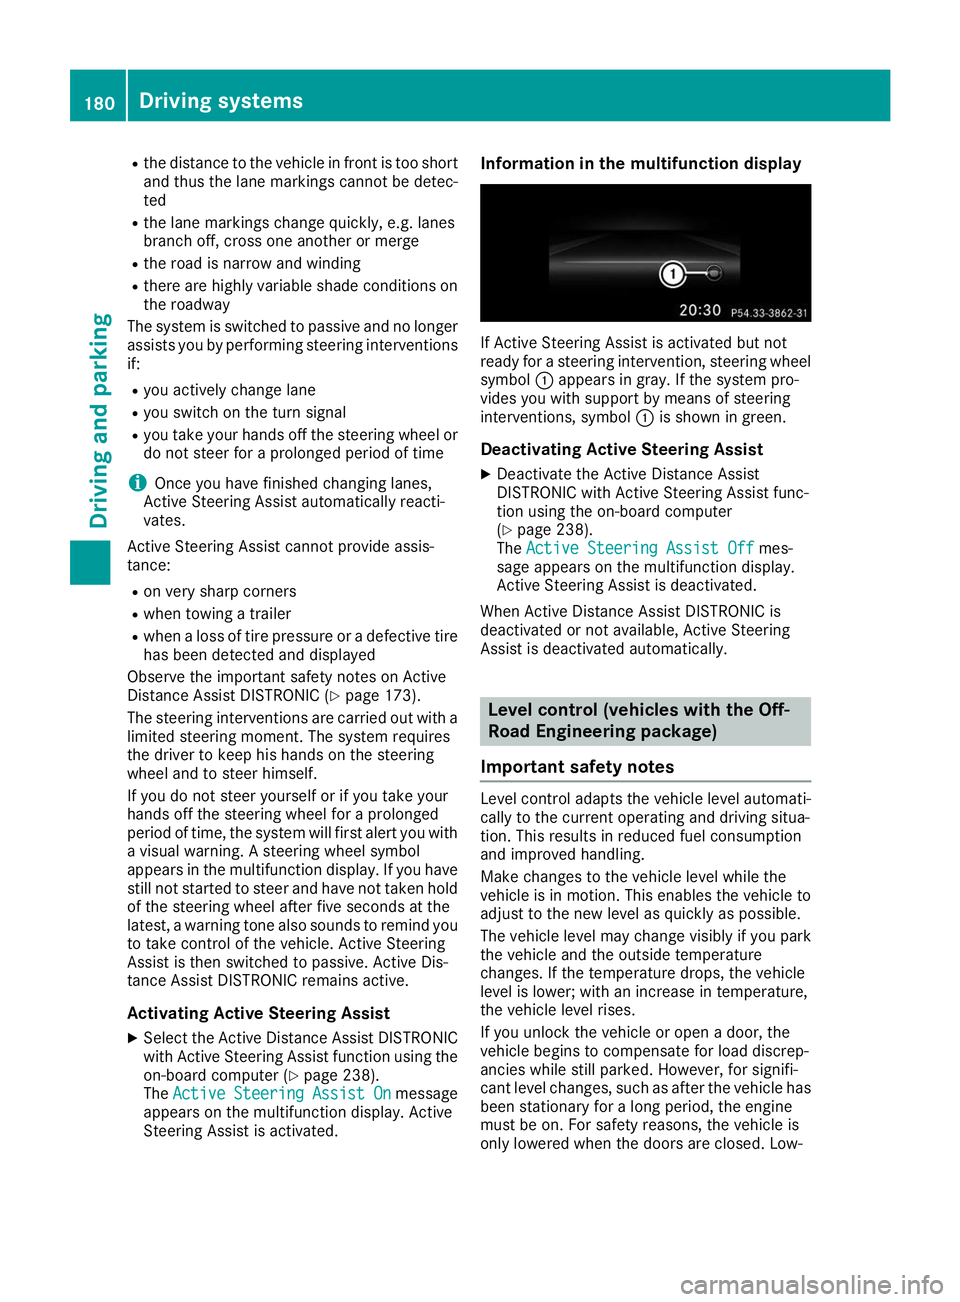
If Active Steering Assist is activated but not
ready for a steering intervention, steering wheel
symbol 0043appears in gray. If the system pro-
vides you with support by means of steering
interventions, symbol 0043is shown in green.
Deactivating Active Steering Assist
X Deactivate the Active Distance Assist
DISTRONIC with Active Steering Assist func-
tion using the on-board computer
(Y page 238).
The Active Steering Assist Off Active Steering Assist Off mes-
sage appears on the multifunction display.
Active Steering Assist is deactivated.
When Active Distance Assist DISTRONIC is
deactivated or not available, Active Steering
Assist is deactivated automatically. Level control (vehicles with the Off-
Road Engineering package)
Important safety notes Level control adapts the vehicle level automati-
cally to the current operating and driving situa-
tion. This results in reduced fuel consumption
and improved handling.
Make changes to the vehicle level while the
vehicle is in motion. This enables the vehicle to adjust to the new level as quickly as possible.
The vehicle level may change visibly if you park
the vehicle and the outside temperature
changes. If the temperature drops, the vehicle
level is lower; with an increase in temperature,
the vehicle level rises.
If you unlock the vehicle or open a door, the
vehicle begins to compensate for load discrep-
ancies while still parked. However, for signifi-
cant level changes, such as after the vehicle has
been stationary for a long period, the engine
must be on. For safety reasons, the vehicle is
only lowered when the doors are closed. Low- 180
Driving systemsDriving an
d parking
Page 184 of 398
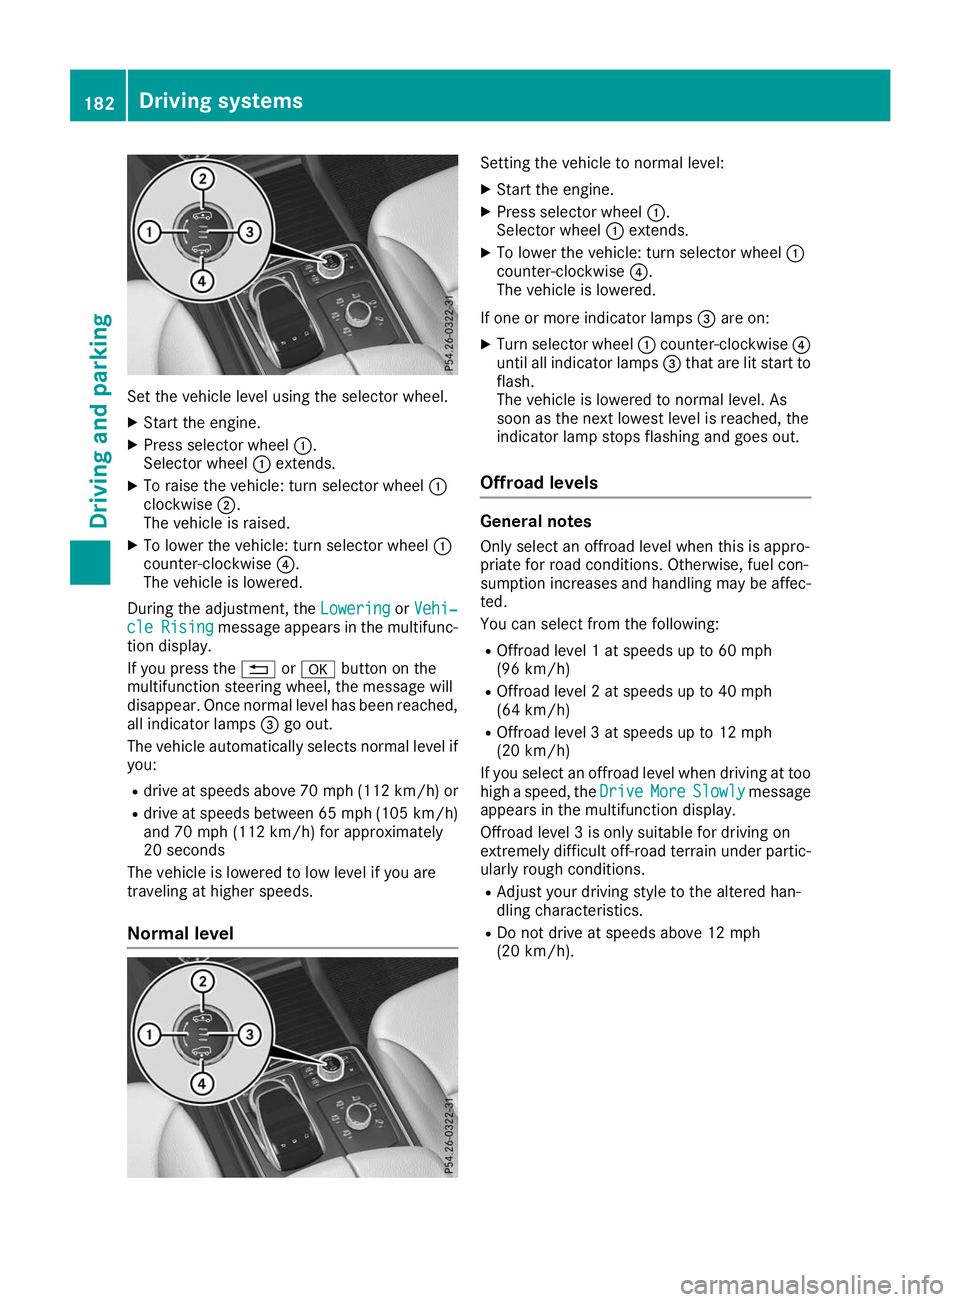
Set the vehicle level using the selector wheel.
X Start the engine.
X Press selector wheel 0043.
Selector wheel 0043extends.
X To raise the vehicle: turn selector wheel 0043
clockwise 0044.
The vehicle is raised.
X To lower the vehicle: turn selector wheel 0043
counter-clockwise 0085.
The vehicle is lowered.
During the adjustment, the Lowering
Lowering orVehi‐
Vehi‐
cle
cle Rising
Rising message appears in the multifunc-
tion display.
If you press the 0038or0076 button on the
multifunction steering wheel, the message will
disappear. Once normal level has been reached, all indicator lamps 0087go out.
The vehicle automatically selects normal level if
you:
R drive at speeds above 70 mph (112 km/h) or
R drive at speeds between 65 mph (105 km/h)
and 70 mph (112 km/h) for approximately
20 seconds
The vehicle is lowered to low level if you are
traveling at higher speeds.
Normal level Setting the vehicle to normal level:
X Start the engine.
X Press selector wheel 0043.
Selector wheel 0043extends.
X To lower the vehicle: turn selector wheel 0043
counter-clockwise 0085.
The vehicle is lowered.
If one or more indicator lamps 0087are on:
X Turn selector wheel 0043counter-clockwise 0085
until all indicator lamps 0087that are lit start to
flash.
The vehicle is lowered to normal level. As
soon as the next lowest level is reached, the
indicator lamp stops flashing and goes out.
Offroad levels General notes
Only select an offroad level when this is appro-
priate for road conditions. Otherwise, fuel con-
sumption increases and handling may be affec- ted.
You can select from the following:
R Offroad level 1 at speeds up to 60 mph
(96 km/h)
R Offroad level 2 at speeds up to 40 mph
(64 km/h)
R Offroad level 3 at speeds up to 12 mph
(20 km/h)
If you select an offroad level when driving at too high a speed, the Drive DriveMore
MoreSlowly
Slowly message
appears in the multifunction display.
Offroad level 3 is only suitable for driving on
extremely difficult off-road terrain under partic- ularly rough conditions.
R Adjust your driving style to the altered han-
dling characteristics.
R Do not drive at speeds above 12 mph
(20 km/h). 182
Driving systemsDriving and parking
Page 185 of 398
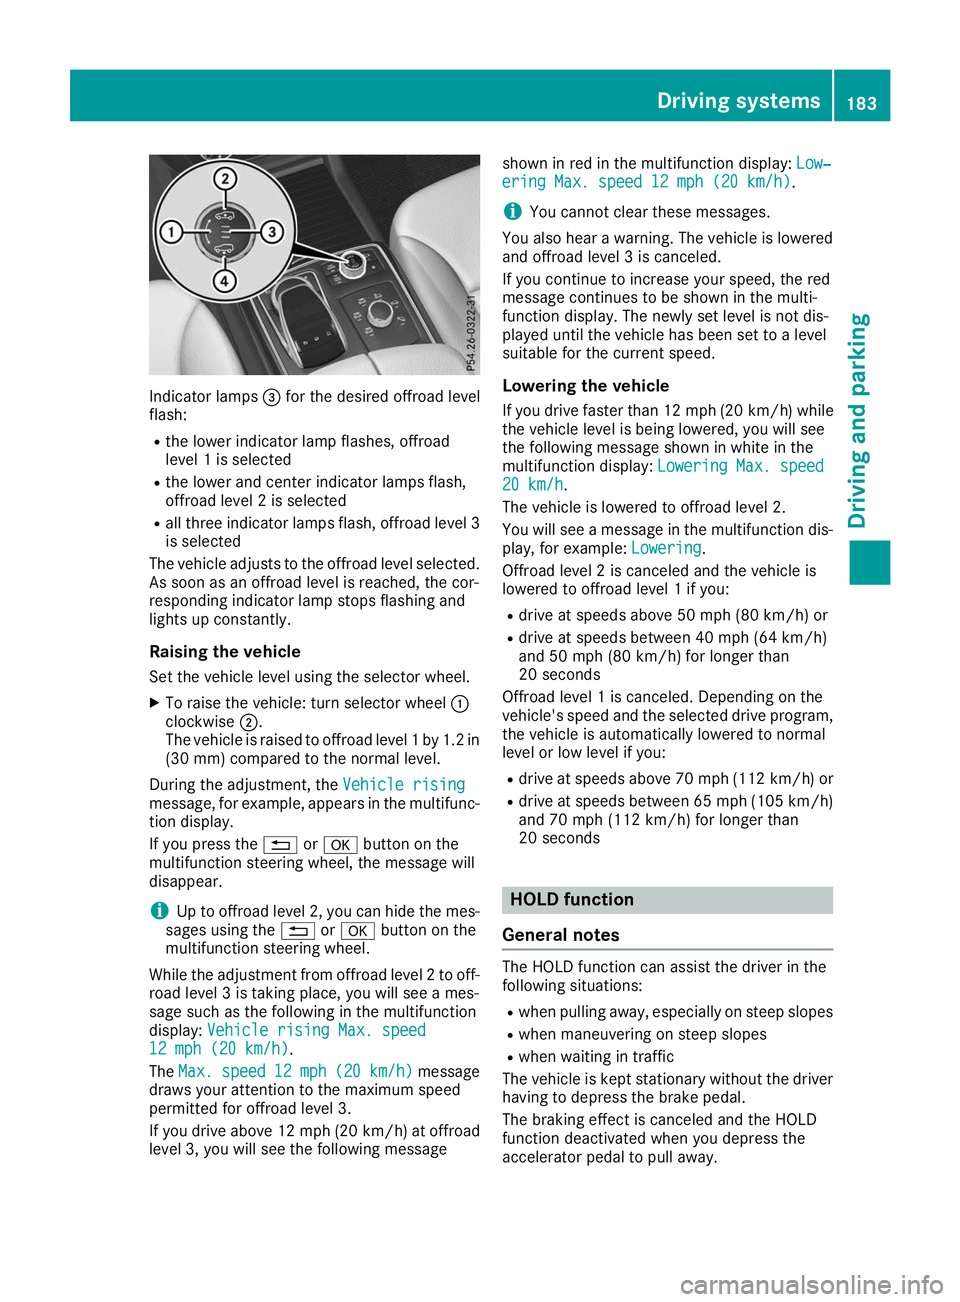
Indicator lamps
0087for the desired offroad level
flash:
R the lower indicator lamp flashes, offroad
level 1 is selected
R the lower and center indicator lamps flash,
offroad level 2 is selected
R all three indicator lamps flash, offroad level 3
is selected
The vehicle adjusts to the offroad level selected.
As soon as an offroad level is reached, the cor-
responding indicator lamp stops flashing and
lights up constantly.
Raising the vehicle
Set the vehicle level using the selector wheel.
X To raise the vehicle: turn selector wheel 0043
clockwise 0044.
The vehicle is raised to offroad level 1 by 1.2 in
(30 mm) compared to the normal level.
During the adjustment, the Vehicle rising
Vehicle rising
message, for example, appears in the multifunc-
tion display.
If you press the 0038or0076 button on the
multifunction steering wheel, the message will
disappear.
i Up to offroad level 2, you can hide the mes-
sages using the 0038or0076 button on the
multifunction steering wheel.
While the adjustment from offroad level 2 to off-
road level 3 is taking place, you will see a mes-
sage such as the following in the multifunction
display: Vehicle rising Max. speed
Vehicle rising Max. speed
12 mph (20 km/h) 12 mph (20 km/h).
The Max. Max. speed
speed 12 mph
12 mph (20 km/h)
(20 km/h) message
draws your attention to the maximum speed
permitted for offroad level 3.
If you drive above 12 mph (20 km/h) at offroad
level 3, you will see the following message shown in red in the multifunction display:
Low‐ Low‐
ering Max. speed 12 mph (20 km/h)
ering Max. speed 12 mph (20 km/h).
i You cannot clear these messages.
You also hear a warning. The vehicle is lowered and offroad level 3 is canceled.
If you continue to increase your speed, the red
message continues to be shown in the multi-
function display. The newly set level is not dis-
played until the vehicle has been set to a level
suitable for the current speed.
Lowering the vehicle If you drive faster than 12 mph (20 km/h) while
the vehicle level is being lowered, you will see
the following message shown in white in the
multifunction display: Lowering Max. speed Lowering Max. speed
20 km/h
20 km/h.
The vehicle is lowered to offroad level 2.
You will see a message in the multifunction dis- play, for example: Lowering Lowering.
Offroad level 2 is canceled and the vehicle is
lowered to offroad level 1 if you:
R drive at speeds above 50 mph (80 km/h) or
R drive at speeds between 40 mph (64 km/h)
and 50 mph (80 km/h) for longer than
20 seconds
Offroad level 1 is canceled. Depending on the
vehicle's speed and the selected drive program,
the vehicle is automatically lowered to normal
level or low level if you:
R drive at speeds above 70 mph (112 km/h) or
R drive at speeds between 65 mph (105 km/h)
and 70 mph (112 km/h) for longer than
20 seconds HOLD function
General notes The HOLD function can assist the driver in the
following situations:
R when pulling away, especially on steep slopes
R when maneuvering on steep slopes
R when waiting in traffic
The vehicle is kept stationary without the driver
having to depress the brake pedal.
The braking effect is canceled and the HOLD
function deactivated when you depress the
accelerator pedal to pull away. Driving systems
183Driving and parking Z
Page 187 of 398
The electric parking brake secures the vehicle
automatically if the HOLD function is activated
when the vehicle is stationary and:
R a system malfunction occurs
R the power supply is insufficient
On steep uphill or downhill gradients or if there
is a malfunction, the transmission may also be
automatically shifted to position 005D.AIRMATIC package
General notes AIRMATIC is an air suspension system with var-
iable damping for improved driving comfort.
Level control ensures the best possible suspen- sion and constant ground clearance, even with a laden vehicle. When you drive fast, the vehicle islowered automatically to improve driving safety
and to reduce fuel consumption. There is also
the option to manually adjust the vehicle level.
AIRMATIC consists of:
R level settings
R level control and
R ADS or ADS PLUS (Adaptive Damping Sys-
tem)
All vehicles (except Mercedes-AMG vehi-
cles): your vehicle may also be equipped with
the ACTIVE CURVE SYSTEM (Y page 186).
Mercedes-AMG vehicles: your vehicle is equip-
ped with the ACTIVE CURVE SYSTEM
(Y page 186).
Observe the notes on driving with a trailer
(Y page 222).
The vehicle level can be set using the DYNAMIC
SELECT controller (Y page 147) or the level but-
ton (Y page 187). The setting always corre-
sponds to the last selected function.
Important safety notes G
WARNING
When the vehicle is being lowered, people
could become trapped if their limbs are
between the vehicle body and the wheels or
underneath the vehicle. There is a risk of
injury. Make sure no one is underneath the vehicle or
in the immediate vicinity of the wheel arches
when the vehicle is being lowered.
If you unlock the vehicle or open a door, the
vehicle begins to compensate for load discrep-
ancies while still parked. However, for signifi-
cant level changes, such as after the vehicle has
been stationary for a long period, the engine
must be on. For safety reasons, the vehicle is
only lowered when the doors are closed. Low-
ering is interrupted if a door is opened, and it
continues once the door has been closed.
ADS and ADS PLUS (Adaptive Damping
System) General notes
The Adaptive Damping System automatically
controls the calibration of the dampers. The
damping characteristics adapt to the current
operating and driving situation.
The damping is tuned individually to each wheel
and depends on:
R your driving style, e.g. sporty
R the road surface conditions
R the drive program selected
R the vehicle level setting
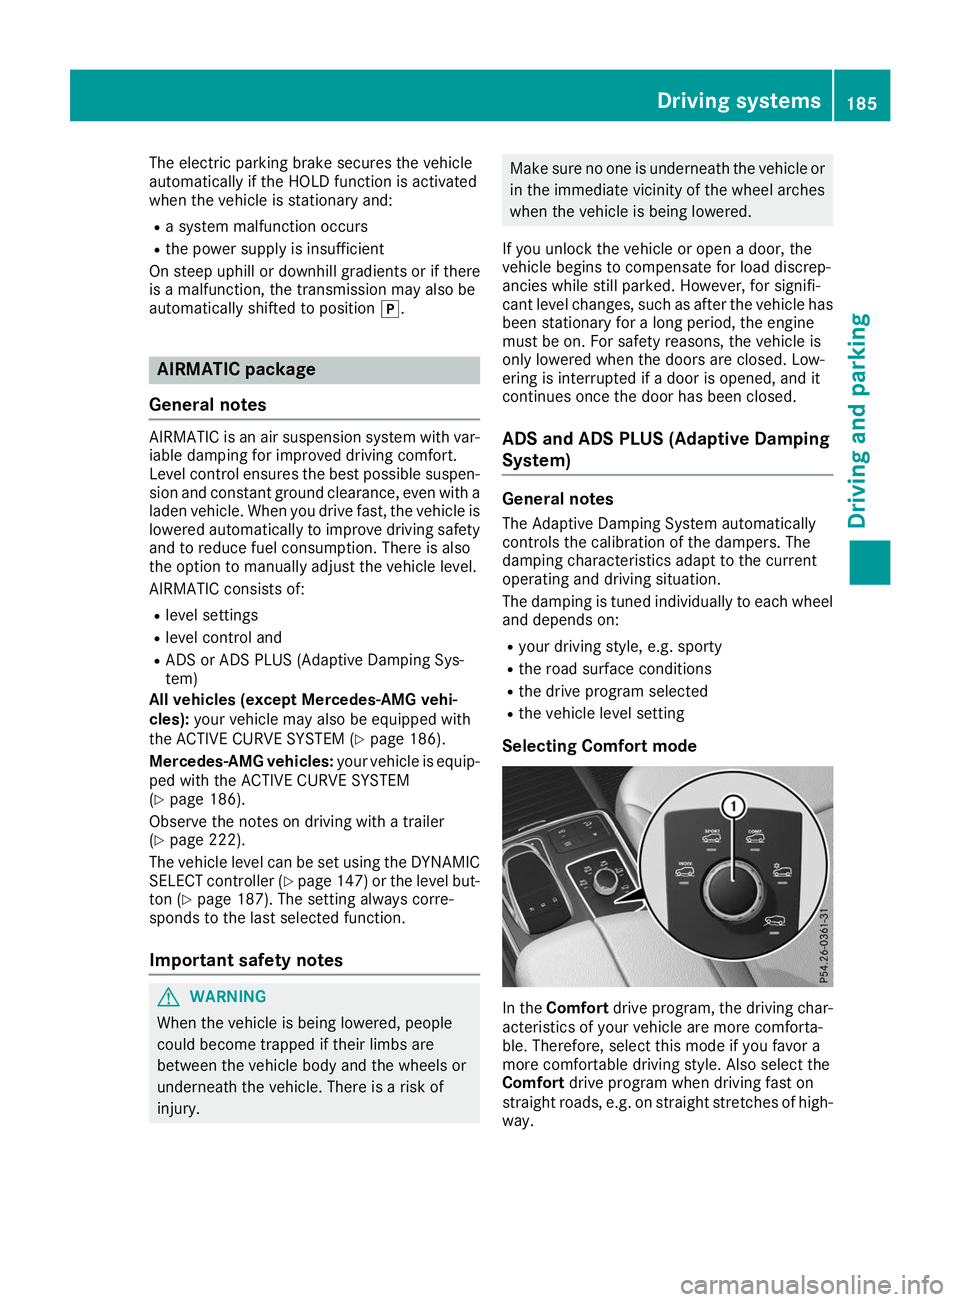
Selecting Comfort mode In the
Comfort drive program, the driving char-
acteristics of your vehicle are more comforta-
ble. Therefore, select this mode if you favor a
more comfortable driving style. Also select the
Comfort drive program when driving fast on
straight roads, e.g. on straight stretches of high-
way. Driving systems
185Driving and parking Z