2019 MERCEDES-BENZ GLS SUV lock
[x] Cancel search: lockPage 222 of 398
Messages in the multifunction display
If a gear change process has not been successful, the following messages may be displayed in the
multifunction display: Display messages
Possible causes/consequences and
0050
0050Solutions LOW RANGE Max.
LOW RANGE Max.
Speed 24 mph Speed 24 mph You have been driving faster than 24 mph (40 km/h). Additionally, the
indicator lamp on the button in the center console is flashing.
X Slow down to change gear. LOW RANGE Shift to
LOW RANGE Shift to
Position N Briefly Position N Briefly The transmission is in position
005Band you are driving at below
40 km/h.
X To shift gear, shift the transmission to position 005C.LOW RANGE Shifting
LOW RANGE Shifting
Canceled Please Canceled Please
Reactivate Reactivate The gear change process was not carried out.
X Ensure that all gear change conditions are fulfilled and carry out the
gear change process again. LOW RANGE Stop
LOW RANGE Stop
Apply Parking Brake Apply Parking Brake A warning tone also sounds. The gear change process has not been
completed. LOW RANGE is in the neutral position. There is no con-
nection between the engine and the drive wheels.
! Do not drive any further. You could otherwise damage the vehi-
cle's drive train.
X Stop the vehicle. Take into account the road and traffic conditions
when doing this.
X Apply the electric parking brake (Y page 159).
X Carry out the gear change process again.
If the gear change process has been carried out, the LOW RANGE LOW RANGE
stop apply parking brake
stop apply parking brake message disappears.Driving dynamics display in the
COMAND display (vehicles with the Off-
Road Engineering package) General notes
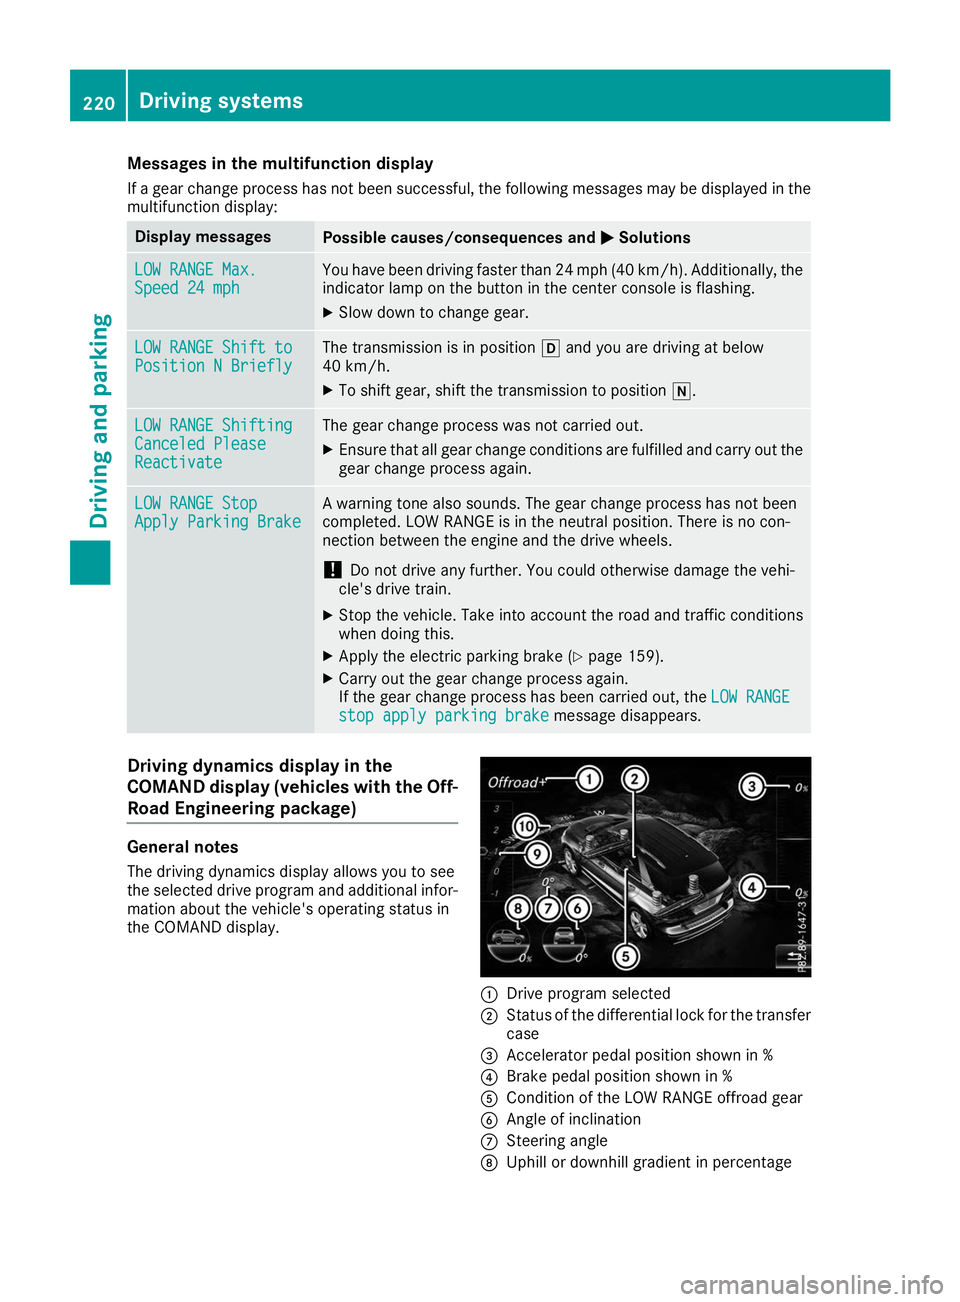
The driving dynamics display allows you to see
the selected drive program and additional infor-
mation about the vehicle's operating status in
the COMAND display. 0043
Drive program selected
0044 Status of the differential lock for the transfer
case
0087 Accelerator pedal position shown in %
0085 Brake pedal position shown in %
0083 Condition of the LOW RANGE offroad gear
0084 Angle of inclination
006B Steering angle
006C Uphill or downhill gradient in percentage 220
Driving systemsDriving and parking
Page 226 of 398
X
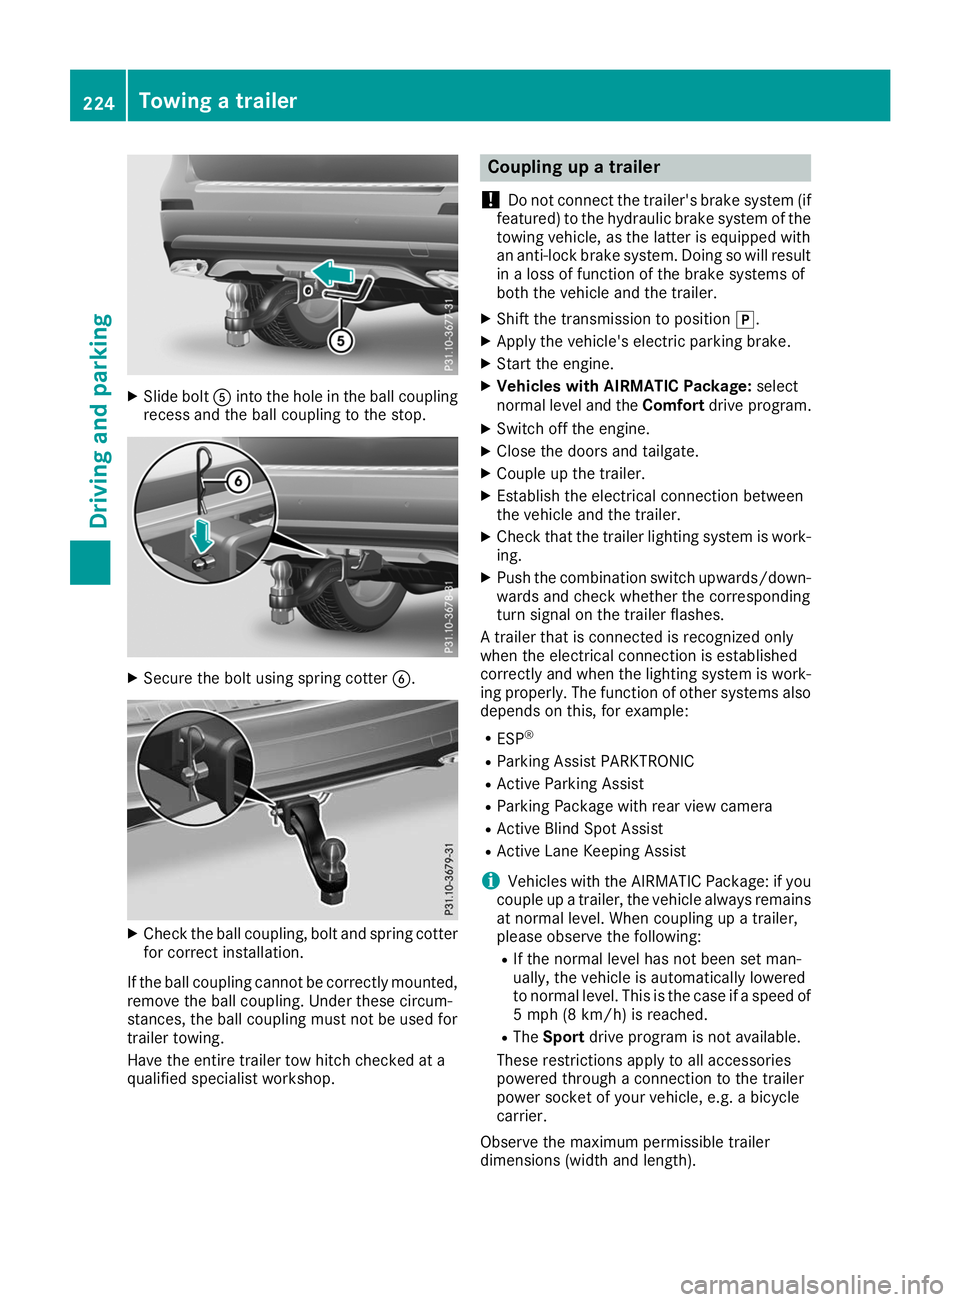
Slide bolt 0083into the hole in the ball coupling
recess and the ball coupling to the stop. X
Secure the bolt using spring cotter 0084.X
Check the ball coupling, bolt and spring cotter
for correct installation.
If the ball coupling cannot be correctly mounted,
remove the ball coupling. Under these circum-
stances, the ball coupling must not be used for
trailer towing.
Have the entire trailer tow hitch checked at a
qualified specialist workshop. Coupling up a trailer
! Do not connect the trailer's brake system (if
featured) to the hydraulic brake system of the towing vehicle, as the latter is equipped with
an anti-lock brake system. Doing so will result
in a loss of function of the brake systems of
both the vehicle and the trailer.
X Shift the transmission to position 005D.
X Apply the vehicle's electric parking brake.
X Start the engine.
X Vehicles with AIRMATIC Package: select
normal level and the Comfortdrive program.
X Switch off the engine.
X Close the doors and tailgate.
X Couple up the trailer.
X Establish the electrical connection between
the vehicle and the trailer.
X Check that the trailer lighting system is work-
ing.
X Push the combination switch upwards/down-
wards and check whether the corresponding
turn signal on the trailer flashes.
A trailer that is connected is recognized only
when the electrical connection is established
correctly and when the lighting system is work-
ing properly. The function of other systems also depends on this, for example:
R ESP ®
R Parking Assist PARKTRONIC
R Active Parking Assist
R Parking Package with rear view camera
R Active Blind Spot Assist
R Active Lane Keeping Assist
i Vehicles with the AIRMATIC Package: if you
couple up a trailer, the vehicle always remains
at normal level. When coupling up a trailer,
please observe the following:
R If the normal level has not been set man-
ually, the vehicle is automatically lowered
to normal level. This is the case if a speed of
5 mph (8 km/h) is reached.
R The Sport drive program is not available.
These restrictions apply to all accessories
powered through a connection to the trailer
power socket of your vehicle, e.g. a bicycle
carrier.
Observe the maximum permissible trailer
dimensions (width and length). 224
Towing a trailerDriving and parking
Page 232 of 398
Important safety notes
G
WARNING
If you operate information systems and com-
munication equipment integrated in the vehi- cle when driving, you may be distracted from
the traffic situation. You could also lose con-
trol of the vehicle. There is a risk of an acci-
dent.
Only operate this equipment when the traffic
situation permits. If you are not sure that this
is possible, park the vehicle paying attention
to traffic conditions and operate the equip-
ment when the vehicle is stationary.
You must observe the legal requirements for the country in which you are currently driving whenoperating the on-board computer. G
WARNING
If the instrument cluster has failed or mal-
functioned, you may not recognize function
restrictions in systems relevant to safety. The operating safety of your vehicle may be
impaired. There is a risk of an accident.
Drive on carefully. Have the vehicle checked
at a qualified specialist workshop immedi-
ately.
If the operating safety of your vehicle is
impaired, pull over as soon as it is safe to do so.
Contact a qualified specialist workshop.
The on-board computer only shows messages or warnings from certain systems in the multifunc-tion display. You should therefore make sure
your vehicle is operating safely at all times.
For an overview, see the instrument panel illus-
tration (Y page 37). Displays and operation
Instrument cluster lighting
The lighting in the instrument cluster, in the dis-
plays and the controls in the vehicle interior can be adjusted using the brightness control knob.
The brightness control knob is located on the
bottom left of the instrument cluster
(Y page 37). X
Turn the brightness control knob clockwise or
counter-clockwise.
If you turn the light switch to 0058,0060or
0058, the brightness is dependent upon the
brightness of the ambient light.
i The light sensor in the instrument cluster
automatically controls the brightness of the
multifunction display.
In daylight, the displays in the instrument
cluster are not illuminated. Speedometer with segments
The segments in the speedometer indicate
which speed range is available.
R Cruise control activated (Y page 171):
The segments light up from the stored speed to the maximum speed.
R Active Distance Assist DISTRONIC activated
(Y page 172):
One or two segments in the set speed range
light up.
R Active Distance Assist DISTRONIC detects a
vehicle in front moving more slowly than the
stored speed:
The segments between the speed of the vehi- cle in front and the stored speed light up. Tachometer
! Do not drive in the overrevving range, as this
could damage the engine.
The red band in the tachometer indicates the
engine's overrevving range.
The fuel supply is interrupted to protect the
engine when the red band is reached. Outside temperature display
You should pay special attention to road condi-
tions when temperatures are around freezing
point.
Bear in mind that the outside temperature dis-
play indicates the temperature measured and
does not record the road temperature.
The outside temperature display is in the multi-
function display (Y page 232).230
Displays and operationOn-board computer and displays
Page 233 of 398
There is a short delay before a change in outside
temperature appears in the multifunction dis-
play. Coolant temperature gauge
G
WARNING
Opening the hood when the engine is over-
heated or when there is a fire in the engine
compartment could expose you to hot gases
or other service products. There is a risk of
injury.
Let an overheated engine cool down before
opening the hood. If there is a fire in the
engine compartment, keep the hood closed
and contact the fire department.
! If the coolant temperature is too high, a dis-
play message is shown.
If the coolant temperature display is in the
area marked in red, do not continue driving.
Otherwise, the engine will be damaged.
The coolant temperature gauge is in the instru-
ment cluster on the right-hand side (Y page 37).
Under normal operating conditions and with the specified coolant level, the coolant temperature gauge may rise to the red marking. Operating the on-board computer
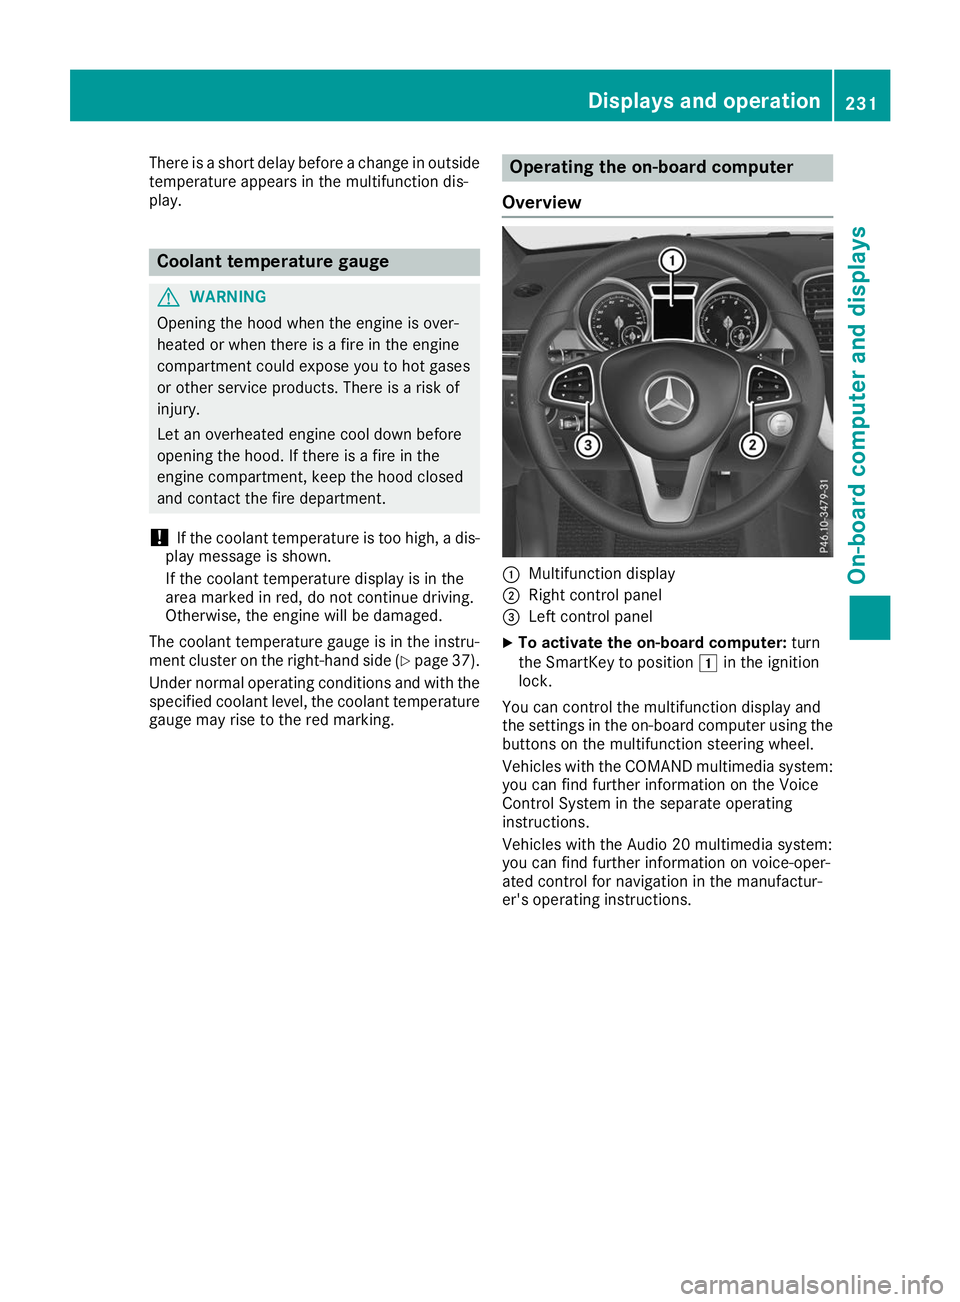
Overview 0043
Multifunction display
0044 Right control panel
0087 Left control panel
X To activate the on-board computer: turn
the SmartKey to position 0047in the ignition
lock.
You can control the multifunction display and
the settings in the on-board computer using the buttons on the multifunction steering wheel.
Vehicles with the COMAND multimedia system: you can find further information on the Voice
Control System in the separate operating
instructions.
Vehicles with the Audio 20 multimedia system:
you can find further information on voice-oper-
ated control for navigation in the manufactur-
er's operating instructions. Displays and operation
231On-board computer and displays Z
Page 243 of 398
R
Highway mode
R Active light function
R Cornering light function
R Extended range fog lamps
R Off-road lights
Further information on the Intelligent Light Sys-
tem (Y page 117).
Vehicle submenu Activating/deactivating the automatic
door locking mechanism
If you activate the Automatic AutomaticDoor
Door Lock
Lockfunc-
tion, the vehicle is centrally locked above a
speed of approximately 9 mph (15 km/h).
X Press the 0059or0065 button on the steering
wheel to select the Sett.
Sett. menu.
X Press the 0064or0063 button to select the
Vehicle
Vehicle submenu.
X Press 0076to confirm.
X Press the 0064or0063 button to select the
Automatic Door Lock Automatic Door Lock function.
When the Automatic Door Lock
Automatic Door Lock function is
activated, the vehicle doors are displayed in
orange in the multifunction display.
X Press the 0076button to save the setting.
For further information on the automatic locking
feature, see (Y page 84).
Activating/deactivating the acoustic
locking verification signal If you switch on the Acoustic
Acoustic Lock Lockfunction, an
acoustic signal sounds when you lock the vehi-
cle.
X Press the 0059or0065 button on the steering
wheel to select the Settings
Settings menu.
X Press the 0064or0063 button to select the
Vehicle
Vehicle submenu.
X Press 0076to confirm.
X Press the 0064or0063 button to select the
Acoustic Lock
Acoustic Lock function.
If the Acoustic Lock
Acoustic Lock function is activated,
the 0037 symbol in the multifunction display
lights up orange.
X Press the 0076button to save the setting. Convenience submenu Activating/deactivating the EASY-
ENTRY/EXIT feature
G
WARNING
When the EASY-ENTRY/EXIT feature adjusts
the steering wheel, you and other vehicle
occupants – particularly children – could
become trapped. There is a risk of injury.
While the EASY-ENTRY/EXIT feature is mak-
ing adjustments, make sure that no one has
any body parts in the sweep of the steering
wheel.
If somebody becomes trapped:
R press one of the memory function position
buttons, or
R move the switch for steering wheel adjust-
ment in the opposite direction to that in
which the steering wheel is moving.
The adjustment process is stopped.
X Press the 0059or0065 button on the steering
wheel to select the Sett. Sett.menu.
X Press the 0064or0063 button to select the
Convenience
Convenience submenu.
X Press 0076to confirm.
X Using 0064or0063, select the Easy
EasyEntry/
Entry/
Exit
Exit function.
If the Easy
Easy Entry/Exit
Entry/Exit function is activated,
the vehicle steering wheel is displayed in
orange in the multifunction display.
X Press the 0076button to save the setting.
Further information on the EASY-ENTRY/EXIT
feature (Y page 109).
Switching the seat belt adjustment on/off X Press the 0059or0065 button on the steering
wheel to select the Settings
Settings menu.
X Press the 0064or0063 button to select the
Convenience Convenience submenu.
X Press 0076to confirm.
X Press the 0064or0063 button to select the
Belt Adjustment
Belt Adjustment function.
If the Belt
Belt Adjustment
Adjustment function is activated,
the vehicle seat belt is shown in orange in the multifunction display.
X Press the 0076button to save the setting. Menus and submenus
241On-board computer and displays Z
Page 244 of 398
For further information on belt adjustment, see
(Y page 48).
Switching the fold-in mirrors when lock-
ing feature on/off
This function is only available when the vehicle is
equipped with the electrical fold-in function.
When you activate the Auto.
Auto. Mirror Mirror Folding
Folding
function, the exterior mirrors are folded in when
the vehicle is locked. The exterior mirrors fold
out automatically again as soon as you unlock
the vehicle.
X Press the 0059or0065 button on the steering
wheel to select the Sett.
Sett. menu.
X Press the 0064or0063 button to select the
Convenience
Convenience submenu.
X Press 0076to confirm.
X Press the 0064or0063 button to select the
Auto. Mirror Folding
Auto. Mirror Folding function.
If the Auto. Mirror Folding Auto. Mirror Folding function is
switched on, the multifunction display shows the exterior mirror in orange.
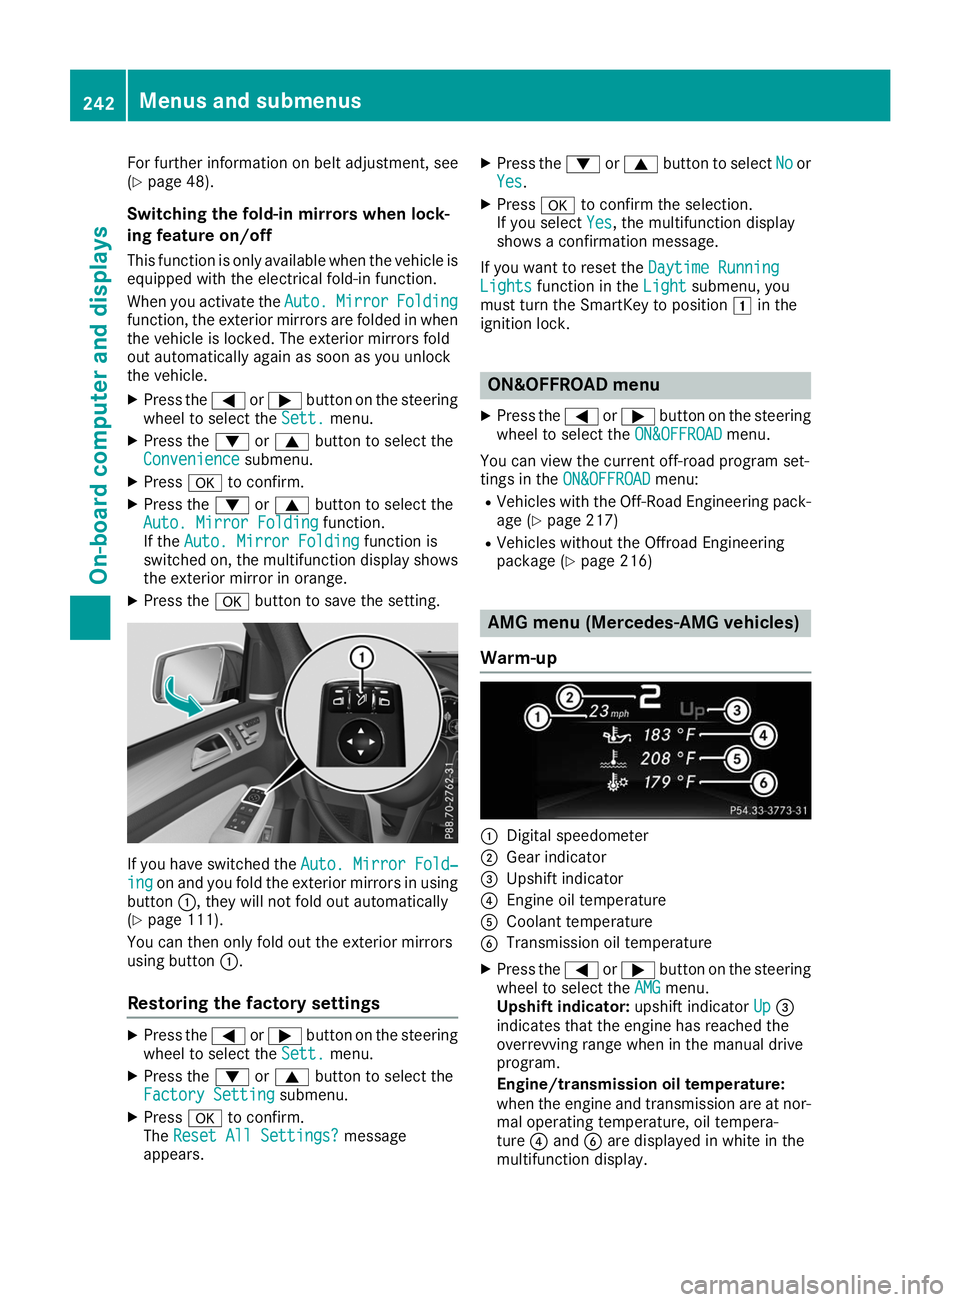
X Press the 0076button to save the setting. If you have switched the
Auto. Mirror Fold‐
Auto. Mirror Fold‐
ing
ing on and you fold the exterior mirrors in using
button 0043, they will not fold out automatically
(Y page 111).
You can then only fold out the exterior mirrors
using button 0043.
Restoring the factory settings X
Press the 0059or0065 button on the steering
wheel to select the Sett.
Sett. menu.
X Press the 0064or0063 button to select the
Factory Setting Factory Setting submenu.
X Press 0076to confirm.
The Reset All Settings?
Reset All Settings? message
appears. X
Press the 0064or0063 button to select No Noor
Yes Yes.
X Press 0076to confirm the selection.
If you select Yes
Yes, the multifunction display
shows a confirmation message.
If you want to reset the Daytime Running
Daytime Running
Lights
Lights function in the Light
Lightsubmenu, you
must turn the SmartKey to position 0047in the
ignition lock. ON&OFFROAD menu
X Press the 0059or0065 button on the steering
wheel to select the ON&OFFROAD
ON&OFFROADmenu.
You can view the current off-road program set-
tings in the ON&OFFROAD
ON&OFFROAD menu:
R Vehicles with the Off-Road Engineering pack-
age (Y page 217)
R Vehicles without the Offroad Engineering
package (Y page 216) AMG menu (Mercedes-AMG vehicles)
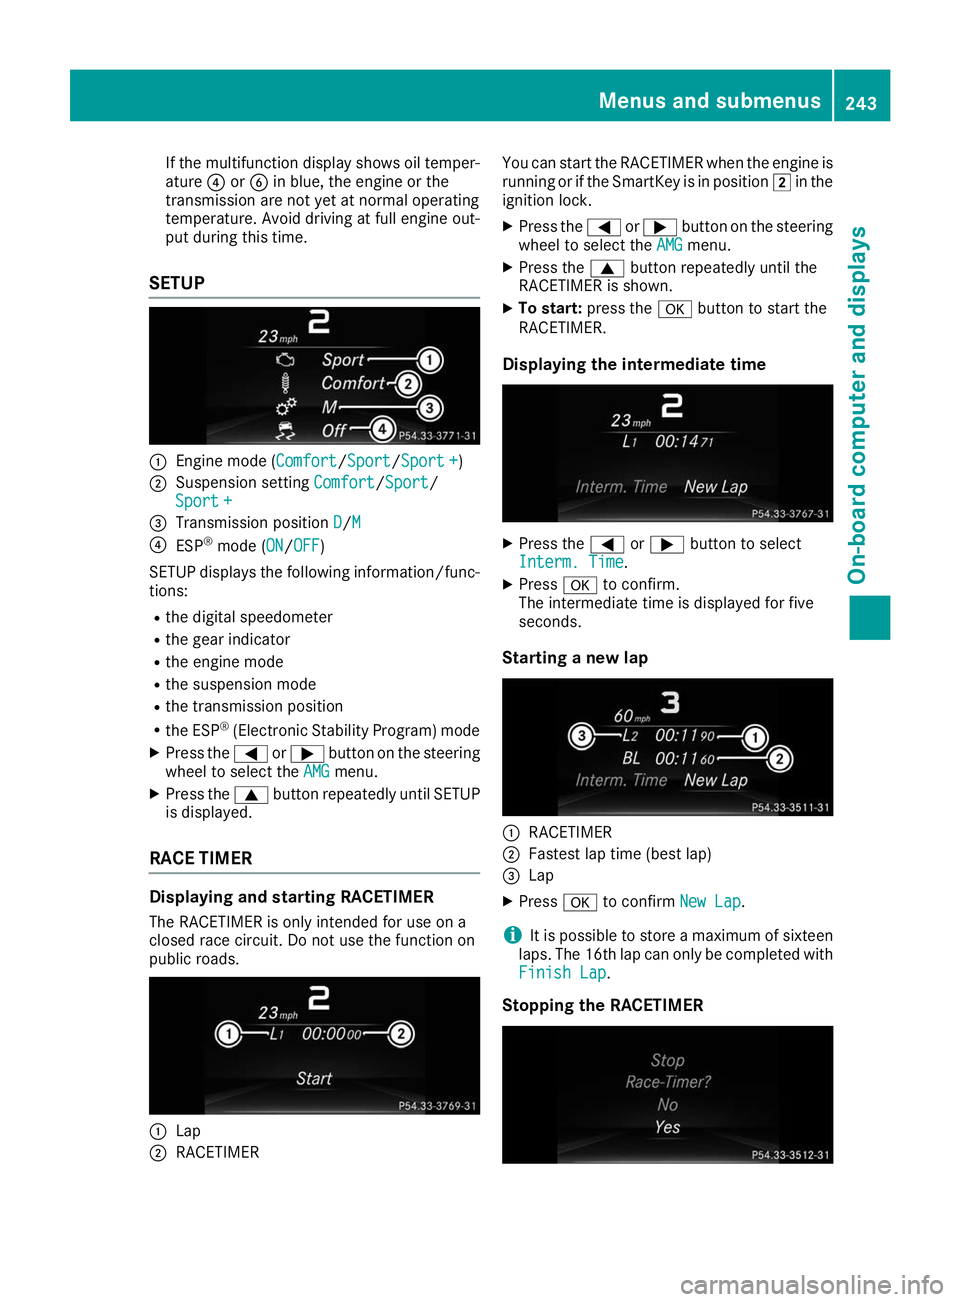
Warm-up 0043
Digital speedometer
0044 Gear indicator
0087 Upshift indicator
0085 Engine oil temperature
0083 Coolant temperature
0084 Transmission oil temperature
X Press the 0059or0065 button on the steering
wheel to select the AMG AMGmenu.
Upshift indicator: upshift indicatorUp
Up0087
indicates that the engine has reached the
overrevving range when in the manual drive
program.
Engine/transmission oil temperature:
when the engine and transmission are at nor-
mal operating temperature, oil tempera-
ture 0085and 0084are displayed in white in the
multifunction display. 242
Menus and submenusOn-board computer and displays
Page 245 of 398
If the multifunction display shows oil temper-
ature 0085or0084 in blue, the engine or the
transmission are not yet at normal operating
temperature. Avoid driving at full engine out-
put during this time.
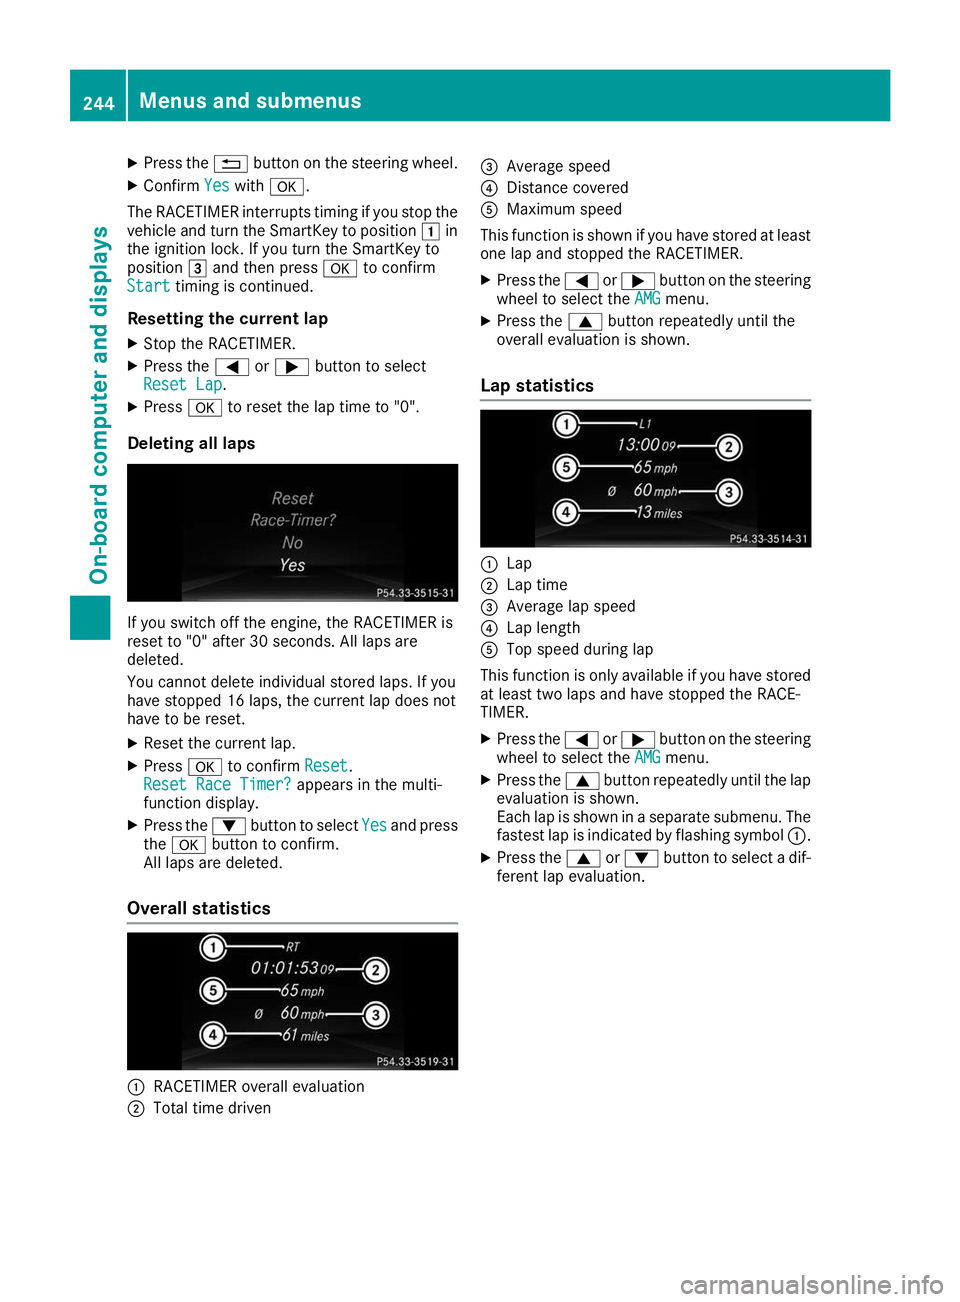
SETUP 0043
Engine mode (Comfort Comfort/Sport Sport/Sport +Sport +)
0044 Suspension setting Comfort
Comfort/SportSport/
Sport +
Sport +
0087 Transmission position D
D/M M
0085 ESP ®
mode (ON ON/OFFOFF)
SETUP displays the following information/func- tions:
R the digital speedometer
R the gear indicator
R the engine mode
R the suspension mode
R the transmission position
R the ESP ®
(Electronic Stability Program) mode
X Press the 0059or0065 button on the steering
wheel to select the AMG
AMGmenu.
X Press the 0063button repeatedly until SETUP
is displayed.
RACE TIMER Displaying and starting RACETIMER
The RACETIMER is only intended for use on a
closed race circuit. Do not use the function on
public roads. 0043
Lap
0044 RACETIMER You can start the RACETIMER when the engine is
running or if the SmartKey is in position 0048in the
ignition lock.
X Press the 0059or0065 button on the steering
wheel to select the AMG
AMG menu.
X Press the 0063button repeatedly until the
RACETIMER is shown.
X To start: press the 0076button to start the
RACETIMER.
Displaying the intermediate time X
Press the 0059or0065 button to select
Interm. Time Interm. Time.
X Press 0076to confirm.
The intermediate time is displayed for five
seconds.
Starting a new lap 0043
RACETIMER
0044 Fastest lap time (best lap)
0087 Lap
X Press 0076to confirm New Lap
New Lap.
i It is possible to store a maximum of sixteen
laps. The 16th lap can only be completed with
Finish Lap
Finish Lap.
Stopping the RACETIMER Menus and submenus
243On-board computer and displays Z
Page 246 of 398
X
Press the 0038button on the steering wheel.
X Confirm Yes
Yes with 0076.
The RACETIMER interrupts timing if you stop the
vehicle and turn the SmartKey to position 0047in
the ignition lock. If you turn the SmartKey to
position 0049and then press 0076to confirm
Start
Start timing is continued.
Resetting the current lap X Stop the RACETIMER.
X Press the 0059or0065 button to select
Reset Lap
Reset Lap.
X Press 0076to reset the lap time to "0".
Deleting all laps If you switch off the engine, the RACETIMER is
reset to "0" after 30 seconds. All laps are
deleted.
You cannot delete individual stored laps. If you
have stopped 16 laps, the current lap does not
have to be reset.
X Reset the current lap.
X Press 0076to confirm Reset Reset.
Reset Race Timer?
Reset Race Timer? appears in the multi-
function display.
X Press the 0064button to select Yes
Yes and press
the 0076 button to confirm.
All laps are deleted.
Overall statistics 0043
RACETIMER overall evaluation
0044 Total time driven 0087
Average speed
0085 Distance covered
0083 Maximum speed
This function is shown if you have stored at least one lap and stopped the RACETIMER.
X Press the 0059or0065 button on the steering
wheel to select the AMG
AMG menu.
X Press the 0063button repeatedly until the
overall evaluation is shown.
Lap statistics 0043
Lap
0044 Lap time
0087 Average lap speed
0085 Lap length
0083 Top speed during lap
This function is only available if you have stored
at least two laps and have stopped the RACE-
TIMER.
X Press the 0059or0065 button on the steering
wheel to select the AMG AMGmenu.
X Press the 0063button repeatedly until the lap
evaluation is shown.
Each lap is shown in a separate submenu. The fastest lap is indicated by flashing symbol 0043.
X Press the 0063or0064 button to select a dif-
ferent lap evaluation. 244
Menus and submenusOn-board computer and displays