2019 MERCEDES-BENZ GLE COUPE wheel
[x] Cancel search: wheelPage 121 of 697
#
Toswitch off/reduce the le vel:press but‐
to n1 repeatedly until the desired ventila‐
tion le vel is set.
If all indicator lamps are off, the seat ventila‐
tion is switched off. Ste
ering wheel Ad
justing the steering wheel mechanically &
WARNING Risk of inju rythro ugh adjust‐
ing vehicle settings while theve hicle is in
motion
Yo u could lose cont rol of theve hicle in the
fo llowing situations:
R ifyo u adjust the driver's seat, the head
re stra ints, thesteering wheel or the mir‐
ro r while theve hicle is in motion
R ifyo ufast enyour seat belt while theve hi‐
cle is in motion #
Before starting the engine: adjust the
driver's seat, the head restra ints, the st
eering wheel or the mir ror and fasten
yo ur seat belt. &
WARNING Risk of entrapment forch il‐
dren when adjusting thesteering wheel
Children could injure themselves if they
adjust thesteering wheel. #
Never lea vechildren unat tended in the
ve hicle. #
When leaving theve hicle, alw aysta ke
th eke y with you and lock theve hicle.
This also applies tothe digital vehicle
ke y if the "Digital Vehicle Key" function
is activated via Mercedes me connect. #
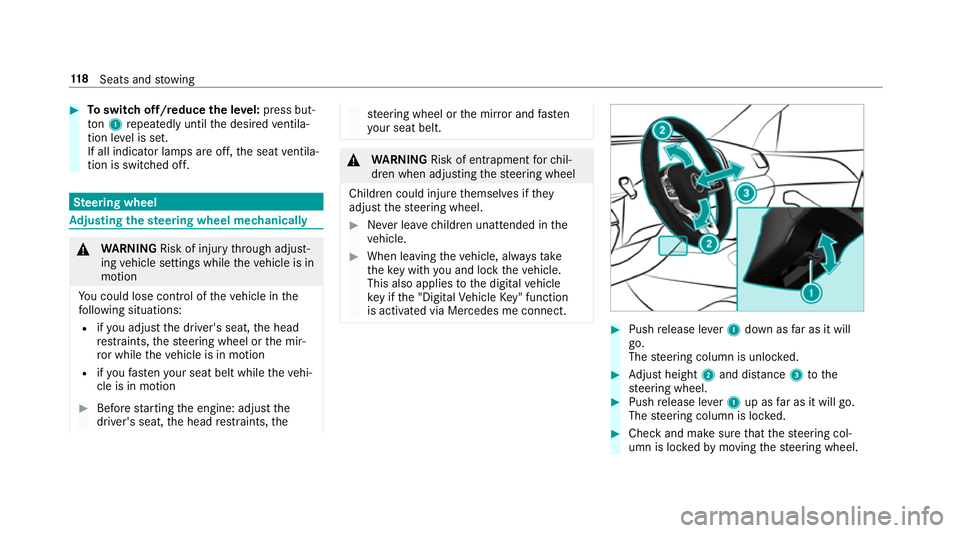
Push release le ver1 down as far as it will
go.
The steering column is unloc ked. #
Adjust height 2and di stance 3tothe
st eering wheel. #
Push release le ver1 up as far as it will go.
The steering column is loc ked. #
Check and make sure that thesteering col‐
umn is loc kedby moving thesteering wheel. 11 8
Seats and stowing
Page 122 of 697
Ad
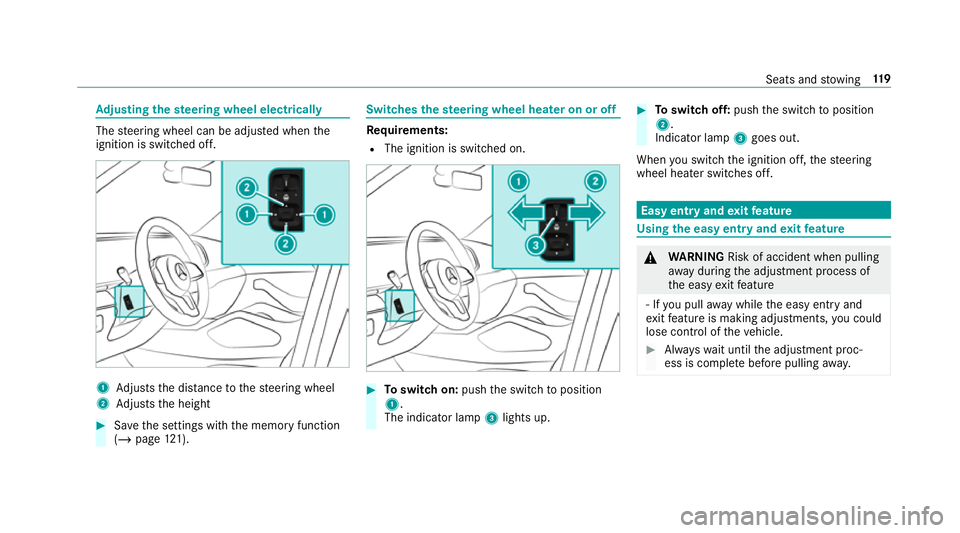
justing the steering wheel electrically The
steering wheel can be adjus ted when the
ignition is switched off. 1
Adjusts the dis tance tothesteering wheel
2 Adjusts the height #
Save the settings with the memory function
(/ page 121). Switches
thest eering wheel heater on or off Re
quirements:
R The ignition is switched on. #
Toswitch on: pushthe switch toposition
1.
The indicator lamp 3lights up. #
Toswitch off: pushthe switch toposition
2.
Indicator lamp 3goes out.
When you swit ch the ignition off, thesteering
wheel heater switches off. Easy entry and
exitfeature Using
the easy entry and exitfeature &
WARNING Risk of accident when pulling
aw ay during the adjustment process of
th e easy exitfeature
‑ If you pull away while the easy entry and
ex itfeature is making adjustments, you could
lose cont rol of theve hicle. #
Alw ayswa it until the adjustment proc‐
ess is comple tebefore pulling away. Seats and
stowing 11 9
Page 123 of 697
&
WARNING Risk of becoming trapped
while adjusting the easy entry andexit
fe ature
When the easy entry andexitfeature adjusts
th esteering wheel and the driver's seat, you
and other vehicle occupants – particular ly
ch ildren – could become trapped. #
During the adjustment process forthe
easy entry andexitfeature, make sure
th at no one has any body parts in the
sweep of thesteering wheel or the driv‐
er's seat.
If th ere is a risk of becoming trapped bythe
st eering wheel: #
Movethe adjustment le ver of thesteer‐
ing wheel.
The adjustment process is stopped.
If th ere is a risk of becoming trapped bythe
driver's seat: #
Press the seat adjustment switch.
The adjustment process is stopped. #
Never lea vechildren unat tended in the
ve hicle. #
When leaving theve hicle, alw aysta ke
th eke y with you and lock theve hicle.
This also applies tothe digital vehicle
ke y if the "Digital Vehicle Key" function
is activated via Mercedes me connect. Ve
hicles with memory function: you can stop
th e adjustment process bypressing one of the
memory function position switches. &
WARNING Risk of becoming trapped
du ring acti vation of the easy entry and
ex itfeature bychildren
If ch ildren activate the easy entry andexit
fe ature, they can become trapped, pa rticu‐
lar lywhen unat tended. #
Never lea vechildren unat tended in the
ve hicle. #
When leaving theve hicle, alw aysta ke
th eke y with you and lock theve hicle. This also applies
tothe Digital Vehicle Key if the
"Digital Vehicle Key" function is activated via
Mercedes me connect.
If th e easy entry andexitfeature is active, the
st eering wheel will mo veupwards and the driv‐
er's seat will mo veback in thefo llowing situa‐
tions:
R you swit chthe ignition off with the driver's
door open
R you open the driver's door with the ignition
switched off
% The steering wheel will mo veupwards on lyif
it is not already as high as it will go. The driv‐
er's seat will mo vebackwards only if it is not
already in there armost position.
The driver's seat backrest will mo vefor‐
wa rds only if it is not already in the front‐
most position.
The steering wheel and the driver's seat will
mo veback tothe last drive position in thefo l‐
lowing cases:
R you swit chthe po wer supp lyor the ignition
on when the driver's door is closed 12 0
Seats and stowing
Page 130 of 697
re
ar ben chseat/rear seat or bythe seat
backrest. The seat belt cann otprotect as
intended and could result in additional
injur y.
R Objects or loads in the boot/load com‐
partment cann otbe restra ined bythe
seat backrest. #
Make sure that the seat backrest and
th ere ar ben chseat/rear seat are
engaged before everytrip. *
NO
TEDama gecaused bytrapping the
seat belt when the seat backrest is fol‐
ded back The seat belt could become trapped and
thus
damaged when the seat backrest is folded
bac k. #
Ensu rethat the seat belt tongue has
been inser ted at the side in the mar ked
position. *
NO
TEDama getothero of lining when
th ere ar seat backrests are folded for‐
wa rds and backwards The
roof lining can be damaged when the
re ar seat backrests are folded forw ards and
backwards. #
Before folding there ar seat backrests
fo rw ards and backwards, insert the
head restra ints. Fo
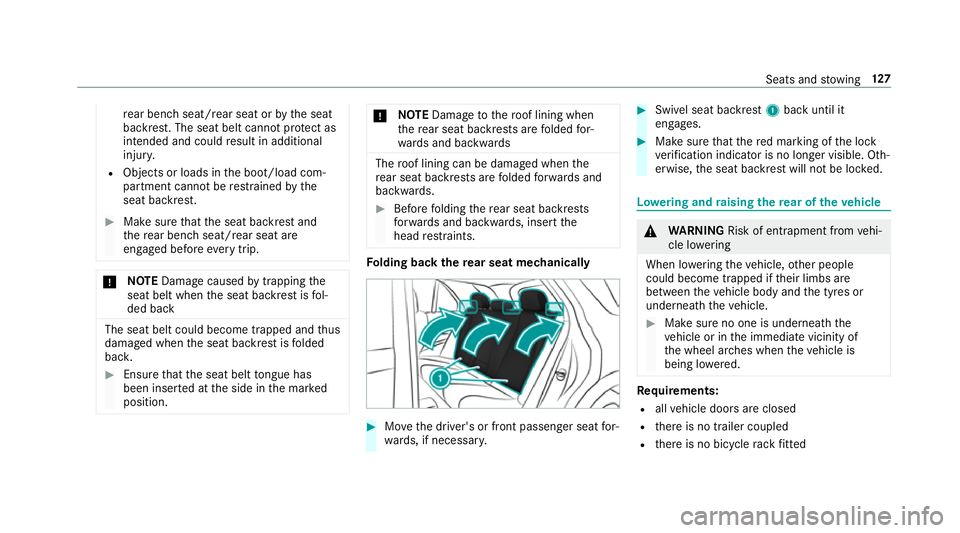
lding back there ar seat mechanically #
Movethe driver's or front passenger seat for‐
wa rds, if necessar y. #
Swi vel seat backrest 1back until it
engages. #
Make sure that there d marking of the lock
ve rification indicator is no longer visible. Oth‐
erwise, the seat backrest will not be loc ked. Lo
weri ng and raising there ar of theve hicle &
WARNING Risk of entrapment from vehi‐
cle lo wering
When lo wering theve hicle, other people
could become trapped if their limbs are
between theve hicle body and the tyres or
underneath theve hicle. #
Make sure no one is underneath the
ve hicle or in the immediate vicinity of
th e wheel ar ches when theve hicle is
being lo wered. Re
quirements:
R allvehicle doors are closed
R there is no trailer coupled
R there is no bicycle rack fitted Seats and
stowing 127
Page 153 of 697
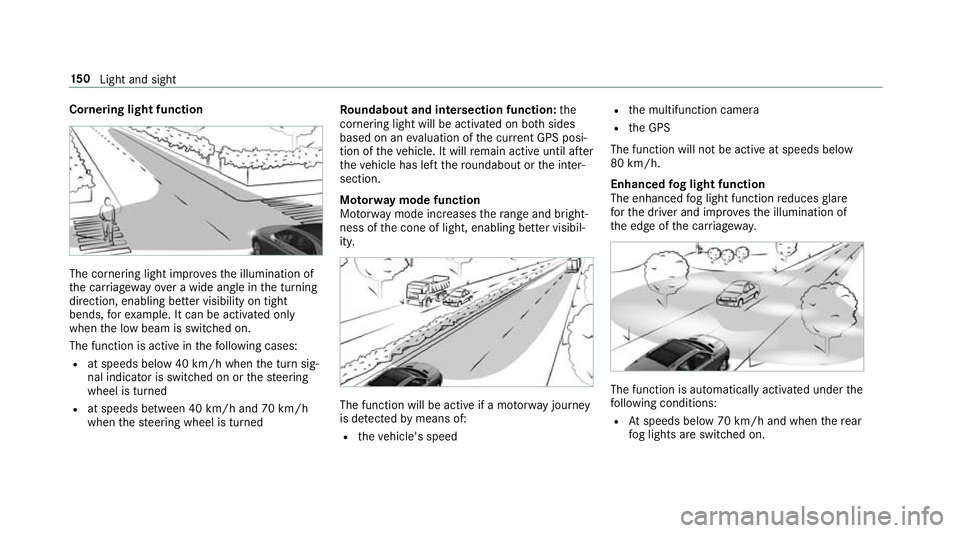
Cornering light function
The cornering light impr
ovesth e illumination of
th e car riag ewa yove r a wide angle in the turning
direction, enabling better visibility on tight
bends, forex ample. It can be activated on ly
when the low beam is switched on.
The function is active in thefo llowing cases:
R at speeds below 40 km/h when the turn sig‐
nal indicator is switched on or thesteering
wheel is turned
R at speeds between 40 km/h and 70 km/h
when thesteering wheel is turned Ro
undabout and intersection function: the
cornering light will be acti vated on bo thsides
based on an evaluation of the cur rent GPS posi‐
tion of theve hicle. It will remain active until af ter
th eve hicle has left thero undabout or the inter‐
section.
Mo torw ay mode function
Mo torw ay mode increases thera nge and bright‐
ness of the cone of light, enabling better visibil‐
ity. The function will be active if a mo
torw ay jou rney
is de tected bymeans of:
R theve hicle's speed R
the multifunction camera
R the GPS
The function will not be active at speeds below
80 km/h.
Enhanced fog light function
The enhanced fog light function reduces glare
fo rth e driver and impr ovesth e illumination of
th e edge of the car riag ewa y. The function is automatically activated under
the
fo llowing conditions:
R Atspeeds below 70 km/h and when there ar
fo g lights are switched on. 15 0
Light and sight
Page 163 of 697

#
Press the wiper blade be yond the point of
re sis tance in the direction of ar row3on
th e wiper arm.
The wiper blade will engage with a noticeable
click and mo vefreely again. #
Foldthe wiper arm back onto the wind‐
screen. Mir
rors Operates
the outside mir rors &
WARNING Risk of inju rythro ugh adjust‐
ing vehicle settings while theve hicle is in
motion
Yo u could lose cont rol of theve hicle in the
fo llowing situations:
R ifyo u adjust the driver's seat, the head
re stra ints, thesteering wheel or the mir‐
ro r while theve hicle is in motion
R ifyo ufast enyour seat belt while theve hi‐
cle is in motion #
Before starting the engine: adjust the
driver's seat, the head restra ints, the
st eering wheel or the mir ror and fasten
yo ur seat belt. &
WARNING Risk of accident due tomis‐
judgement of dis tances when using the
outside mir ror
The outside mir rors reflect objects on a
smaller scale. The objects in view are in fact
closer than they appear.
As a result, you may misjud gethe dis tance
between you and thero ad user driving
behind you, e.g. when changing lanes. #
Therefore, alw ays look over your shoul‐
der in order toensure that you are
aw are of the actual dis tance between
yo u and thero ad users driving behind
yo u. Fo
lding the outside mir rors in/out #
Brief lypress the2 button.
% Ifth e battery has been disconnected or has
dischar ged, the outside mir rors must be
mo ved briefly using button 2. Onlythen will
th e automatic mir rorfo lding function work
proper ly. 16 0
Light and sight
Page 165 of 697
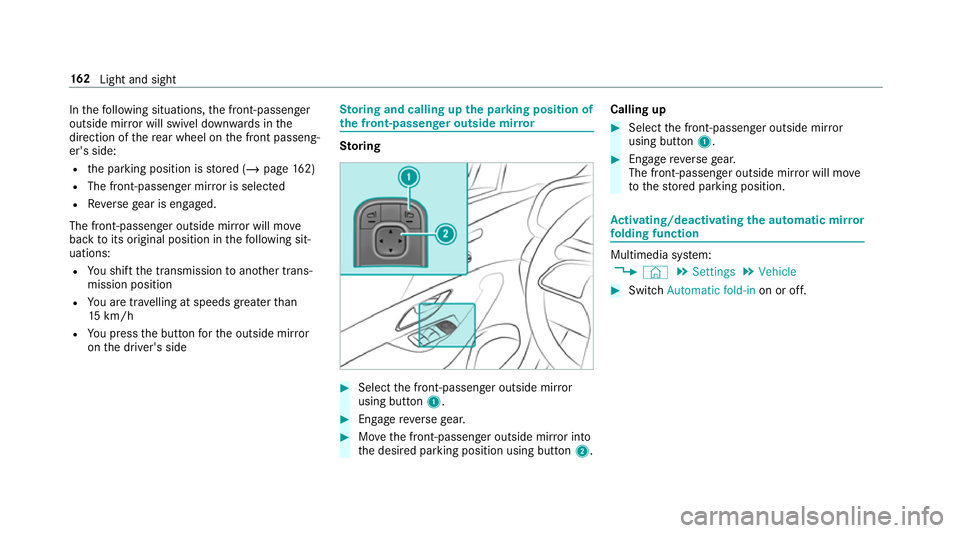
In
thefo llowing situations, the front-passen ger
outside mir ror will swivel down wards in the
direction of there ar wheel on the front passeng‐
er's side:
R the parking position is stored (/ page162)
R The front-passenger mir ror is selected
R Reversege ar is engaged.
The front-passenger outside mir ror will mo ve
back toits original position in thefo llowing sit‐
uations:
R You shift the transmission toano ther trans‐
mission position
R You are tr avelling at speeds greater than
15 km/h
R You press the button forth e outside mir ror
on the driver's side St
oring and calling up the pa rking position of
th e front-passenger outside mir ror Sto
ring #
Select the front-passen ger outside mir ror
using but ton1. #
Engage reve rsege ar. #
Movethe front-passen ger outside mir ror into
th e desired parking position using button 2.Calling up #
Select the front-passen ger outside mir ror
using but ton1. #
Engage reve rsege ar.
The front-passenger outside mir ror will mo ve
to thestored parking position. Ac
tivating/deactivating the automatic mir ror
fo lding function Multimedia sy
stem:
4 © 5
Settings 5
Vehicle #
Switch Automatic fold-in on or off.16 2
Light and sight
Page 174 of 697
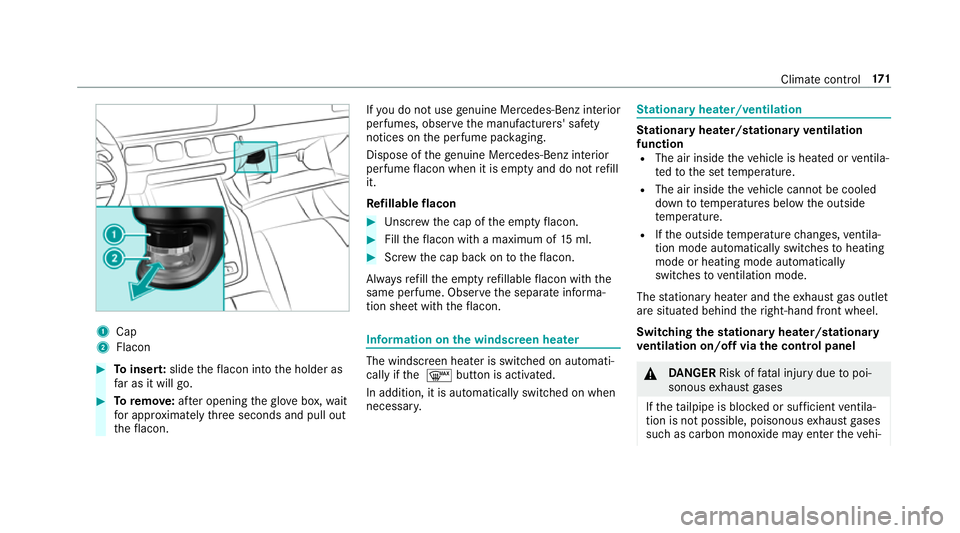
1
Cap
2 Flacon #
Toinser t:slide theflacon into the holder as
fa r as it will go. #
Toremo ve:af te r opening theglov e box, wait
fo r appro ximately thre e seconds and pull out
th eflacon. If
yo u do not use genuine Mercedes-Benz interior
pe rfumes, obse rveth e manufacturers' saf ety
notices on the perfume pac kaging.
Dispose of thege nuine Mercedes-Benz interior
pe rfume flacon when it is em pty and do not refill
it.
Re fillable flacon #
Unscr ew the cap of the em ptyflacon. #
Filltheflacon with a maximum of 15ml. #
Screw the cap back on totheflacon.
Alw aysre fill th e em ptyre fillable flacon with the
same perfume. Obser vethe separate informa‐
tion sheet with theflacon. Information on
the windscreen heater The windscreen heater is swit
ched on automati‐
cally if the ¬ button is activated.
In addition, it is automatically switched on when
necessar y. St
ationary heater/ventilation St
ationary heater/stationary ventilation
function R The air inside theve hicle is heated or ventila‐
te dto the set temp erature.
R The air inside theve hicle cannot be cooled
down totemp eratures below the outside
te mp erature.
R Ifth e outside temp erature changes, ventila‐
tion mode au tomatical lyswitches toheating
mode or heating mode automatically
switches toventilation mode.
The stationary heater and theex haust gas outlet
are situated behind theright-hand front wheel.
Switching thest ationary heater/stationary
ve ntilation on/off via the control panel &
DANG ER Risk of fata l injury due topoi‐
sonous exhaust gases
If th eta ilpipe is bloc ked or suf ficient ventila‐
tion is not possible, poisonous exhaust gases
such as carbon monoxide may enter theve hi‐ Climate control
171