2019 MERCEDES-BENZ GLE COUPE washer fluid
[x] Cancel search: washer fluidPage 20 of 370

SD memory card
see also Digital Operator's Man-
ual .................................................. 264
Selecting ........................................2 14
Search & Send
see also Digital Operator's Man-
ual ................................................. .264
Seat
Correct driver's seat position ........... 94
Seat belts
Adjusting the driver's and front-
passenger seat bel t......................... 46
Adjusting the height ......................... 46
Cleaning ......................................... 308
Correct usage .................................. 45
Fastening ......................................... 46
Important safety guidelines ............. 44
Introduction ..................................... 43
Releasing ......................................... 46
Switching belt adjustment on/off
(on-board computer) ...................... 219
Warning lamp ................................. 251
Warning lamp (function) ................... 46
Seats
Adjusting (electrically) ..................... 95
Adjusting the 4-way lumbar sup-
port .................................................. 98
Adjusting the head restraint ............ 96
Calling up a stored setting (mem-
ory function) .................................. 105
Cleaning the cover ......................... 307
Folding the rear bench seat for-
wards/back ................................... 275
Important safety notes .................... 94
Overview .......................................... 94
Seat heating problem ...................... 99
Seat ventilation problem .................. 99
Storing settings (memory func-
tion) ............................................... 105
Switching seat heating on/of f......... 98
Switching seat ventilation on/of f.... 99
Section
Sliding sunroof ................................. 89
Selector lever
Cleaning ......................................... 307
Sensors (cleaning instructions) ....... 305
Service menu (on-board com-
puter) .................................................. 217 Service message
see ASSYST PLUS
Service products
Brake fluid ..................................... 362
Coolant (engine) ............................ 362
Engine oil ....................................... 361
Fuel ................................................ 360
Important safety notes .................. 359
Refrigerant (air-conditioning sys-
tem) ............................................... 363
Washer fluid ................................... 363
Setting the air distribution ............... 121
Setting the airflow ............................ 121
Setting the date/time format
see also Digital Operator's Man-
ual .................................................. 264
Setting the language
see also Digital Operator's Man-
ual .................................................. 264
Setting the time
see also Digital Operator's Man-
ual .................................................. 264
Settings
Factory (on-board computer) ......... 220
On-board computer ....................... 217
SETUP (on-board computer,
Mercedes-AMG vehicles) .................. 220
Side impact air bag ............................. 49
Side marker lamp (display mes-
sage) ................................................... 235
Side windows
Cleaning ......................................... 304
Convenience closing feature ............ 87
Convenience opening feature .......... 87
Important safety information ........... 86
Opening/closing .............................. 86
Overview .......................................... 86
Problem (malfunction) ..................... 88
Resetting ......................................... 88
Reversing feature ............................. 86
SIRIUS services
see also Digital Operator's Man-
ual .................................................. 264
Sliding sunroof
see Panorama roof with power
tilt/sliding panel 18
Index
Page 25 of 370
Transporting ..................................3
23
Unlocking (in an emergency) ........... 81
Unlocking (SmartKey) ..................... .74
Vehicle data ................................... 364
Vehicle data
Roof load (maximum) .....................3 64
Trunk load (maximum) ................... 364
Vehicle data (off-road driving)
Approach/departure angle ............ 366
Maximum gradient climbing abil-
ity ................................................. .367
Maximum water depth ................... 366
Vehicle dimensions ........................... 364
Vehicle emergency locking ................ 81
Vehicle identification number
see VIN
Vehicle identification plate .............. 358
Vehicle level
AIRMATIC ...................................... 170
Vehicle level (display message) ....... 239
Vehicle tool kit .................................. 310
Video
Operating the DVD ......................... 214
see also Digital Operator's Man-
ual ................................................. .264
VIN ...................................................... 358
Seat ............................................... 359
Type plate ...................................... 358 W
Warning and indicator lamps ABS ................................................ 254
Brakes .......................................... .253
Coolant .......................................... 260
Distance warning ........................... 262
Engine diagnostics ......................... 259
ESP ®
.............................................. 256
ESP ®
OFF ....................................... 257
Fuel tank ........................................ 259
Overview .......................................... 36
Parking brake ................................ 259
PASSENGER AIR BAG ..................... .43
Reserve fuel .................................. .259
Restraint system ............................ 259
Seat belt ........................................ 251
Tire pressure monitor .................... 263
Warranty .............................................. 27 Washer fluid
Display message ............................ 249
Weather display (COMAND)
see also Digital Operator's Man-
ual.................................................. 264
Wheel and tire combinations
Tires ............................................... 352
Wheel bolt tightening torque ........... 351
Wheel chock ...................................... 349
Wheels
Changing a whee l.......................... 347
Checking ........................................ 327
Cleaning ......................................... 304
Emergency spare wheel ................. 353
Important safety notes .................. 327
Information on driving .................... 327
Interchanging/changing ................ 347
Mounting a new whee l................... 351
Mounting a whee l.......................... 348
Overview ........................................ 327
Removing a whee l.......................... 350
Snow chains .................................. 329
Storing ........................................... 348
Tightening torque ........................... 351
Wheel size/tire size ....................... 352
Window curtain air bag
Display message ............................ 232
Operation ......................................... 49
Windows
see Side windows
Windshield
Defrosting ...................................... 122
Windshield washer fluid
see Windshield washer system
Windshield washer system
Adding washer fluid ....................... 299
Important safety notes .................. 363
Windshield wipers
Problem (malfunction) ................... 114
Replacing the wiper blades ............ 111
Replacing the wiper blades
(MAGIC VISION CONTROL) ............ 113
Switching on/of f........................... 111
Winter driving
Slippery road surfaces ................... 151
Winter operation
Overview ........................................ 329
Radiator cover ............................... 297 Index
23
Page 113 of 370
Replacing bulbs (vehicles with LED
headlamps)
The front and rear light clusters of your vehicle
are equipped with light-emitting diodes. Do not
replace the vehicle's bulbs yourself. Contact a
qualified specialist workshop which has the nec-
essary specialist knowledge and tools to carry
out the work required.
Lamps are an important aspect of vehicle safety. You must therefore make sure that these func-
tion correctly at all times. Have the headlamp
setting checked regularly. Windshield wipers
Switching the windshield wipers
on/off
! Do not operate the windshield wipers when
the windshield is dry, as this could damage
the wiper blades. Moreover, dust that has col-
lected on the windshield can scratch the glass
if wiping takes place when the windshield is
dry.
If it is necessary to switch on the windshield
wipers in dry weather conditions, always use
washer fluid when operating the windshield
wipers.
! If the windshield wipers leave smears on the
windshield after the vehicle has been washed
in an automatic car wash, wax or other resi-
dues may be the reason for this. Clean the
windshield using washer fluid after washing
the vehicle in an automatic car wash.
! Intermittent wiping with rain sensor: due to
optical influences and the windshield becom- ing dirty in dry weather conditions, the wind-
shield wipers may be activated inadvertently. This could then damage the windshield wiper
blades or scratch the windshield.
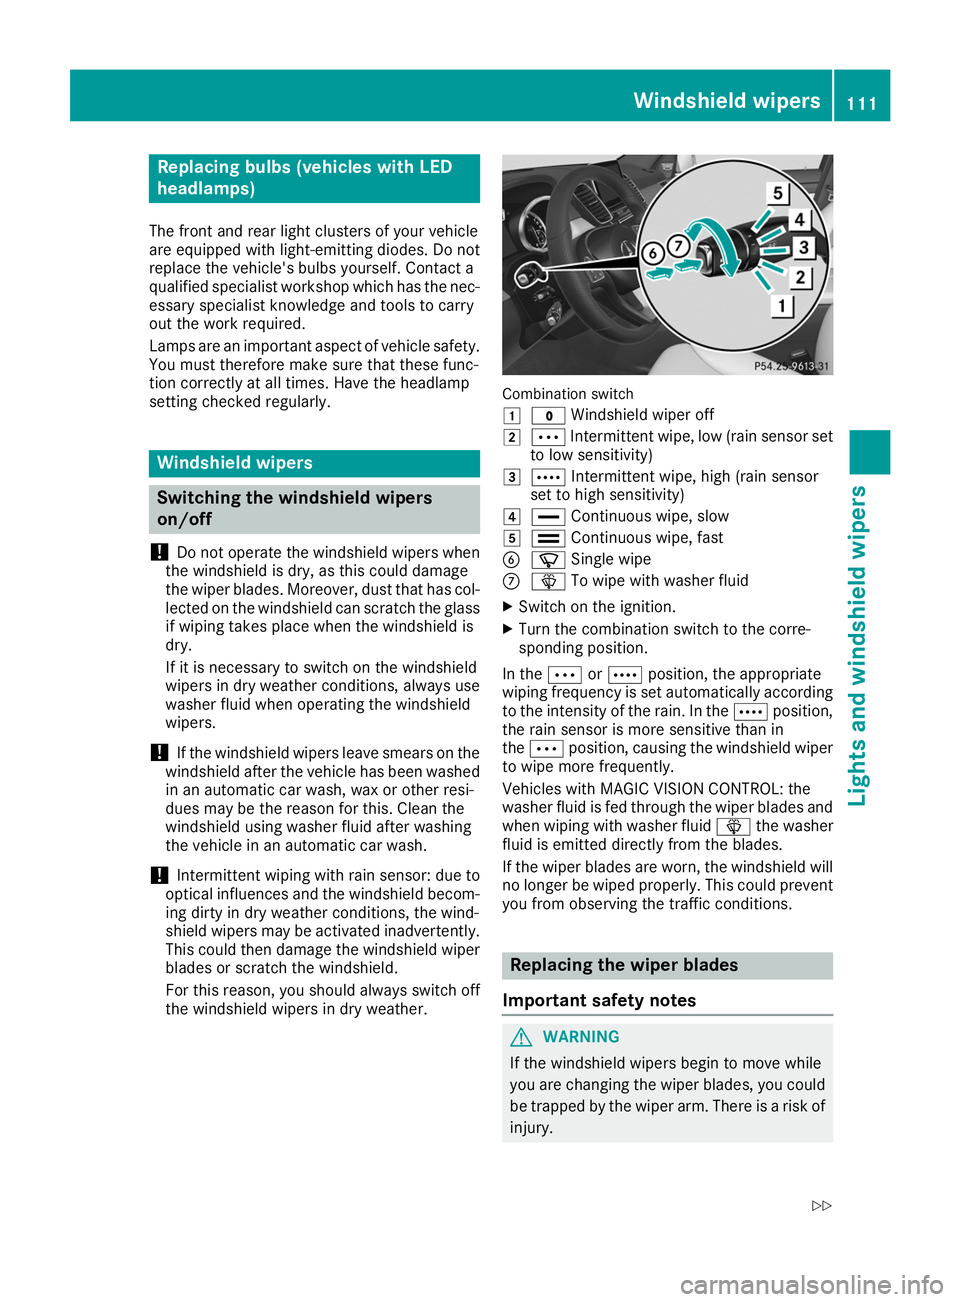
For this reason, you should always switch off the windshield wipers in dry weather. Combination switch
0047
003F Windshield wiper off
0048 0062 Intermittent wipe, low (rain sensor set
to low sensitivity)
0049 0063 Intermittent wipe, high (rain sensor
set to high sensitivity)
004A 00AA Continuous wipe, slow
004B 00A9 Continuous wipe, fast
0084 00D3 Single wipe
006B 00D4 To wipe with washer fluid
X Switch on the ignition.
X Turn the combination switch to the corre-
sponding position.
In the 0062or0063 position, the appropriate
wiping frequency is set automatically according
to the intensity of the rain. In the 0063position,
the rain sensor is more sensitive than in
the 0062 position, causing the windshield wiper
to wipe more frequently.
Vehicles with MAGIC VISION CONTROL: the
washer fluid is fed through the wiper blades and when wiping with washer fluid 00D4the washer
fluid is emitted directly from the blades.
If the wiper blades are worn, the windshield will no longer be wiped properly. This could prevent
you from observing the traffic conditions. Replacing the wiper blades
Important safety notes G
WARNING
If the windshield wipers begin to move while
you are changing the wiper blades, you could be trapped by the wiper arm. There is a risk of
injury. Windshield wipers
111Lights and windshield wipers
Z
Page 251 of 370
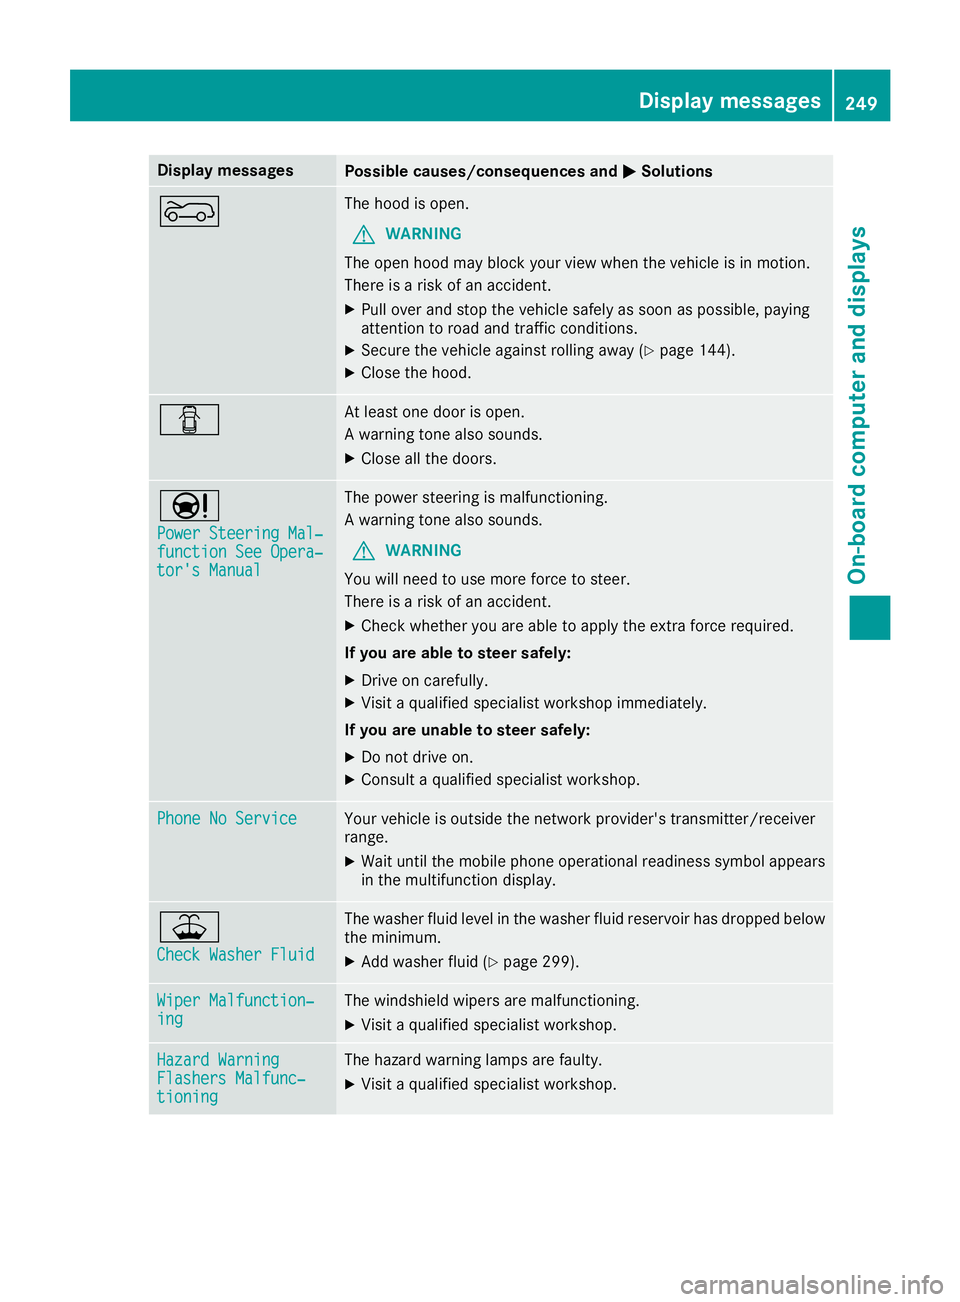
Display messages
Possible causes/consequences and
0050
0050Solutions 0066 The hood is open.
G WARNING
The open hood may block your view when the vehicle is in motion.
There is a risk of an accident.
X Pull over and stop the vehicle safely as soon as possible, paying
attention to road and traffic conditions.
X Secure the vehicle against rolling away (Y page 144).
X Close the hood. 0051 At least one door is open.
A warning tone also sounds.
X Close all the doors. 00CC
Power Steering Mal‐ Power Steering Mal‐
function See Opera‐ function See Opera‐
tor's Manual tor's Manual The power steering is malfunctioning.
A warning tone also sounds.
G WARNING
You will need to use more force to steer.
There is a risk of an accident.
X Check whether you are able to apply the extra force required.
If you are able to steer safely:
X Drive on carefully.
X Visit a qualified specialist workshop immediately.
If you are unable to steer safely:
X Do not drive on.
X Consult a qualified specialist workshop. Phone No Service Phone No Service Your vehicle is outside the network provider's transmitter/receiver
range.
X Wait until the mobile phone operational readiness symbol appears
in the multifunction display. 00B2
Check Washer Fluid Check Washer Fluid The washer fluid level in the washer fluid reservoir has dropped below
the minimum.
X Add washer fluid (Y page 299). Wiper Malfunction‐
Wiper Malfunction‐
ing ing The windshield wipers are malfunctioning.
X Visit a qualified specialist workshop. Hazard Warning
Hazard Warning
Flashers Malfunc‐ Flashers Malfunc‐
tioning tioning The hazard warning lamps are faulty.
X Visit a qualified specialist workshop. Display
messages
249On-board computer and displays Z
Page 301 of 370
Where possible, let the engine cool down and
touch only the components described in the
following. G
WARNING
The cooling system is pressurized, particularly when the motor is warm. If you open the cap, you could be scalded if hot coolant sprays out.
There is a risk of injury.
Let the engine cool down before you open the
cap. Wear protective gloves and protective
eyewear when opening. Open the cap slowly
to release pressure.
The coolant level may only be checked and cool- ant refilled when the engine and engine coolingsystem have cooled down. G
WARNING
Windshield washer concentrate is highly flam- mable. If windshield washer concentrate getsonto hot components of the engine or the
exhaust system, it can ignite. There is a risk of
fire and injury.
Make sure that windshield washer concen-
trate is not spilled in the vicinity of the filler
neck.
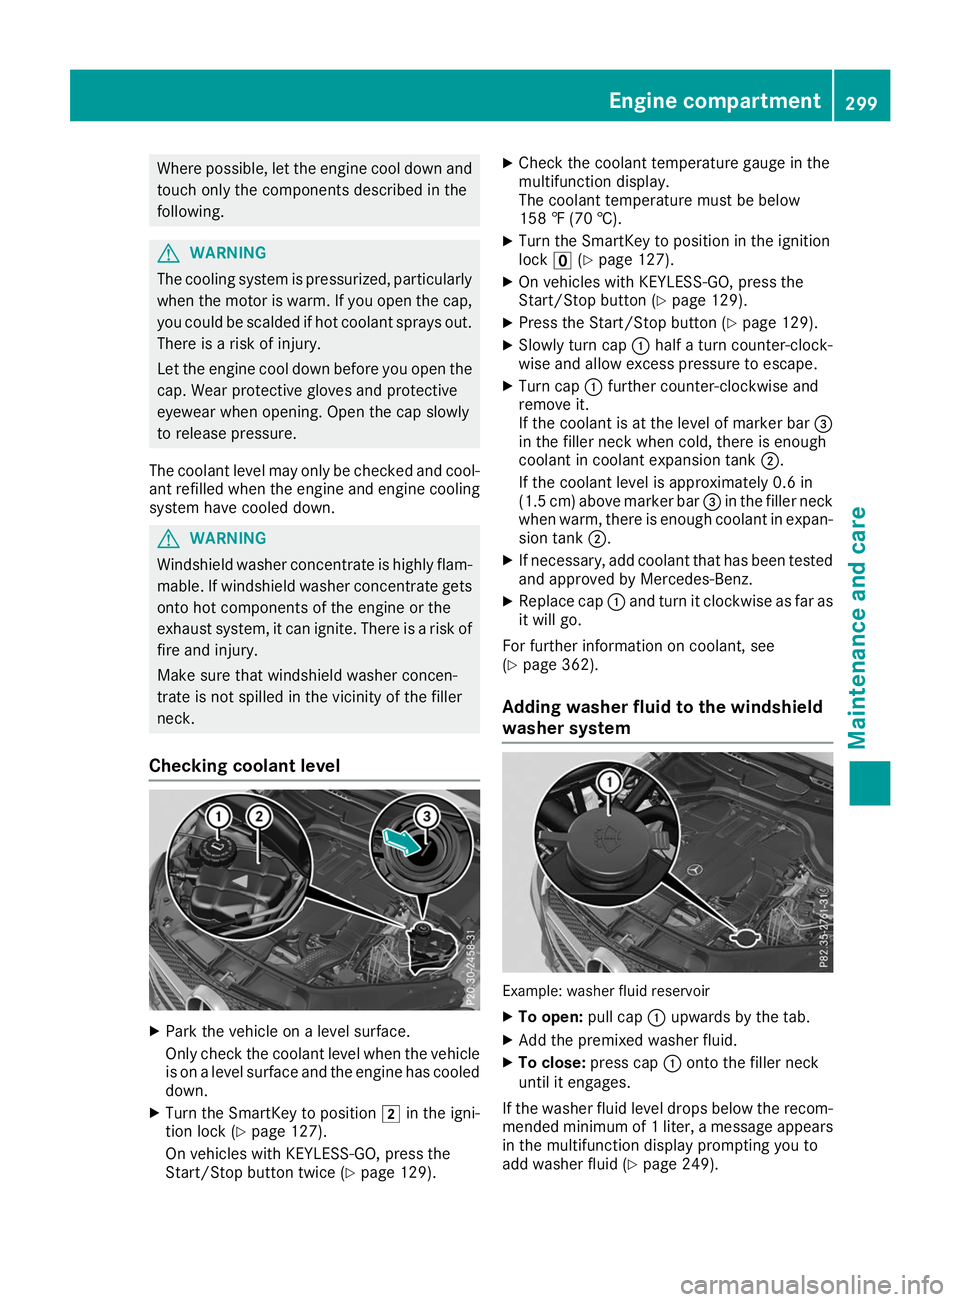
Checking coolant level X
Park the vehicle on a level surface.
Only check the coolant level when the vehicle
is on a level surface and the engine has cooled
down.
X Turn the SmartKey to position 0048in the igni-
tion lock (Y page 127).
On vehicles with KEYLESS-GO, press the
Start/Stop button twice (Y page 129).X
Check the coolant temperature gauge in the
multifunction display.
The coolant temperature must be below
158 ‡ (70 †).
X Turn the SmartKey to position in the ignition
lock 0092(Ypage 127).
X On vehicles with KEYLESS-GO, press the
Start/Stop button (Y page 129).
X Press the Start/Stop button (Y page 129).
X Slowly turn cap 0043half a turn counter-clock-
wise and allow excess pressure to escape.
X Turn cap 0043further counter-clockwise and
remove it.
If the coolant is at the level of marker bar 0087
in the filler neck when cold, there is enough
coolant in coolant expansion tank 0044.
If the coolant level is approximately 0.6 in
(1.5 cm) above marker bar 0087in the filler neck
when warm, there is enough coolant in expan- sion tank 0044.
X If necessary, add coolant that has been tested
and approved by Mercedes-Benz.
X Replace cap 0043and turn it clockwise as far as
it will go.
For further information on coolant, see
(Y page 362).
Adding washer fluid to the windshield
washer system Example: washer fluid reservoir
X To open: pull cap0043upwards by the tab.
X Add the premixed washer fluid.
X To close: press cap 0043onto the filler neck
until it engages.
If the washer fluid level drops below the recom- mended minimum of 1 liter, a message appears in the multifunction display prompting you to
add washer fluid (Y page 249). Engine compartment
299Maintenance and care Z
Page 302 of 370
Further information on windshield washer fluid
(Y page 363). ASSYST PLUS
Service message
i If the scheduled service intervals are excee-
ded, this may result in damage to the vehicle.
You can obtain up-to-date information concern-
ing the servicing of your vehicle from a qualified specialist workshop, e.g. an authorized
Mercedes-Benz Center or at
http://www.mbusa.com (USA only).
i The ASSYST PLUS service interval display
does not show any information on the engine
oil level. Observe the notes on the engine oil
level (Y page 297).
The multifunction display shows a service mes-
sage for several seconds, e.g.:
R Service A in .. Days Service A in .. Days
R Service A Due
Service A Due
R Service A Exceeded by .. Days
Service A Exceeded by .. Days
Depending on the operating conditions of the
vehicle, the remaining time or distance until the next service due date is displayed.
The letter A Aor B
B, possibly in connection with a
number or another letter, shows the type of ser-
vice. A
A stands for a minor service and B
Bfor a
major service.
Further information can be obtained at a quali-
fied specialist workshop.
The ASSYST PLUS service interval display does
not take into account any periods of time during
which the battery is disconnected.
Maintaining the time-dependent service sched-
ule:
X Note down the service due date displayed in
the multifunction display before disconnect-
ing the battery.
or
X After reconnecting the battery, subtract the
battery disconnection periods from the ser-
vice date shown on the display. Hiding a service message
X Press the 0038or0076 button on the steering
wheel. Displaying service messages
X Switch on the ignition.
X Press the 0059or0065 button on the steering
wheel to select the Serv. Serv.menu.
X Press the 0063or0064 button to select the
ASSYST
ASSYST PLUS
PLUSsubmenu and confirm by press-
ing the 0076button.
The service due date appears in the multi-
function display. Information about Service
Resetting the ASSYST PLUS service
interval display !
If the ASSYST PLUS service interval display
has been inadvertently reset, this setting can
be corrected at a qualified specialist work-
shop.
Have service work carried out as described in the Maintenance Booklet. This may otherwise
lead to increased wear and damage to the
major assemblies or the vehicle.
A qualified specialist workshop will reset the
ASSYST PLUS service interval display after the
service work has been carried out. You can also obtain further information on maintenance
work, for example.
Special service requirements The specified maintenance interval takes only
the normal operation of the vehicle into
account. Under increased load on the vehicle,
maintenance work must be carried out more
frequently, for example:
R Regular city driving with frequent intermedi-
ate stops
R If the vehicle is primarily used to travel short
distances
R Use in mountainous terrain or on poor road
surfaces
R If the engine is often left idling for long periods
Under these or similar conditions, have, for
example, the air filter, engine oil and oil filter
replaced or changed more frequently. Under
arduous operating conditions, the tires must be checked more often. Further information can be
obtained at a qualified specialist workshop. 300
ASSYST PLUSMaintenance and care
Page 305 of 370
Information about the correct distance is
available from the equipment manufacturer.
Move the power washer nozzle around when
cleaning your vehicle.
The water temperature of the power washer
must not exceed 140 ‡ (60 †).
Cleaning the paintwork !
Do not affix:
R stickers
R films
R magnetic plates or similar items
to painted surfaces. You could otherwise
damage the paintwork.
Scratches, corrosive deposits, areas affected by
corrosion and damage caused by inadequate
care cannot always be completely repaired. In
such cases, visit a qualified specialist workshop.
X Remove dirt immediately, where possible,
while avoiding rubbing too hard.
X Soak insect remains with insect remover and
rinse off the treated areas afterwards.
X Soak bird droppings with water and rinse off
the treated areas afterwards.
X Remove tree resin, oils, fuels and greases by
rubbing gently with a cloth soaked in petro-
leum ether or lighter fluid
X Remove coolant and brake fluid with a moist
cloth and clear water.
X Use tar remover to remove tar stains.
X Use silicone remover to remove wax.
If water no longer forms "beads" on the paint
surface, use the paint care products recommen- ded and approved by Mercedes-Benz. This is the
case approximately every three to five months,
depending on the climate conditions and the
care product used.
If dirt has penetrated the paint surface or if the
paint has become dull, the paint cleaner recom-
mended and approved by Mercedes-Benz
should be used.
Do not use these care products in the sun or on the hood while the hood is hot.
X Use a suitable touch-up stick, e.g. MB Touch-
Up Stick, to repair slight damage to the paint- work quickly and provisionally. Matte finish care !
Never polish the vehicle or the light alloy
wheels. Polishing causes the finish to shine.
! The following can give the paint a glossy
appearance and thus reduce the matt effect:
R Rubbing hard with unsuitable agents
R Washing the vehicle in direct sunlight
! Never use paint cleaner, buffing or polishing
products, or gloss preserver, e.g. wax, for the purpose of paintwork care. These products
are only suitable for high-gloss surfaces. Their
use on vehicles with matte paintwork leads to
considerable surface damage or, more spe-
cifically, to shiny, spotted areas.
Always have paintwork repairs carried out at a
qualified specialist workshop.
! Only use automatic car washes which cor-
respond to the latest technological stand-
ards. Never use wash programs which finish
by treating the vehicle with hot wax.
Observe these notes if your vehicle has a clear
matte finish. This will help you to avoid damage
to the paintwork due to incorrect treatment.
These notes also apply to light alloy wheels with
a clear matte finish.
i Use only insect remover and car shampoo
from the range of recommended and
approved Mercedes-Benz care products.
Cleaning the decorative film !
The following may have an effect on the ser-
vice life and color of decorative film:
R sunlight
R temperature, e.g. hot-air fan
R weather conditions
R stone impacts and dirt
R chemical cleaning agents
R greasy substances
! Do not use any types of polish on matt dec-
orative film. Polishing surfaces covered with
film gives it a shiny finish.
! Do not treat matt or structured decorative
film with wax. This may lead to marks that
cannot be removed.
Observe the notes in the matte finish paintwork
care and treatment chapter (Y page 303). Care
303Maintenance and care Z
Page 361 of 370
from the data shown here. You can find the
data applicable to your vehicle on the vehicle
identification plate. Vehicle identification number (VIN)
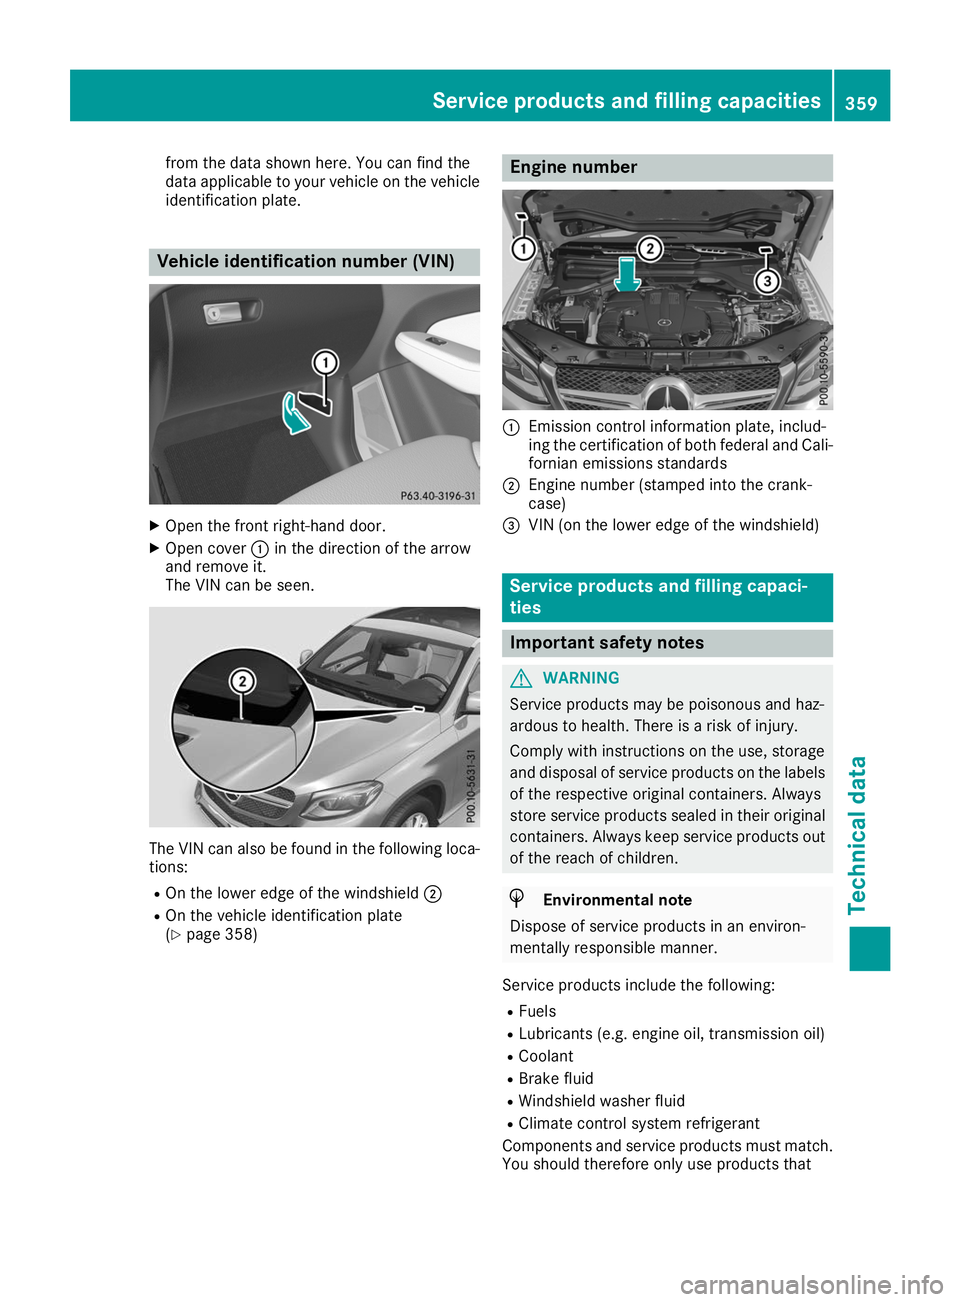
X
Open the front right-hand door.
X Open cover 0043in the direction of the arrow
and remove it.
The VIN can be seen. The VIN can also be found in the following loca-
tions:
R On the lower edge of the windshield 0044
R On the vehicle identification plate
(Y page 358) Engine number
0043
Emission control information plate, includ-
ing the certification of both federal and Cali-
fornian emissions standards
0044 Engine number (stamped into the crank-
case)
0087 VIN (on the lower edge of the windshield) Service products and filling capaci-
ties
Important safety notes
G
WARNING
Service products may be poisonous and haz-
ardous to health. There is a risk of injury.
Comply with instructions on the use, storage
and disposal of service products on the labels of the respective original containers. Always
store service products sealed in their original containers. Always keep service products out
of the reach of children. H
Environmental note
Dispose of service products in an environ-
mentally responsible manner.
Service products include the following: R Fuels
R Lubricants (e.g. engine oil, transmission oil)
R Coolant
R Brake fluid
R Windshield washer fluid
R Climate control system refrigerant
Components and service products must match.
You should therefore only use products that Service products and filling capacities
359Technical data Z