2019 MERCEDES-BENZ GLE COUPE width
[x] Cancel search: widthPage 165 of 370
Displays in the instrument cluster
Displays in the speedometer
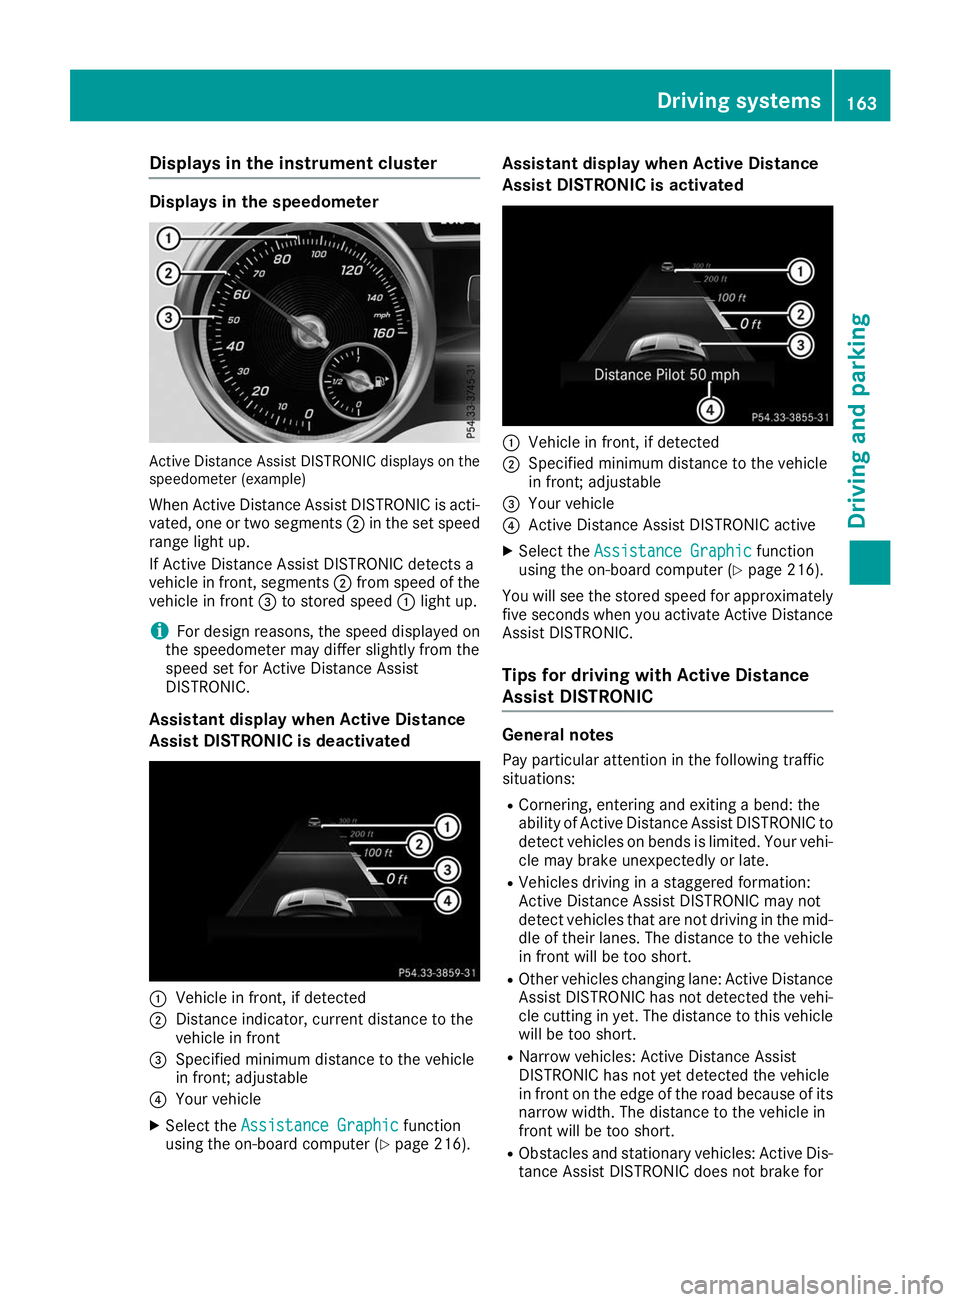
Active Distance Assist DISTRONIC displays on the
speedometer (example)
When Active Distance Assist DISTRONIC is acti-
vated, one or two segments 0044in the set speed
range light up.
If Active Distance Assist DISTRONIC detects a
vehicle in front, segments 0044from speed of the
vehicle in front 0087to stored speed 0043light up.
i For design reasons, the speed displayed on
the speedometer may differ slightly from the
speed set for Active Distance Assist
DISTRONIC.
Assistant display when Active Distance
Assist DISTRONIC is deactivated 0043
Vehicle in front, if detected
0044 Distance indicator, current distance to the
vehicle in front
0087 Specified minimum distance to the vehicle
in front; adjustable
0085 Your vehicle
X Select the Assistance Graphic
Assistance Graphic function
using the on-board computer (Y page 216).Assistant display when Active Distance
Assist DISTRONIC is activated
0043
Vehicle in front, if detected
0044 Specified minimum distance to the vehicle
in front; adjustable
0087 Your vehicle
0085 Active Distance Assist DISTRONIC active
X Select the Assistance Graphic Assistance Graphic function
using the on-board computer (Y page 216).
You will see the stored speed for approximately five seconds when you activate Active Distance
Assist DISTRONIC.
Tips for driving with Active Distance
Assist DISTRONIC General notes
Pay particular attention in the following traffic
situations:
R Cornering, entering and exiting a bend: the
ability of Active Distance Assist DISTRONIC to
detect vehicles on bends is limited. Your vehi-cle may brake unexpectedly or late.
R Vehicles driving in a staggered formation:
Active Distance Assist DISTRONIC may not
detect vehicles that are not driving in the mid- dle of their lanes. The distance to the vehiclein front will be too short.
R Other vehicles changing lane: Active Distance
Assist DISTRONIC has not detected the vehi-
cle cutting in yet. The distance to this vehicle
will be too short.
R Narrow vehicles: Active Distance Assist
DISTRONIC has not yet detected the vehicle
in front on the edge of the road because of its
narrow width. The distance to the vehicle in
front will be too short.
R Obstacles and stationary vehicles: Active Dis-
tance Assist DISTRONIC does not brake for Driving syste
ms
163Driving an d parking Z
Page 183 of 370
R
if the camera lens is dirty or obstructed.
Observe the notes on cleaning
(Y page 305)
R if the rear of your vehicle is damaged. In this
event, have the camera position and setting
checked at a qualified specialist workshop
The field of vision and other functions of the rear
view camera may be restricted due to additional
accessories on the rear of the vehicle (e.g.
license plate holder, bicycle rack).
On vehicles with height-adjustable chassis,
leaving the standard height can result in inac-
curacies in the guide lines, depending on tech-
nical conditions.
i The contrast of the display may be affected
by the sudden presence of sunlight or other
light sources, e.g. when exiting a garage. Pay
particular attention in this situation.
i If usability is severely restricted, e.g. due to
pixel errors, have the display repaired or
replaced.
i The rear view camera is protected from rain-
drops and dust. When the rear view camera is
switched on, the Mercedes emblem opens
with the rear view camera in the cover on the tailgate.
The emblem closes again when:
R you have finished the maneuvering process
R you switch off the engine
R you open the trunk
Observe the notes on cleaning (Y page 305).
For technical reasons, the emblem may
remain open briefly after the rear view camera
has been deactivated.
Activating/deactivating the rear view
camera X
To activate: make sure that the SmartKey is
in position 0048in the ignition lock.
X Make sure that the Activation by R gear
Activation by R gear
function is selected on the multimedia system (see the Digital Operator's Manual).
X Engage reverse gear.
The rear view camera flap opens. The multi-
media system shows the area behind the vehi-
cle with guide lines.
The image from the rear view camera is avail- able throughout the maneuvering process. X
To switch the function mode for vehicles
with trailer tow hitch: using the controller,
select symbol 0043for the "Reverse parking"
function or symbol 0044for "Coupling up a
trailer".
The symbol of the selected function is high-
lighted.
To deactivate: shift the transmission to posi-
tion 005Dor drive forwards.
Displays in the multimedia system The rear view camera may show a distorted view
of obstacles, show them incorrectly or not at all.
The rear view camera does not show objects in
the following positions:
R very close to the rear bumper
R under the rear bumper
R in the area immediately above the tailgate
handle
! Objects not at ground level may appear to
be further away than they actually are, e.g.:
R the bumper of a parked vehicle
R the drawbar of a trailer
R the ball coupling of a trailer tow hitch
R the rear section of an HGV
R a slanted post
Use the guidelines only for orientation.
Approach objects no further than the bottom-
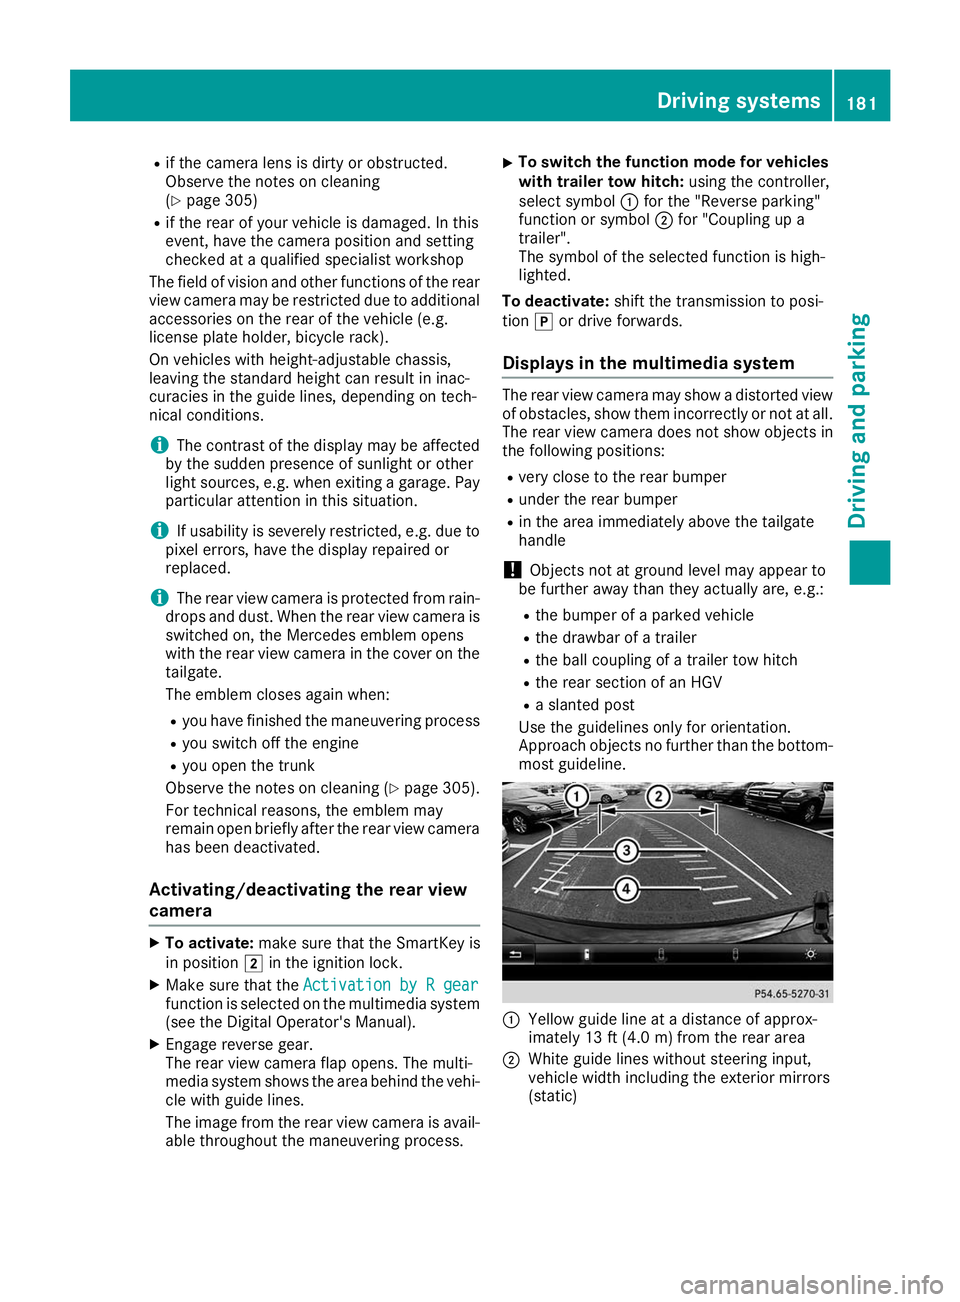
most guideline. 0043
Yellow guide line at a distance of approx-
imately 13 ft (4.0 m) from the rear area
0044 White guide lines without steering input,
vehicle width including the exterior mirrors
(static) Driving systems
181Driving and parking Z
Page 184 of 370
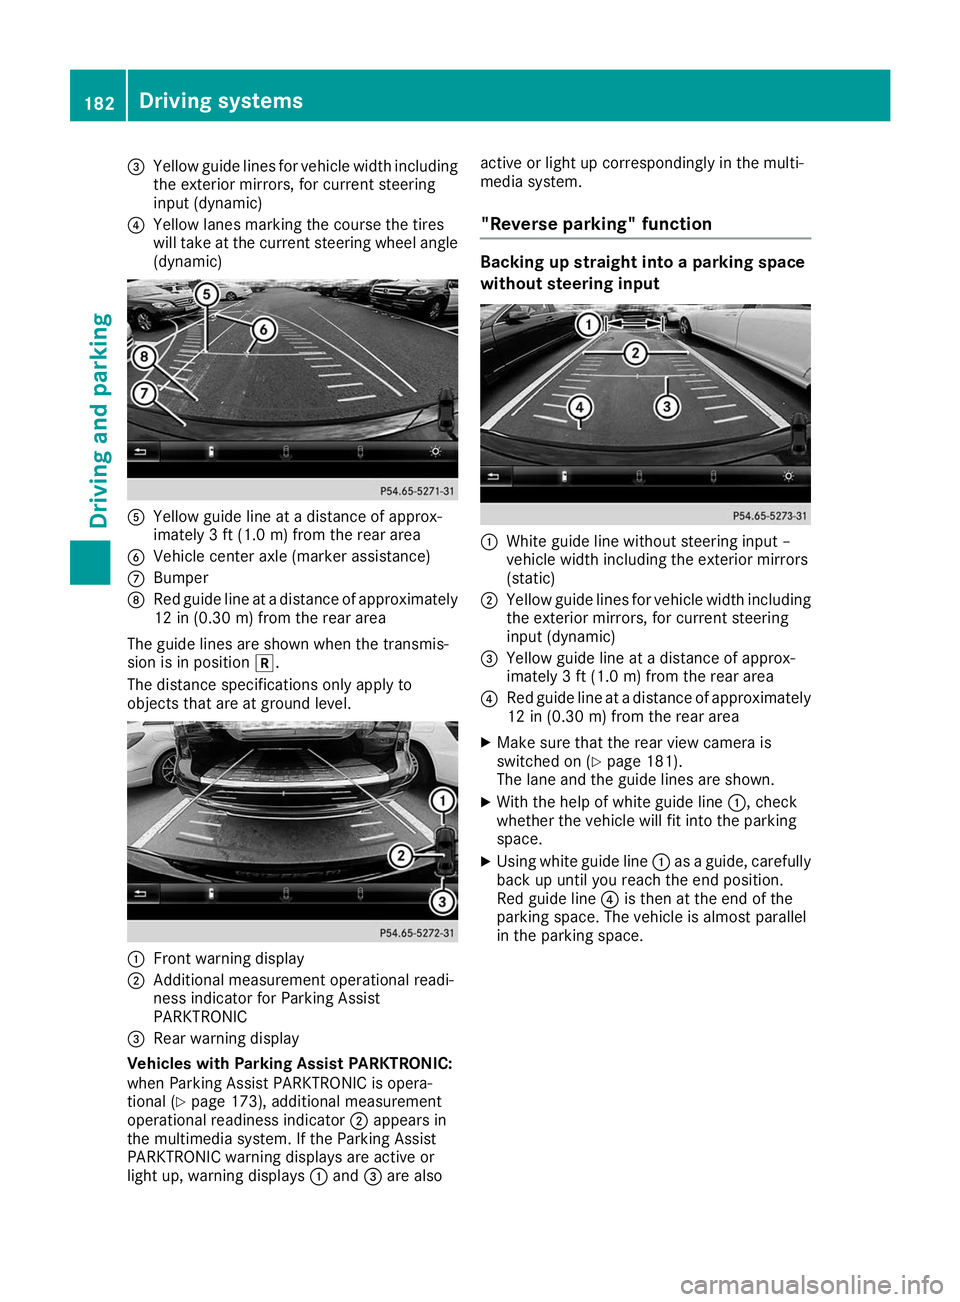
0087
Yellow guide lines for vehicle width including
the exterior mirrors, for current steering
input (dynamic)
0085 Yellow lanes marking the course the tires
will take at the current steering wheel angle (dynamic) 0083
Yellow guide line at a distance of approx-
imately 3 ft (1.0 m) from the rear area
0084 Vehicle center axle (marker assistance)
006B Bumper
006C Red guide line at a distance of approximately
12 in (0.30 m) from the rear area
The guide lines are shown when the transmis-
sion is in position 005E.
The distance specifications only apply to
objects that are at ground level. 0043
Front warning display
0044 Additional measurement operational readi-
ness indicator for Parking Assist
PARKTRONIC
0087 Rear warning display
Vehicles with Parking Assist PARKTRONIC:
when Parking Assist PARKTRONIC is opera-
tional (Y page 173), additional measurement
operational readiness indicator 0044appears in
the multimedia system. If the Parking Assist
PARKTRONIC warning displays are active or
light up, warning displays 0043and 0087are also active or light up correspondingly in the multi-
media system.
"Reverse parking" function Backing up straight into a parking space
without steering input 0043
White guide line without steering input –
vehicle width including the exterior mirrors
(static)
0044 Yellow guide lines for vehicle width including
the exterior mirrors, for current steering
input (dynamic)
0087 Yellow guide line at a distance of approx-
imately 3 ft (1.0 m) from the rear area
0085 Red guide line at a distance of approximately
12 in (0.30 m) from the rear area
X Make sure that the rear view camera is
switched on (Y page 181).
The lane and the guide lines are shown.
X With the help of white guide line 0043, check
whether the vehicle will fit into the parking
space.
X Using white guide line 0043as a guide, carefully
back up until you reach the end position.
Red guide line 0085is then at the end of the
parking space. The vehicle is almost parallel
in the parking space. 182
Driving systemsDriving and parking
Page 185 of 370
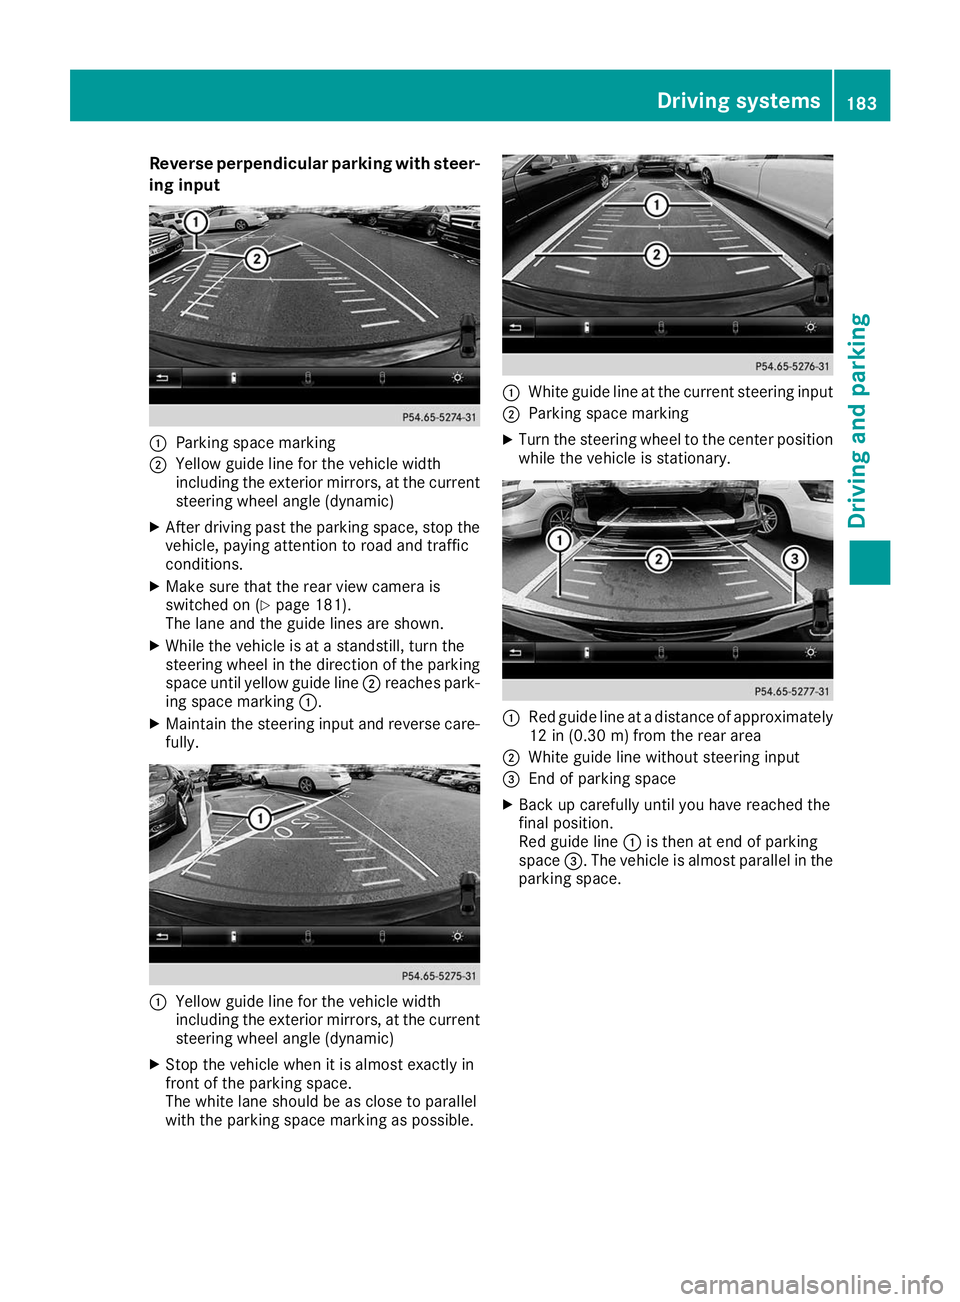
Reverse perpendicular parking with steer-
ing input 0043
Parking space marking
0044 Yellow guide line for the vehicle width
including the exterior mirrors, at the current
steering wheel angle (dynamic)
X After driving past the parking space, stop the
vehicle, paying attention to road and traffic
conditions.
X Make sure that the rear view camera is
switched on (Y page 181).
The lane and the guide lines are shown.
X While the vehicle is at a standstill, turn the
steering wheel in the direction of the parking space until yellow guide line 0044reaches park-
ing space marking 0043.
X Maintain the steering input and reverse care-
fully. 0043
Yellow guide line for the vehicle width
including the exterior mirrors, at the current
steering wheel angle (dynamic)
X Stop the vehicle when it is almost exactly in
front of the parking space.
The white lane should be as close to parallel
with the parking space marking as possible. 0043
White guide line at the current steering input
0044 Parking space marking
X Turn the steering wheel to the center position
while the vehicle is stationary. 0043
Red guide line at a distance of approximately
12 in (0.30 m) fromthe rear area
0044 White guide line without steering input
0087 End of parking space
X Back up carefully until you have reached the
final position.
Red guide line 0043is then at end of parking
space 0087. The vehicle is almost parallel in the
parking space. Driving systems
183Driving and parking Z
Page 189 of 370
!
Objects not at ground level may appear to
be further away than they actually are, e.g.:
R the bumper of a parked vehicle
R the drawbar of a trailer
R the ball coupling of a trailer tow hitch
R the rear section of an HGV
R a slanted post
Use the guidelines only for orientation.
Approach objects no further than the bottom- most guideline.
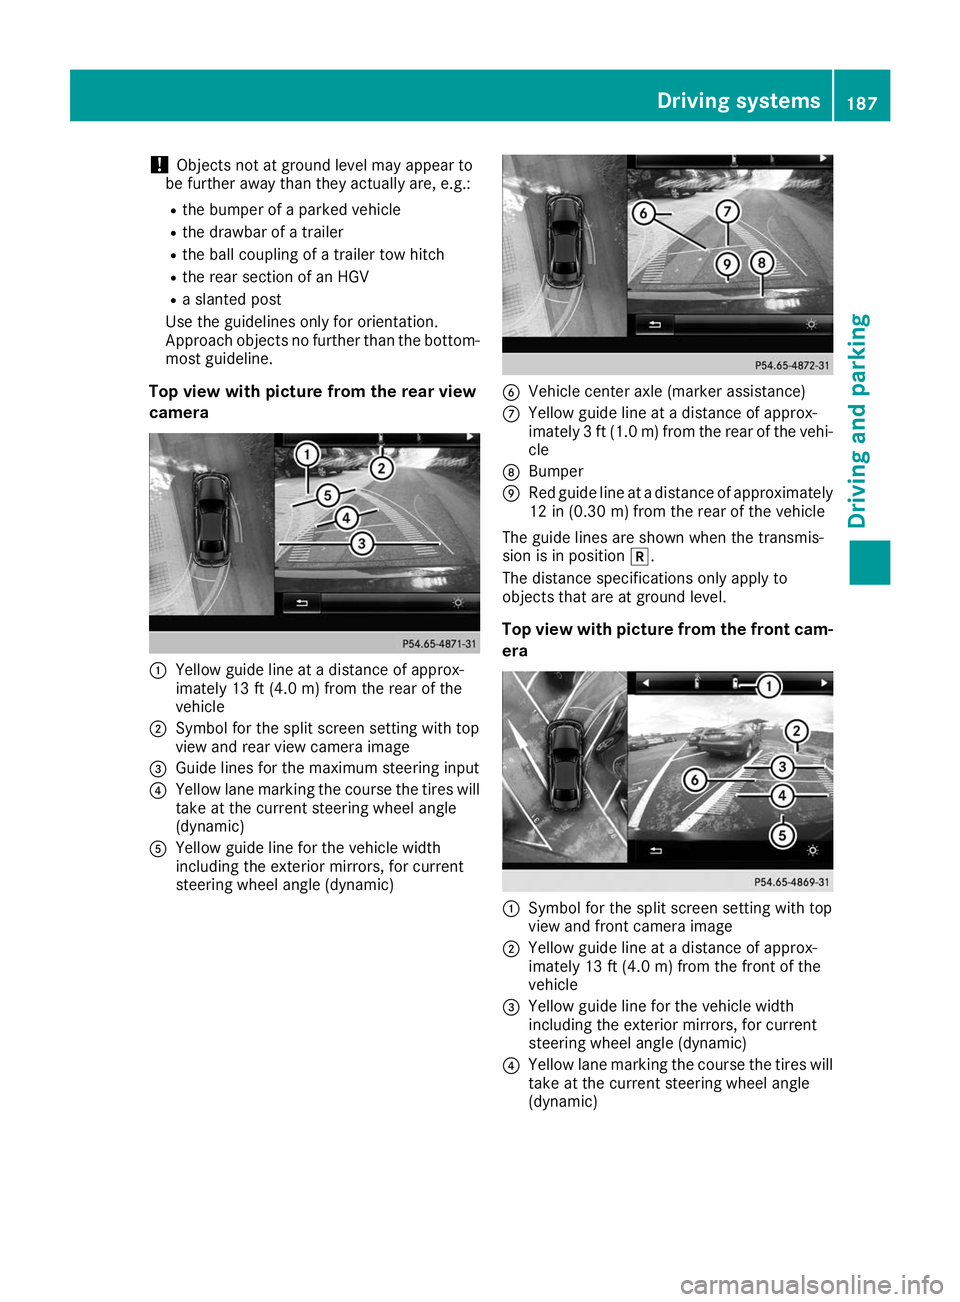
Top view with picture from the rear view
camera 0043
Yellow guide line at a distance of approx-
imately 13 ft (4.0 m) from the rear of the
vehicle
0044 Symbol for the split screen setting with top
view and rear view camera image
0087 Guide lines for the maximum steering input
0085 Yellow lane marking the course the tires will
take at the current steering wheel angle
(dynamic)
0083 Yellow guide line for the vehicle width
including the exterior mirrors, for current
steering wheel angle (dynamic) 0084
Vehicle center axle (marker assistance)
006B Yellow guide line at a distance of approx-
imately 3 ft (1.0 m) from the rear of the vehi-
cle
006C Bumper
006D Red guide line at a distance of approximately
12 in (0.30 m) from the rear of the vehicle
The guide lines are shown when the transmis-
sion is in position 005E.
The distance specifications only apply to
objects that are at ground level.
Top view with picture from the front cam-
era 0043
Symbol for the split screen setting with top
view and front camera image
0044 Yellow guide line at a distance of approx-
imately 13 ft (4.0 m) from the front of the
vehicle
0087 Yellow guide line for the vehicle width
including the exterior mirrors, for current
steering wheel angle (dynamic)
0085 Yellow lane marking the course the tires will
take at the current steering wheel angle
(dynamic) Driving systems
187Driving and parking Z
Page 190 of 370
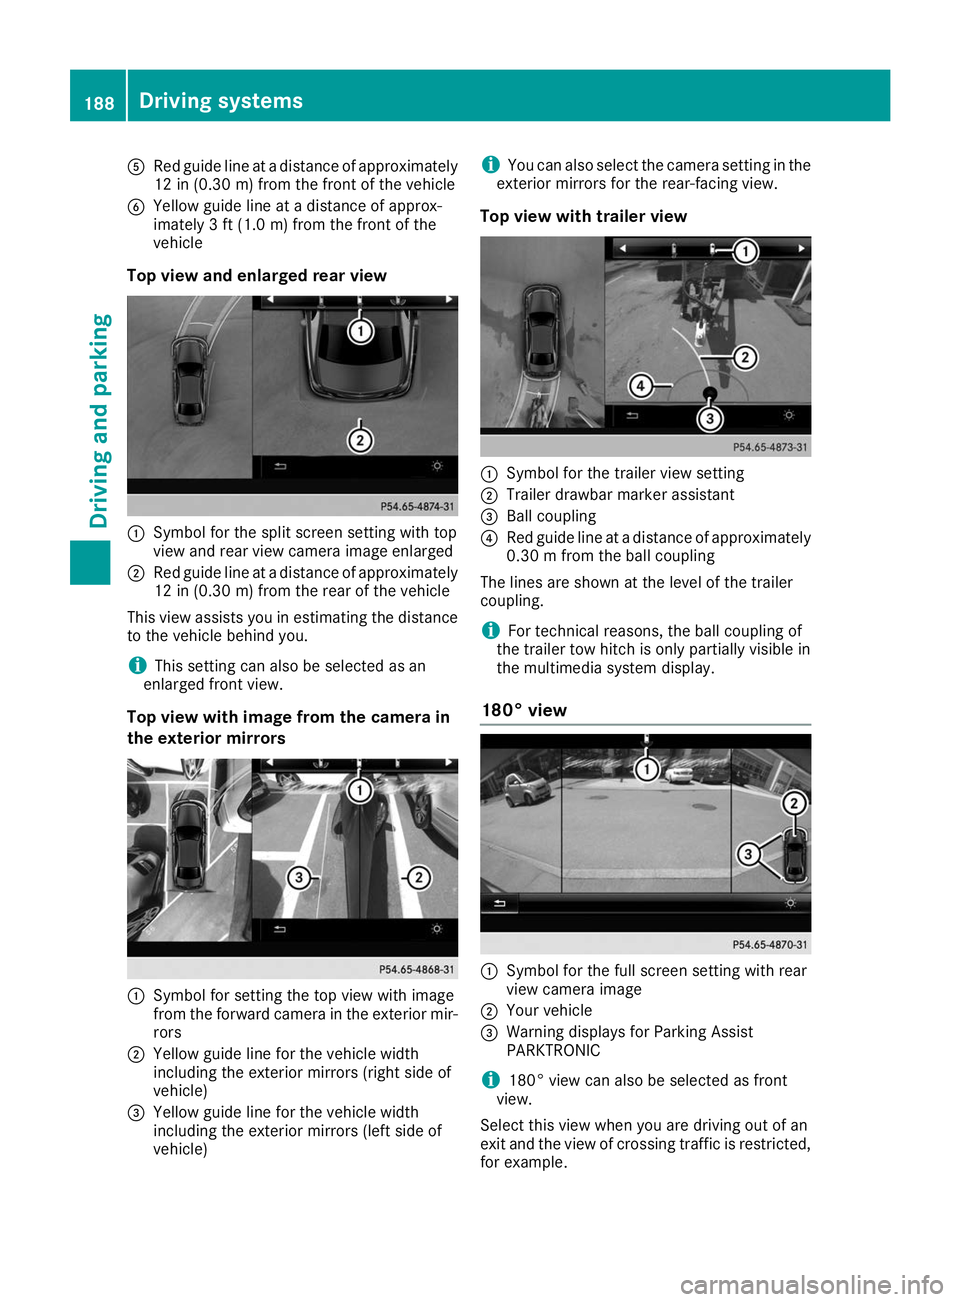
0083
Red guide line at a distance of approximately
12 in (0.30 m) from the front of the vehicle
0084 Yellow guide line at a distance of approx-
imately 3 ft (1.0 m) fromthe front of the
vehicle
Top view and enlarged rear view 0043
Symbol for the split screen setting with top
view and rear view camera image enlarged
0044 Red guide line at a distance of approximately
12 in (0.30 m)from the rear of the vehicle
This view assists you in estimating the distance to the vehicle behind you.
i This setting can also be selected as an
enlarged front view.
Top view with image from the camera in
the exterior mirrors 0043
Symbol for setting the top view with image
from the forward camera in the exterior mir-
rors
0044 Yellow guide line for the vehicle width
including the exterior mirrors (right side of
vehicle)
0087 Yellow guide line for the vehicle width
including the exterior mirrors (left side of
vehicle) i
You can also select the camera setting in the
exterior mirrors for the rear-facing view.
Top view with trailer view 0043
Symbol for the trailer view setting
0044 Trailer drawbar marker assistant
0087 Ball coupling
0085 Red guide line at a distance of approximately
0.30 m from the ball coupling
The lines are shown at the level of the trailer
coupling.
i For technical reasons, the ball coupling of
the trailer tow hitch is only partially visible in
the multimedia system display.
180° view 0043
Symbol for the full screen setting with rear
view camera image
0044 Your vehicle
0087 Warning displays for Parking Assist
PARKTRONIC
i 180° view can also be selected as front
view.
Select this view when you are driving out of an
exit and the view of crossing traffic is restricted,
for example. 188
Driving systemsDriving and parking
Page 205 of 370
X
Establish the electrical connection between
the vehicle and the trailer.
X Check that the trailer lighting system is work-
ing.
X Push the combination switch upwards/down-
wards and check whether the corresponding
turn signal on the trailer flashes.
A trailer that is connected is recognized only
when the electrical connection is established
correctly and when the lighting system is work-
ing properly. The function of other systems also depends on this, for example:
R ESP ®
R Parking Assist PARKTRONIC
R Active Parking Assist
R Parking Package with rear view camera
R Active Blind Spot Assist
R Active Lane Keeping Assist
i Vehicles with the AIRMATIC Package: if you
couple up a trailer, the vehicle always remains
at normal level. When coupling up a trailer,
please observe the following:
R If the normal level has not been set man-
ually, the vehicle is automatically lowered
to normal level. This is the case if a speed of
5 mph (8 km/h) is reached.
R The Sport drive program is not available.
These restrictions apply to all accessories
powered through a connection to the trailer
power socket of your vehicle, e.g. a bicycle
carrier.
Observe the maximum permissible trailer
dimensions (width and length).
Most U.S. states and all Canadian provinces
require by law: R Safety chains between the towing vehicle and
the trailer. The chains should be cross-woundunder the trailer drawbar. They must be fas-
tened to the vehicle's trailer coupling, not to
the bumper or the axle.
Leave enough play in the chains to make tight
cornering possible.
R A separate brake system for certain types of
trailer.
R Safety switch for braked trailers. Check the
specific legal requirements applicable to your
state.
If the trailer becomes detached from the tow-
ing vehicle, the safety feature triggers the
trailer brakes. Towing a trailer
There are numerous legal requirements con-
cerning the towing of a trailer, e.g. speed restric- tions. Make sure that your car/trailer combina-
tion complies with the local regulations:
R in your place of residence
R in the location to which you are driving
The police and local authorities can provide reli- able information.
Observe the following when towing a trailer:
R To gain driving experience and to become
accustomed to the new handling characteris-
tics, you should practice the following in a
traffic-free location:
- cornering
- stopping
- backing up
R Before driving, check:
- trailer tow hitch
- safety switch for braked trailers
- safety chains
- electrical connections
- lights
- wheels
R Adjust the exterior mirrors to provide an
unobstructed view of the rear section of the
trailer.
R If the trailer has electronically controlled
brakes, pull away carefully. Brake manually
using the brake controller and check whether
the brakes function correctly.
R Secure any objects on the trailer to prevent
the cargo from slipping when the vehicle is in
motion.
R When you couple up a trailer, check at regular
intervals that the load is firmly secured. If the trailer is equipped with trailer lights and
brakes, check the trailer to ensure that these
are working.
R Bear in mind that the handling will be less
stable when towing a trailer than when driving
without one. Avoid sudden steering move-
ments.
R The vehicle/trailer combination is heavier,
accelerates more slowly, has a decreased
gradient climbing capability and a longer
braking distance.
It is more susceptible to side winds and
requires more careful steering. Towing a trailer
203Driving and parking Z
Page 303 of 370
Driving abroad
An extensive Mercedes-Benz Service network is
also available in other countries. You can obtain further information from any authorized
Mercedes-Benz Center. Care
General notes
H
Environmental note
Dispose of empty packaging and cleaning
cloths in an environmentally responsible man- ner.
! When cleaning your car, do not use:
R dry, coarse or hard cloths
R abrasive cleaning agents
R solvents
R cleaning agents containing solvents
Do not scrub.
Do not touch the surfaces and films with hard
objects, e.g. rings or ice scrapers. Otherwise,
you may scratch or damage the surfaces and films.
! Do not park your vehicle for a long period of
time directly after cleaning, particularly after
cleaning the wheel rim with wheel cleaner.
Wheel cleaner can lead to the increased cor-
rosion of the brake discs and pads. Therefore,
drive for a few minutes after cleaning. By
heating up the brakes, the brake discs and
pads dry. The vehicle can then be parked for a long period of time.
Regular care of your vehicle is a condition for
retaining the quality in the long term.
Use care products and cleaning agents recom-
mended and approved by Mercedes-Benz. Washing the vehicle and cleaning the
paintwork
Automatic car wash G
WARNING
Braking efficiency is reduced after washing
the vehicle. There is a risk of an accident. After the vehicle has been washed, brake
carefully while paying attention to the traffic
conditions until full braking power is restored.
! Before driving into an automatic car wash,
make sure that it is suitable for the dimen-
sions of the vehicle. In particular, make sure
that:
R there is enough ground clearance between
the vehicle underbody and the guide rails of the automatic car wash.
R the clearance width of the automatic car
wash, in particular the width of the guide
rails, is adequate (for further information on
the width of the tire wall on the rear wheel,
see "Technical data")
R you enter the automatic car wash straight
and in the center of the guide rails in order
to avoid damaging the tires or wheel rims.
Fold in the exterior mirrors before the vehicle is washed. The exterior mirrors could other-
wise be damaged.
! When Active Distance Assist DISTRONIC or
the HOLD function is activated, the vehicle
brakes automatically in certain situations.
To avoid damage to the vehicle, deactivate
Active Distance Assist DISTRONIC and the
HOLD function in the following or similar sit-
uations:
R when towing the vehicle
R in the car wash
! Never clean your vehicle in a Touchless
Automatic Car Wash as these use special
cleaning agents. These cleaning agents can
damage the paintwork or plastic parts.
! Make sure that:
R the side windows and the sliding sunroof
are fully closed.
R that the blower of the ventilation/heating
system is switched off (OFF button has
been pressed).
R the windshield wiper switch is at position
005A.
The vehicle may otherwise be damaged.
! In car washes with a towing mechanism,
make sure that the automatic transmission is
in transmission position 005C; otherwise, the
vehicle could be damaged.
R Vehicles with a SmartKey: Care
301Maintenance and care Z