2019 MERCEDES-BENZ GLE COUPE height adjustment
[x] Cancel search: height adjustmentPage 20 of 370

SD memory card
see also Digital Operator's Man-
ual .................................................. 264
Selecting ........................................2 14
Search & Send
see also Digital Operator's Man-
ual ................................................. .264
Seat
Correct driver's seat position ........... 94
Seat belts
Adjusting the driver's and front-
passenger seat bel t......................... 46
Adjusting the height ......................... 46
Cleaning ......................................... 308
Correct usage .................................. 45
Fastening ......................................... 46
Important safety guidelines ............. 44
Introduction ..................................... 43
Releasing ......................................... 46
Switching belt adjustment on/off
(on-board computer) ...................... 219
Warning lamp ................................. 251
Warning lamp (function) ................... 46
Seats
Adjusting (electrically) ..................... 95
Adjusting the 4-way lumbar sup-
port .................................................. 98
Adjusting the head restraint ............ 96
Calling up a stored setting (mem-
ory function) .................................. 105
Cleaning the cover ......................... 307
Folding the rear bench seat for-
wards/back ................................... 275
Important safety notes .................... 94
Overview .......................................... 94
Seat heating problem ...................... 99
Seat ventilation problem .................. 99
Storing settings (memory func-
tion) ............................................... 105
Switching seat heating on/of f......... 98
Switching seat ventilation on/of f.... 99
Section
Sliding sunroof ................................. 89
Selector lever
Cleaning ......................................... 307
Sensors (cleaning instructions) ....... 305
Service menu (on-board com-
puter) .................................................. 217 Service message
see ASSYST PLUS
Service products
Brake fluid ..................................... 362
Coolant (engine) ............................ 362
Engine oil ....................................... 361
Fuel ................................................ 360
Important safety notes .................. 359
Refrigerant (air-conditioning sys-
tem) ............................................... 363
Washer fluid ................................... 363
Setting the air distribution ............... 121
Setting the airflow ............................ 121
Setting the date/time format
see also Digital Operator's Man-
ual .................................................. 264
Setting the language
see also Digital Operator's Man-
ual .................................................. 264
Setting the time
see also Digital Operator's Man-
ual .................................................. 264
Settings
Factory (on-board computer) ......... 220
On-board computer ....................... 217
SETUP (on-board computer,
Mercedes-AMG vehicles) .................. 220
Side impact air bag ............................. 49
Side marker lamp (display mes-
sage) ................................................... 235
Side windows
Cleaning ......................................... 304
Convenience closing feature ............ 87
Convenience opening feature .......... 87
Important safety information ........... 86
Opening/closing .............................. 86
Overview .......................................... 86
Problem (malfunction) ..................... 88
Resetting ......................................... 88
Reversing feature ............................. 86
SIRIUS services
see also Digital Operator's Man-
ual .................................................. 264
Sliding sunroof
see Panorama roof with power
tilt/sliding panel 18
Index
Page 97 of 370

G
WARNING
You could lose control of your vehicle if you do the following while driving:
R adjust the driver's seat, head restraint,
steering wheel or mirrors
R fasten the seat belt
There is a risk of an accident.
Adjust the driver's seat, head restraint, steer-
ing wheel and mirror and fasten your seat belt before starting the engine. G
WARNING
If you adjust the seat height carelessly, you or other vehicle occupants could be trapped andthereby injured. Children in particular could
accidentally press the electrical seat adjust-
ment buttons and become trapped. There is a
risk of injury.
While moving the seats, make sure that your
hands or other body parts do not get under the
lever assembly of the seat adjustment sys-
tem. G
WARNING
If the head restraints are not installed or not
adjusted correctly, they cannot provide pro-
tection as intended. There is an increased risk
of injury in the head and neck area, e.g. in the event of an accident or when braking.
Always drive with the head restraints instal-
led. Before driving off, make sure for every
vehicle occupant that the center of the head
restraint supports the back of the head at
about eye level. G
WARNING
The seat belt does not offer the intended level of protection if you have not moved the back-
rest to an almost vertical position. When brak-
ing or in the event of an accident, you could
slide underneath the seat belt and sustain
abdomen or neck injuries, for example. This
poses an increased risk of injury or even fatal injury. Adjust the seat properly before beginning
your journey. Always ensure that the backrest
is in an almost vertical position and that the
shoulder section of your seat belt is routed
across the center of your shoulder.
! To prevent damage to the seats and the seat
heating, observe the following notes:
R Do not spill liquids onto the seats. Dry the
seats as soon as possible if liquid does get
spilled on the seats.
R If the seat covers are damp or wet, do not
switch on the seat heating. Also, do not use
the seat heating to dry the seats.
R Clean the seat covers as recommended;
see keyword "Care".
R Do not transport heavy loads on the seats.
Do not place pointed objects on the seat
cushions such as knives, nails or tools.
Where possible, use the seats only for car-
rying passengers.
R When operating the seat heating, do not
cover the seats with insulating materials,
e.g. blankets, coats, bags, protective cov-
ers, child seats or booster seats.
! Make sure that there are no objects in the
footwell under or behind the seats when mov-
ing the seats back. There is a risk that the
seats and/or the objects could be damaged.
i Further related subjects:
R Cargo compartment enlargement (folding
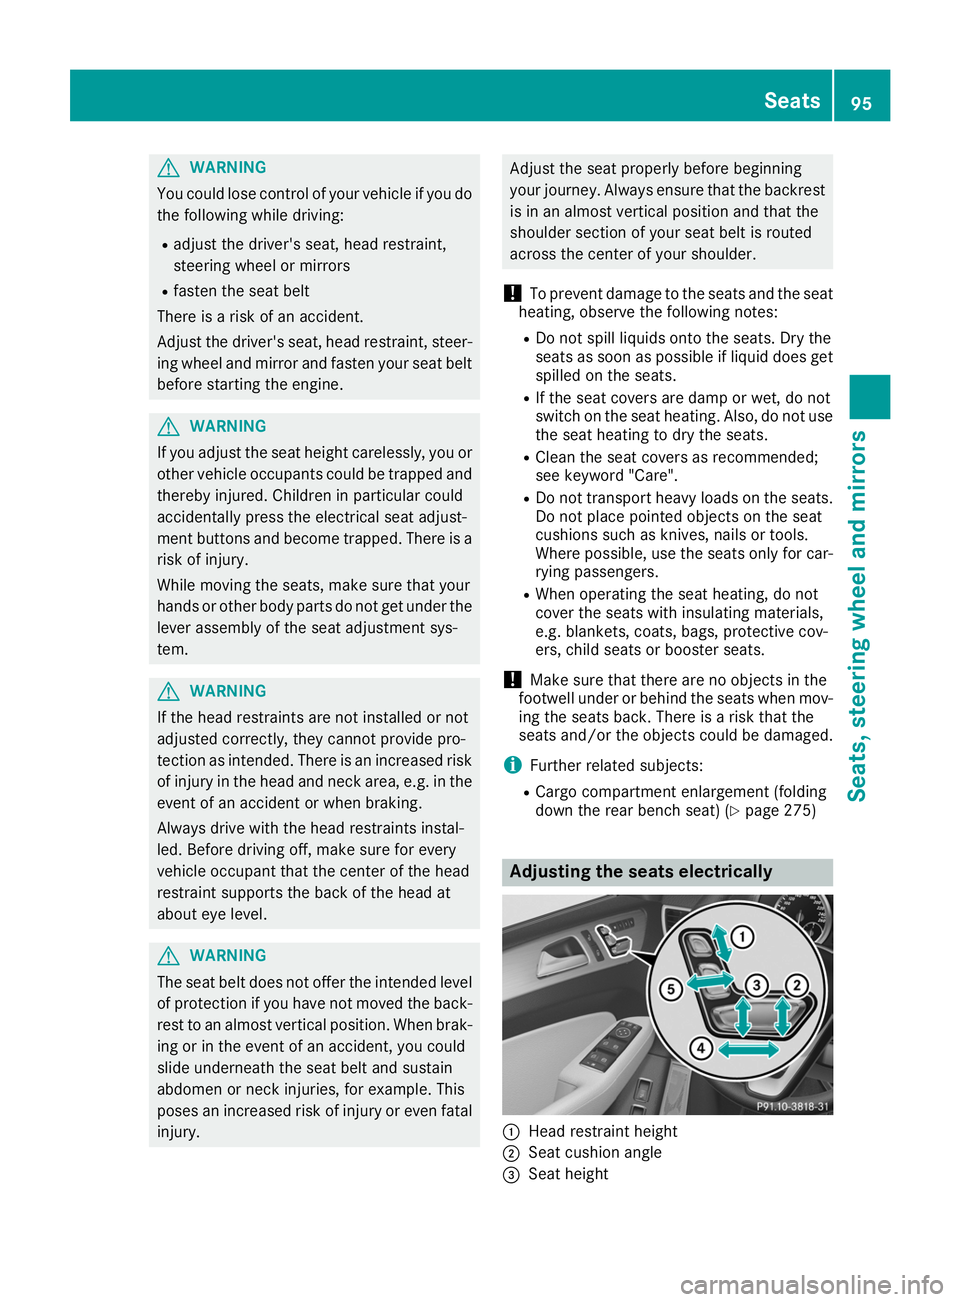
down the rear bench seat) (Y page 275) Adjusting the seats electrically
0043
Head restraint height
0044 Seat cushion angle
0087 Seat height Seats
95Seats, steering wheel and mirrors Z
Page 98 of 370

0085
Seat fore-and-aft adjustment
0083 Backrest angle
i Vehicles with memory function: if PRE-
SAFE ®
has been triggered, the front-
passenger seat will be moved to a better posi- tion if it was previously in an unfavorable posi-
tion.
i Vehicles with memory function: when the
seat is moved forwards or backwards, the
headrest is moved up or down automatically. Adjusting the head restraints
Important safety notes G
WARNING
You could lose control of your vehicle if you do the following while driving:
R adjust the driver's seat, head restraint,
steering wheel or mirrors
R fasten the seat belt
There is a risk of an accident.
Adjust the driver's seat, head restraint, steer-
ing wheel and mirror and fasten your seat belt before starting the engine. G
WARNING
If the head restraints are not installed or not
adjusted correctly, they cannot provide pro-
tection as intended. There is an increased risk
of injury in the head and neck area, e.g. in the event of an accident or when braking.
Always drive with the head restraints instal-
led. Before driving off, make sure for every
vehicle occupant that the center of the head
restraint supports the back of the head at
about eye level.
Do not swap the head restraints of the front and
rear seats. Otherwise, you cannot adjust the
height and angle of the head restraints to the
correct position.
Using the fore-and-aft adjustment, adjust the
head restraint so that it is as close as possible to your head.
Observe the important safety notes regarding
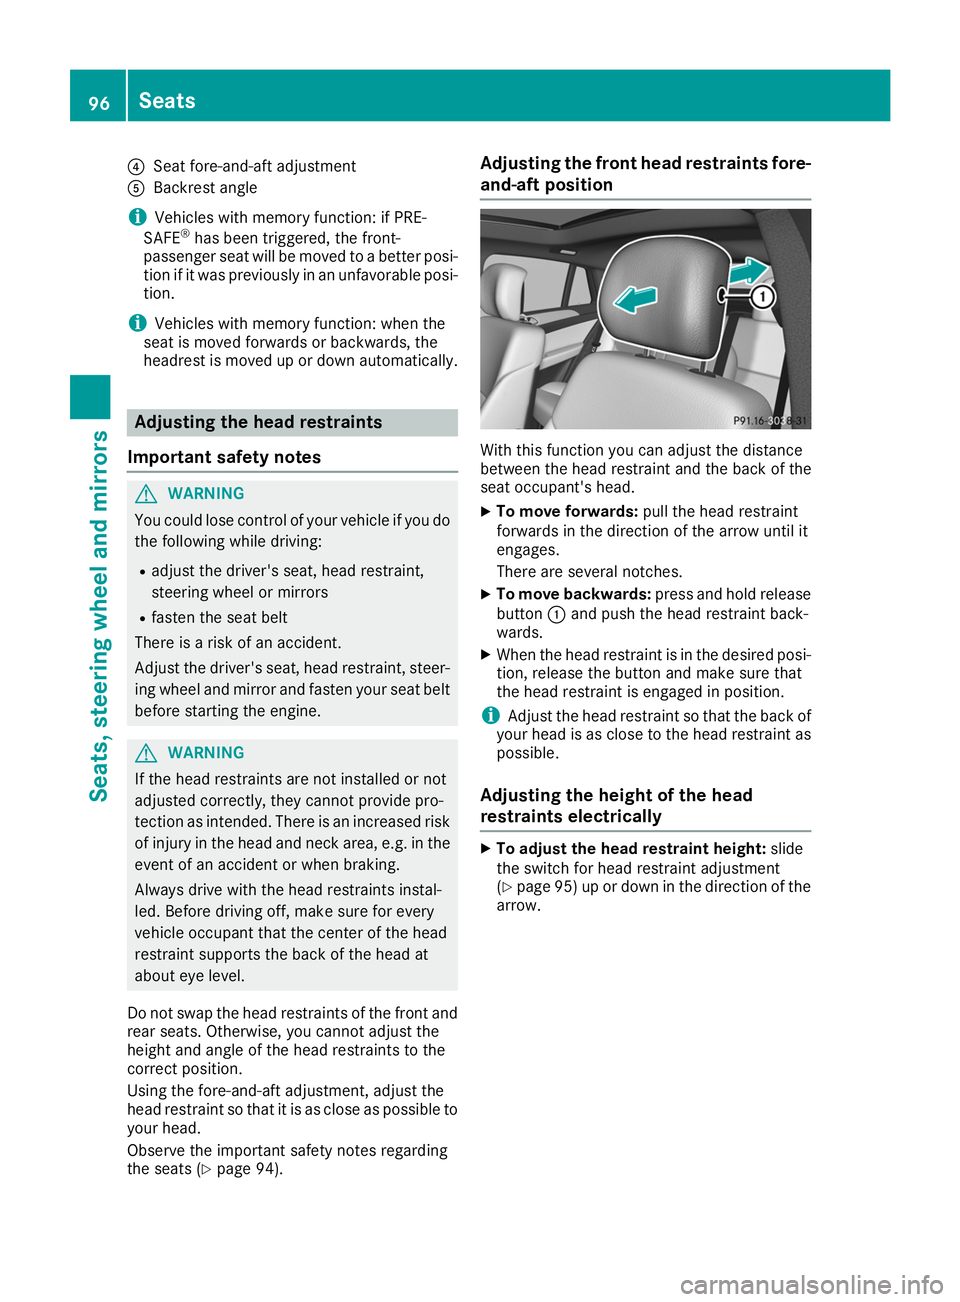
the seats (Y page 94). Adjusting the front head restraints fore-
and-aft position With this function you can adjust the distance
between the head restraint and the back of the
seat occupant's head.
X To move forwards: pull the head restraint
forwards in the direction of the arrow until it
engages.
There are several notches.
X To move backwards: press and hold release
button 0043and push the head restraint back-
wards.
X When the head restraint is in the desired posi-
tion, release the button and make sure that
the head restraint is engaged in position.
i Adjust the head restraint so that the back of
your head is as close to the head restraint as possible.
Adjusting the height of the head
restraints electrically X
To adjust the head restraint height: slide
the switch for head restraint adjustment
(Y page 95) up or down in the direction of the
arrow. 96
SeatsSeats, steering wheel and mirrors
Page 102 of 370

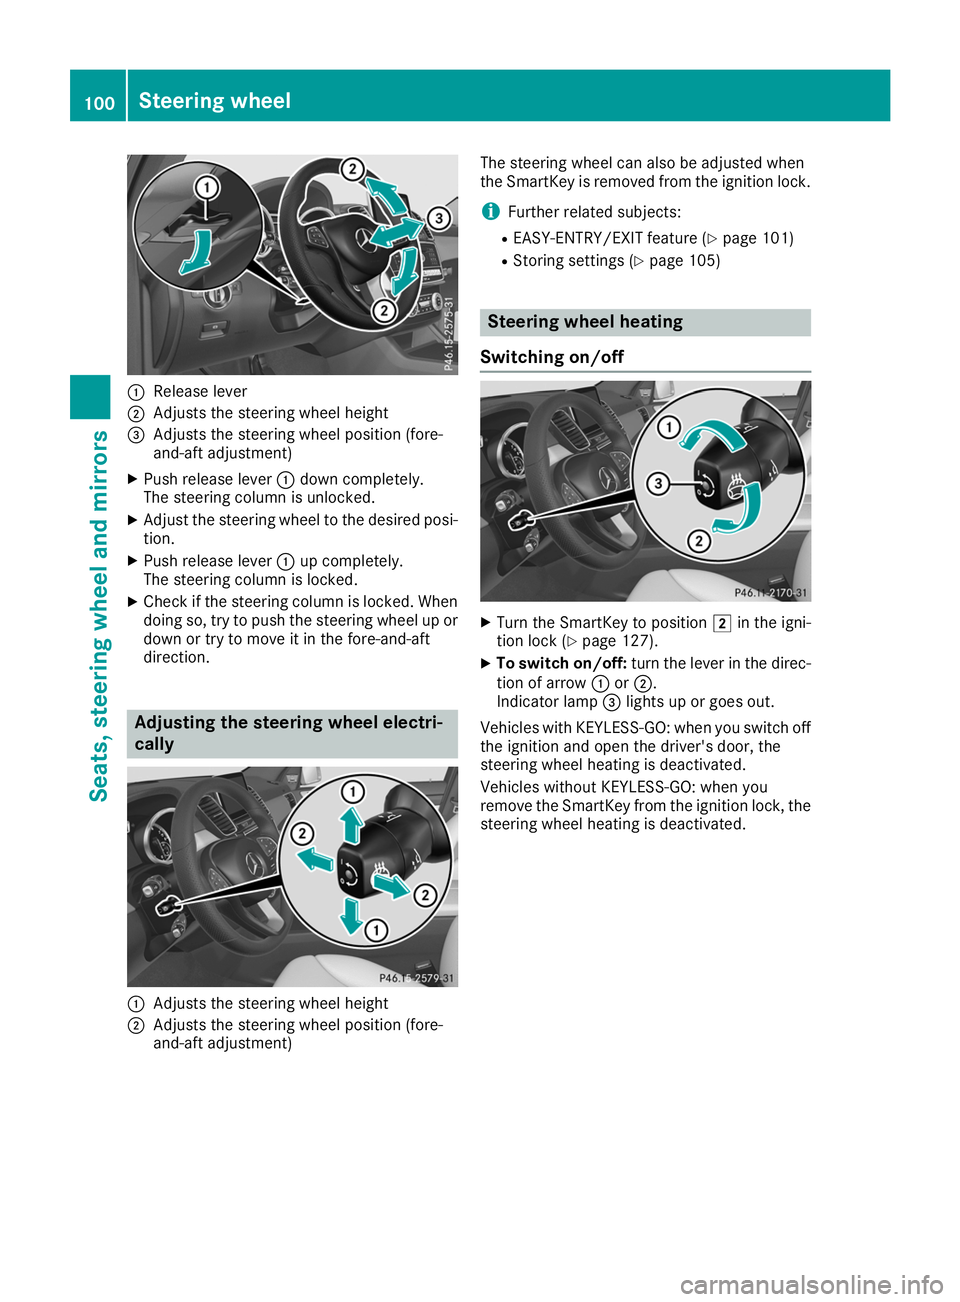
0043
Release lever
0044 Adjusts the steering wheel height
0087 Adjusts the steering wheel position (fore-
and-aft adjustment)
X Push release lever 0043down completely.
The steering column is unlocked.
X Adjust the steering wheel to the desired posi-
tion.
X Push release lever 0043up completely.
The steering column is locked.
X Check if the steering column is locked. When
doing so, try to push the steering wheel up or down or try to move it in the fore-and-aft
direction. Adjusting the steering wheel electri-
cally 0043
Adjusts the steering wheel height
0044 Adjusts the steering wheel position (fore-
and-aft adjustment) The steering wheel can also be adjusted when
the SmartKey is removed from the ignition lock.
i Further related subjects:
R EASY-ENTRY/EXIT feature (Y page 101)
R Storing settings (Y page 105) Steering wheel heating
Switching on/off X
Turn the SmartKey to position 0048in the igni-
tion lock (Y page 127).
X To switch on/off: turn the lever in the direc-
tion of arrow 0043or0044.
Indicator lamp 0087lights up or goes out.
Vehicles with KEYLESS-GO: when you switch off the ignition and open the driver's door, the
steering wheel heating is deactivated.
Vehicles without KEYLESS-GO: when you
remove the SmartKey from the ignition lock, the
steering wheel heating is deactivated. 100
Steering wheelSeats
, steering wheel and mirrors
Page 174 of 370

R
Mercedes-AMG vehicles: you drive at
speeds between 40 mph (64 km/h) and
43 mph (70 km/h) for approximately 20 sec- onds.
R You drive with a trailer at speeds greater than
19 mph (30 km/h).
The raised vehicle level remains saved when you are not driving within these speed ranges.
Setting the normal vehicle level
! Make sure that there is enough ground
clearance when the vehicle is being lowered.
It could otherwise hit the ground, damaging
the underbody.
X Start the engine.
If indicator lamp 0044is lit:
X Press button 0043.
Indicator lamp 0044flashes while the vehicle is
being lowered, and goes out as soon as the
desired vehicle level is reached.
Vehicles with no trailer coupled: the vehi-
cle is adjusted to the height of the selected
drive program (Y page 134).
Vehicles with a trailer coupled: the vehicle
is adjusted to normal level regardless of the
drive program selected (Y page 134). The
vehicle remains at the normal level, even if the
drive program is changed.
During the adjustment, the Lowering
Lowering mes-
sage appears in the multifunction display.
If you press the 0038or0076 button on the
multifunction steering wheel, the message will
disappear. AMG adaptive sport suspension sys-
tem
General notes The electronically controlled damping system
works continuously. This improves driving
safety and ride comfort.
The damping is tuned individually to each wheel
and depends on:
R your driving style, e.g. sporty
R the road surface condition, e.g. bumps
R your individual selection of Sport, Sport+ or
Comfort The suspension setting can be adjusted using
the appropriate button on the center console or
the DYNAMIC SELECT controller (Y page 134).
Each time you restart the engine with the Smart- Key or the Start/Stop button, Comfort mode is
activated. For further information about starting
the engine, see (Y page 128).
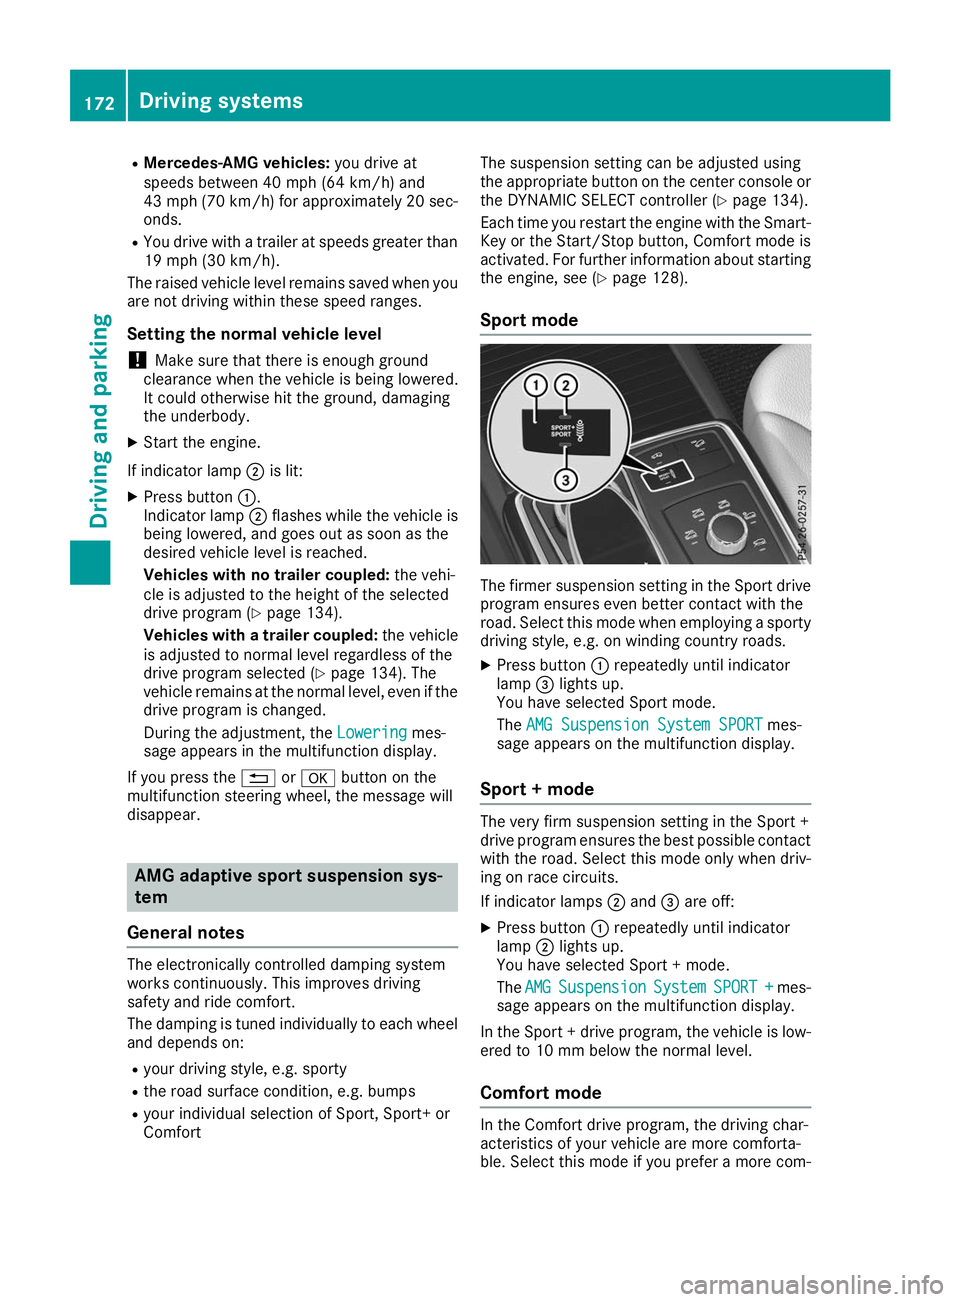
Sport mode The firmer suspension setting in the Sport drive
program ensures even better contact with the
road. Select this mode when employing a sporty driving style, e.g. on winding country roads.
X Press button 0043repeatedly until indicator
lamp 0087lights up.
You have selected Sport mode.
The AMG Suspension System SPORT AMG Suspension System SPORT mes-
sage appears on the multifunction display.
Sport + mode The very firm suspension setting in the Sport +
drive program ensures the best possible contact
with the road. Select this mode only when driv-
ing on race circuits.
If indicator lamps 0044and 0087are off:
X Press button 0043repeatedly until indicator
lamp 0044lights up.
You have selected Sport + mode.
The AMG AMG Suspension
Suspension System
SystemSPORT +
SPORT + mes-
sage appears on the multifunction display.
In the Sport + drive program, the vehicle is low-
ered to 10 mm below the normal level.
Comfort mode In the Comfort drive program, the driving char-
acteristics of your vehicle are more comforta-
ble. Select this mode if you prefer a more com-172
Driving systemsDriving and parking