2019 MERCEDES-BENZ GLE COUPE window
[x] Cancel search: windowPage 125 of 370
Activating/deactivating
X
Turn the SmartKey to position 0048in the igni-
tion lock (Y page 127).
X Press the 006Cbutton.
The indicator lamp in the 006Cbutton lights
up or goes out.
Problems with the rear window defroster Problem
Possible causes/consequences and
0050
0050Solutions The rear window
defroster has deactiva-
ted prematurely or can-
not be activated. The battery has not been sufficiently charged.
X Switch off any consumers that are not required, e.g. reading lamps,
interior lighting or the seat heating.
When the battery is sufficiently charged, the rear window defroster can be activated again. Switching air-recirculation mode
on/off
General notes You can deactivate the flow of fresh air if
unpleasant odors are entering the vehicle from
outside. The air already inside the vehicle will
then be recirculated.
If you switch on air-recirculation mode, the win-
dows can fog up more quickly, in particular at
low temperatures. Only use air-recirculation
mode briefly to prevent the windows from fog-
ging up.
Activating/deactivating X
Turn the SmartKey to position 0048in the igni-
tion lock (Y page 127).
X To activate: press the0089button.
The indicator lamp in the 0089button lights
up.
i In the event of high pollution levels (3-zone
automatic climate control only) or at high out-
side temperatures, air-recirculation mode is
automatically activated. When air-recircula-
tion mode is activated automatically, the indi-
cator lamp in the 0089button is not lit.
Outside air is added after about 30 minutes.
X To deactivate: press the0089button.
The indicator lamp in the 0089button goes
out. i
Air-recirculation mode deactivates auto-
matically:
R after approximately five minutes at outside
temperatures below approximately 41 ‡
(5 †)
R after approximately five minutes if cooling
with air dehumidification is deactivated
R after approximately 30 minutes at outside
temperatures above approximately 41 ‡
(5 †) if the "Cooling with air dehumidifica-
tion" function is activated Switching the residual heat on or off
General notes The residual heat function is only available on
vehicles for Canada.
It is possible to make use of the residual heat of
the engine to continue heating the stationary
vehicle for up to 30 minutes after the engine has been switched off. The heating time depends on
the set interior temperature.
Activating/deactivating X
To activate: press the004Bor0056 button.
The indicator lamp in the 004Bor0056 button
lights up.
i The blower will run at a low speed regardless
of the airflow setting. Operating the climate control systems
123Climate control
Page 126 of 370
i
If you activate the residual heat function at
high temperatures, only the ventilation will be
activated. The blower runs at medium speed.
X To deactivate: press the004Bor0056 but-
ton.
The indicator lamp in the 004Bor0056 button
goes out.
Residual heat is deactivated automatically:
R after approximately 30 minutes
R when the ignition is switched on
R if the battery voltage drops Ionization
Ionization is used to purify the air in the vehicle interior and attain an improved interior climate.
The ionization of the interior air is odorless and
cannot be perceived directly in the vehicle inte- rior.
You can switch ionization on and off via the mul-
timedia system (see the Digital Operator's Man- ual).
Ionization can only be operated when the auto-
matic climate control is switched on. The side air
vent on the driver's side must be open. Setting the air vents
Important safety notes
G
WARNING
Very hot or very cold air can flow from the air vents. This could result in burns or frostbite in the immediate vicinity of the air vents. There
is a risk of injury.
Make sure that all vehicle occupants always
maintain a sufficient distance to the air out-
lets. If necessary, redirect the airflow to
another area of the vehicle interior.
In order to ensure the direct flow of fresh air
through the air vents into the vehicle interior,
please observe the following notes:
R keep the air inlet grille on the hood and in the
engine compartment on the front-passenger side free of blockages, such as ice, snow or
leaves.
R never cover the air vents or air intake grilles in
the vehicle interior.
i For virtually draft-free ventilation, adjust the
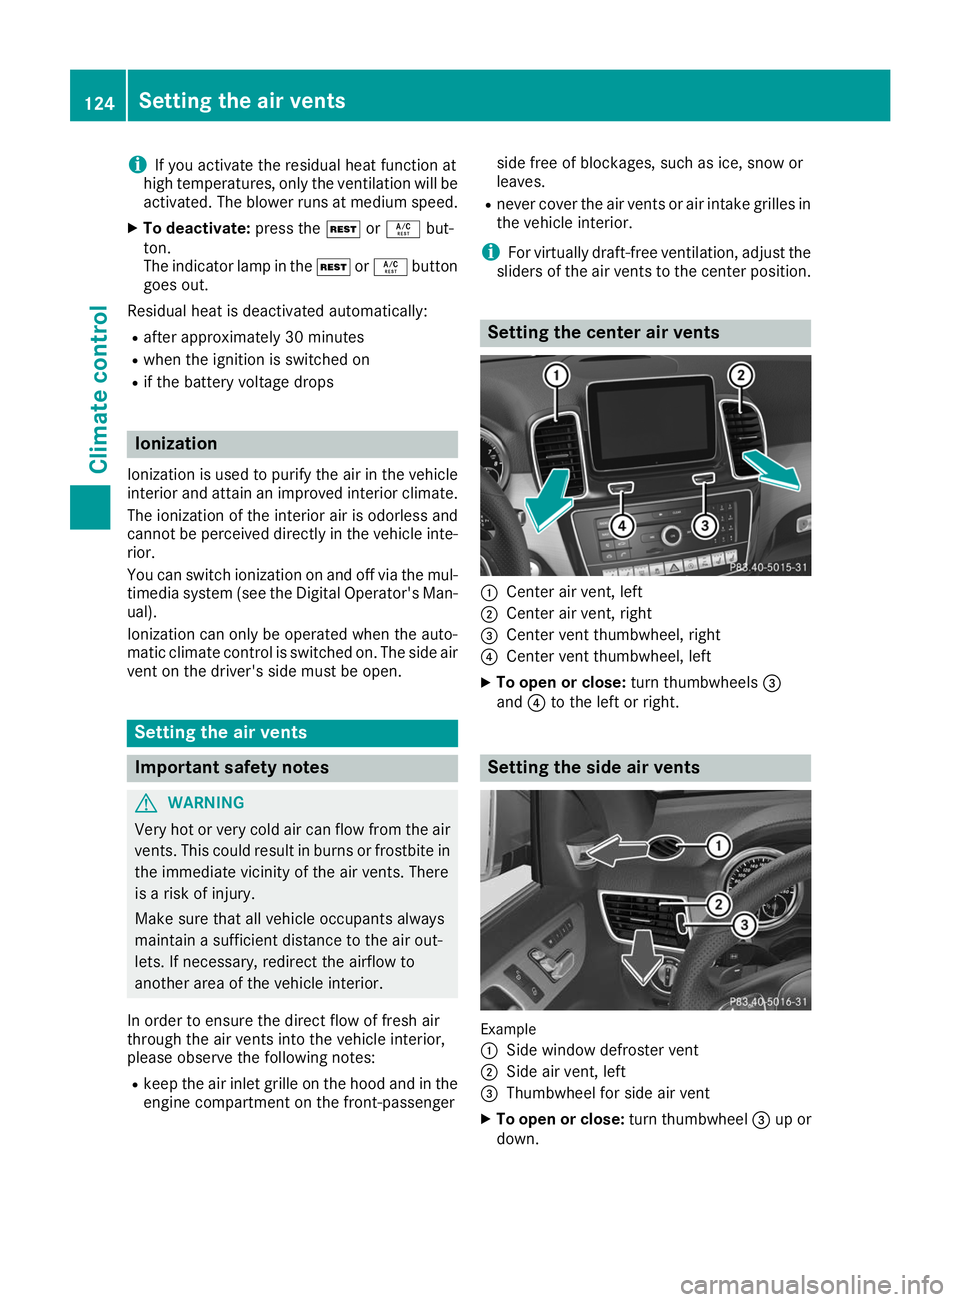
sliders of the air vents to the center position. Setting the center air vents
0043
Center air vent, left
0044 Center air vent, right
0087 Center vent thumbwheel, right
0085 Center vent thumbwheel, left
X To open or close: turn thumbwheels0087
and 0085to the left or right. Setting the side air vents
Example
0043
Side window defroster vent
0044 Side air vent, left
0087 Thumbwheel for side air vent
X To open or close: turn thumbwheel0087up or
down. 124
Setting the air ventsClimate control
Page 131 of 370
G
WARNING
Flammable materials introduced through
environmental influence or by animals can
ignite if in contact with the exhaust system or parts of the engine that heat up. There is a risk
of fire.
Carry out regular checks to make sure that
there are no flammable foreign materials in
the engine compartment or in the exhaust
system.
General notes Vehicles with a gasoline engine:
the catalytic
converter is preheated for up to 30 seconds
after a cold start. The sound of the engine may
change during this time.
Automatic transmission X
Shift the transmission to position 005D
(Y page 135).
The transmission position indicator on the
multifunction display shows 005D
(Y page 136).
i You can start the engine in transmission
position 005Dand 005C.
Starting procedure with the SmartKey X
Turn the SmartKey to position 0049in the igni-
tion lock (Y page 127) and release it as soon
as the engine is running.
Using KEYLESS-GO to start the engine The Start/Stop button can be used to start the
vehicle without inserting the SmartKey into the
ignition lock. The Start/Stop button must be
inserted in the ignition lock and the SmartKey
must be in the vehicle. This mode for starting the engine operates independently of the ECO
start/stop automatic engine start function.
X Depress the brake pedal and keep it
depressed.
X Press the Start/Stop button once
(Y page 127).
The engine starts. Starting procedure via smartphone Observe the important safety notes on starting
the engine (Y
page 128).
You can also start your engine via your smart-
phone from outside the vehicle. In this case, the previously selected climate control setting is
activated. In this way you can cool or heat the
interior of the vehicle before starting the jour-
ney.
Only start the engine via your smartphone if it is
safe to start and run the engine where your vehi-
cle is parked.
Observe the legal stipulations in the area where your vehicle is parked. Engine start via smart-
phone may be limited to certain countries or
regions.
You can execute a maximum of two consecutive
starting attempts via your smartphone. If you
insert the SmartKey into the ignition lock, you
can carry out two more starting attempts.
Once you have started the engine, you can
switch the engine off via your smartphone at any
time.
You can only start the engine via your smart-
phone if:
R the SmartKey is in the ignition lock
R park position 005Dis selected
R the accelerator pedal is not depressed
R the anti-theft alarm system is not activated
R the panic alarm is not activated
R the hazard warning lamps are switched off
R the hood is closed
R the doors are closed and locked
R the windows and sliding sunroof are closed
Also make sure that:
R the fuel tank is sufficiently filled
R the starter battery has been sufficiently
charged G
WARNING
Limbs could be crushed or trapped if the
engine is started unintentionally during ser-
vice or maintenance work. There is a risk of
injury.
Always secure the engine against uninten-
tional starting before carrying out mainte-
nance or repair work. Driving
129Driving and parking Z
Page 144 of 370
Refueling
Important safety notes
G
WARNING
Fuel is highly flammable. Risk of fire and
explosion by improper handling of fuel.
You must avoid fire, open flames, smoking
and creating sparks. Switch off the ignition
before refueling and, if present, switch off the auxiliary heating. G
WARNING
Fuels are toxic and harmful to health. There is a risk of injury.
You must avoid fuels coming into contact with
skin, eyes and clothes or being swallowed.
Do not inhale the fuel vapors. Keep children
away from fuels.
Keep doors and windows closed during the
refueling process.
If you or others come into contact with fuel,
observe the following points:
R Immediately rinse the fuel off your skin with
soap and water.
R If you get fuel into your eyes, immediately
rinse your eyes throughly with clean water.
Seek medical attention immediately.
R Seek medical attention immediately if fuel
has been swallowed. Do not induce vomit-
ing.
R Immediately change out of clothing which
has come into contact with fuel. G
WARNING
Electrostatic charging can lead to the creation
of sparks and ignite fuel vapor. There is a risk of fire and explosion.
Touch the metallic body of the vehicle before
you open the fuel filler cap or handle the pump nozzle. Any possible electrostatic charge
present will in this way be depleted.
Do not get into the vehicle again during the
refueling process. Otherwise, electrostatic
charge could build up again. !
Do not use diesel to refuel vehicles with a
gasoline engine. Do not switch on the ignition if you accidentally refuel with the wrong fuel.
Otherwise, the fuel will enter the fuel system. Even small amounts of the wrong fuel could
result in damage to the fuel system and the
engine. Notify a qualified specialist workshop
and have the fuel tank and fuel lines drained
completely.
! Overfilling the fuel tank could damage the
fuel system.
! Take care not to spill any fuel on painted
surfaces. You could otherwise damage the
paintwork.
! Use a filter when adding fuel from a fuel can.
The fuel lines and/or the fuel injection system could otherwise be blocked by particles fromthe fuel can.
Do not get into the vehicle again during the refu-
eling process. Otherwise, electrostatic charge
could build up again.
If you overfill the fuel tank, fuel could spray out
when the fuel pump nozzle is removed.
For further information on fuel and fuel quality
(Y page 360). Refueling
General information Pay attention to the important safety notes
(Y
page 142).
The fuel filler flap is unlocked or locked auto-
matically when you unlock or lock the vehicle
with the SmartKey or using KEYLESS-GO.
The position of the fuel filler cap is displayed
00B6 in the instrument cluster. The arrow next
to the filling pump indicates the side of the vehi- cle. 142
RefuelingDriving and parking
Page 153 of 370
For this reason, in the event of heavy rain or in
conditions in which hydroplaning may occur,
you must drive in the following manner:
R lower your speed
R avoid ruts
R avoid sudden steering movements
R brake carefully
Driving on flooded roads !
Do not drive through flooded areas. Check
the depth of any water before driving through it. Drive slowly through standing water. Oth-
erwise, water could enter the vehicle interior
or engine compartment. It can then damage
the engine's or automatic transmission's
electronic components. It can also be sucked
in by the engine's air intake connection and
cause engine damage.
i Vehicles with the AIRMATIC Package:
select the raised vehicle level before driving
through a body of water.
Off-road fording !
Under no circumstances should you accel-
erate before entering the water. The bow
wave could cause water to enter and damage the engine and other assemblies.
! Do not open any of the vehicle's doors while
fording. Otherwise, water could get into the
vehicle interior and damage the vehicle's
electronics and interior equipment.
R Establish how deep the water is and the char-
acteristics of the body of water before ford-
ing.
R Select the highest possible vehicle level.
R Shift to a lower gear using the left-hand steer-
ing wheel paddle shifter.
R Avoid high engine speeds.
R Enter and exit the water at a flat place and at
a steady walking pace.
R Drive slowly and at an even speed through the
water.
R Ensure that a bow wave does not form as you
drive.
R Do not stop and do not switch off the engine.
Water offers a high degree of resistance, and
the ground is slippery and in some cases
unstable. Therefore, it is difficult and danger-
ous to pull away in the water. R
Clean any mud from the tire tread after ford-
ing.
R Apply the brakes to dry them after fording.
Always observe the maximum fording depth val-
ues (Y page 366). Winter driving
G
WARNING
If you shift down on a slippery road surface in an attempt to increase the engine's braking
effect, the drive wheels could lose their grip.
There is an increased danger of skidding and
accidents.
Do not shift down for additional engine brak-
ing on a slippery road surface. G
DANGER
If the exhaust pipe is blocked or adequate
ventilation is not possible, poisonous gases
such as carbon monoxide (CO) may enter the vehicle. This is the case, e.g. if the vehicle
becomes trapped in snow. There is a risk of
fatal injury.
If you leave the engine or the auxiliary heating
running, make sure the exhaust pipe and area
around the vehicle are clear of snow. To
ensure an adequate supply of fresh air, open a window on the side of the vehicle that is not
facing into the wind.
! When scraping ice off the rear window, take
care not to damage the rear-window seal or
trim.
Have your vehicle winter-proofed at a qualified
specialist workshop at the onset of winter.
Drive particularly carefully on slippery road sur- faces. Avoid sudden acceleration, steering and
braking maneuvers. Do not use cruise control or
Active Distance Assist DISTRONIC.
If the vehicle threatens to skid or cannot be
stopped when moving at low speed:
X Shift the transmission to position 005C.
X Try to bring the vehicle under control using
corrective steering. Driving tips
151Driving and parking Z
Page 155 of 370
vehicle rectified immediately at a qualified spe-
cialist workshop.
Do not shift into transmission position 005Cwhen
driving off-road. You could lose control of the
vehicle if you attempt to brake the vehicle using
the service brake. If the gradient is too steep for
your vehicle, drive back down in reverse gear.
General notes H
Environmental note
Protection of the environment is of primary
importance. Treat nature with respect.
Observe all prohibiting signs.
Read this section carefully before driving your
vehicle off-road. Practice by driving over more
gentle off-road terrain first.
Familiarize yourself with the characteristics of
your vehicle and the gear shift operation before
driving through difficult terrain.
The following driving systems are specially
adapted to off-road driving:
R AIRMATIC package (vehicle level)
(Y page 168)
R DSR (Downhill Speed Regulation)
(Y page 167)
Observe the following notes:
R Select a vehicle level that is suitable for the
terrain. To avoid damaging the vehicle, make
sure there is always sufficient ground clear-
ance.
R Check that items of luggage and loads are
stowed safely and are well secured
(Y page 276).
R Always keep the engine running and in gear
when driving on a downhill gradient. Activate
DSR (Y page 167).
R Always keep the engine running and in gear
when driving down an incline.
R Adapt your speed to the terrain. The rougher,
steeper or more ruts on the terrain, the slower
your speed should be.
R Do not jump with the vehicle as this will inter-
rupt the vehicle's propulsion.
R Drive with extreme care on unfamiliar off-road
routes where visibility is poor. For safety rea- sons, get out of the vehicle first and survey
the off-road route.
R Look out for obstacles, such as rocks, holes,
tree stumps and furrows. R
Take care when turning on an uphill or down-
hill slope or when driving across a slope. The
vehicle could otherwise tip over.
R Always keep the doors, the tailgate, the side
windows and the sliding sunroof closed while
the vehicle is in motion.
R Do not shift the automatic transmission to
position 005C.
R Observe the notes on off-road fording
(Y page 151).
i Information about retrofitting special all-ter-
rain tires is available from any qualified spe-
cialist workshop.
i Do not use the HOLD function when driving
off-road, on steep uphill or downhill gradients
or on slippery or loose surfaces. The HOLD
function cannot hold the vehicle on such sur- faces.
Checklist before driving off-road !
If the engine oil warning lamp lights up while
the vehicle is in motion, stop the vehicle in a
safe place as soon as possible. Check the
engine oil level. The engine oil warning lamp
warning must not be ignored. Continuing the
journey while the symbol is displayed could
lead to engine damage.
X Engine oil level: check the engine oil level
and add engine oil if necessary.
When you drive on steep gradients, the engine
oil level must be sufficiently high to ensure
that oil is supplied correctly in the vehicle.
X Tire-changing tool kit: check that the jack is
working and make sure you have the lug
wrench, a robust tow cable and a folding
spade in the vehicle.
X Wheels and tires: check the tread depth and
pressure of the tires.
X Check for damage and remove any foreign
objects, e.g. small stones, from the wheels/
tires.
X Replace any missing valve caps.
X Replace dented or damaged wheels.
X Rims: dented or bent rims can result in a loss
of tire pressure and damage the tire bead.
Before driving off-road, check the wheels and replace them if necessary. Driving tips
153Driving and parking Z
Page 206 of 370
R
If possible, do not brake suddenly, but instead
depress the brake pedal moderately at first sothat the trailer can activate its brakes. Then
increase the pressure on the brake pedal.
R If the automatic transmission repeatedly
shifts between gears on uphill or downhill gra- dients, shift to a lower gear using the left-hand
steering wheel paddle shifter.
A lower gear and lower speed reduce the risk of engine failure.
R When driving downhill, shift to a lower gear to
utilize the engine's braking effect.
Avoid continuous brake application as this
may overheat the vehicle brakes and, if instal-
led, the trailer brakes.
R If the coolant temperature increases dramat-
ically while the air-conditioning system is
switched on, switch off the air-conditioning
system.
Coolant heat can also be dissipated by open-
ing the windows and switching the ventilation blower and the interior temperature to the
highest level.
R When overtaking, pay particular attention to
the extended length of your vehicle/trailer
combination.
Due to the length of the vehicle/trailer com-
bination, you require additional road space in relation to the vehicle you are overtaking
before you can change back to the original
lane. Decoupling a trailer
G
WARNING
If you uncouple a trailer with the overrun
brake engaged, you could trap your hand
between the vehicle and the trailer drawbar.
There is a risk of injury.
Do not uncouple a trailer if the overrun brake is engaged. G
WARNING
Vehicles with level control:
The vehicle is lowered as soon as you discon-
nect the trailer cable. This could result in your limbs or those of other people that are
between the vehicle body and tires or under- neath the vehicle being trapped. There is a
risk of injury.
Make sure that nobody is in the immediate
vicinity of the wheel housings or under the
vehicle when you disconnect the trailer cable.
! Do not disconnect a trailer with an engaged
overrun brake. Otherwise, your vehicle could
be damaged by the rebounding of the overrun brake.
X Shift the transmission to position 005D.
X Apply the vehicle's electric parking brake.
X Start the engine.
X Close the doors and tailgate.
X Apply the trailer's parking brake.
X Detach the trailer cable and decouple the
trailer.
X Switch off the engine. Permissible trailer loads and drawbar
loads
Weight specifications Maximum allowable gross mass
The gross vehicle weight of the trailer is calcu-
lated by adding the weight of the trailer to the
weight of the load and equipment on the trailer.
You will find installing dimensions and loads
under "Technical data" (Y page 367).
Permissible noseweight You will find installing dimensions and loads
under "Technical data" (Y page 367).
Loading a trailer R
When loading the trailer, make sure that nei-
ther the permissible gross weight of the trailer
nor the gross vehicle weight are exceeded.
The permissible gross vehicle weight is indi-
cated on the identification plate located on
the B-pillar on the driver's side of the vehicle.
You can find the maximum permissible values
on the type plates of your vehicle and the
trailer. When calculating how much weight 204
Towing a trailerDriving and parking
Page 234 of 370
Display messages
Possible causes/consequences and
0050
0050Solutions 0075
Rear Left Malfunc‐ Rear Left Malfunc‐
tion Service tion Service
Required Required
orRear
Rear
Right Malfunction
Right Malfunction
Service Required Service Required The rear left-hand or right-hand restraint system is malfunctioning.
The 0075 warning lamp also lights up in the instrument cluster.
G WARNING
The air bags or Emergency Tensioning Devices may either be triggered unintentionally or, in the event of an accident, may not be triggered.
There is an increased risk of injury.
X Visit a qualified specialist workshop immediately. 0075
Rear Rear
Center
Center Malfunc‐
Malfunc‐
tion Service
tion Service
Required Required The rear center restraint system is malfunctioning. The
0075warning
lamp also lights up in the instrument cluster.
G WARNING
The air bags or Emergency Tensioning Devices may either be triggered unintentionally or, in the event of an accident, may not be triggered.
There is an increased risk of injury.
X Visit a qualified specialist workshop immediately. 0075
Left Side Curtain Left Side Curtain
Airbag Malfunction Airbag Malfunction
Service Required Service Required
or
Right Side Curtain
Right Side Curtain
Airbag Malfunction Airbag Malfunction
Service Required Service Required The left-hand or right-hand window curtain air bag is malfunctioning.
The 0075 warning lamp also lights up in the instrument cluster.
G WARNING
The left or right window curtain air bag may either be triggered unin-
tentionally or, in the event of an accident, may not be triggered.
There is an increased risk of injury.
X Visit a qualified specialist workshop immediately. 232
Display
messagesOn-board computer and displays