2019 MERCEDES-BENZ GLE COUPE keyless
[x] Cancel search: keylessPage 103 of 370
Problems with the steering wheel heating
Problem
Possible causes/consequences and
0050
0050Solutions The steering wheel heat-
ing has switched off pre-
maturely or cannot be
switched on. The on-board voltage is too low because too many electrical consum-
ers are switched on.
X Switch off electrical consumers that you do not need, such as the
rear window defroster or interior lighting. EASY-ENTRY/EXIT feature
Important safety notes G
WARNING
When the EASY-ENTRY/EXIT feature adjusts
the steering wheel, you and other vehicle
occupants – particularly children – could
become trapped. There is a risk of injury.
While the EASY-ENTRY/EXIT feature is mak-
ing adjustments, make sure that no one has
any body parts in the sweep of the steering
wheel.
Move the steering wheel adjustment lever if
there is a risk of entrapment by the steering
wheel. The adjustment process is stopped.
Press one of the memory function position but-
tons. This function is only available on vehicles
with memory function. G
WARNING
If children activate the EASY-ENTRY/EXIT fea- ture, they can become trapped, particularly
when unattended. There is a risk of injury.
When leaving the vehicle, always take the
SmartKey with you and lock the vehicle. Never leave children unsupervised in the vehicle. G
WARNING
If you drive off while the EASY-ENTRY/EXIT
feature is making adjustments, you could lose
control of the vehicle. There is a risk of an
accident.
Always wait until the adjustment process is
complete before driving off.
The EASY-ENTRY/EXIT feature makes getting in
and out of your vehicle easier. You can activate and deactivate the EASY-
ENTRY/EXIT feature in the on-board computer
(Y page 219).
Position of the steering wheel when the EASY-ENTRY/EXIT feature is active The steering wheel swings up when you:
R remove the SmartKey from the ignition lock.
R open the driver's door and KEYLESS-GO is in
position 0047.
R open the driver's door and the SmartKey is in
position 0092or0047 in the ignition lock.
i The steering wheel only moves up if it has
not already reached the upper stop.
Position of the steering wheel for driv-
ing The steering wheel is moved to the last selected
position when:
R the driver's door is closed
R you insert the SmartKey into the ignition lock
or
R you press the Start/Stop button once on vehi-
cles with KEYLESS-GO
When you close the driver's door with the igni-
tion switched on, the steering wheel is also
automatically moved to the previously set posi- tion.
The last position of the steering column is stored
when you:
R switch the ignition off
R save the setting with the memory function
(Y page 105).
Crash-responsive EASY-EXIT feature If the crash-responsive EASY-EXIT feature is trig-
gered in an accident, the steering column will
move upwards when the driver's door is opened. Steering wheel
101Seats, steering wheel and mirrors Z
Page 114 of 370
Always switch off the windshield wipers and
ignition before changing the wiper blades.
! Always position the windshield wiper arms
vertically before folding them away from the
windshield. By doing so, you will avoid dam-
age to the hood.
! To avoid damaging the wiper blades, make
sure that you touch only the wiper arm of the wiper.
! Never open the hood if a windshield wiper
arm has been folded away from the wind-
shield.
Never fold a windshield wiper arm without a
wiper blade back onto the windshield.
Hold the windshield wiper arm firmly when
you change the wiper blade. If you release the
windshield wiper arm without a wiper blade
and it falls onto the windshield, the windshield may be damaged by the force of the impact.
Mercedes-Benz recommends that you have
the wiper blades changed at a qualified spe-
cialist workshop.
Replacing the wiper blades (standard
wiper blades) Moving the wiper arms to a vertical posi-
tion
On vehicles without KEYLESS-GO:
X Turn the SmartKey to position 0092in the igni-
tion lock (Y page 127).
X Set the windshield wiper to position 00AAon
the combination switch.
X Turn the SmartKey to position 0047in the igni-
tion lock (Y page 127).
X As soon as the wiper arms are vertical to the
hood, turn the SmartKey to position 0092in the
ignition lock (Y page 127).
X Remove the SmartKey.
X Fold the wiper arms away from the windshield
until you feel them snap into place.
On vehicles with KEYLESS-GO:
X Switch off the engine.
X Remove your foot from the brake pedal.
X Set the windshield wiper to the 00AAposition.
X Press the Start/Stop button repeatedly until
the windshield wiper starts. X
When the wiper arms are vertical to the hood,
press the Start/Stop button repeatedly until
the windshield wiper stops.
X Fold the wiper arms away from the windshield
until you feel them snap into place.
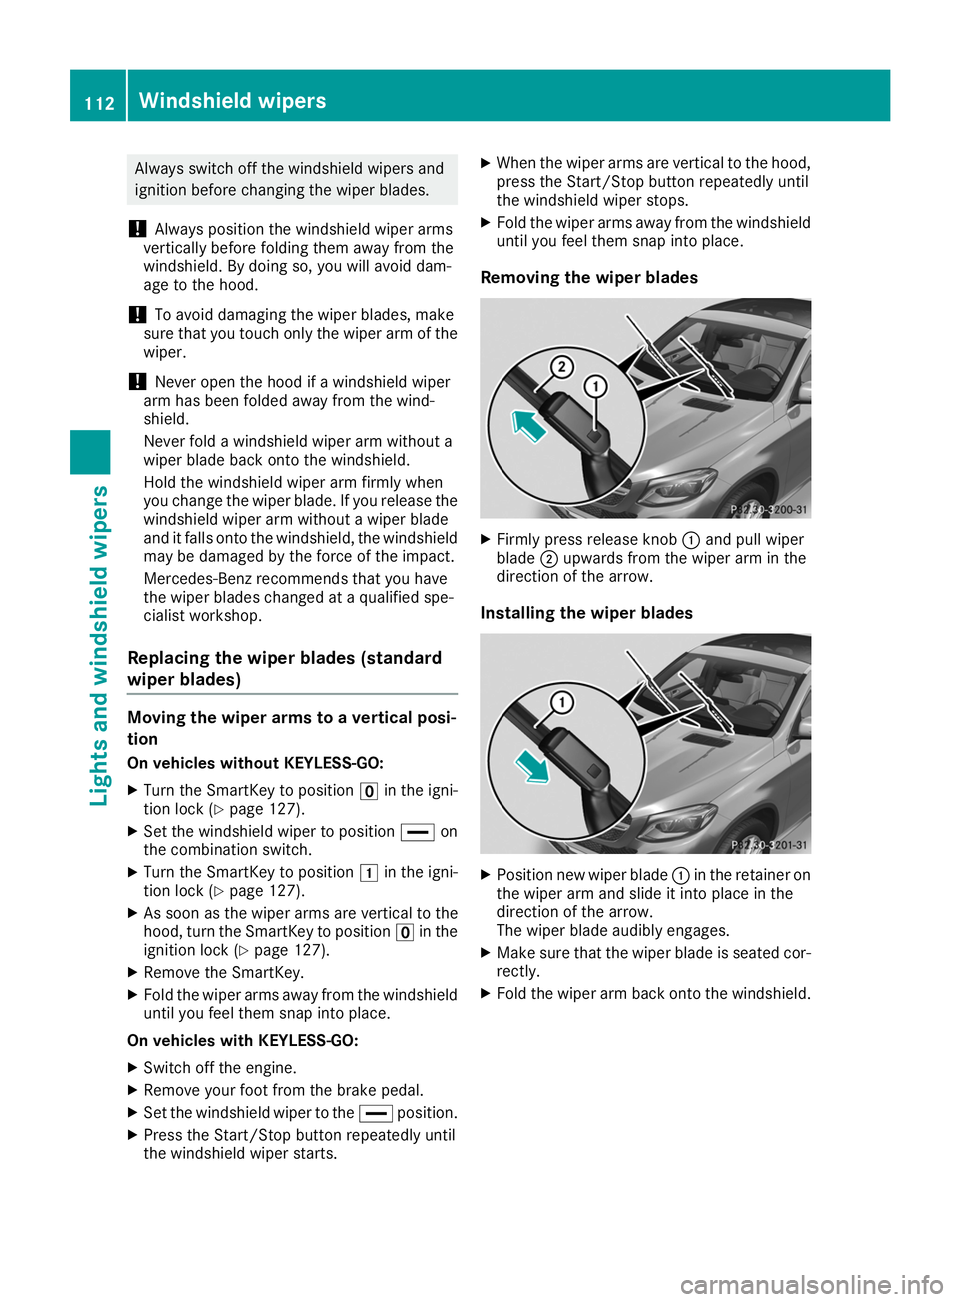
Removing the wiper blades X
Firmly press release knob 0043and pull wiper
blade 0044upwards from the wiper arm in the
direction of the arrow.
Installing the wiper blades X
Position new wiper blade 0043in the retainer on
the wiper arm and slide it into place in the
direction of the arrow.
The wiper blade audibly engages.
X Make sure that the wiper blade is seated cor-
rectly.
X Fold the wiper arm back onto the windshield. 112
Windshield wipersLights and
windshield wipers
Page 115 of 370
Replacing the wiper blades (MAGIC
VISION CONTROL) Moving the wiper arms to a vertical posi-
tion
On vehicles without KEYLESS-GO:
X Turn the SmartKey to position 0092in the igni-
tion lock (Y page 127).
X Set the windshield wiper to position 00AAon
the combination switch.
X Turn the SmartKey to position 0047in the igni-
tion lock (Y page 127).
X As soon as the wiper arms are vertical to the
hood, turn the SmartKey to position 0092in the
ignition lock (Y page 127).
X Remove the SmartKey.
X Fold the wiper arms away from the windshield
until you feel them snap into place.
On vehicles with KEYLESS-GO:
X Switch off the engine.
X Remove your foot from the brake pedal.
X Set the windshield wiper to the 00AAposition.
X Press the Start/Stop button repeatedly until
the windshield wiper starts.
X When the wiper arms are vertical to the hood,
press the Start/Stop button repeatedly until
the windshield wiper stops.
X Fold the wiper arms away from the windshield
until you feel them snap into place.
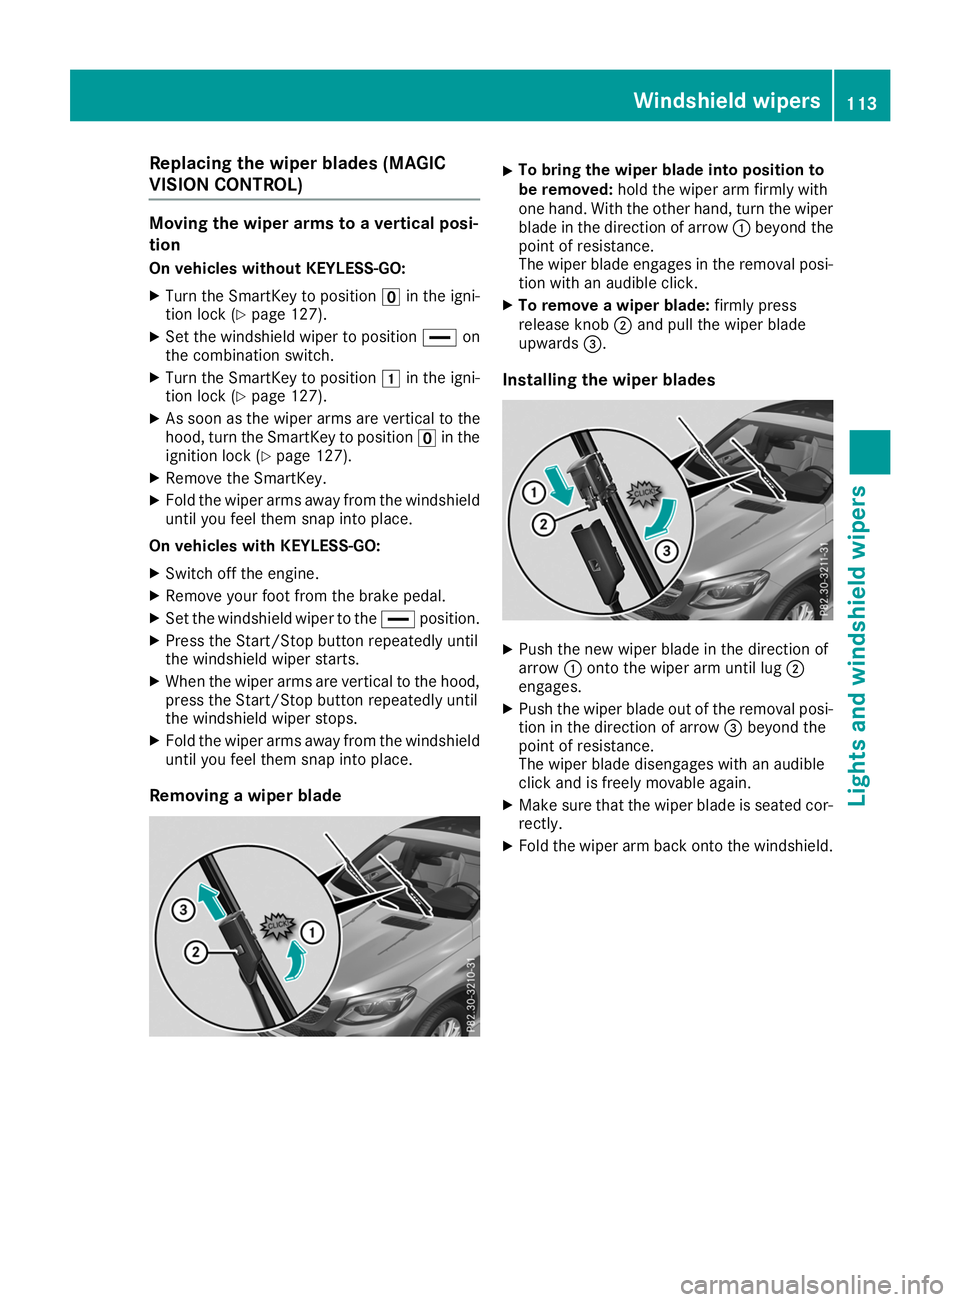
Removing a wiper blade X
To bring the wiper blade into position to
be removed:
hold the wiper arm firmly with
one hand. With the other hand, turn the wiper blade in the direction of arrow 0043beyond the
point of resistance.
The wiper blade engages in the removal posi-
tion with an audible click.
X To remove a wiper blade: firmly press
release knob 0044and pull the wiper blade
upwards 0087.
Installing the wiper blades X
Push the new wiper blade in the direction of
arrow 0043onto the wiper arm until lug 0044
engages.
X Push the wiper blade out of the removal posi-
tion in the direction of arrow 0087beyond the
point of resistance.
The wiper blade disengages with an audible
click and is freely movable again.
X Make sure that the wiper blade is seated cor-
rectly.
X Fold the wiper arm back onto the windshield. Windshield wipers
113Lights and windshield wipers Z
Page 129 of 370
!
Do not warm up the engine while stationary.
Pull away immediately. Avoid high engine
speeds and full throttle until the engine has
reached its operating temperature.
In vehicles with automatic transmission,
engage positions P and R only when the vehi-
cle is stationary.
Where possible, avoid spinning the drive
wheels when pulling away on slippery roads.
You could otherwise damage the drive train.
! Mercedes-AMG vehicles:
at low engine oil
temperatures below 68 ‡ (+20 †), the max-
imum engine speed is restricted in order to
protect the engine. To protect the engine and
maintain smooth engine operation, avoid driv-
ing at full throttle when the engine is cold. Key positions
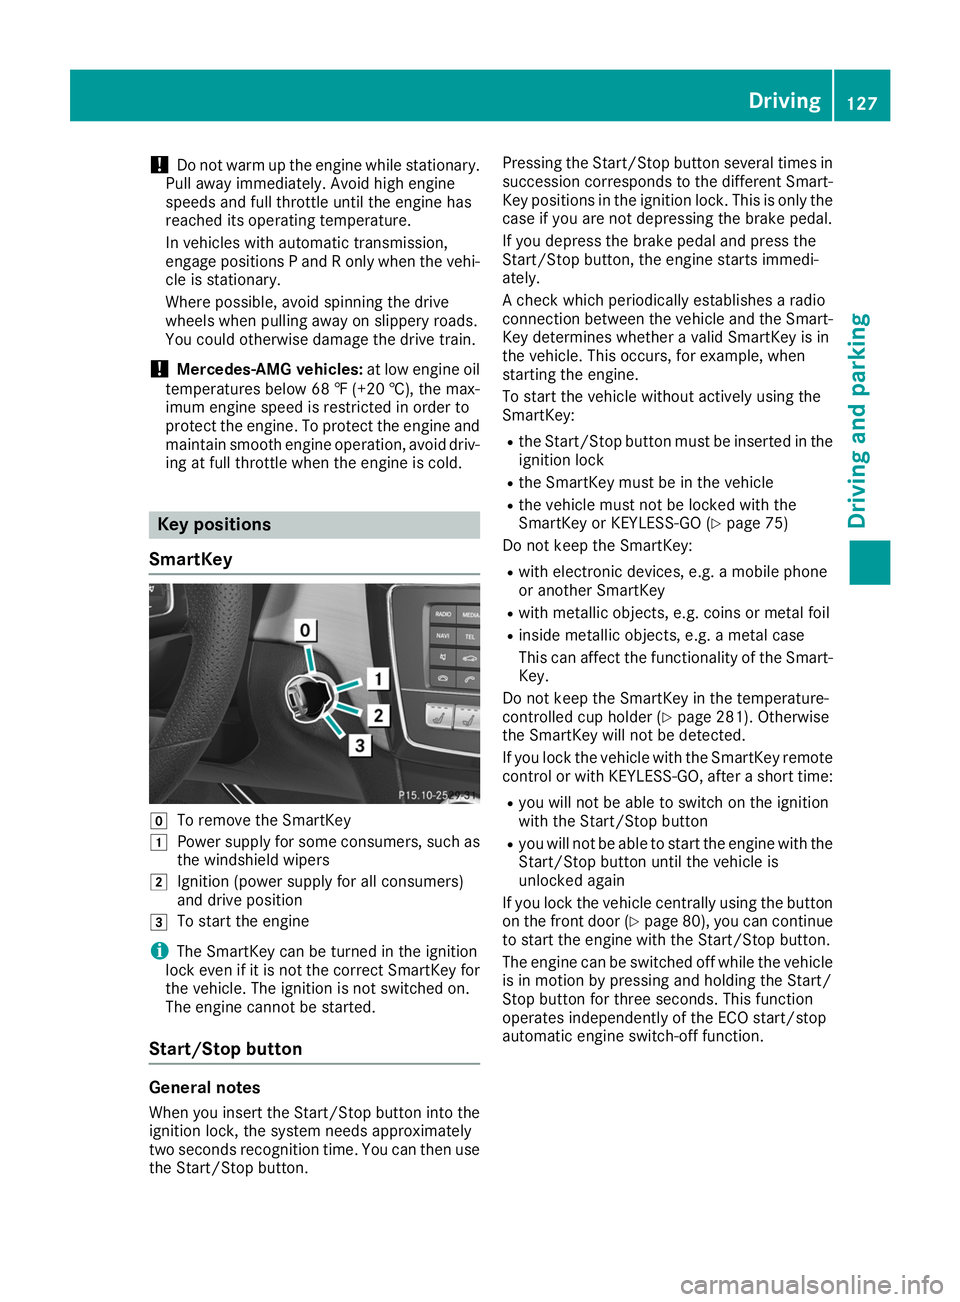
SmartKey 005A
To remove the SmartKey
0047 Power supply for some consumers, such as
the windshield wipers
0048 Ignition (power supply for all consumers)
and drive position
0049 To start the engine
i The SmartKey can be turned in the ignition
lock even if it is not the correct SmartKey for
the vehicle. The ignition is not switched on.
The engine cannot be started.
Start/Stop button General notes
When you insert the Start/Stop button into the
ignition lock, the system needs approximately
two seconds recognition time. You can then use the Start/Stop button. Pressing the Start/Stop button several times in
succession corresponds to the different Smart-
Key positions in the ignition lock. This is only the
case if you are not depressing the brake pedal.
If you depress the brake pedal and press the
Start/Stop button, the engine starts immedi-
ately.
A check which periodically establishes a radio
connection between the vehicle and the Smart-
Key determines whether a valid SmartKey is in
the vehicle. This occurs, for example, when
starting the engine.
To start the vehicle without actively using the
SmartKey:
R the Start/Stop button must be inserted in the
ignition lock
R the SmartKey must be in the vehicle
R the vehicle must not be locked with the
SmartKey or KEYLESS-GO (Y page 75)
Do not keep the SmartKey:
R with electronic devices, e.g. a mobile phone
or another SmartKey
R with metallic objects, e.g. coins or metal foil
R inside metallic objects, e.g. a metal case
This can affect the functionality of the Smart-
Key.
Do not keep the SmartKey in the temperature-
controlled cup holder (Y page 281). Otherwise
the SmartKey will not be detected.
If you lock the vehicle with the SmartKey remote control or with KEYLESS-GO, after a short time:
R you will not be able to switch on the ignition
with the Start/Stop button
R you will not be able to start the engine with the
Start/Stop button until the vehicle is
unlocked again
If you lock the vehicle centrally using the button
on the front door (Y page 80), you can continue
to start the engine with the Start/Stop button.
The engine can be switched off while the vehicle
is in motion by pressing and holding the Start/
Stop button for three seconds. This function
operates independently of the ECO start/stop
automatic engine switch-off function. Driving
127Driving and parking Z
Page 131 of 370
G
WARNING
Flammable materials introduced through
environmental influence or by animals can
ignite if in contact with the exhaust system or parts of the engine that heat up. There is a risk
of fire.
Carry out regular checks to make sure that
there are no flammable foreign materials in
the engine compartment or in the exhaust
system.
General notes Vehicles with a gasoline engine:
the catalytic
converter is preheated for up to 30 seconds
after a cold start. The sound of the engine may
change during this time.
Automatic transmission X
Shift the transmission to position 005D
(Y page 135).
The transmission position indicator on the
multifunction display shows 005D
(Y page 136).
i You can start the engine in transmission
position 005Dand 005C.
Starting procedure with the SmartKey X
Turn the SmartKey to position 0049in the igni-
tion lock (Y page 127) and release it as soon
as the engine is running.
Using KEYLESS-GO to start the engine The Start/Stop button can be used to start the
vehicle without inserting the SmartKey into the
ignition lock. The Start/Stop button must be
inserted in the ignition lock and the SmartKey
must be in the vehicle. This mode for starting the engine operates independently of the ECO
start/stop automatic engine start function.
X Depress the brake pedal and keep it
depressed.
X Press the Start/Stop button once
(Y page 127).
The engine starts. Starting procedure via smartphone Observe the important safety notes on starting
the engine (Y
page 128).
You can also start your engine via your smart-
phone from outside the vehicle. In this case, the previously selected climate control setting is
activated. In this way you can cool or heat the
interior of the vehicle before starting the jour-
ney.
Only start the engine via your smartphone if it is
safe to start and run the engine where your vehi-
cle is parked.
Observe the legal stipulations in the area where your vehicle is parked. Engine start via smart-
phone may be limited to certain countries or
regions.
You can execute a maximum of two consecutive
starting attempts via your smartphone. If you
insert the SmartKey into the ignition lock, you
can carry out two more starting attempts.
Once you have started the engine, you can
switch the engine off via your smartphone at any
time.
You can only start the engine via your smart-
phone if:
R the SmartKey is in the ignition lock
R park position 005Dis selected
R the accelerator pedal is not depressed
R the anti-theft alarm system is not activated
R the panic alarm is not activated
R the hazard warning lamps are switched off
R the hood is closed
R the doors are closed and locked
R the windows and sliding sunroof are closed
Also make sure that:
R the fuel tank is sufficiently filled
R the starter battery has been sufficiently
charged G
WARNING
Limbs could be crushed or trapped if the
engine is started unintentionally during ser-
vice or maintenance work. There is a risk of
injury.
Always secure the engine against uninten-
tional starting before carrying out mainte-
nance or repair work. Driving
129Driving and parking Z
Page 144 of 370
Refueling
Important safety notes
G
WARNING
Fuel is highly flammable. Risk of fire and
explosion by improper handling of fuel.
You must avoid fire, open flames, smoking
and creating sparks. Switch off the ignition
before refueling and, if present, switch off the auxiliary heating. G
WARNING
Fuels are toxic and harmful to health. There is a risk of injury.
You must avoid fuels coming into contact with
skin, eyes and clothes or being swallowed.
Do not inhale the fuel vapors. Keep children
away from fuels.
Keep doors and windows closed during the
refueling process.
If you or others come into contact with fuel,
observe the following points:
R Immediately rinse the fuel off your skin with
soap and water.
R If you get fuel into your eyes, immediately
rinse your eyes throughly with clean water.
Seek medical attention immediately.
R Seek medical attention immediately if fuel
has been swallowed. Do not induce vomit-
ing.
R Immediately change out of clothing which
has come into contact with fuel. G
WARNING
Electrostatic charging can lead to the creation
of sparks and ignite fuel vapor. There is a risk of fire and explosion.
Touch the metallic body of the vehicle before
you open the fuel filler cap or handle the pump nozzle. Any possible electrostatic charge
present will in this way be depleted.
Do not get into the vehicle again during the
refueling process. Otherwise, electrostatic
charge could build up again. !
Do not use diesel to refuel vehicles with a
gasoline engine. Do not switch on the ignition if you accidentally refuel with the wrong fuel.
Otherwise, the fuel will enter the fuel system. Even small amounts of the wrong fuel could
result in damage to the fuel system and the
engine. Notify a qualified specialist workshop
and have the fuel tank and fuel lines drained
completely.
! Overfilling the fuel tank could damage the
fuel system.
! Take care not to spill any fuel on painted
surfaces. You could otherwise damage the
paintwork.
! Use a filter when adding fuel from a fuel can.
The fuel lines and/or the fuel injection system could otherwise be blocked by particles fromthe fuel can.
Do not get into the vehicle again during the refu-
eling process. Otherwise, electrostatic charge
could build up again.
If you overfill the fuel tank, fuel could spray out
when the fuel pump nozzle is removed.
For further information on fuel and fuel quality
(Y page 360). Refueling
General information Pay attention to the important safety notes
(Y
page 142).
The fuel filler flap is unlocked or locked auto-
matically when you unlock or lock the vehicle
with the SmartKey or using KEYLESS-GO.
The position of the fuel filler cap is displayed
00B6 in the instrument cluster. The arrow next
to the filling pump indicates the side of the vehi- cle. 142
RefuelingDriving and parking
Page 145 of 370
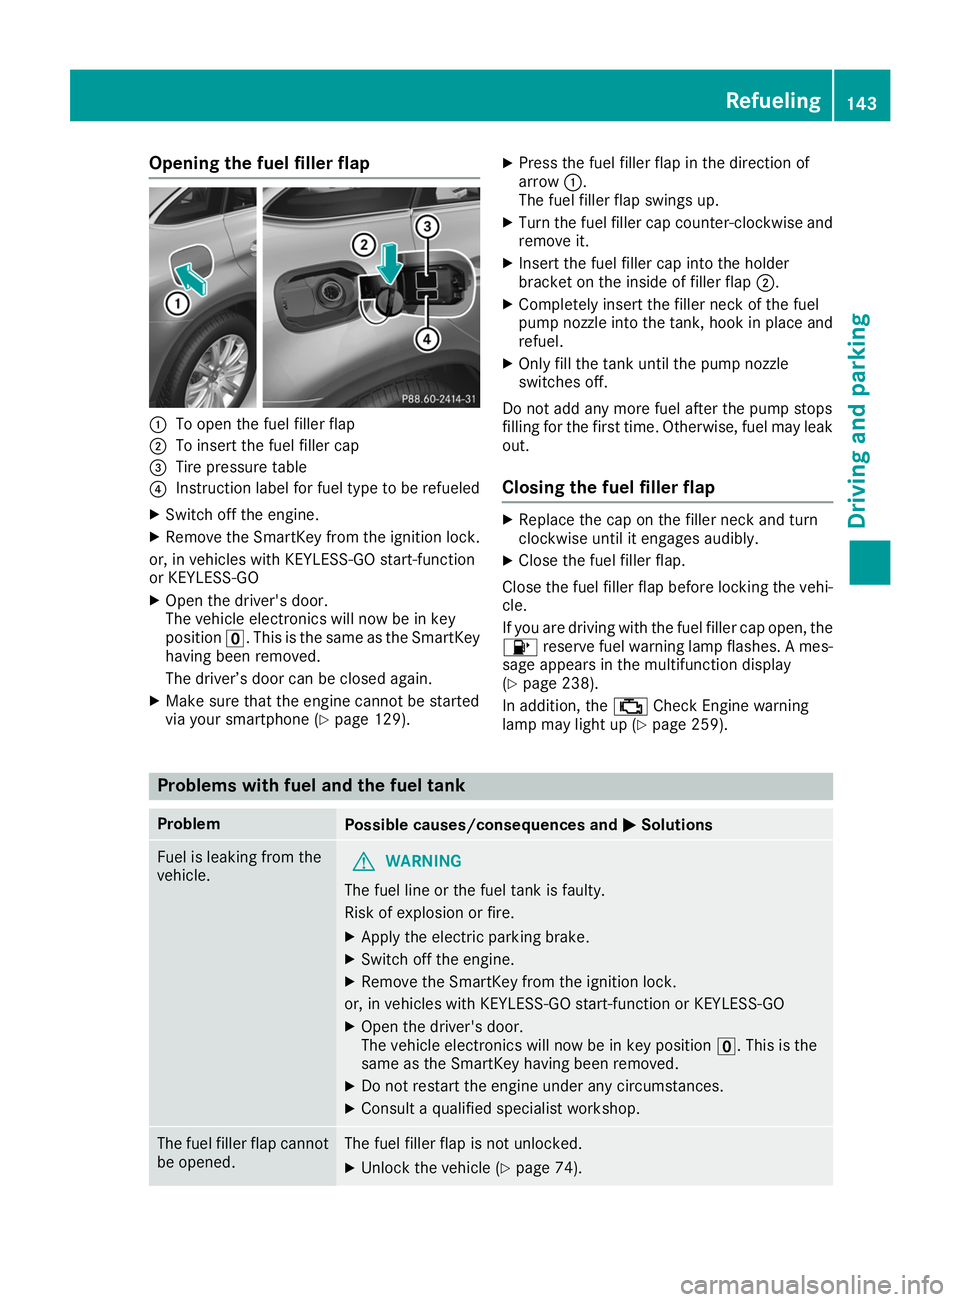
Opening the fuel filler flap
0043
To open the fuel filler flap
0044 To insert the fuel filler cap
0087 Tire pressure table
0085 Instruction label for fuel type to be refueled
X Switch off the engine.
X Remove the SmartKey from the ignition lock.
or, in vehicles with KEYLESS-GO start-function
or KEYLESS‑GO
X Open the driver's door.
The vehicle electronics will now be in key
position 0092. This is the same as the SmartKey
having been removed.
The driver’s door can be closed again.
X Make sure that the engine cannot be started
via your smartphone (Y page 129).X
Press the fuel filler flap in the direction of
arrow 0043.
The fuel filler flap swings up.
X Turn the fuel filler cap counter-clockwise and
remove it.
X Insert the fuel filler cap into the holder
bracket on the inside of filler flap 0044.
X Completely insert the filler neck of the fuel
pump nozzle into the tank, hook in place and
refuel.
X Only fill the tank until the pump nozzle
switches off.
Do not add any more fuel after the pump stops
filling for the first time. Otherwise, fuel may leak out.
Closing the fuel filler flap X
Replace the cap on the filler neck and turn
clockwise until it engages audibly.
X Close the fuel filler flap.
Close the fuel filler flap before locking the vehi-
cle.
If you are driving with the fuel filler cap open, the 00B6 reserve fuel warning lamp flashes. A mes-
sage appears in the multifunction display
(Y page 238).
In addition, the 00B9Check Engine warning
lamp may light up (Y page 259). Problems with fuel and the fuel tank
Problem
Possible causes/consequences and
0050 0050Solutions Fuel is leaking from the
vehicle.
G
WARNING
The fuel line or the fuel tank is faulty.
Risk of explosion or fire. X Apply the electric parking brake.
X Switch off the engine.
X Remove the SmartKey from the ignition lock.
or, in vehicles with KEYLESS-GO start-function or KEYLESS ‑GO
X Open the driver's door.
The vehicle electronics will now be in key position 0092. This is the
same as the SmartKey having been removed.
X Do not restart the engine under any circumstances.
X Consult a qualified specialist workshop. The fuel filler flap cannot
be opened. The fuel filler flap is not unlocked.
X Unlock the vehicle (Y page 74). Refueling
143Driving and parking Z
Page 146 of 370
Problem
Possible causes/consequences and
0050
0050Solutions The SmartKey battery is discharged or nearly discharged.
X Unlock the vehicle using the mechanical key (Y page 76).The fuel filler flap is unlocked, but the opening mechanism is jammed.
X Consult a qualified specialist workshop. Parking
Important safety notes
G
WARNING
Flammable material such as leaves, grass or
twigs may ignite if they come into contact with hot parts of the exhaust system or exhaust
gas flow. There is a risk of fire.
Park the vehicle so that no flammable mate-
rials come into contact with parts of the vehi- cle which are hot. Take particular care not to
park on dry grassland or harvested grain
fields. G
WARNING
If you leave children unsupervised in the vehi- cle, they could set it in motion by, for example:
R release the parking brake.
R shift the automatic transmission out of the
parking position P.
R start the engine.
In addition, they may operate vehicle equip-
ment and become trapped. There is a risk of
an accident and injury.
When leaving the vehicle, always take the
SmartKey with you and lock the vehicle. Never
leave children unsupervised in the vehicle.
! Always secure the vehicle correctly against
rolling away. Otherwise, the vehicle or its driv-
etrain could be damaged.
To ensure that the vehicle is secured against
rolling away unintentionally:
R the electric parking brake must be applied
R the transmission must be in position 005Dand
the SmartKey must be removed from the igni- tion lock R
the front wheels must be turned towards the
curb on steep uphill or downhill gradients
R the empty vehicle must be secured at the
front axle with a wheel chock or similar, for
example, on uphill or downhill gradients
R a laden vehicle must also be secured at the
rear axle with a wheel chock or similar, for
example, on uphill or downhill gradients Switching off the engine
G
WARNING
The automatic transmission switches to neu-
tral position Nwhen you switch off the engine.
The vehicle may roll away. There is a risk of an
accident.
After switching off the engine, always switch
to parking position P. Prevent the parked vehi-
cle from rolling away by applying the parking
brake.
X Apply the electric parking brake.
X Shift the transmission to position 005D.
X With the SmartKey: turn the SmartKey to
position 0092in the ignition lock and remove it.
The immobilizer is activated.
X With KEYLESS-GO:
Press the Start/Stop button (Y
page 127)
The engine stops and all the indicator lamps in the instrument cluster go out.
If you switch the engine off with the transmis-
sion in position 005Eor005B, the automatic trans-
mission shifts to 005Cautomatically.
If you then open the driver's or front-passenger
door, the automatic transmission shifts to 005D
automatically. 144
ParkingDriving and parking